Showing posts with label Dark Age Scots. Show all posts

Saturday, 14 August 2021

Early Scots: the Piper

 Introduction

A couple of years ago I showed a mode of a sword dancer that I had prepared for my Dark Age Scots warband.  At the time someone commented that I needed a bagpipe player or other musician as well, to complement the scene.  Well, I have finally built that model!


The Base Model

Models of early or medieval pipers are not very common, which isn't surprising as there is no documentary or archaelogical evidence for them in Scotland before the 16th century!  I did eventually find a suitable model in Antediluvian's "Islemen-Galloglass Command 2" pack.

This model is technically for the later middle ages - maybe 1300 to 1400 - but styles of dress and equipment didn't change that quickly in more far-flung locations such as the Scottish isles.  In the earlier period, bare legs and no shoes seem to be quite a feature of Dark Age celtic peoples, especially the commoners.

The only change I made to bring my model back to 800 or 900 AD was to replace the legs.  I cut off the model's legs-in-hose-and-shoes and replaced them with some bare legs from a plastic Zulu.  As a bonus, my figure is now standing still, rather than marching forwards - that suits my purposes better.


The Piper

Once this simple conversion had been done, painting the figure was very straightforward.  He has a plain, brown tunic and a patterned cloak, vaguely suggestive of tartan.  The pipes themselves are just a leather bag with some wood or bone tubes.


Conclusion

My SAGA Scots now have someone to play music for the sword dancer!  Or he could lead them into battle, I suppose.

Either way, both the pipes and the sword dance are probably anachronistic; neither is documented as being present in the dark ages.  But then again, the origins of both are not entirely clear, so they could have been present at this period.  Please, just allow me my little fancy!


Sunday, 23 June 2019

Sword Dance: 28mm figure

Introduction


The Sword Dance has been a staple part of Highland Dancing competitions for many decades.  Although these days it's more likely to be performed by young girls, the origins of this dance are as a martial exercise - to show off the fitness, strength and dexterity of a warrior.

So why am I telling you this?  The audience for this blog are (I imagine) primarily wargamers and model makers.  Well, I had a hankering to include some character figure models in my Dark Age Scots warband; a sword dancer seemed appropriate.  Also, it's a way of showing an interest in my daughter's hobby 🙂.

Authenticity


Actually, there are a number of issues with my idea.  It is quite possibly anachronistic and out of place.  Here are some of the things that I have considered:
  1. Issue: the Highland sword dance is only recorded from the early Renaissance onwards; the earliest mention is in a 15th century document.
    Rebuttal: it seems likely that some form of "showing off" to enemies did exist in 800AD (the time period for my Scots warband).  Such a display could have been a complex dance, couldn't it - just because it isn't recorded doesn't mean that it didn't happen?
  2. Issue: in historical records, the sword dance seems to have been performed before the king and court to show the readiness and power of his army - something like a military parade today.
    Rebuttal: my dancer model could be part of a camp scene, or maybe is just practicing his art before any hostilities have begun.  I don't imagine that he's performing in the middle of a shieldwall during a battle!
  3. Issue: it's unlikely that the modern steps are anything like a dance from the early medieval period.
    Rebuttal: I don't care!  No-one will know the difference.  It's not as if I was portraying a Napoleonic redcoat breakdancing, or a knight in full armour doing the Lindy Hop...
  4. Issue: no-one makes a 28mm model of a Dark Age sword dancer.
    Rebuttal: well, I'll have to convert one then.  No big deal...

The Figure


Ideally, I needed to start with a figure that had only one foot on the ground - preferably on tiptoes.  Fortunately, one of Crusader Miniatures "Scots skirmishers" had exactly this posture.  So, a fairly straightforward conversion:
  • I bent the head around (gently!) so that the model was looking straight ahead instead of to one side.
  • The raised right leg was bent inwards somewhat and the foot repositioned to touch the calf of the left leg.  Actually, refixing the cut-off foot was very fiddly and caused me a lot of frustration.  Ideally (at least, if I was matching the modern steps), his right foot should be behind the left calf, but I just couldn't manage that.  I guess that this guy's technique isn't going to win him any prizes!
  • Both arms were cut off and replaced.  The new plastic arms came from a Gripping Beast set; I believe they were both intended for an archer.
  • The right hand is tucked in to the waist; that was reasonably straightforward.
  • The left hand is the difficult one; it should ideally show the iconic position where the middle finger touches the thumb and the other fingers are outstretched.
    I achieved this with a "grasping" hand from a plastic zombie set; this had very clearly-defined fingers.  The middle finger of the donor hand was cut off and replaced with a (tiny!) piece of green stuff, curled in just the right manner to meet the thumb.

Basing


Firstly, I glued the model to a suitable base, though somewhat off centre.  The base was levelled up with brown wood filler.


The next step was to texture the base by adding some sand to it.  I added a few small rocks to break up the monotony, though these are around the edges rather than in the middle.  After all, I imagine that my dancer has selected a reasonably flat, open area for his dance so as not to trip over any obstacles.

Two plastic swords were then stuck to the base, in the classic "X" shape.  I didn't have any bare swords in my bits box; so these swords had to be constructed by taking the blade from a "hand-with-sword" piece and marrying it to a hilt from a "sword-in-scabbard" part.

Painting


Painting this model was easy; he doesn't have much in the way of detail.  So: undercoat, flesh, hair, tunic. The tunic is easily the most complex bit of painting; my dancer wears a "pseudo tartan" tunic.  I've described my technique for these before, so I won't repeat it again.


By custom, figures in my SAGA warbands have names.  I called the dancer "Muiredach".

Conclusion

I had the idea for this model a very long time ago, but it took a long time to get around to making it.  When I finally began, it was a reasonably easy conversion that was built and painted quickly; I'm pleased with the result.  Of course, now I really need a piper or other musician to accompany him...

History is full of examples of warriors trying to intimidate or insult their enemies just before a fight begins.  Or maybe they are just trying to bolster their own courage?  Either way, there aren't as many models of these as I would like - but they're often not hard to convert.  Pretty much any army from any time period could have such figures.  As well as the sword dance or other weapons display, here are some more ideas:
  • Shaking a fist.  Optionally with one (or two) fingers raised.
  • Baring buttocks/"mooning".  This one might be a bit harder to find a suitable donor model to convert...
  • Facial expressions.  Could be anything from sticking out a tongue to the exaggerated eye rolling and grimaces of the Maoris.
So, let's see your insulting or showing-off figures!

Tuesday, 10 April 2018

SAGA: The Red River

Introduction

Last Thursday, my son A. and I went along to the Helensburgh games club (HAHA) again.  I had arranged to play an introductory game of SAGA with another club member.  In the event, my son played the game and I acted as umpire, dispensing advice and rules knowledge with complete impartiality.

We were still playing SAGA version 1, though this may well be the last such game before I upgrade to v.2 .  I set up "The River" scenario from the original rule book: this has an impassable stream with 2 crossing places.  The winner is whoever has more of his force on the opposite side after 7 turns.  Simple enough!


The Vikings


A. took control of a Viking warband, comprised of the following:

  • 1 x Warlord ("Leif")
  • 1 x 4 berserkers
  • 2 x 4 hearthguard ("hirdmen")
  • 2 x 8 warriors
  • 1 x 12 archers (levy)


The Scots

Sorry for the out-of-focus shot.  I'm not sure what happened here...

Facing the Vikings was a similarly-sized formation of Scots:

  • 1 x Warlord ("Macbheatha")
  • 2 x 6 hearthguard ("thanes")
  • 2 x 8 warriors
  • 1 x 12 angry monks (levy)
Note that we were not playing with any advanced rules for this game, so the Scots banner-waving hearthguard was counted as just a regular hearthguard.  Mind you, A. nominated the banner as a self-proclaimed objective.  I forget his exact words, but the sentiment was very much along the lines of "I'm going to capture that!"


The Game


For the first turn or two, both warlords used pretty much all of their SAGA dice to advance their bands.  At this stage, they were trying to maintain some semblance of order (and didn't want to leave anyone behind!); nothing fancy happened.

Macbheatha stayed in the middle (i.e. between the ford and the bridge) with his angry monks acting as a spiritual reserve (generating an extra SAGA dice by being near to the seat of power!)

Leif encouraged his Vikings to cross the bridge, though he was conspicuously not in the front rank.


First contact occurred soon enough, of course.  Scots thanes had barely set foot in the ford when a bunch of yelling, semi-naked madmen ran at them from the Viking lines.


The berserkers stumbled, though.  Even though they threw a significantly larger number of dice than the defenders, they couldn't penetrate the Scots's armour and only 2 of the thanes fell.  In return, all 4 of the frothing loonies were cut down.  Someone's been eating their haggis this morning!


Losses were mounting as the Scots thanes charged across the river and all but obliterated the Viking warriors who were facing them (a single soul survived).  Then, the Scots thanes were eliminated in turn by some fresh Viking hirdmen just before the Scots spearmen could cross the river to join them.


At the bridge, an initial Viking rush was met by a wall of Scots warriors and repulsed.  The Scots thanes (with banner) then counter-attacked the retreating raiders and slew them.


Another wave of Viking warriors charged forwards, but again the Scots thanes held their ground and sent the attackers reeling with heavy losses.  Mind you, the Scots were not without loss themselves.


Continuing to advance, the Scots thanes finished off the last warriors in front of them.  They were tiring now, but only warlord Leif himself stood in their way (the levy archers don't really count; they were not very useful all through the game).


Leif cut down one thane, then a second and finally a third!  However, the fourth and final thane was just too much for him; the Viking warlord fell and there was nothing left to prevent the Scots from following their banner and streaming over the bridge (again, the levies don't really count as they had all the stopping power of wet tissue paper).


Back at the ford, the Viking hirdmen were forging forwards.  They entered the river and pushed back the Scots spearmen, but it was too little, too late.  Macbheatha shoved past his crowd of holy men and ran towards the norsemen.  Even though both sides were fatigued, the Scots lord had no difficulty in cutting down the two remaining hirdmen.

That left just a solitary Viking warrior (plus their levy archers) on the west bank of the stream.


With a cry of "Valhalla!", this likely lad charged Macbheatha.  There was no realistic chance that he could injure the experienced and armoured warlord, but the audacity of his attack must have caught the Scot unawares.  The Viking's spear thrust bounced off the Scot's shield without any attempt at a return stroke.  Honour satisfied, Sigvald ran off into the dusk.


Conclusion

Although technically we had 2 more turns to play, we decided to halt the game at this point.  It should be fairly obvious to anyone who has followed the story that the Scots had won a significant, if bloody, victory; there was nothing to stop them from advancing the remnants of at least 2 units over each of the ford and the bridge.  The lone Viking warrior would have been cut down easily by a counterattack and although the levy  archers might possibly have inflicted a casualty or two in melee, they didn't generate any SAGA dice and so they they would have been easy prey, unable to activate to move, shoot or rest.

It is true that the Vikings had some poor luck in the first two turns of the game (they didn't roll even one 'rare' face on any SAGA die and their combat rolls were less than stellar).  Neither side made a lot of use of their battle-board's SAGA abilities, which isn't really surprising considering that both players were relative or complete beginners.  Still, as far as I can tell, both players enjoyed the game - and that's the main thing.

As you can see from the casualty markers, the river ran red that day!

Thursday, 15 October 2015

SAGA: There's no place like Home

Introduction

A couple of weekends ago, my friend Steve came over for a day's gaming.  I've already described our Black Powder game (the Battle of Grochow, 1809), but that was only a part of the day's activities.  For afters, we played a game of SAGA.  I took my Scots, whilst Steve opted for a Viking warband.

Homeland

Since I now have some Dark Age buildings (suitable for northern Scotland, at least), we chose the Homeland scenario.  In this game, one side attacks a settlement that is defended by the other.  That sounds simple enough, but there's a twist: each player bids for the "privilege" of defending.

Here's how it works: the attacker will use a full 6-point warband.  Both players secretly write down the size of the smallest force which they think can hold the buildings until the end of the game (6 turns, from memory).  Whoever bids lowest becomes the defender!

In the event, I decided that I would need 4 points of troops to defend, but Steve reckoned he could do it with 3 points worth.  So, Steve's Vikings became the defenders, but would have half the force that the attacking Scots would use.  I wasn't exactly gloating, but at this point I thought that I would be able to roll right over them and win the game easily.  Oh, yeah!

The Game


OK, here's the plan:
  • My thanes (4 mounted and 8 on foot) will advance up the centre and attack as soon as they're able.
  • 2 groups of warriors (10 and 6 strong) will work round the flanks and provide backup in case the nobles cannot defeat the Vikings all on their own.  They're marching round the flanks mainly because I don't want to cause a traffic jam in the centre, not because I'm being tactically sophisticated!
  • My warlord and 12 chanting monks will stay in the centre and offer moral support.  This is partly because they generate a fair number of SAGA dice and partly because if I lose my warlord in this scenario then I lose the game instantly  Although I'd love to have him fighting in the front rank, I'm not sure that I dare, at least until the defenders are considerably weakened....
Facing me, the Vikings have decided to abandon one building entirely, place 4 hearthguard in each of the other two (and their warlord in the further one), whilst keeping a reserve of 8 bondi (warriors) behind the village.


So, for the first 2 turns, the Scots rode, walked and (in some cases) jogged forward.  Not much else happened, except that the Vikings prepared to die honourably, with as many defensive SAGA abilities as possible.  I admit that I was a bit amused by Steve's discomfort on discovering that Vikings don't really have many defensive abilities available, no matter how many SAGA dice they roll!


In turn 3, it was my turn to be frustrated.  Carelessly, I put the SAGA dice that I had intended to use to activate the Thanes into the boxes on the chart which activate levies.  This was not at all what I had intended, but I'm too honest a player to back out from such an error and so the result stood.

The monks really sprinted ahead, whilst all the Scots thanes stood and watched.  Maybe it was the thought of climbing a wall into an enclosure filled with cattle, or perhaps it was the rather fierce-looking chickens pecking about in the centre of the settlement (my cavalry once had a very bad experience with some chickens), but the Scots nobility didn't move on turn 3.

At this point, I suddenly realised that the game was half-way over and none of my warband had even made contact with the Vikings yet.  Hmm, perhaps this wasn't going to be so easy after all.


The next turn, the Scots thanes attacked the first house.  Firstly the cavalry charged, then (once the defenders were fatigued) the large unit on foot assaulted the building.  Now, here's the thing: the Vikings don't really have any defensive measures on their battleboard.  But equally, the Scots don't have any offensive abilities.  This fight was resolved pretty much without any power-ups from SAGA dice.

So, the Viking hearthguard crouched behind their shields and the thick walls of the building and sacrificed as many attack dice as they were permitted in order to boost their defence.  Although the Scots then took no casualties, the Vikings were very hard to hurt; only 2 of the 4 defenders fell to this all-out assault.


To start the attack on the big house at the back, my flanking warriors moved forward.  They were countered by the reserve Viking bondi who, although they lost the fight, still inflicted some casualties and fatigue on the Scots.  The clock was running out, but I still hadn't managed to get near to the Viking chieftain and his retinue!


In the last 2 turns of the game, the Scots thanes pushed through the cattle and cut down the last 2 defenders of the rightmost hut.  However, to win they needed to clear all the buildings and the Viking warlord and his bodyguard still held the central building.

Wave after wave of Scots attacked the last dwelling, but the Vikings just hunkered down and blocked the entrances with shields and the bodies of the fallen.  One Viking huscarl fell to an unlucky spear thrust from the mounted Scots nobles, but the cavalry lost one of their own in return.

The Scots warriors at the rear were met by the Viking chieftain himself; they didn't even manage to wound him.  Even the monks joined in, frantically tearing at the barricades in their haste to reach the heathen.  But their faith didn't protect them and they died just the same.

And so the game ended, with the battered Vikings still holding out...

Conclusion

This scenario didn't play to either side's strengths, really.  The Scots' battle board doesn't have much in the way of offensive options; it's more about defence and counter-attack.  Equally, the Vikings don't have many defensive boosts.  Having said that, my attackers couldn't really have afforded to use many SAGA dice for power-ups anyway; they were all needed just to move the troops across the board.  Don't underestimate the effort this takes in a time-limited game and when the enemy doesn't plan on coming to you!

My initial belief in a walkover for the attackers was steadily sapped throughout the game as it became obvious how little progress I was making.  Perhaps if I hadn't messed up my activations on turn 3 then the game would have been closer, but this seems to be clutching at straws really.  I was thoroughly defeated by a stout defence and lack of time.

I'm already pondering alternate tactics that might have been employed:
  • For the attackers, perhaps one or two large, fast-moving elite units could have been used as the assault force whilst multiple small units of less expensive troops cheer them on without stepping from the baseline (i.e. spectators, just to generate the necessary SAGA dice!)
  • The defenders might experiment with small, throwaway units to advance and act as speed & fatigue "bumps".  By delaying and tiring out the attackers, they might disorganise the attack and buy enough time for the game clock to run out.

Thursday, 14 May 2015

SAGA: Ragnar vs the Monks

Introduction

Nearly 2 weeks ago, I mentioned in a post (here) that we had played some games and that I'd report on them in due course.  Well, you've already had the ATZ short story, so now it's time for the SAGA battle!

Clash of Warlords


"My lord, Abbot Killian is here to see you", the servant announced.  Macbheatha had barely registered this before the churchman and several of his attendants strode into the hall.  "Lord Macbheatha!" exclaimed the holy man.  "It won't do at all!  You must show the heathen that he cannot prevail!"
The Scots warlord sighed.  "Err, is your anger directed against some particular pagan, or do you simply disapprove of all such on principle?" he replied.
"Why, it's that Viking, Ragnar Lothbrok!" returned the churchman.  "He has erected a false idol near the bridge over the Clutha burn.  When our holy brothers started to destroy it, they were beaten most severely!  Ragnar must be punished.  You must challenge him and show the pagans that they cannot do such things!"
Wearily, Macbheatha reached for his sword and shield.

We played a 6 point game, using the "Clash of Warlords" scenario.  In this, each warlord can take 12 hits before falling; victory is determined solely on the number of such wounds suffered.  The gaining of territory or the destruction of other models counts for nothing in the end (though obviously it may confer a short term tactical advantage!)

I played the Scots and took a regular warlord, a mixture of hearthguard and warriors on foot, a few mounted hearthguard and a dozen angry monks.

My younger son (A.) played the Vikings.  He chose to take the special character Ragnar Lothbrok, small numbers of berserkers and hearthguard, a fair number of warriors and some levy archers.  Hmm, I thought: one of Ragnar's special abilities is that he can ignore the first 2 hits in each melee rather than a regular warlord's 1 hit.  This would make him a very tough customer in a game where such wounds determined the winner.

Early Moves

For the first couple of turns, forces on both sides moved forwards whilst the 2 warlords beat up on each other.  The Viking's attacks were ferocious, but the Scots lord's defence was sufficient to deflect them all.

The general fighting was opened by the Scots hearthguard.  Seeing that some Viking berserkers were in the lead and getting perilously close to Macbheatha, the thanes double-timed over the bridge and charged at the semi-naked axemen.

Some cunning use of SAGA abilities including the powerful A Barrier of Spears and some lucky dice rolling enabled the thanes to wipe out all of the scary berserkers for no loss whatsoever.  As the Scots' commander, this was excellent news and a brilliant start to the game!

...or so I thought.  A large group of Viking warriors charged down off the hill, shouting "Valhalla!" and banging their shields.  It seems that the berserkers are not the only models in the Viking army who can make violently aggressive attacks - and the Scots had burnt through all of their SAGA abilities for the turn already.  Bother!

By the time the fighting subsided, just 2 of the thanes were left standing, surrounded by piles of dead and injured from both sides.

To finish the job, a small unit of Viking hearthguards then charged the tired pair of thanes.  Predictably, the Scots fell, though they did manage to take one enemy with them.

The remaining hearthguard of both sides now tried to intervene and break the deadlock between the 2 tiring warlords.  Almost predictably, all they achieved was mutual near-annihilation as the Scots were reduced to 1 horseman and the Vikings to a single bodyguard.  However, more Scots were pouring across the bridge and even the monks were getting close to the central duel.

At this moment, Nick (my brother-in-law, who was visiting from New Zealand and watching the game) told A. that his Viking levy archers were completely useless.  Just to prove him wrong, my son used them to shoot down the first rank of Scots warriors to cross the bridge.

In the ever-escalating tit-for-tat, the depleted Scots warriors crossed the bridge and killed the last Viking hearthguard.  In turn, the last unit of Viking bondi attacked and drove off those Scots.  However, another group of Scots warriors was just on the bridge, so could they do any better?

The fresh Scots warriors charged off the bridge, but took 1 casualty from the Vikings.  However, they scored a respectable 5 hits on the Norsemen in return.  That should do it, right: 5 hits, each needing a 5+ to save?

5 hits, each needing a 5+ to save.  What could go wrong?
Amazingly, all the Vikings made their saves and the Scots attack was repulsed.  Oh, fudge!  At least only 1 Scottish warrior had been lost.

Right, so let's send the Scots warriors back in for another attack.  This time, 3 Vikings fell for no loss.  Hurrah - at last we might be able to send men to help Macbheatha in his seemingly endless and pointless fight with Ragnar!

But it wasn't to be.  Ragnar finally managed to pierce Macbheatha's defences and wound the Scots lord.  That would be hard enough to claw back with a matching injury to Ragnar, but then the Viking archers shot another volley.  The last significant group of Scots warriors was slaughtered!

As if sensing victory, Ragnar now drove Macbheatha back, wounding him twice more in quick succession.  This was beginning to look like the end for the Scots; despite all the effort they had put in!

The few remaining warriors on both sides skirmished with each other, killing a few more fighters.  However, neither side achieved any decisive superiority.  Finally, the last remaining Viking shieldmaiden attacked the monks to try to prevent them from attacking Ragnar.  She fell to their anger, but not before she had created a martyr from one of them.

The distraction caused by this little skirmish allowed Macbheatha finally to score a hit on Ragnar.  Still, going into the last turn of the game, the odds didn't look good that the tired Scot would be able to achieve anything more against this legendary, rock-hard Viking.

Right, time to go for broke!  I put SAGA dice on every ability I could that might generate attack dice (not that many for the Scots battleboard!) and sent the monks in as well.  The 2 warlords disappeared under a pile of kicking, biting and swearing holy men.  No doubt there was the odd dagger used as well.  Injuries were received by both Macbheatha and Ragnar, but who would come off worse?

So here's the final tally: 5 wounds to Ragnar, but only 4 wounds to Macbheatha.  The Scots squeak a narrow victory at the last moment!

Macbheatha picked himself up from the dirt with the help of Abbot Killian and dusted down his tunic.  It was bloody and torn from the long fight; he'd need to get another one to replace it.  Drat; he'd really liked that tunic.

 He stared for a moment at the receding back of the Viking lord as Ragnar ran away, then shouted "Let that be a lesson to you.  And DON'T COME BACK!"


Monday, 3 November 2014

SAGA: Macbeth's Revenge

Introduction

I spent all of yesterday visiting my friend Steve; both of us brought our younger son to the gaming session as well.  The two boys have the same first name, which caused occasional confusion.  However, we played a lot of games.

There was a game of Dreadball between the 2 children, where the humans got an early lead of 4 points and held onto it through the game.  This was mainly because the opposing goblins were very unlucky with their shots at goal and missed every single time (and they had multiple chances!).  In the final rush, one goblin was sprinting down the sideline, deep in enemy territory and quite unopposed, when a random event caused the ball to shatter and fall apart in his hands.  Such was typical of their luck.  However, some honour was salvaged when one of their Orc guards killed an opposing human - the first fatality we've seen in our games of Dreadball.

We played a couple of games of Race for the Galaxy, which is a brilliant card game of empire building amongst the stars.  I won one and my son won one; it takes a little while to get into this game and the hosts were still finding it a bit difficult to come up with coherent strategies, I think.  That's not intended as any mark of disrespect to them and I'm sure they'll be better prepared next time...

The big game of the day was SAGA, though...

SAGA: The Confrontation

Thurstan of Northumbria had led his men north to meet with King Macbeth of the Scots.  They were supposed to discuss mutual security - in other words, both leaders wanted the other side to stop raiding them whilst still continuing surreptitiously to steal cattle in return.  The peace conference didn't go well, insults were traded and then the leaders drew their weapons.  Nobody could be sure who broke the peace first, of course...

In the tan corner: Macbeth and his Scots
The Scots warband consisted of:
  • Macbeth (Hero of the Viking Age)
  • 1 x 8 thanes on foot
  • 1 x 4 thanes, mounted
  • 2 x 8 warriors

In the green corner: Thurstan's Northumbrians (Anglo Danes)
This was the first time that I had used my Anglo-Danish warband.  I took the following:
  • Thurstan (generic warlord, great axe)
  • 1 x 6 huscarls (great axe)
  • 1 x 6 huscarls (spear), with a banner
  • 2 x 8 warriors
  • 1 x 12 levies (sling)

We played the Challenge scenario.  In this, each warlord can take 12 hits (instead of the normal 1 + resilience).  The aim of the game is simple: you have 7 turns to slay the enemy warlord!  All other casualties are irrelevant, at least for determining victory.

All On His Own

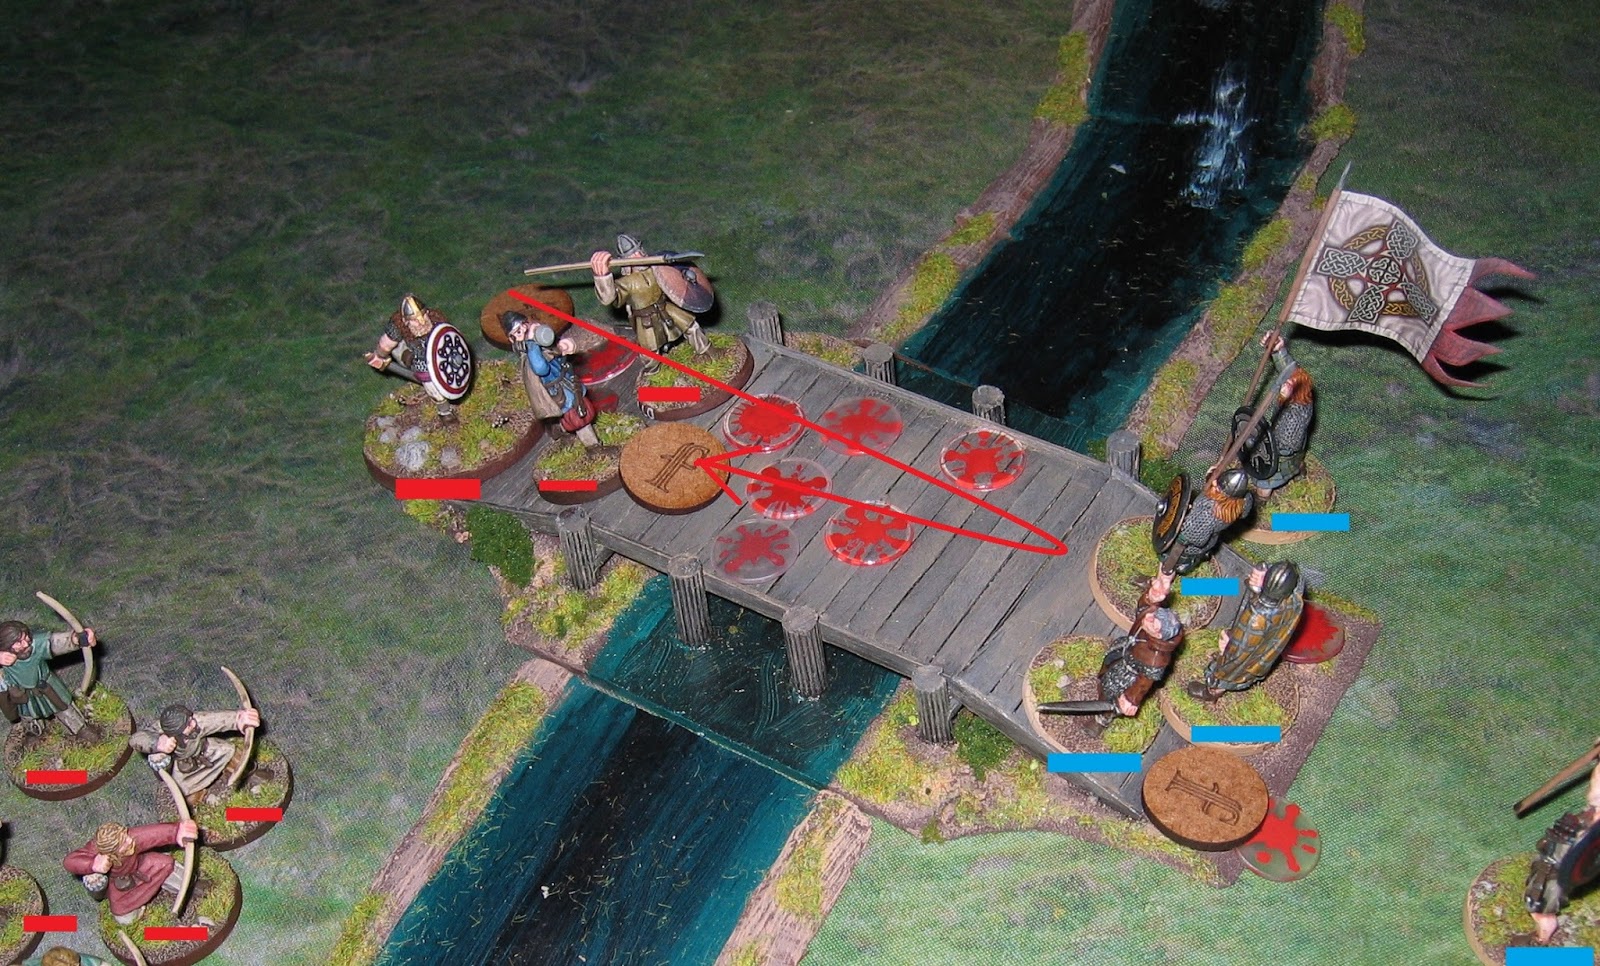
I won the dice roll to start deploying first, which meant that I had to place Thurstan in the centre of the table.  Macbeth ended up slightly nearer his own lines.  This wasn't a disaster for the Anglo Danes, but then the Scots finished deploying first (they had fewer units) and so would move first in turn 1.  Thurstan was feeling quite isolated as the Scots thanes all advanced on him.

Indeed, Macbeth felt brave enough to have a lunge at the stout Northumbrian.  Blows were exchanged and a few cuts taken by each side.  However, Thurstan won that encounter, causing Macbeth to step backwards into the safety of his lines of bodyguards.  (From a tactical point of view, I would have been delighted to lose a wound or two in exchange for being able to retreat towards my own troops.  But Thurstan just wasn't prepared to give an inch...).

With a roar of anger, the Northumbrians advanced to assist their beleaguered leader.  All, that is, apart from one group of warriors behind a hill who hadn't realised that the battle had started (or maybe they were just shirking where no-one could see them - I don't know for sure).

Now the battle got going in earnest!  The Anglo Danes had loaded their battle board with a die on the Intimidate ability, which could be used to cancel an enemy's dice used for activation.  I was hoping to use this to prevent Thurstan from being attacked by the Scots.  Instead, Macbeth used his automatic leader's activation (determination), we obey and side-by-side to take his large units of thanes into combat with my smaller unit of huscarls.  "Come on, lads!  With me!", he called as they cut down 5 of the 6 Northumbrians.  At least 1 of my men survived, so I'd still get a SAGA dice for the unit!

Simultaneously, the Scots cavalry advanced menacingly towards my slingers.  I used Intimidate on them, but they came on anyway (by using a second activation die).  At least the slingers managed to shoot down one of the horsemen.

Then, the cavalry charged!  They were fatigued by this time and only managed to cut down 2 of the Northumbrian slingers.  As these withdrew, the Scots horsemen were horrified to see that the levies had been masking a group of Huscarls.  They in turn charged from the trees into the tired and dispirited horsemen and slaughtered them all without loss (that's the second time I've seen my Scots cavalry models used in a game; they performed dismally in the first game as well!).

Near the centre of the battle, Northumbrian warriors attacked the fatigued Scots thanes, whilst Thurstan and Macbeth glowered at each other and caught their breath.  The Northumbrians may have though that they'd caught their enemies at a disadvantage, but the Scots weren't fazed and repulsed the attacking warriors bloodily!

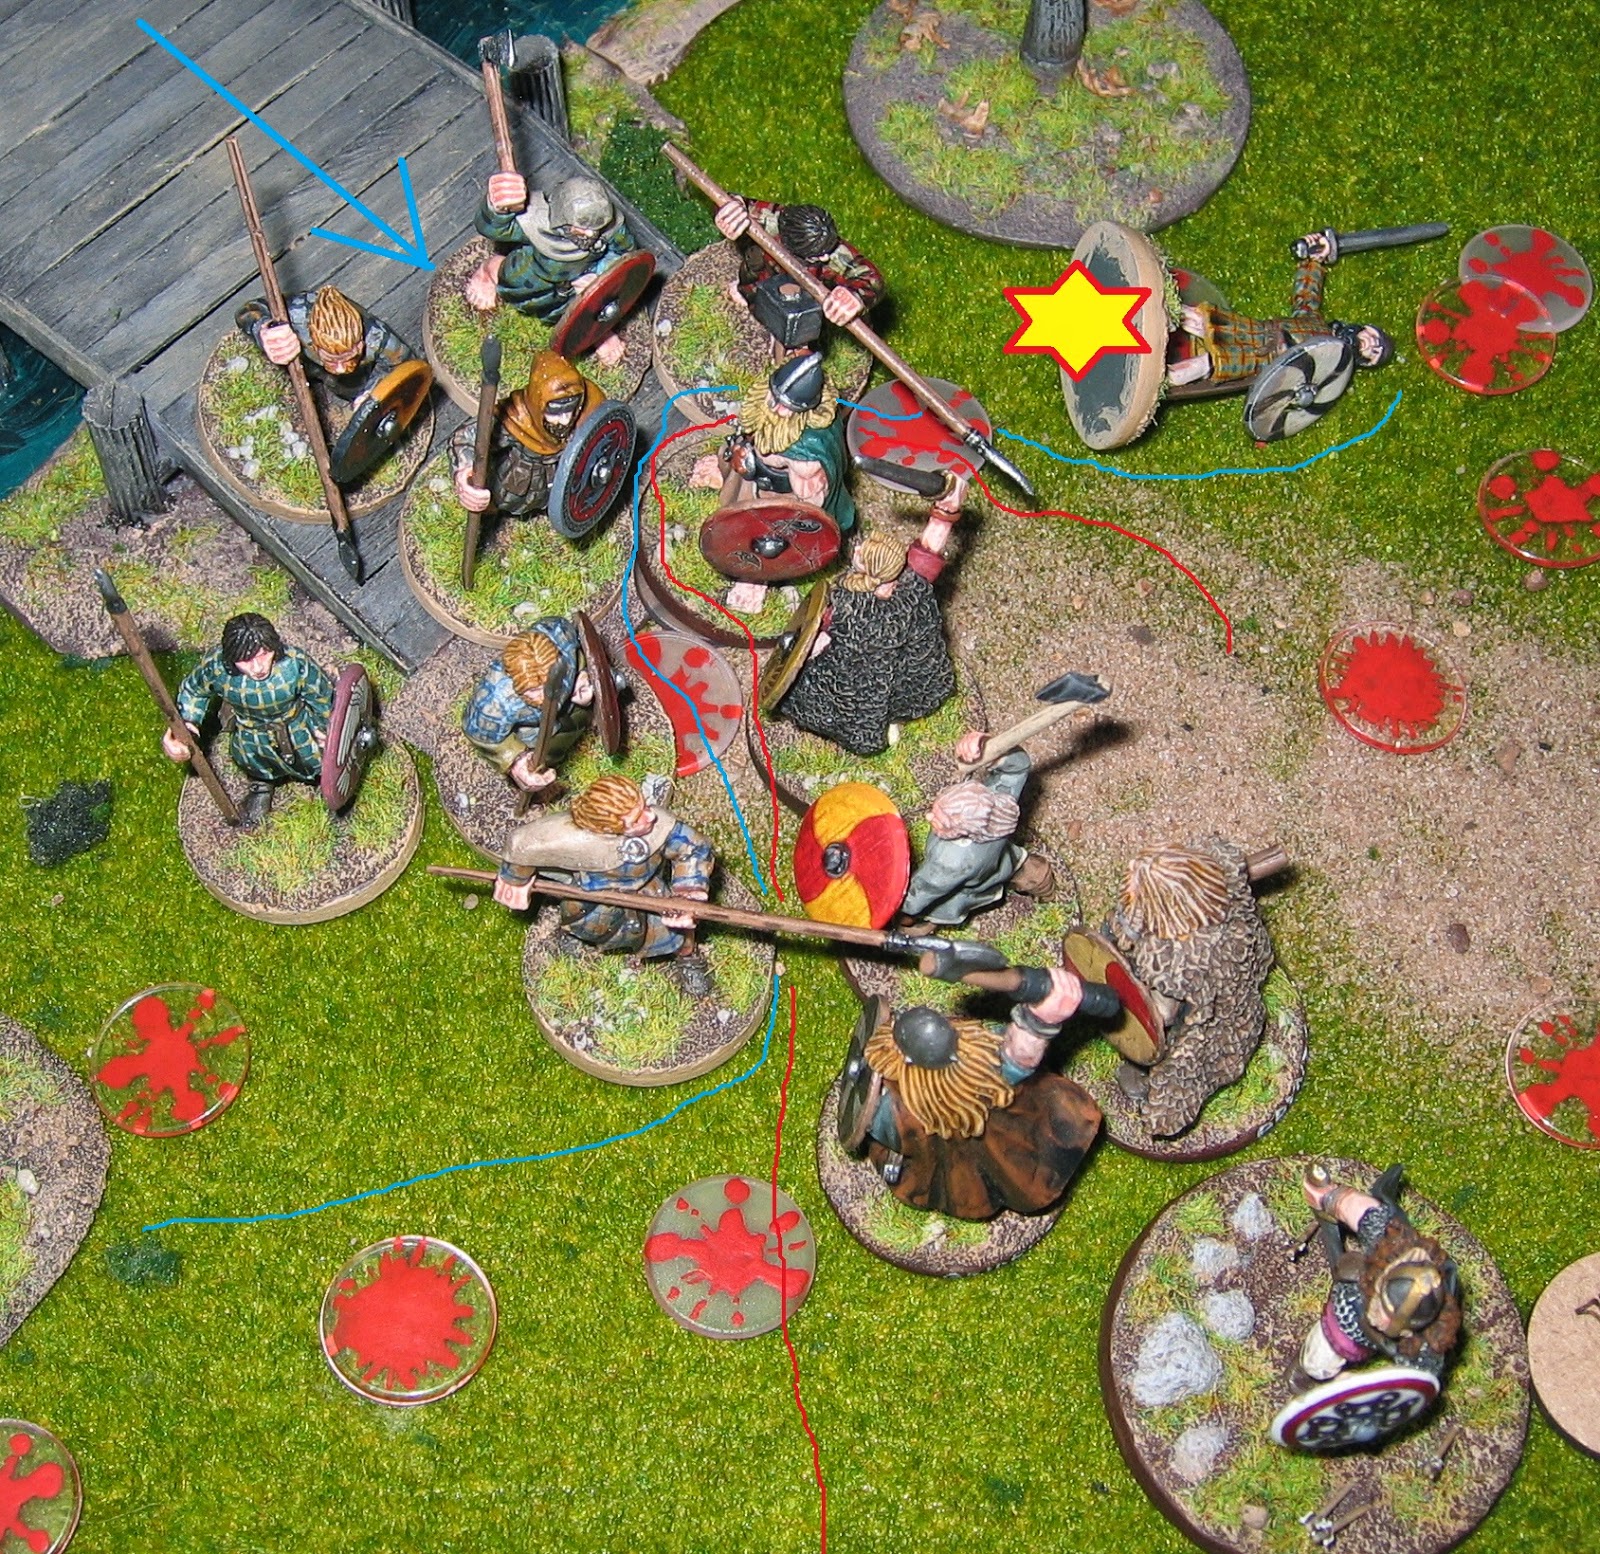
Now that Thurstan was unsupported again, Macbeth ordered his remaining 2 thanes to attack.  The Scots were rolling well and had plenty of choices with their SAGA dice, but they now discovered a particularly vicious combination.  By activating Hold the Ground and Counterattack together, they could generate an extra 11 attack dice for a single melee!

The pair of thanes between them inflicted another 8 hits on Thurstan, taking him up to a total of 10 of his 12 wounds!  Ouch!  The battered and bloodied warlord did manage to slay one of his attackers, but this was small comfort.

To add insult to the injury, Scots warriors slaughtered most of the nearby Northumbrian warriors, once again leaving Thurstan exposed and unsupported.  One of the Northumbrian warriors did survive and was sent scuttling for the hills, so at least I didn't lose a SAGA dice for the massacre.  Oh, well...

To and Fro

I took some small comfort by using my remaining Huscarls to steamroller the last remaining Thane; he never stood much of a chance.  At the same time, a lucky set of SAGA dice allowed me to use Trapped to fatigue all the remaining Scots and then Exhaustion to cause 2 of the Scots warriors to fall by the wayside.  But it wasn't enough...

Macbeth personally led his reserve warriors in a retaliatory attack on the huscarls.  Although both sides took some losses, the Northumbrians came off worse and retreated.

Another clash saw more losses on both sides, but the Scots were held at bay, for now.  Maybe, just maybe the Northumbrians would have enough time to rouse their last fresh unit of warriors from the other side of the hill and save the day with them?  At least it looks as if the last huscarl is blowing his horn with all his might in an attempt to summon aid to his lord!

However even at this late stage in the game and despite having lost 2 entire units, the canny Macbeth was still rolling 6 SAGA dice every turn (due to his special "Hero of the Viking Age" ability).  He managed a particularly handy set of stags and ducks in turn 6 and loaded up the battle board as seen above, (plus a couple of activations, if I remember correctly).

Firstly, the Scots warriors used reach to take out the last Northumbrian huscarl.  The bodyguard didn't even get a chance to strike back as he was pinned down by their long spears.
Then, with a bloodcurdling yell, Macbeth himself charged at Thurstan.  The wily Scotsman used the same combination of Hold the ground and Counterattack to boost his attack to 16 dice.  Even though Thurstan braced himself for defence, this was only going to end one way...

These are the dice from part way through the combat between the leaders; 1 dice for each hit, with a 5 or 6 needed to save it.  Macbeth took only 1 hit and even managed to save it.  Thurstan took so many hits that I'm not even going to bother counting them!
Surrounded by his enemies, Thurstan fell on top of the bodies of his loyal household troops as Macbeth hacked and hacked at him.  The confrontation was quite decisive and it was a dark day for the Northumbrians.  After all, Macbeth is famous, but who has ever heard of Thurstan before?

Conclusion

As the Anglo Danes, I never really felt that I got going in this battle.  My troops were fed piecemeal into a mincing machine, all in the vain attempt to protect a warlord who was too proud to retreat even a few steps!  For the first half of the game, I just about held my own, but I suffered badly once the Scots got more used to their battleboard.

We've not used any Heroes of the Viking Age before; I think that having Macbeth really helped the Scots towards the end.  In any other game, they would have slowed down as units were destroyed and caused the loss of SAGA dice.  Not this warlord; he just kept on coming, with 6 dice giving him plenty of options!

Incidentally, the Anglo Danes had most of their units left at the end of the game; they lost only one!  However that hides the fact that 2 units were reduced to 1 figure each, the slingers (whilst numerous) were somewhat useless and the final unit of warriors never really got moving and were too far off to affect anything.  Lazy, cowardly dogs!