Showing posts with label HAHA. Show all posts

Monday, 28 February 2022

HAHA SAGA Escalation League - 5

Introduction

Over 2 years ago, the Helensburgh Alternative Hobby Association (HAHA) set out to run an escalation league for SAGA.  We managed the first two of our planned monthly meetings, in January and February 2020 - then Covid-19 struck.  Since then we have been through lockdowns, isolations and other inconveniences, but as of a few months ago we re-started our event.  This is a momentous post, because WE FINALLY COMPLETED THE LEAGUE!

For descriptions of the league rules and the five planned events, see here:

The plan was always for a climactic, every-man-for-himself battle at the end of the league.  In this, each player would field the entire 4-point SAGA warband that he (or she) had collected over the duration of the campaign.  Although we started with seven or eight players, due to the lengthy delays we only finished with four.  The others had all moved away from the area and were unable to continue participating.  I hope they are still enjoying SAGA as much as they did in the first two events, wherever they are now!


Armageddon

Usefully, the SAGA "Book of Battles" has a scenario for exactly the kind of grand, chaotic game we had envisioned: it's called "Battle Royale"!  This scenario has an alternating placement anywhere on the table.  Victory conditions revolve around Survival Points and successful charges.

We read the rules slightly incorrectly and gave the VP only for a charge which caused more casualties than were received, rather than any charge that made contact.  In the end this wouldn't have made any real difference to the results, though.


Deployment

Initial placement was quite simple: the Skraelings filled the marsh and the wood with bowmen, planning to move all their warriors onto the hill (and not appreciating that the gentle hill gave no defensive bonuses at all).  The Anglo Saxons, Normans and Crusaders mostly kept to themselves and deliberately didn't interleave with their enemies.


Fighting

Much of the action in our game revolved around the foreground hill.  Although the Skraelings climbed it, they were then sandwiched and harried by both the Crusaders' and the Anglo Saxons' elite troops.  Skraelings don't do too well when defending and their forces just melted away.


The other early action was between the Crusaders' crossbowmen and the Normans' spearmen.  The crossbows proved deadly, both at range and in melee (though by the time the melee occurred, there weren't too many spearmen left!)


Little action occurred elsewhere, except that the Norman archers' volley fire was a constant, if minor irritant to anyone in range.


Finally, the Norman knights decided that they'd find out how squishy the nearby Skraelings were.  It turns out that the swamp didn't slow down the knights enough to save the archers and yes - the Skraeling levy were exceptionally squishy.


The game ended after fierce fighting left the Crusader warlord as "King of the Hill".  He had triumphed over all opposition, including all the Skraeling warriors, their warlord, the Anglo Saxon chief and all of his hearthguard.  He did have a little help in doing this, but the Crusader lord had been all but unstoppable!


Results

For this particular battle:
  • The Crusaders scored an impressive 17 survival points.  Much of that was due to successful charges, though many of their units still existed at the end of the game - albeit sorely reduced.  For such a clear victory, they score the maximum 3 league points!
  • The Anglo Saxons and the Normans scored 11 and 12 survival points respectively.  Mostly this came down to the units they had left, rather than scoring for charges.  Decent second places, so both are awarded 2 league points.
  • The Skraelings were hammered by everyone else (though the others all swore that there was no conspiracy against them!).  They gained a mere 2 survival points for the single unit of levy hiding in the forest.  At least the league rules grant 1 league point for just showing up, so their sacrifice had some purpose...

The HAHA Escalation League Conclusion

After all the points have been added up, the standings are as follows:

January 2020
Starter for ten
February 2020
Powers of two
March 2020
October 2021
Long live the peasants!
April 2020
November 2021
Bonus round
May 2020
February 2022
Armageddon
TOTAL
Byzantines11(damaged)(absent)(retired)2
Anglo Saxons3313212
Normans121(absent)26
Jomsvikings12(retired)(retired)(retired)3
Anglo Danes3(absent)(retired)(retired)(retired)3
Skraelings123219
Crusaders221139

Congratulations are due to the Anglo Saxons, who won 3 of the 5 rounds outright and thus achieved an unassailable number of league points.  They are the champions!

It's been a long campaign, but we finally got there.  I'm immensely pleased that we completed the schedule, whilst at the same time I'm saddened that it took so long and that we lost so many participants along the way (again, not due to lack of interest, but rather because "real life" got in the way).

Would I do something like this again?  Certainly I would - like a flash!

Sunday, 21 November 2021

HAHA SAGA Escalation League - 4

Introduction

We've now reached the fourth session for our SAGA Escalation league at the HAHA games club.  This is the bonus round and here's how it was described in the original manifesto:

Each participant will bring 1 extra item, to be judged on theme and painting quality.  This could be any of the following, or indeed anything else that fits:

  • a piece of scenery (Celtic cross, Viking longboat, Dark Age house, wood, marsh…)

  • extra – but not “regular” - figures for the warband (a bard, champion, mercenary group…)

  • game accessories (objective or fatigue markers: ox carts, groups of civilians, broken shields & wounded warriors, livestock, sacks/chests of loot…)

On the night, only 3 participants were able to enter an item, though all the members of the club (including the non-SAGA gamers) were encouraged to vote.  Let's see how they did:

Skraelings

The Skraelings chose to bring some civilians (though this might be hard to define in a tribal society!): a couple of fishermen in a canoe.  This piece is probably best thought of as a scenic accent, though I suppose it could be used as an objective or game marker.


Anglo Saxons

The Anglo Saxons brought a hut, along with the blacksmith who lives in it.  Seems like a very useful piece of scenery to me.


Crusaders

For the Crusaders, a warrior priest was added to their ranks.  A minor hero is surely going to help them in their fights against all the infidels!


Conclusion

As you can see from the votes cast (attached to each picture), the club members liked the Anglo Saxon hut a great deal; it scored more votes than the other two entries put together!  So we award a further 3 points to them for this excellent entry, 2 points to the runner up and 1 point for all other submissions.

After that, the standings now look like this:

January 2020
Starter for ten
February 2020
Powers of two
March 2020
October 2021
Long live the peasants!
April 2020
November 2021
Bonus round
May 2020
December 2021
Armageddon
TOTAL
Byzantines11(damaged)(absent)2
Anglo Saxons331310
Normans121(absent)4
Jomsvikings12(retired)(retired)3
Anglo Danes3(absent)(retired)(retired)3
Skraelings12328
Crusaders22116

So, onward!  There's only 1 one more round to go, after which all finishers should have a 4 point SAGA army and a bonus "extra" item.

On to the final round ==>

Saturday, 23 October 2021

HAHA SAGA Escalation League - 3

Introduction

Back in December 2019, a group of us at the Helensburgh Alternative Hobby Association (HAHA) planned out an escalation league for SAGA.  Each month we would bring along a warlord and 1 more point of troops and fight a battle.  The original rules for the league are set out here: escalation-league.docx

We only managed 2 sessions before covid struck and everything went on hold.  You can read about these here:

  1. Escalation league week 1
  2. Escalation league week 2

Well, this is a month of many "first in a long time" events.  We were able to restart the league and play round 3, finally.

The Setup

As per the schedule, each player brought along a SAGA warband consisting of their warlord and 3 points of troops - at least one point of which was not hearthguard.

I had been hoping to arrange a pair of 3-player every-man-for-himself matches for the evening, but with the numbers we had this wasn't possible.  Of the original 7 participants, 2 have moved away from the area in the past 19 months.  One of the remaining armies (the Byzantines) was involved in a terrible shelf-collapse accident on the morning of the club meeting and was therefore unavailable.  I really hope it can be restored in due course...

That left 4 players.  We (well, I) decided that we would play a 4-way every-man-for-himself match.  The scenario was simple: each player would enter on a different edge of a 4 foot square table.  In the centre was an objective.

If any player started their turn as the only force in contact with the objective then they would win the match.  Obviously, this means they would have had to move that unit into position on their previous turn, thus allowing all the other players a chance to respond!  We limited this automatic win to turn 3 or after, to prevent any cavalry-heavy force from dashing in before all the infantry warbands had marched any great distance.

The Game

The Saxons, Crusaders and Skraelings all advanced early on, whilst the Normans spent their time building up abilities and shooting long range volleys of archery.


Fighting started between the Saxons and the Crusaders.  Whilst this was distracting them, the Skraeling "beaver totem" warriors raced through the woods and hurled javelins into one group of Crusader reinforcements.


Then the Normans joined in.  A savage charge of knights almost destroyed one unit of Saxon hearthguard.


After a couple of turns, the Crusaders and Saxons had taken heavy losses (though oddly enough, the Saxons hadn't lost a unit - instead all of their units were reduced to just one or two figures)


This left the Normans free to attempt the objective.  Initial attempts by the Skraeling "beavers" to dislodge them were repulsed bloodily.


...but the other unit of Skraeling warriors (the "pumas") wiped out the nearest Norman knights and sent their warlord recoiling, thoroughly exhausted.


Now we came to an interesting issue that I hadn't forseen when I set up the scenario: the Warlord's Pride rule.  Put simply, a warlord must attack another warlord if able.  In this case, the Crusader general saw the Saxon chief and went for him, ignoring the possibly more significant targets who were actually on the objective.  The heavily-boosted Crusader overpowered his foe, but was considerably tired from the fight.


The Norman commander then saw the Skraeling chief and somehow mustered up enough energy to attack him (I think he used a battle board ability to throw off a fatigue and charge all in one go).  Both captains went down in a mutual knockout.


This left the Crusaders as the only faction with a leader.  He charged the Skraeling pumas - but because of his earlier fatigue the battle was a close one.  Once more, both sides fought to mutual destruction.


By this time there were very few warriors left, although some levy archers hung about the outer fringes.  The one remaining Skraeling beaver made it to the objective.  The last Saxon (a hearthguard) couldn't quite reach it.  That left the advancing Crusader crossbowmen as the only force which might dislodge the Skraelings.  They shot at him, scoring 3 hits.  2 of these were cancelled by the agility ability, leaving one hit to save on a 4, 5 or 6 - for the game.  The Skraeling made the saving roll and victory was theirs!

Conclusion

Well, that was bloody!  The Skraelings, Normans and Crusaders still had all of their archers or crossbows left, but virtually all the other figures had been removed.  Indeed, the Saxon band was reduced to a single model.  It makes me wonder, with all the leaders out of action, if any of the rank-and-file understood why they were fighting over a big rock in the middle of the board!

After round 3 the standings of the HAHA escalation league are this:

January 2020
Starter for ten
February 2020
Powers of two
March 2020
October 2021
Long live the peasants!
April 2020
November 2021
Bonus round
May 2020
December 2021
Armageddon
TOTAL
Byzantines11(damaged)2
Anglo Saxons3317
Normans1214
Jomsvikings12(retired)3
Anglo Danes3(absent)(retired)3
Skraelings1236
Crusaders2215


Monday, 2 March 2020

HAHA SAGA Escalation League - 2

<--  Part 1 is here, if you wish to start at the beginning

Introduction

So, this is Part 2 of our games club's SAGA Escalation League.  A group of us from HAHA (Helensburgh Alternative Hobby Association) are collecting new SAGA armies to a monthly timetable.  February's challenge was to expand the warlord and 1 point that we had produced in January by bringing a second point of troops.  Heady stuff!

6 of us met on the club's regular Thursday evening.  This was somewhat awkward, since I had planned (without thinking about it very hard) that in session 2 we would fight 2 vs 2 battles.  Of course, that only works if you have 4 or 8 players, or indeed any other multiple of four.

Instead, we decided to play 3 vs 3, with each side having 3 warlords and their respective 2-point entourages.  This makes for a fairly quick battle, so we managed to fit in 2 such games over the course of the evening.

Game 1

In the first game, both sides looked fairly evenly distributed across their base lines.

However, the Crusaders made a beeline for the Saxons...

...whilst the Jomsvikings and Skraelings defended the rest of the table against an aggressive, but somewhat disjointed attack from the combined Norman and Byzantine horsemen.

The isolated Saxons and Crusaders fought each other to an exhausted stalemate.  Much blood was spilt, but neither of these warlords could finish off his opponent before the end of the game.
Result: a significant (but not crushing) victory for the combined Jomsvikings, Skraelings and Saxons.

Game 2

We randomised the sides again and reset for another game.


This time, the Byzantines and the Saxons left their erstwhile allies and traded places.  Both sides tried to implement some form of strategy - but with too many commanders around, such ideas were short lived!


Instead, the Normans and the Jomsvikings knocked lumps out of each other whilst the Saxons hovered about in the centre, looking menacing but not doing much else.  The Normans had the better of it; their archers shot down the Jomsviking leader in exchange for a few peasants, whilst both sides lost some hearthguard.


Elsewhere, the Crusaders charged forwards at breakneck speed.  Initially this took the allies by surprise, but over time the Byzantines and the Skraelings surrounded their attackers and ground them down.  Eventually, only the Crusader leader was left, surrounded by a ring of his enemies.  He was slain by the Skraeling warlord in the last turn, though not before he had done a lot of damage (question: just how do you scalp someone who is wearing chainmail and a helmet?!)

Result: a narrow victory for the Normans, Saxons and Crusaders.

Conclusion

The sharp-eyed reader will have noticed that the Saxons were on the winning side in both games and therefore score 3 league points.  Equally, the Byzantines were on the losing side twice and only score 1 league point.  Everyone else who was present comes in second place with one win and one loss: 2 league points.

Standings are therefore as follows:
January
Starter for ten
February
Powers of two
March
Long live the peasants!
April
Bonus round
May
Armageddon
TOTAL
Byzantines112
Anglo Saxons336
Normans123
Jomsvikings123
Anglo Danes3(absent)3
Skraelings123
Crusaders224

For March's challenge, each warband must add a 3rd point to its strength - but these must not be hearthguard.  An additional 8 warriors or 12 levy will almost double the size of many of these warbands!

Friday, 31 January 2020

HAHA SAGA Escalation League - 1

Introduction

I don't think I've mentioned this before on my blog, but a group of us are running an escalation league for SAGA at the Helensburgh Alternative Hobby Association (HAHA).

What is this?  Well, it's modelled on the "Tale of four gamers" concept which pops up in White Dwarf magazine every year or two.  At the simplest, a number of people commit to collecting forces for some game system over a fixed time period, playing such games as can be managed at regular intervals.

The full rules for our league can be found here: escalation-league.docx , if anyone is interested.

Starter for Ten

2 games in progress, with various dice, boards and other paraphernalia scattered around the edges 

Since this was the first meeting for our league, each participant brought along a warlord and 1 point of troops for their chosen warband.  Most people chose 4 hearthguard, but a few had 8 warriors as their 1 point's worth of troops.  Interestingly, everyone had selected a different faction, so we didn't have the monotony of 8 Viking warbands 😃.

There were 8 players present for this meeting, which was far more than I had imagined would be interested when the idea of a league was first proposed back in November 2019.  We even had a visitor who had travelled from Fort William (some 2 hours away) especially for the evening.  I hope we were sufficiently good hosts to make this level of dedication worthwhile!

The players were a mixture of veterans like myself and relative newcomers who wish to start playing SAGA.  Most/all of us are collecting a fresh army for the Escalation League, even if a few of us already have quite a lot of figures for other warbands.  After all, one of the main purposes is mutual encouragement!

The "Duel" Scenario

The format of the evening was a series of individual duels.  We created two simple 2x2 foot boards; the rules for the scenario were thus:
  • Each warband will deploy in the centre of one tile, diametrically opposite to their opponent (i.e. slightly more than a standard 'M' foot move from the table centre).
  • The game will last for 3 turns.
  • At the end of the game, any player whose warlord is standing on the board's centre spot will score 2 victory points.
  • Any player who eliminates his opponent's warlord will score 1 victory point (unless he/she is already scoring 2 points for 'centre of table').
...and that's it!  Really simple.

We managed to rattle through quite a few of these short matches over the course of 2 hours or so.  Some of the games were a bit slower where new players weren't as familiar with the rules as the old hands, but everyone played at least one match and most played two or three.

Highlights

Skraelings are massacred by a very skillful (and probably very lost!) Jomsviking warlord.

Saracens take the fight to Normans in what looks to be quite an uneven match

The "to hit" rolls from a boosted charge by Crusader knights.  They needed 5+ to hit and this looks like a dramatic result.  Ironically, the player had activated an ability that required him to re-roll 6s - ouch 😢!

Crusaders trying to toss the Jomsviking chieftain over a cliff and into the sea.  I cannot remember if they succeeded or not.

With all their hearthguards already dead or dying, Anglo Saxon and Anglo Dane warlords kill each other in a final, deadly embrace.

Skraeling (with Moose totem) and Anglo Saxon warlords fight to mutual exhaustion - but the Saxon holds the centre ground

Conclusion

As the primary organiser of this league, I was really not sure how the first evening would work.  I need not have worried: everyone had a great time and the "duel" format worked really well.

It became quite obvious over the course of the evening that some faction's battle boards are better suited to very small forces than others.  At the extreme ends, the Anglo Saxons couldn't use any of their abilities which work for very large units, whilst the Anglo Danes' "Intimidation" effect was particularly potent.

Even though there may have been some minor balance issues, everyone was good-natured and took their wins and losses gracefully.  It probably helped that about half the group (including myself) failed to score a single victory point all night - at least there wasn't one poor soul left alone at the bottom of the scoring!

Part 2 of the escalation league is here -->

Tuesday, 10 April 2018

SAGA: The Red River

Introduction

Last Thursday, my son A. and I went along to the Helensburgh games club (HAHA) again.  I had arranged to play an introductory game of SAGA with another club member.  In the event, my son played the game and I acted as umpire, dispensing advice and rules knowledge with complete impartiality.

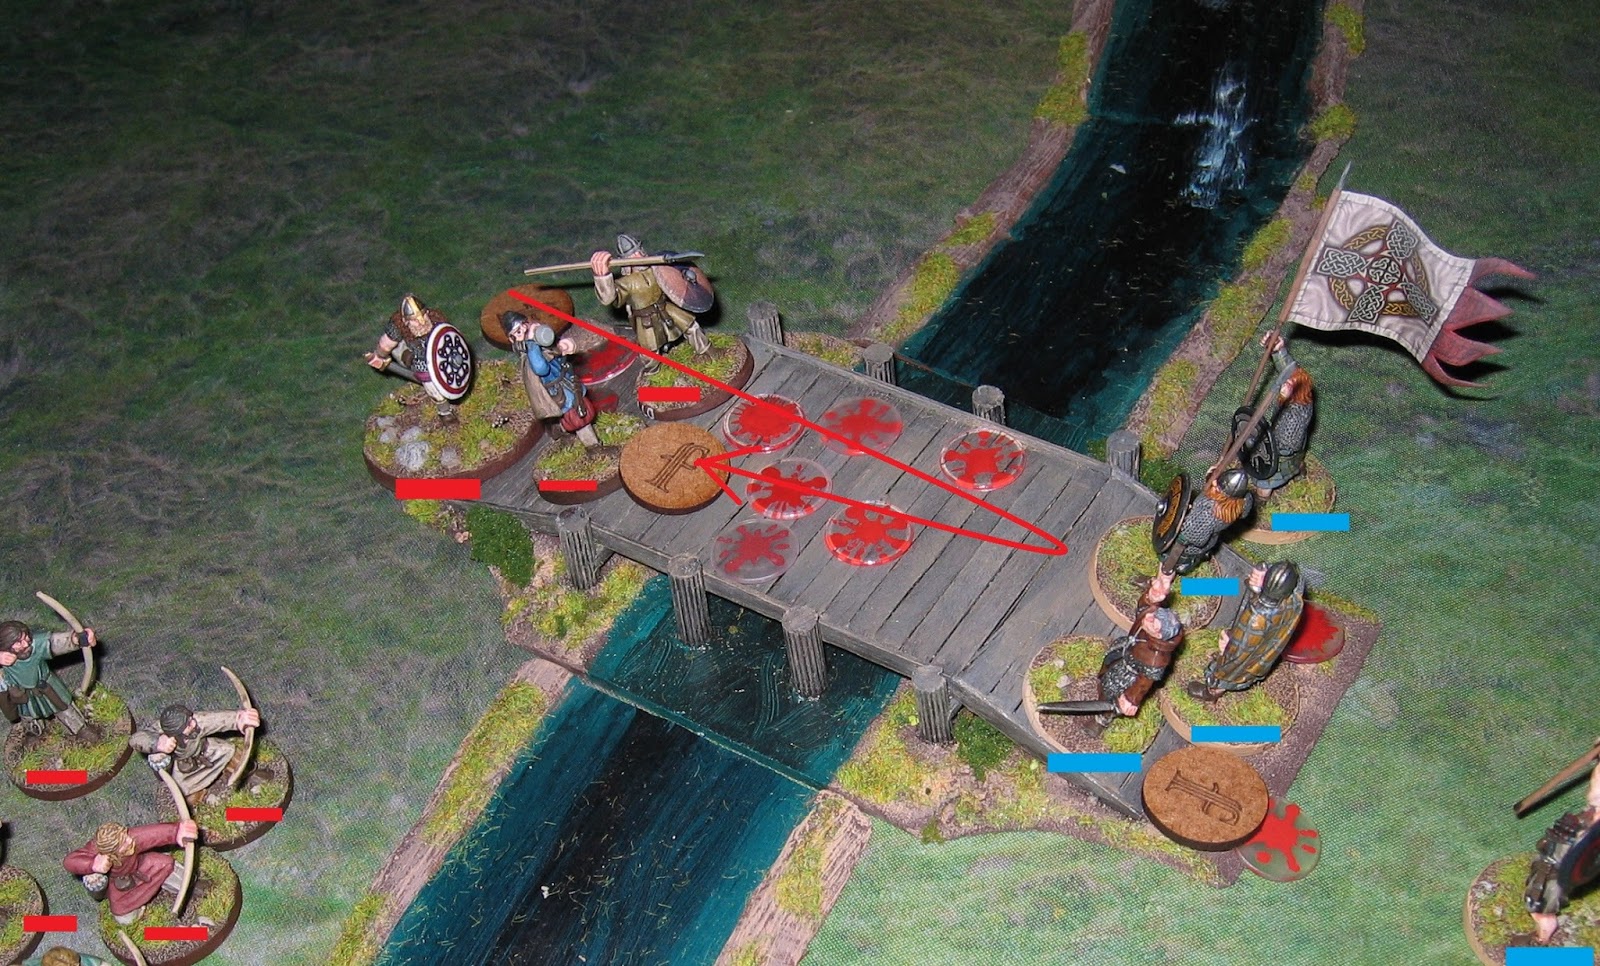
We were still playing SAGA version 1, though this may well be the last such game before I upgrade to v.2 .  I set up "The River" scenario from the original rule book: this has an impassable stream with 2 crossing places.  The winner is whoever has more of his force on the opposite side after 7 turns.  Simple enough!


The Vikings


A. took control of a Viking warband, comprised of the following:

  • 1 x Warlord ("Leif")
  • 1 x 4 berserkers
  • 2 x 4 hearthguard ("hirdmen")
  • 2 x 8 warriors
  • 1 x 12 archers (levy)


The Scots

Sorry for the out-of-focus shot.  I'm not sure what happened here...

Facing the Vikings was a similarly-sized formation of Scots:

  • 1 x Warlord ("Macbheatha")
  • 2 x 6 hearthguard ("thanes")
  • 2 x 8 warriors
  • 1 x 12 angry monks (levy)
Note that we were not playing with any advanced rules for this game, so the Scots banner-waving hearthguard was counted as just a regular hearthguard.  Mind you, A. nominated the banner as a self-proclaimed objective.  I forget his exact words, but the sentiment was very much along the lines of "I'm going to capture that!"


The Game


For the first turn or two, both warlords used pretty much all of their SAGA dice to advance their bands.  At this stage, they were trying to maintain some semblance of order (and didn't want to leave anyone behind!); nothing fancy happened.

Macbheatha stayed in the middle (i.e. between the ford and the bridge) with his angry monks acting as a spiritual reserve (generating an extra SAGA dice by being near to the seat of power!)

Leif encouraged his Vikings to cross the bridge, though he was conspicuously not in the front rank.


First contact occurred soon enough, of course.  Scots thanes had barely set foot in the ford when a bunch of yelling, semi-naked madmen ran at them from the Viking lines.


The berserkers stumbled, though.  Even though they threw a significantly larger number of dice than the defenders, they couldn't penetrate the Scots's armour and only 2 of the thanes fell.  In return, all 4 of the frothing loonies were cut down.  Someone's been eating their haggis this morning!


Losses were mounting as the Scots thanes charged across the river and all but obliterated the Viking warriors who were facing them (a single soul survived).  Then, the Scots thanes were eliminated in turn by some fresh Viking hirdmen just before the Scots spearmen could cross the river to join them.


At the bridge, an initial Viking rush was met by a wall of Scots warriors and repulsed.  The Scots thanes (with banner) then counter-attacked the retreating raiders and slew them.


Another wave of Viking warriors charged forwards, but again the Scots thanes held their ground and sent the attackers reeling with heavy losses.  Mind you, the Scots were not without loss themselves.


Continuing to advance, the Scots thanes finished off the last warriors in front of them.  They were tiring now, but only warlord Leif himself stood in their way (the levy archers don't really count; they were not very useful all through the game).


Leif cut down one thane, then a second and finally a third!  However, the fourth and final thane was just too much for him; the Viking warlord fell and there was nothing left to prevent the Scots from following their banner and streaming over the bridge (again, the levies don't really count as they had all the stopping power of wet tissue paper).


Back at the ford, the Viking hirdmen were forging forwards.  They entered the river and pushed back the Scots spearmen, but it was too little, too late.  Macbheatha shoved past his crowd of holy men and ran towards the norsemen.  Even though both sides were fatigued, the Scots lord had no difficulty in cutting down the two remaining hirdmen.

That left just a solitary Viking warrior (plus their levy archers) on the west bank of the stream.


With a cry of "Valhalla!", this likely lad charged Macbheatha.  There was no realistic chance that he could injure the experienced and armoured warlord, but the audacity of his attack must have caught the Scot unawares.  The Viking's spear thrust bounced off the Scot's shield without any attempt at a return stroke.  Honour satisfied, Sigvald ran off into the dusk.


Conclusion

Although technically we had 2 more turns to play, we decided to halt the game at this point.  It should be fairly obvious to anyone who has followed the story that the Scots had won a significant, if bloody, victory; there was nothing to stop them from advancing the remnants of at least 2 units over each of the ford and the bridge.  The lone Viking warrior would have been cut down easily by a counterattack and although the levy  archers might possibly have inflicted a casualty or two in melee, they didn't generate any SAGA dice and so they they would have been easy prey, unable to activate to move, shoot or rest.

It is true that the Vikings had some poor luck in the first two turns of the game (they didn't roll even one 'rare' face on any SAGA die and their combat rolls were less than stellar).  Neither side made a lot of use of their battle-board's SAGA abilities, which isn't really surprising considering that both players were relative or complete beginners.  Still, as far as I can tell, both players enjoyed the game - and that's the main thing.

As you can see from the casualty markers, the river ran red that day!

Friday, 30 March 2018

Full Thrust: Convoy RX-18

Introduction

There's a new club in town: the Helensburgh Alternative Hobby Association (HAHA).  I'm very excited about this as it opens up the possibility of getting some regular gaming after a number of years without such a group nearby.  With that in mind, I attended the weekly meeting for my first time yesterday and took along Full Thrust; a couple of members had expressed interest in learning how to play.

So, here's a simple scenario for beginners: a Federation convoy is leaving a planetary system when it is pounced upon by Klingon raiders.  The Federation have some warships, but are outclassed by the attackers.  Will any of the merchantmen make it to the far end of the table, where they are deemed to have reached the hyper limit of the solar system and can escape by engaging their warp drives?


Federation Forces


The defenders have the following resources:

  • USS Los Angeles (light cruiser)
  • USS Endeavour (scout cruiser)
  • USS Oryx and USS Antelope (large destroyers)
  • 5 assorted merchant ships, from the tiny Peregrine (free trader) to the huge Pride of the Orient (bulk carrier).
For the warships, the decision is simple: do they stay with the freighters or advance to meet the Klingons?
  • If they take the former path then the attackers might leave the Federation warships untargeted in favour of the merchantmen, thus allowing them to fight back for longer.
  • On the other hand, if they attack the Klingons first then the smaller Federation vessels won't last long, but they might manage to disable or distract one or more of the attackers and thus buy time for the freighters to escape.


Klingon Forces


The Klingons have a very simple fleet:
  • IKS Asgard (heavy cruiser)
  • IKS Ragnarok (heavy cruiser)
  • IKS Valhalla (heavy cruiser)
They have exactly the opposite decision to the Federation.  Should they target the escorts first and remove them as a threat (but risk the convoy escaping in the meantime), or should they attack the freighters first (and perhaps the Federation warships will be able to fight back unopposed)?


The Game


The convoy accelerated as hard as it could (which wasn't much; merchantmen are typically very sluggish!).  Their only real chance was to build up as much speed as they could and race past the raiders in as short a time as possible.  Even so, at least some of them weren't likely to make it...

Initially, the escorts kept station with the freighters, though when a Klingon warship appeared around the gas giant, Endeavour and Oryx peeled off to face it.

The IKS Valhalla fired everything it had at the light scout cruiser; Endeavour was raked from stem to stern and suffered a triple threshold check (for those readers who don't know Full Thrust, that's a very bad thing.  Each internal system only survives on a d6 roll of '1'!).  By the time the sparks had stopped flying, the only things still working on the Federation vessel were Life Support and the Warp Core.  Could be worse...

In return, the Oryx fired a stupendously accurate torpedo which hit the Valhalla square in the engine room.  This, together with damage accumulated from a long range torpedo the previous turn (Oryx again), caused a warp core breach on the Klingon ship.  Her damage control parties raced to contain the damage, but the reactor went super-critical before they could take any action and the heavy cruiser blew up rather spectacularly!


The other two Klingons were not so easily dispatched.  The Ragnarok curved in to a position behind the convoy, destroying the Lunar Conveyor as it passed.  The Asgard, however, manoeuvred perfectly into the very heart of the merchant fleet and began to fire at all the targets around her!


Asgard's left-hand beams did significant damage to the Marie Celeste, though not enough to be fatal.  At least, not ordinarily - for in a strange quirk of fate the freighter lost her Bridge, Life Support and Warp Core all from this one salvo (each requiring a roll of '6' to be damaged).  With the ship in such a bad way, the remaining crew decided to abandon ship.

Asgard also put some serious hurt onto the large freighter Empress of Orion, though this wasn't enough to stop the civilian ship.


At the rear of the convoy, all three of the Federation warships (discounting the crippled Endeavour) converged on either flank of the Ragnarok...


...while at the same time, the Asgard just about kept pace with the fleeing merchantmen (the convoy was travelling rather faster than the cruiser at this point, but the difference wasn't enough to increase the range significantly.  Worryingly for the Klingon, the burning, drifting hulk of the Marie Celeste was still alongside the Asgard; the freighter could blow up at any moment!

In fact, if the Federation got lucky then both the remaining Klingon cruisers might be crippled or destroyed this turn!


Fate works in strange ways.  The Klingons had the initiative and could therefore choose the first ship to fire.  They decided it would be the Ragnarok, as otherwise - surrounded as she was - she might not have a chance later on.

The Ragnarok split her fire between the two Federation destroyers.  At point-blank range, phasers chopped the Oryx apart.  In Full Thrust, a beam weapon that rolls a '6' to hit does damage (typically 2 points) and is then re-rolled.  The player just kept rolling '6's, one after the other, whilst the rest of us watched on, dumbfounded!  By the time the cascade came to an end, the poor Oryx had taken 15 points of damage; she was completely atomised.

Ragnarok then fired her other wing weapons at the Antelope.  Although the second Federation destroyer survived, she was reduced to a smoking wreck which was abandoned a turn or two later.


Asgard was equally lucky, at least from a Klingon point of view.  The Marie Celeste didn't blow up whilst adjacent to the cruiser, but instead drifted far enough away that the shock wave wouldn't be an issue - and then exploded.  Meanwhile, the Asgard had dispatched the Empress of Orion and was knocking chunks out of the large bulk carrier Pride of the Orient.


Bulk carriers are big and the attacker didn't manage to destroy the freighter before it crossed the edge of the table.  However, the Pride of the Orient wasn't in a good way; she had a lot of damage and (especially significant) a warp core breach.  She had a single damage control party (DCP) so the odds of them saving the ship were not great, but we diced it out anyway:
  • First turn (after leaving the table): DCP failed to control the warp core (they needed to roll a '1'), but it didn't explode (which would have happened on a die roll of '5' or '6').
  • Second turn: DCP failed to control the damage, but it didn't explode.
  • Third turn: DCP managed to eject the core and thus save the ship.  Or at least, what was left of it.  At least they had functioning life support...


There were now just two Klingon heavy cruisers on the table (although the Ragnarok had accumulated quite a lot of damage over the course of the game and now had a lot of weapons knocked out) and only one Federation light cruiser.  That's discounting the crippled Endeavour, which was creeping away quietly on the other side of the planet.

We were playing with my Full Thrust Event Cards, though not much use had been made of them up till this point.  The Federation player belatedly tried a Confused Orders card on the Klingons; if the two big cruisers could be prevented from ganging up on the Los Angeles then she might just have a chance of taking out the more damaged Ragnarok.  It wasn't to be though; the enemy helmsman wasn't fooled for a moment.

In the dying moments of the game, the plucky Los Angeles came face to face with the almost untouched IKS Asgard at very close range.  This time, the Federation had the initiative; Los Angeles' strike was lucky enough to disable most of Asgard's weapons.  She survived the return fire from the enraged pair of Klingon vessels and fled into hyperspace (though not before taking a non-critical hit: her supplies locker was destroyed, flooding decks 2 and 3 with ankle-deep grey paint).


Conclusion

As expected, this was a bloodbath!  The convoy is basically there so that players can get the hang of the Full Thrust orders and movement system - which the Klingon commander seemed to do extremely efficiently.  It certainly helped that my Klingon cruiser designs are very maneuverable and have good, all-round firepower.  Once the Asgard was within the convoy and unopposed, she could just sit there and shoot in all directions.

Oddly, there seemed to be a lot of "extreme" dice rolls.  The Klingon player in particular was afflicted by this; sometimes a full cruiser salvo would produce virtually no hits and sometimes a penetrating hit would explode into a massive cascade.  Still, the Federation had their piece of luck as well: the destroyer Oryx taking out a heavy cruiser (Valhalla) with 2 turns of torpedo and beam damage was stupendous!

Klingon Status:

  • IKS Valhalla: DESTROYED
  • IKS Asgard: Damaged
  • IKS Ragnarok: Heavily damaged

Federation Status

  • USS Los Angeles: Damaged
  • USS Endeavour: Heavily damaged
  • USS Antelope: DESTROYED
  • USS Oryx: DESTROYED
  •  Pride of the Orient: Heavily damaged
  • Lunar ConveyorDESTROYED
  • Marie CelesteDESTROYED
  • Empress of OrionDESTROYED
  • PeregrineDESTROYED
We didn't really quantify any victory conditions.  It was stated that "some" of the freighters had to escape, but not how many, or indeed if different levels of victory would apply for different numbers of craft saved.  Both the warship commanders (and me, as umpire & convoy captain) enjoyed the game, so who won?  Does it even matter?  What do you think?