Friday, 18 January 2013

Full Thrust Event Cards: initial version

Introduction

A number of the games I play (or intend to play!) use random events to add interest and narrative drive.
In the case of All Things Zombie (ATZ), the base rules have some random events, but I wanted more!  As many readers will know, I created my own deck of ATZ event cards and these seem to have been well received by the zombie gaming community (people who play zombies games, not zombies who play games!).
I'm in the middle of designing and testing a similar set of event cards for Full Thrust, especially with a Star Trek flavour to them.  Although this is still work-in-progress, it's time to share the early version with the world!  Here are some playtest games in which these event cards have appeared:

Full Thrust Random Events


Unlike some other games, Full Thrust has no mechanism for random events built into the rules.  So as well as coming up with a set of events and their effects, I also needed to devise a mechanism for them to enter play.  I chose to copy the model from the Doctor Who Miniatures Game (DWMG).  In that game, each side is dealt a hand of 3 cards at the start of the game.  The holder may play a card at any time, but with only 3 cards (and no way of replenishing them), it is important to pick an appropriate moment.
For my playtests of Full Thrust event cards, I've added the stipulation that a force may not play more than 1 card per turn.
Note that I've been very careful to state that the hand of 3 cards is held by a side (aka a force), rather than by a player.  In a big game it would probably introduce too much chaos for each individual player to have their own cards.  You could either give all 3 cards to the admiral in charge of that side or perhaps distribute 3 cards randomly between the players on a single side (but remember: only 1 card may be played from that force per turn!).

Design Notes

There are 2 parts to each card in a good deck:

1. The Physical Appearance

I haven't spent a lot of time or effort on the appearance of this set of events yet.  In the fullness of time, I hope to come up with some attractive graphical elements that will really make these cards shine.  That might include borders, pictures and/or quotations; all of these were used in my ATZ cards:
For now, the playtest cards will have to remain fairly plain.

2. The Content

The events I've chosen so far are partly inspired by real-life naval warfare and partly by memorable scenes or common tropes from a variety of science fiction space battles.  For the most part, the cards are targeted at Star Trek (all versions), though it would be just as easy to make a set of random events that were derived from Star Wars, Babylon-5, Battlestar Galactica or whatever other universe takes your fancy.
The events are not intended to be automatically game-winning, but rather small, flavourful occurrences that add to the narrative.  Of course, even a small event can have dramatic consequences when it occurs at just the right time!

Where Can I Get Them?

If I've done this correctly, then the draft set of 32 cards can be downloaded ==> here <==This is a PowerPoint file with 8 cards per sheet.  I've not produced any back for the deck, so for now you just print off the 4 sheets (onto thin card?) and then cut them into separate cards.


What Happens Next?

Eventually, I hope to expand the number of cards to 54.  I'll also improve the appearance so that the events are prettier to look at (yes, I believe this does matter!).  Putting these goals together will enable me to upload the finished designs to Artscow.com or a similar print-on-demand service.  I'll then be able to have a professionally-made deck of Full Thrust event cards.
Of course, when/if I achieve the above, I fully intend to share the result so that anyone else who is interested can print a copy of the deck, or can use the design for anything (non-commercial) that they wish.

In the meantime, I would really appreciate any input from interested gamers.  I need both constructive criticism of the events that I've devised so far, but I also need ideas for the other 22 cards which would be needed to bring the deck up to strength.  If you wish to participate in this then I'll look forward to hearing from you (though I retain ultimate editorial control, of course)!

Update: the finished deck of cards is described here: http://colgar6.blogspot.co.uk/2013/05/full-thrust-event-cards-final-version.htmlThis supercedes the draft version presented in this article.

Wednesday, 16 January 2013

Full Thrust: It's Life, But Not As We Know It!

Introduction

2 off-world trade missions were visiting the rich, independent planet of Gomeisa Prime.  Both Federation and Ferengi negotiators were vying for favourable terms and exclusive contracts with the natives.
Although suspicious of each other, neither side was prepared to open hostilities.  Mainly this was because the Gomeisan Maharajah had made it clear that his people wouldn't trade with anyone who started a war in their system.
All this became moot when a large, spacefaring creature was detected approaching the planet.  The monster, tentatively identified as the "Kraken", would surely wreak havok on the planet and its inhabitants.  At least, that's what the Gomeisans claimed when they pointed out that no treaties could be signed until the intruder was driven off.
The ships of both trade missions together would probably have the combined firepower to defeat the Kraken.  However, each knew that the fleet which took less damage would be in a better negotiating position thereafter.  Could they work with each other to save the planet?  Read on...

This game would act as a further test of my Full Thrust event cards, as mentioned before here and here.  Each side would be dealt 3 cards at random; these could be held and played as desired (though any one side could not play more than 1 event in a single turn).

The Kraken

The Kraken is a large, space-faring life form.  It does indeed intend to eat the planet, or at least to suck off some of the atmosphere or something like that.  Or perhaps to lay eggs - who knows?
Whatever it did would cause harm to millions of the local inhabitants, though the Kraken either doesn't know or doesn't care.  It's not inherently aggressive, though; it will ignore spaceships unless they attack it (though the Ferengi and Federation commanders don't know this).

In Full Thrust terms the Kraken has been designed as a Phalon battleship, albeit a very large one.  Since my playing group doesn't normally play with 'xeno' technology, this should give them a bit of a surprise!
Its most notable features are the huge, level-6 plasma bolt launcher at the front and the very thick, 4-row shell armour.  For such a large 'ship', it's surprisingly nimble with a thrust rating of 4.  Oh, it also has a couple of smaller plasma bolt launchers facing side and rear.  Yes, this creature really can shoot flames out of its arse!
I'll be in command of the Kraken myself, as well as acting as gamesmaster.

The Federation

The Federation fleet consists of the following:
  • USS Danube.  Heavy cruiser
  • USS Los Angeles.  Light Cruiser
  • USS Antelope and USS Ibex.  Large destroyers.

The Ferengi

The Ferengi trade delegation has:
  • Krayton.  Heavy cruiser
  • Letek.  Light cruiser
  • Bractor.  Destroyer
  • Gosbok and Taarbok.  Corvettes

The Game

The Kraken approached the planet at a leisurely speed of 8, passing between a couple of small patches of asteroids.  Initially, both the Ferengi and Federation fleets barely moved; it looked as each was waiting for some sign of commitment from the other.


After a couple of turns, the captain of the Danube tried a long range shot at the monster despite the explicit orders of the Federation admiral to hold his fire.  This immediately brought about some retaliation from the Kraken: it launched a large plasma bolt ahead of the Danube.  Both the Danube and the Los Angeles took significant damage from the blast, but due to the extremely low speed of the Federation ships the bolt missed the destroyers completely.

The Ferengi fleet had approached a bit faster, though without shooting.  They now opened fire half-heartedly and even managed to scratch the Kraken's shell.  At the same time, their admiral took the opportunity to play a Plasma Fire event on the creature.  This could have done some damage, had it burnt out of control.  However, the Kraken's equivalent of damage control parties (antibodies? white blood cells?!) put the fire out immediately.  All it felt was a little indigestion.

The enraged Kraken turned on the Ferengi just as they attempted to veer off.  First, it launched a lesser plasma bolt right into the middle of the cluster of yellow ships.  This was reduced from strength-3 to strength-1 by defensive fire, though both corvettes were badly damaged by even the small shockwave.  Pulsar fire from the Kraken wasn't particularly effective, so it was just as well for the creature that most of the Ferengi ships couldn't retaliate: their largest batteries were of forward facing weapons.

To add insult to injury, the Ferengi then played another event card.  This time it was Tribbles, thus infecting the Kraken with a particularly obnoxious space parasite.  Again, the creature's internal damage control systems took care of this menace before anything bad happened to it.

Before the Kraken could take any other action, the Federation player announced a further event card.  This was getting annoying!  How come the opposition had all the cool cards, when all I had was a useless Atmospheric ionisation?!  The Federation's Static Warp Bubble event froze the Kraken in a separate plane of reality for a turn (though on re-reading the card now, I realise we played it incorrectly.  It should have affected a random ship on any side, not just the enemy of the card's owner.  Oh, well).

When it returned to reality, the Kraken found that the Ferengi ships had all moved away.  On the other hand, the Federation fleet was now much closer and the monster had reloaded its prow launcher.  It fired a huge plasma bolt at the annoying white ships...

...with devastating results!

Reinforcements

Many players had lost their ships by now, either destroyed outright or crippled and out of the fight.  Consequently, as gamesmaster, I allowed some reinforcements to enter play.  For the Federation, the light cruisers USS Phoebe and USS Callisto came streaking in from the right.  On the left, the Ferengi battleship Hoex approached more sedately.

Just as the Kraken was about to turn back towards the planet to do whatever it needed to do, the Ferengi played their last event card.  Romulan Ale is intoxicating enough to affect even the largest life form, though how the Ferengi managed to make the monster partake is unknown to me!  Perhaps they beamed a fine mist of the drink into the path of the creature?  Anyway, the result was to force the woozy Kraken to repeat its previous movement orders - a hard turn to the right!

The drunken turn took the Kraken in exactly the wrong direction and left it face-to-face with the Phoebe.  Despite being severely outclassed, the brave Federation light cruiser landed a punishing volley of phaser fire on the monster, breaking through its shell and causing enough internal damage for a threshold check.
At this point, the befuddled Kraken destroyed a couple of the smaller Ferengi ships that were tailing it (the light cruiser Letek was completely atomised by a massive overkill), but its smaller plasma bolts failed to inflict serious damage on the heavily-shielded Federation cruisers.
Finally, the newly-arrived Ferengi battleship Hoex fired.  Its opening shots also delivered an improbably large amount of damage, but more importantly it stunned the Kraken for 5 turns (In Full Thrust terms, another threshold check yielded a command bridge critical hit).  Since the beast was now out of action and also because we'd run out of time, I declared the game over!

Aftermath

With the Kraken drifting away from the planet, stunned and helpless, the inhabitants of Gomeisa Prime were clearly saved, though at a terrible cost.  Both trade missions had lost a number of ships: the final count was as follows:

Federation

  • USS Danube.  Heavy cruiser: moderate damage
  • USS Phoebe.  Light cruiser: no significant damage
  • USS Callisto.  Light cruiser: no significant damage
  • USS Los Angeles.  Light Cruiser: destroyed
  • USS Antelope.  Large destroyer: destroyed
  • USS Ibex.  Large destroyer: destroyed

Ferengi

  • Hoex. Battleship: no significant damage
  • Krayton.  Heavy cruiser: heavy damage
  • Letek.  Light cruiser: destroyed
  • Bractor.  Destroyer: destroyed
  • Gosbok.  Corvette: heavy damage
  • Taarbok.  Corvette: destroyed
At the time of the game, I felt that the Ferengi had come out better.  However, looking at these results I'd say it was pretty even after all.

Many event cards were played in this game.  The Ferengi admiral was particularly lucky to have a full hand of useful events, though the Federation didn't do badly either.  As it turned out, quite a few of these cards didn't have much effect on the game, other than to unsettle the Kraken, that is!  However, one or two had much more significent consequences and these certainly added to the narrative.
On the other hand, the Kraken (i.e. me) didn't have any cards that were useful during this game.  Humph!


Sunday, 13 January 2013

Fat Blokes and Slobs

Introduction

I've promised to play Space Hulk with my younger son this afternoon, so this might be a short post.  Anyway, I had thought of showcasing some of the 28mm modern survivors that I use when playing All Things Zombie (ATZ).  When I started looking through the collection, I quickly decided that there are far too many to describe in a single post, so I had to reign in this idea a bit.

The first subset that came into my mind was unarmed civilians, but a quick count showed that there were too many even of those.  A better subset is fat or unfit civilians; I haven't got a large number of them.  Of course, in a zombie game it many be a bit hopeful to describe all of these characters as survivors!

Unarmed Fat Blokes

From the left, we have:
  • Denis is from Killer B Games and is sold as exactly what I've called him - a slob.  I rather like the miniature though; it does exactly what it says on the tin.  Denis' chance of surviving the zombie apocalypse: 0 out of 5.
  • Larry is a gamer from Victory Force.  He's fairly chunky, though the extra weight seems to be equally spread over chest and abdomen.  I'm not totally convinced by that shape, but I still like this figure, especially with the paint job I did on it.
  • Mr Braxton comes from Foundry and is one of the very few figures in the Street Violence range to be unarmed.  He was originally sold as one of the Mob, though I've repurposed him as a used car salesman in my ATZ campaign (not that he lasted for long!).  This is one of the first 28mm modern figures that I ever painted; it's not the best I've ever done.
  • Mario is also from the Mob.  I think there's something very cartoon-like about this sculpt; I challenge any reader to find a real-life picture of someone with this body shape!  Because of his girth, this miniature is a great deal heavier than all the others.
  • Finally, Bob is the stereotypical lazy British builder (do other countries have the same cliche, I wonder?).  He's having a cup of tea and a ham or bacon sandwich (white bread, of course) and this lack of exertion and poor diet has obviously taken a toll on his physique over the years.  I hesitated slightly when describing Bob as "unarmed" as he does have a hammer hanging from his belt.

Armed Fat Blokes

 Again, from the left:
  • Ernie is from Hasslefree and is clearly based on the character of Ed from the film Shaun of the Dead.  He's a very nicely-sculpted miniature, as I would expect from this manufacturer and is equipped with a golf club as an improvised weapon.  However, Ernie is playing with his mobile phone rather than paying attention to his environment, so I don't rate his chances in a zombie apocalypse at better than 2 out of 5.
  • Curly is one of the EM-4 plastic gangers with a metal "heavy weapons" torso/head upgrade, but carrying a standard plastic auto-shotgun.  He certainly looks flabby - his belly is hanging over his belt - but there's something not quite right about the figure as I've constructed it.  Perhaps he's pretending to ride a horse?
  • Porkchop also comes from EM-4, but he belongs to the metal Bikers range.  This miniature will probably be quite familiar to many of my readers who follow other zombie gaming blogs, though not in these colours!
  • Damage is also a biker from EM-4.  I think he probably counts as fat, though he's obviously got a lot of muscle as well.  He's very heavily armed: as well as his assault rifle he has a holstered pistol, a knife and a grenade.  Chance of survival in a zombie apocalypse?  Hmm - perhaps 3 out of 5.  I'd make this higher (he's obviously used to violence), but I suspect that Damage will lose it when he can't find any more beer...

Conclusion

One thing that seems painfully obvious to me on examining the images above is that sculptors of 28mm figures aren't all equally capable of creating plausible shapes for fatties (or for women either, but let's not go there right now!)  Although I'll be happy enough to use all of these models in a game, most of them just don't look quite right.  There are some exceptions, of course!

Wednesday, 9 January 2013

ATZ-FFO Campaign, Game 8: Breakdown!

The Story So Far

In game 6 of my ATZ campaign, the small community of survivors who were living at the Golden Hills retirement complex were scattered and separated.  One elderly couple (Albert and Gertrude) was accidentally left behind, while Bomber fled to the east.  His search for some friends who were out foraging at the time of the zombie attack on Golden Hills was played out in game 7.

Meanwhile, the remainder of the group escaped aboard a convoy of trucks manned by a squad of National Guard, traveling to a resettlement camp at an undisclosed location.  This is their story.

Who's Who

Survivors

  • John: REP 6 survivalist, pistol, camera.  Followed around by Laddie, REP 2 Shetland collie.
  • Darcy and Lizzie: REP 5 married survivalists, each with a pistol.
  • Abe: REP 3 elderly citizen.  He drives a mobility scooter and has a hunting rifle.
  • Edna, the crazy cat lady: REP 2 elderly citizen.  Always surrounded by cats.

National Guard

  • Lieutenant Costner: REP 5 military, BA pistol.
  • Corporal Van Damme: REP 4 military, assault rifle
  • Connery: REP 4 military, assault rifle (drives the GPV)
  • Dalton: REP 3 military, assault rifle (drives the first truck)
  • Eastwood: REP 3 military, assault rifle (drives the second truck)

Setup

The small convoy was driving along a wide road through the suburbs when Dalton in the middle vehicle signaled a halt.  Lieutenant Costner and Corporal Van Damme walked over to see what had happened.    Dalton spoke: "Flat tyre, sir".
"Nuts.  OK, it seems quiet enough here - we'll change it now.  Get to work, soldier!" the officer replied.
"Lieutenant, my dog needs some exercise" called John from where he was sitting in the back of the truck.
"All right.  Anyone who needs to stretch can dismount for a few minutes, but don't go out of sight!"

The Opposition

As the survivors walked about and the soldiers started to work on the broken-down truck, an angry mob appeared further down the road.

Lieutenant Costner and trooper Connery moved forward to find out what the newcomers wanted.  They were making a lot of noise and it was difficult to hear clearly, but it appeared that they wanted the military to hand over their weapons so the civilians could defend their own homes against zombies.  This wasn't going to happen!

In the side streets, there were stirrings and movements as the first few zombies started to appear.  The guardsmen and the mob were too intent on their confrontation to notice, though some of the survivors were becoming very uneasy.

Costner shouted to the crowd to disperse, but they kept on coming.  Both soldiers on the front line were hit by thrown rocks and bottles, though neither was seriously injured.  In desperation, Connery fired a warning shot over the heads of the rioters.

The mob immediately broke ranks and charged.  Lieutenant Costner squeezed off a single pistol shot as the thugs approached, but his bullet went wide (perhaps it was also intended as a warning).  Connery reacted by instinct, mowing down 3 of the protestors with his assault rifle.  Any hope of a peaceful settlement was now gone (to be fair, a REP 4 angry mob with 3 agitators was always likely to make a swift frontal attack, if I've understood the ATZ:Haven rules for mobs correctly)!

The fighting quickly became widespread, as Dalton and Eastwood rushed in to help their 2 colleagues.  Eastwood was swiftly knocked out by a lout who thrust a scaffolding pole into his face, but the other soldiers just about managed to hold the line.

From the side, John the photographer started taking pictures of the shambles.  His powerful camera flash temporarily blinded a number of rioters who were looking in his direction, thus preventing them from outflanking the soldiers.

At the same time, a pair of zombies clawed at the mob from behind, but without doing any damage.

Elsewhere...

Other than John, the survivors had kept their distance from the large melee in the middle of the road.  Darcy was caught by surprise by a lone zombie who came round the corner of the games store.  He wrestled with it for several turns before finally putting it down.

Abe had parked his mobility chair on the central reservation.  From there, he took potshots at the occasional zombie coming from the rear.  He even managed to hit one (a first for Abe!) but although it fell to the ground, the creature just stood back up again and continued its slow approach.

At this point, we drew the first random event of the game.  This indicated that the middle truck had suffered another puncture.  Maybe this was caused by a stray bullet, or perhaps it had been fitted with some sub-standard equipment at the depot by a dodgy quartermaster.  Whatever the cause, it now had 2 flats; this vehicle wasn't going anywhere for a while!

Lizzie had noticed 2 zombies finally make it into contact with Abe.  The old man seemed to be holding his own; he knocked down his first attacker.  However, Lizzie could see the second creature about to bite him.  She fired a single shot at it; her bullet narrowly missed the zombie but hit Abe instead.  Lizzie was horrified to see the pensioner fall from his scooter and slump to the ground.  Before she could do anything else, the 2 zombies ripped the man's belly open and started to devour him!

Weapons Free

What of the 5th soldier, corporal Van Damme?  Rather than getting involved in the brawl, he had climbed into the GPV and unlocked the roof-mounted M240 MMG.  He now swung the weapon round and opened fire into the mob.  At this range it was almost impossible to miss the closely-packed civilians and many were slain.

Within a short time, the crossroads was turned into a scene of carnage as Van Damme hosed the mob with machine gun fire.  Even as Lieutenant Costner and trooper Connery were knocked out of the fight, the few remaining rioters broke and fled.  The last pair stopped long enough to take the pistol, helmet and radio from the unconscious Lieutenant Costner before they also ran off.

The Approaching Storm

More and more zombies were approaching in the middle distance, attracted by the commotion.  At this point, a flurry of random events occurred.  The players used the Distraction event to move Edna to safety, away from one such creature.  However, Thousands of Them didn't bode well at all!  Fortunately, a Pause for Reflection gave the remaining humans a little breathing space.

Dalton and John each grabbed the nearest unconscious soldier (Eastwood and Connery) and dragged them over to the GPV.  The party had just enough time to jam everyone into a very crowded vehicle and drive off before the zombie hordes caught up with them.

None of the characters were eligible for a REP increase after this game.  Although most of them had defeated an opponent, the party's victory conditions had not been met.  The mob wasn't dispersed peacefully, looters did manage to get hold of military equipment and 2 characters were lost (Abe was already dead and Lieutenant Costner was left for dead).  However, it was bonanza time for the zombies; the crossroads was littered with unconscious and dying rioters!

Saturday, 29 December 2012

The Workbench, December 2012

Introduction

It's been a little while since I posted.  In part that is because I've been taking a break over the Christmas period (and it's amazing how much time is sucked up in entertaining the children, cooking, shopping and other such activities at this time of year).  Secondly, I've got a bit of a cold right now and am feeling quite tired and lethargic.  So today's post is going to be something very simple.

The Workbench

Back in July, I showed the world what was on my workbench at the time (here).  Since then, many items have been finished and stored, while many new models have been started.  Here's what it looks like now:
Hmm.  Some things are exactly the same, though I think I'll leave it up to you to work out what, if you care to.  I suppose we could think of this as a real-life "spot the difference" puzzle, but without any prizes!

So, what am I working on currently?

HotT Barbarians

Black Tree Design are having a big sale at the moment, so just before Christmas I ordered a 28mm barbarian army deal and separate leader at 50% off.  Of course, the miniatures were promptly taken off me by my family, who wrapped and tagged them and handed them back on Christmas day.  Thanks, it's a horde of hairy, smelly, uncouth model warriors!  Just what I wanted :-) !

These figures will be made into a warband-heavy force for Hordes of the Things.  So far I've managed to base the hero general (front left), cleric (front right, still needing a sacrificial altar, rune stone or similar) and a number of warband elements (behind).  Yet to come are a couple of bases of shooters and possibly a horde or two of young hopefuls. Sadly I've run out of pre-cut 60mm x 30mm bases and will therefore have to order or make some more before I can proceed.

West Wind Motorcycle Gang

Few manufacturers make 28mm models of bikers actually on their motorcycles - but West Wind Productions do!  These models are a real b*gger to put together, so I've only managed to assemble 4 so far despite having the set (of 10) for some months now.  Still, I think they'll look good when they are finished.

Zombies, Survivor, Scots

At the front are a couple of zombies and a survivor that are near completion.  The zed with the surfboard and the bald guy with the axe are from Hasslefree, while the zombie in the middle is another Blue Moon figure.

Behind them are 8 of the warriors from my Saga Scots warband.  I've mentioned before how hard I'm finding it to get these guys painted.  Well, I've finished the 8 hearthguard and so only have 16 warriors to go.  At least these lesser troops shouldn't be as ornate as the nobility; they ought to be quicker to finish!

Egyptian Skeletons

For Pulp games involving a bit of tomb raiding, what better adversaries could there be other than reanimated ancient warriors (especially if I throw in some Nazis as well)?  Here are 4 Egyptian warriors to back up the Mummy.  They are built from Games Workshop's Khemri skeletons, though I didn't like the oversized weapons in the GW kit.  Instead, I've replaced them with some oversized weapons from Crocodile Games "Warlords of Aegyptus" range.  At least they're not covered with skulls...


Barrel Zombie

Here's something I'm making just because I had the parts; I'm not sure how I'd use it in a game.  The zombie crawler is coming out of the tipped barrel, which will also be releasing a stream of goo of some kind when the model is finished.


The Back of the Bench

Anything that ends up on the board at the back of my work area is only semi-active.  It could be moved from there, part complete, into storage (this has happened to a very large number of models of mine).  Or it might be brought forward and get further attention.  The decision usually occurs on the rare occasions that I tidy up.

Anyway, here you can see a variety of cowboys, spaceships, medieval townsfolk and zombies.  And Tarzan.  And the A-Team (or at least, 2 members of it).

Finally

Last, but not least, is a part-built paper/card shuttle from Genet Models [ex-Ebbles Models].  The body is complete, but the undercarriage or landing skids are not attached.  Despite being described as 1:60 scale, this is a huge model in comparison with any ground vehicles in my collection.  Perhaps that's reasonable, but I'm debating whether to finish this one or to print another at a reduced size and build that instead.

So there we are - another collection of part-finished toys.  I really need to get some of these completed, if only to recover some table space (as if that's ever going to happen!).

Thursday, 20 December 2012

HOTT: It Was The Week Before Christmas...

Introduction

Just before midwinter, the Knights of Lyonesse received an appeal for help from a reclusive toymaker who lived in the northern wastes, near the edge of the world.  It seemed that a large band of goblins was marching towards his settlement and threatening to pillage it.  The Grand Duke of Lyonesse felt morally obliged to help; in part this was because the Knights are sworn to protect the weak and helpless, but also he felt a certain amount of guilt because his forces had displaced the goblins from their usual haunts and set them on their path into the wilderness (see here for that story).

On reaching the toymaker's workshop, the knights were entertained royally, with a feast of roast poultry and root vegetables followed by many steamed puddings and fruit pies.  Served alongside this were copious amounts of mulled wine.  Most of the knights, anticipating the oncoming battle, were restrained in their intake.  However, the heroic Red Knight had a few tankards too many...

Setup

In the morning, the massive goblin army approached from the west.  They had the usual mixture of hordes of foot soldiers, packs of wolves (both ridden and loose) and a scattering of trolls.  The Knights lined up on either flank, while the toymaker's forces were positioned in front of his house.


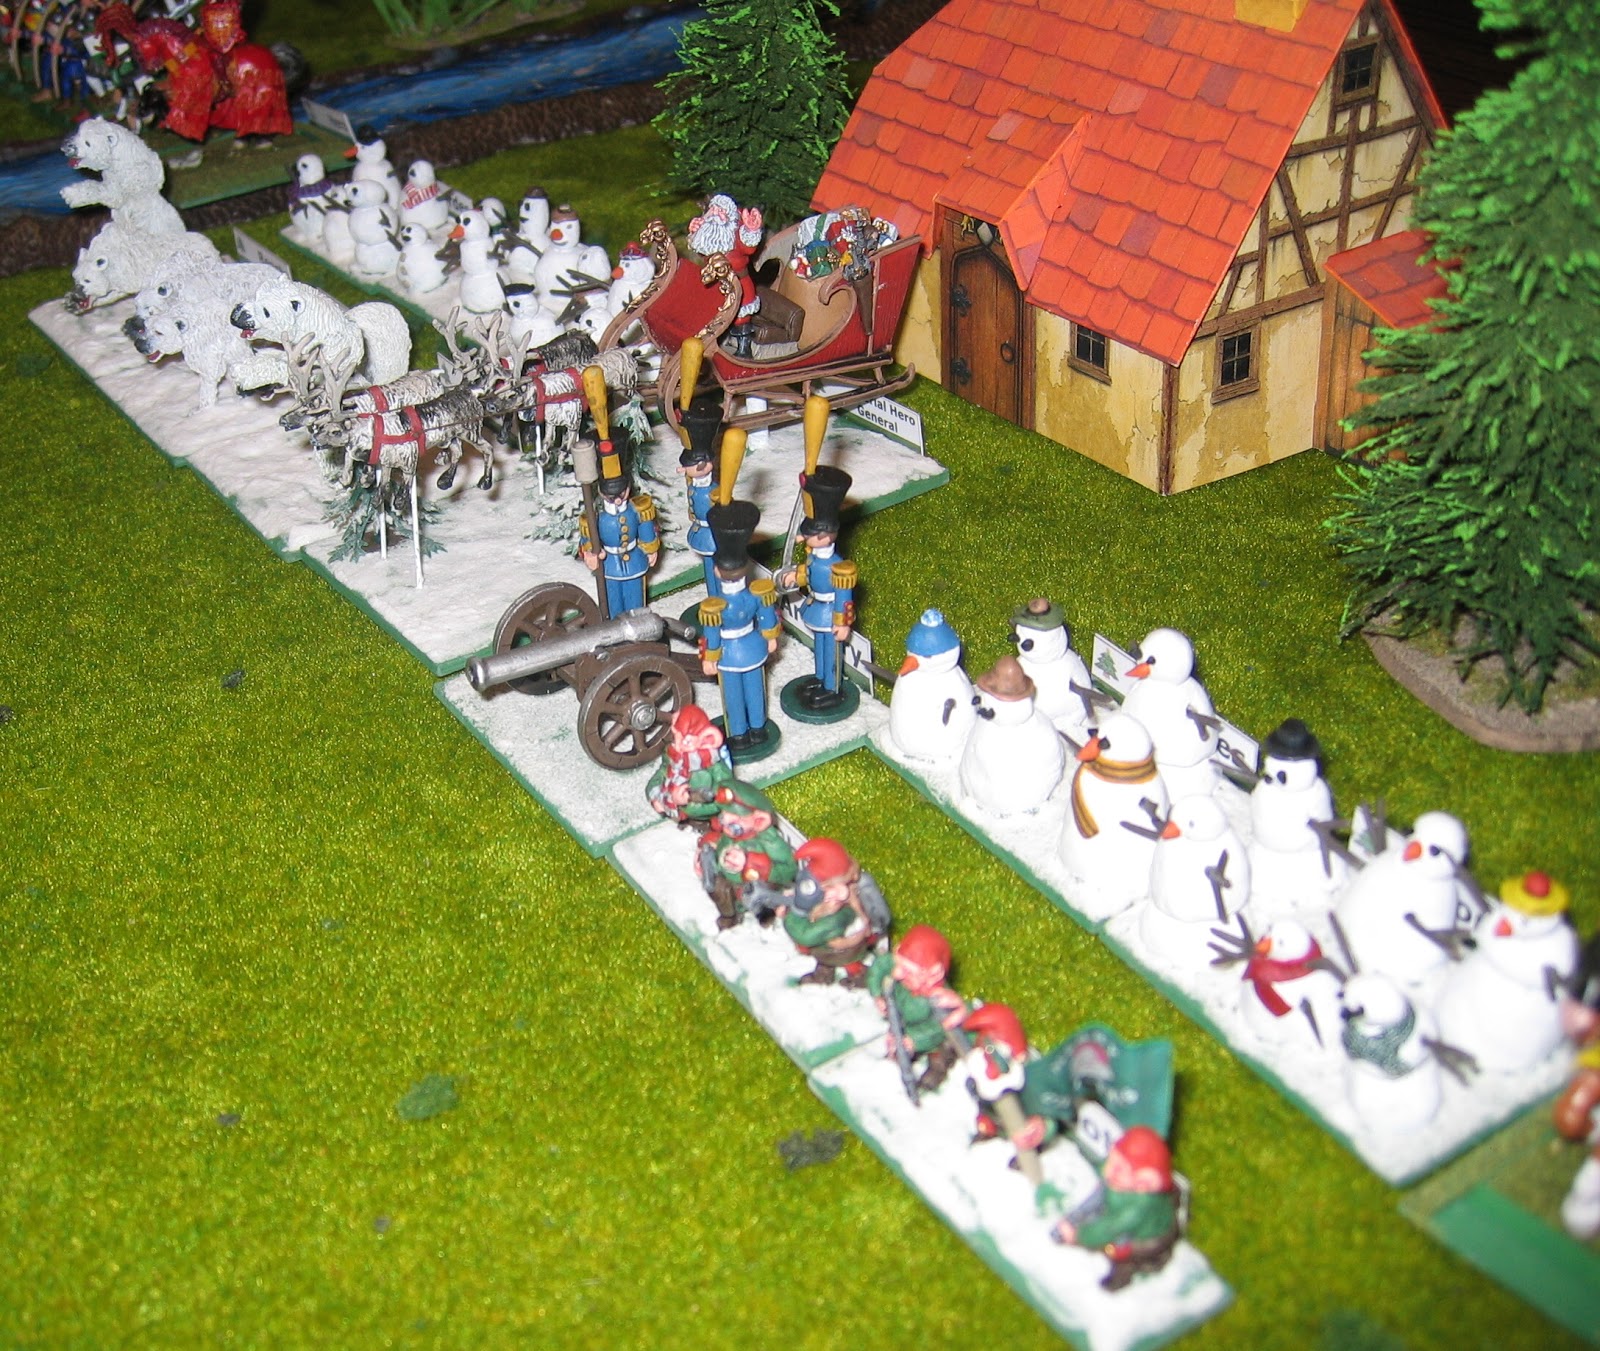
The toymaker had an eclectic mix of local troops to help defend his domains.  He himself went to battle in a large sleigh drawn by flying reindeer.  Some of his elven helpers had been armed with what their boss called "sten guns" and ".303 Lee Enfield rifles", though the Knights understood little of such peculiar devices.  These elves were strange to them, being short, round and jolly; quite unlike the tall, thin, serious types of which they knew. A few of the local ice bears would fight alongside the toymaker and some enchanted wooden soldiers manned a popgun.  Finally, all of these allies had been busy making snowmen, though the knights didn't see how that would help!

The Battle

In the centre and north, the goblin hordes moved forwards steadily.  The knights advanced rapidly across the stream and through the woods, while the ice bears and elves also moved forward.  The Red Knight, his brain addled by too much drink, attached himself to the bears and followed them.

After a hesitant start, the southern lines of wolf riders and knights met in a thunderous charge which left both sides reeling.

At the other end of the field, the knights emerging from the stream and the woods were surprised by the ferocity of the counterattack.  In particular, the wolves caused much difficulty for the horsemen.  To assist them, the toymaker flew his sleigh over the heads of the goblin chief.  However, he didn't dare to land in case he was swamped and surrounded; the goblins just ignored the flying sleigh as they put more pressure on the knights.  No matter how many of them fell, there always seemed to be more goblins coming up from the rear!

Back in the centre, the ice bears were all busy chasing hordes of goblins, in some cases almost back to their starting lines.  The Red Knight was having trouble, however.  He could barely stay on his horse and certainly couldn't defeat even a single horde - which was very poor indeed for such a famous hero!  The popgun made loud noises and occasionally the goblins would step backwards in fright, but then they'd realise that they weren't hurt and so they just kept on coming.

Finally, the toymaker saw his chance.  From high in the air, he saw that the southern block of knights had lost their general and were wavering.  He flew across the battlefield and landed with a rush, careering downhill into (and over) an unfortunate troll.  The behemoth was obliterated instantly by the heavy sleigh (a hero general, attacking downhill, has an impressive combat score in HotT).

This inspired the knightly hero (a distant relative of Roger the Castellan and others who had all perished while wearing the same livery) to attack the closest goblin warlord.  The knight brushed aside the bodyguard and rained blows upon the creature, leaving him broken on the grass and the nearby goblins leaderless and demoralised!

 In the north, the fighting was intense and chaotic.  All semblance of organisation was now gone and troops fought in confused, individual melees.  One unfortunate knight was pushed off the edge of the world by wolves, thus disproving those savants who claim the world is round (as if)!  The knights couldn't sustain the losses they were taking for long; the goblin hordes just kept on coming.

Again, the toymaker flew the length of the battlefield to assist.  He managed to find the goblin's general and attacked, pinning him against a block of unyielding wolves.  With nowhere to go, the goblin leader perished beneath the hooves of the magic reindeer.  Two of the 3 goblin armies were now demoralised, though the northern knights had also had enough!

In the centre, 2 huge trolls advanced on a group of snowmen.  They pulverised one base, but the other snowmen retreated.  The slow behemoths just couldn't finish off the more nimble snowmen, no matter how far they pursued them (and there's a sentence I never thought I'd write!).
Nearby, the Red Knight was still having difficulties against a single goblin horde.  Even with the assistance of some nearby snowmen, the famous hero just couldn't land a single blow on his opponents.

The toymaker was on a roll now!  He took to the skies again and returned to the centre.  In the plains before his house, he spied the last remaining goblin general and swooped to attack.  Such was the ferocity of his assault that he ran straight over the accursed creature, shouting as he did so "HO HO HO!  YOU'VE BEEN A VERY NAUGHTY BOY, HAVEN'T YOU!"

One goblin horde did finally reach the popgun, just before their entire force collapsed and routed.  They were laughing too much to achieve anything against it, though and so this last small fight ended in a stalemate.

Goblin of the Match

Probably the southern goblin general.  He killed the knight general who faced him in single combat and nearly defeated the army facing him.

Man of the Match

Definitely the toymaker.  He intervened in 3 critical fights, defeating a troll in the south and goblin warlords in the north and centre.  All of these were decisive turning points!

The Red Knight gets an award for "most inept model".  As a hero, he was expected to sweep through many hordes without breaking a sweat, but he spent the whole game tussling with the very first one he encountered.  Even with aid, he was unable to defeat it!  The popgun comes a close second; it made a lot of noise but achieved very little.

Finally,

A Merry Christmas to all my Readers!

Thanks to you all; without your support, this blog wouldn't have happened.