Sunday, 13 September 2015

The Big Tidy

Introduction

For about the last 2 months, my hobby workbench has been completely unusable.  The problem has been building up over a long time, but has now grown well past the point where I can paint anything.  It's depressing, but there is no solution for this other than to spend the effort to tidy up.  So, after 2 months without any model-making, I bit the bullet and started a deep clean of the desk and its surroundings.

Before.  Both leaves of the desk are filled with stuff, there's no possibility of sitting at the desk and even if I could, the central paint station is piled high with stuff...

The Big Tidy

I'll not bore you with all the details of my 3-week long cleanup (3 weeks because I didn't have much time to spend on any one day, not because the task itself was so vast).  However, here are the main points:
  • Find more efficient packaging for finished models of unusual shapes & sizes.
  • Sort spare parts into fewer, smaller boxes.
  • Discard fragments of wood/plastic/foamcore that are really too small or tatty to be used.
  • Put away unstarted models or common parts (especially bases) into existing longer-term storage.
  • Collect part-completed models into trays, so that I can tell what's waiting for attention.
  • Clean up the huge amount of dust, metal filings, plastic scraps, dried blobs of paint &c. that had accumulated since my last tidy up!

...After.  It may not look much different, but it really is!  At least I can sit at the desk and get my feet under it now.

Needing Attention...

So, this was something of a shocker.  For the last few years, I've been trying to live by a self-imposed rule: "if you start it then you must finish it".  In other words, no model that has been assembled or undercoated may be put away until it is completed.  It sounds fine in theory...


In the picture above are all the part-finished models that I found on or near my desk.  By gathering them all in one place, I realised just how much this collection had grown out of control.  It's also painfully obvious how much space is taken by the part-made terrain pieces.  In comparison, the set of figures is not too big at all!

So, I really need to stop beating around the bush and just go and finish some of these projects.

Conclusion


Finally, after being out of action for the entire summer, my painting desk is ready to be used again  I'm beginning to feel quite enthusiastic about this!

So, I started to paint a few of the models that were closest to completion, with a view to finishing off all the easiest ones first.  About 1 hour into this task, my desk lamp started to flicker badly; it was as if I was at a disco.  Under these circumstances, I had to stop painting immediately.


One of my model-making lamp's fluorescent tubes (it has 2) had gone bad and would have to be replaced.  Of course, I didn't have a spare and none of the local shops carry such an item.  I'll need to try further afield, perhaps on my commute home from work on Monday.  As a backup plan, I've ordered a spare tube from eBay, though that could take a while to arrive.  So, no painting for at least a day or two more...

Wednesday, 9 September 2015

The Wrong Glue.

A Salutary Tale

Once upon a time, a few years ago when I took up paper model-making, I scoured the Internet for advice on the best glue to use.  I wanted something that would cover well, dry relatively quickly and hold fast.  There were various horror stories about water-based glues that caused shrinking and warping of the models, so I decided to avoid those.

Eventually, the consensus on the net seemed to be that this was the stuff to use:


Note that this is not a common or garden glue stick, as used frequently in primary schools around the world.  Rather, this is a clear, thick, liquid glue pen that promises not to cause any problems with the paper or card being glued: no shrinkage, no ink smudges and no warping.  It's a bit more expensive than many other glues, but it seemed that this was indeed the answer to my prayers.

For a while, I used this glue on all my paper models and it worked well.  The joints were sound, colours never ran and the card was not distorted in any way.  However, after a while, I noticed that my older models weren't quite as perfect as when I built them.


For example, the walls of my hotel started to sag.  The fire escape fell off at one end (and was then torn off the other end by its own weight).  It looked as if the glue had re-liquefied or softened, the parts had moved and then the glue had hardened again.  What was going on?

Many of these models were stored on shelves high up in a back room.  It gets pretty warm up there at times (hot air rises!) but is otherwise quite cool.  Mind you, compared to some parts of the globe, the range of temperatures in my house is probably not that great.   I can only imagine that such limited changes in temperature, perhaps aided by changes in humidity, had caused the glue to flow slightly over a long period.


It's a bit of a puzzle because any time that I've investigated, the (remaining) parts of each affected model have been held very firmly in place at whatever angle they've come to rest.  At no point have I detected any stickiness or softening of the glue!

So, what next?

I gave up using the UHU office pens several years ago, once I started to notice this effect on my first card models.  I'm sure that they are a very fine product for some applications, but they don't suit my needs at all.  Now I use exclusively white glue (PVA, "Elmer's glue") for paper kits.  I use a sculpting tool to spread a very thin layer on one part only; the join is relatively quick and absolutely permanent!

For the older models that suffered such fatigue, I've mostly had to bin them.  The UHU glue has encrusted itself onto parts of the joints, leaving other previously-glued parts almost bare.  It is possible to cut or scrape such hard conglomerations away and re-glue the models with PVA, but it's just not worth the effort in the worst cases.  For the less badly affected kits (mostly vehicles), I have indeed made some such repairs.

At least with paper models, I can always build replacements.  Of course, finding the time to do this might be a problem...

Sunday, 6 September 2015

Waspquito!

Introduction

So, I'm still trying to clean up my desk to make it usable.  It's been about 2 months now since I've done any painting; the workspace has been just too cluttered (and the piles of assorted stuff were just too precarious!)  I'm making inroads into the mess, but oh, it's a slow and weary business.

Waspquitos

As I've been tidying up, I've uncovered some of my models that were in deep storage.  It's not that I've forgotten that these miniatures exist, but rather than I wasn't sure where they were; they're not figures which I use very often.  Anyway, since I've brought them to light in order to repackage them, I thought that you might be interested to see them.

This is a swarm of 6 Waspquitos.  They're obviously a cross between a mosquito and a wasp and as such they presumably have the worst characteristics of both species.  I imagine that they'll make a highly irritating, high-pitched whining, buzzing sound as they approach.  Then they'll suck all the blood from you whilst threatening to sting if you try to stop them.  They might also transmit malaria or some other interesting tropical disease to your now withered husk.  Oh, they'll probably then get stuck in the jam on your sandwich...

The waspquitos are from Heresy Miniatures, though I don't think they appear in the current catalogue.  I bought mine many years ago, intending to use them initially in a Doctor Who scenario ("The Green Death") and later on in any other games where a swarm of giant, mutant flying pests would make sense (?!).

The miniatures themselves are multi-part, metal models.  From memory, they came as a body, 2 sets of legs and 4 wings.  I felt that the metal wings were too thick and heavy; they didn't look good and would have been difficult to fasten securely to the bodies.  I replaced them with some thin, clear plastic sheet that was cut to the same shape.

The colouring of these critters is straightforward and was derived from examining photos of real life mosquitos and wasps.  The torsos, heads and legs are a very dark reddish-brown (not black), whilst the tails are black and yellow.  Rather than just paint simple bands of colour on the tails, I've tried to follow the pattern from a real species of wasp; this looks much more effective to me.

The wings had simple veins draw on on them with a fine black pen.  They've become somewhat frosted after the models were varnished, but I think this improves them, if anything.

These are (to date) the only flying models where I have painted the upright support rather than leaving it transparent.  The lower half of each support is in the same colour as the dirt, whilst the upper half is a sky blue.  I'm not sure how effective this is, though the supports are relatively well hidden by the bugs' legs anyway.

Conclusion

These models would make an excellent opponent for an adventuring party in a post-apocalyptic, mutated world.  They'd also fit right in to a fantasy setting such as Dungeons and Dragons and I could see them being part of a Victorian "Lost World" or Tarzan game.  I just need to get on and do it, right?

Sunday, 30 August 2015

My *other* Imperial Fleet

Introduction

I've been trying to tidy up my work area recently; it's such a mess that I've not been able to do any painting for 6 weeks or more now.  Rather than just push everything loose into yet more piles, I'm attempting a "deep clean", where I reorganise quite a lot of the storage of my finished models as well as deciding how to arrange all the tools, paints, part-finished figures and materials.  Of course, this is going very slowly...

Whilst I was opening some of the tattier cardboard boxes on my shelves to discover what was in them, I came across the following spaceships.  I thought that maybe you'd like to see them too, before they go back into a more suitable box.  They are my Imperial starships, though I'm not really sure to which Empire they belong.

I have a different Full Thrust "Imperial" fleet, based loosely on the bad guys from Star Wars, but I actually had this fleet painted up first and so technically it's my first set of  such ships.  Ah, I guess that I just like huge, star-spanning civilisations with grand, hereditary heads of state!

All of these starships are from Games Workshop's Battlefleet Gothic range.  They come from the Imperial and Space Marine ranges, though I don't necessarily regard my versions as belonging to the Warhammer 40K Universe.

The superdreadnought "Honourable"

 The "Honourable" is a huge ship.  Officially, it's a Space Marine "Battle Barge" (whatever one of those might be!), but I regard it as simply a very large battleship.  She's clearly armed with multiple heavy beams on the prow and with missile launchers or possibly guns on each broadside, plus a significant, turreted array of lighter point defence weapons.

To put a bit of distance between my models and the Warhammer 40K universe, I've painted a Warzone Imperial insignia on the tail fins.  That should confuse both sets of fanboys, I think!

The light cruiser "Obedient"

 Obedient clearly shares some of the same design principles as the Honourable, but is a lot smaller.  It's not immediately obvious just what a size difference there is until you see the two models side-by-side.

This light cruiser also has a Warzone Imperial insignia on her sides, forward-facing beam weapons and broadsides of missile or gun tubes.

52nd Destroyer Flotilla

Destroyers: Bonfire, Blaze, Pyrotechnic, Arsonist, Torch, Ember
Next up are the 6 destroyers of the 52nd flotilla.  They're all Firestorm-class vessels, though there are minor variations between each.  This is partly due to being built at different yards and partly due to varying levels of refit and upgrade.

The Firestorm-class destroyers have a heavy battery of forward-facing beam weapons.  These aren't powerful enough to take on an enemy battleship, but rather their task is to screen their own capital ships from hostile light units.

114th Frigate Squadron

Frigates: Fer-de-Lance, Asp, Diamondback, Constrictor, Cottonmouth
Finally, here are the 5 frigates of the 114th squadron.  They're all Viper-class torpedo boats, whose task is to assault enemy heavy units.  Since the Vipers are lightly built and don't have much in the way of weaponry other than their torpedoes, they have short life expectancies!  Still, every frigate's captain dreams of glory: if he, she or it could just be the one to sink an enemy flagship then they'd be a hero!

The Whole Fleet

This is quite an unbalanced fleet, with plenty of small and large ships but not much in between.  I could use a few more cruisers and I might even have 1 unbuilt Space Marine cruiser lying about somewhere.

Will I ever use these models in a game?  I hope so, though at the moment I don't have any Full Thrust SSDs for them.  I suppose they could also be used in Battlefleet Gothic, or 5150: Star Navy, though, if only I had the time...

Sunday, 23 August 2015

More card:FAB1 and M969OJB

Introduction

Last week, I published pictures of some card models that I built whilst on holiday: here.  These were all downloads from Dave's "Cut and Fold" Card Creations site and a wonderful resource it is!  I also mentioned in passing that I had started (but not finished) a 6-wheeled, pink Rolls Royce.  Well, I've now completed FAB1 and here it is!  There's also a nice, simple bonus model that only took me a short while to make.

FAB1

As all fans will know, FAB1 is the name of Lady Penelope's vehicle from the Thunderbirds TV series by Gerry Anderson.  She was described as International Rescue's "London Agent" and was a cross between a super-spy, a diplomat and a high society debutante.
In keeping with her extremely glamourous position, Lady Penelope was driven about in this flamboyant and brightly-coloured Rolls Royce by her dour butler/chauffeur, Parker.  Parker was a reformed criminal whose underworld contacts and burglary skills often came in useful, but his driving of FAB1 was near-legendary as well.
The limousine was not just a luxury transport, though.  FAB1 had more gadgets than one of James Bond's rides, including multiple weapons, defensive and anti-pursuit measures.  Heck, it could even drive on water at up to 50 mph!  Mind you, I don't like to think too much about the fuel consumption it must have required...

  • Size: this paper model measures about 10.5cm .  That works out at 1:60 scale, which is a tad small for 28mm figures such as the Crooked Dice "Daredevil sister" shown in the picture.  A purist might want to scale it up by 6% or so, but it's close enough for me.
  • Issues: Like many of Dave's paper car kits, the wheels are just single-thickness disks.  For gaming purposes I prefer to make them a bit more robust and so I've added treads to them.
    The clear, domed hood looks like a real pain to build from card.  Actually, it was much simpler than I had expected and went together quite easily.  It still shows a few rough edges, though.
    The "flying lady" hood ornament was described in the kit as "optional".  No kidding - it was far too small for my level of skill - and it would have been very vulnerable as well.
  • Overall: 4/5.  Another fine model of an iconic TV vehicle.  The canopy is slightly odd, but given the limitations of paper as a modelling material it is surprisingly effective.

M969OJB

At the other end of the price & luxury scale, we have another car from Dave's Cut and Fold site.  This is the much-rubbished Reliant Robin and unlike FAB1, it was a real vehicle which sold in considerable numbers!
It was often criticised for not being much of a car (to put it mildly!), but that's really missing the point.  The Robin was designed to fit with the lesser requirements of British license and tax regulations that more usually applied to motorcycles.  I'm simplifying a bit here, but the result was that it was much cheaper and simpler to run than a 4-wheel vehicle.
This particular Reliant Robin was made famous after it appeared in an episode of the BBC's Top Gear motoring programme.  In that, I believe M969OJB was driven by (and lambasted by) Jeremy Clarkson.  This kit has a small image of Mr Clarkson in the driver's window.

Oh, look - he's rolled it...
  • Size: I calculate this Reliant Robin model as 1:52 scale.  Like FAB1, that's about 5 or 6% wrong for 28mm models, though in this case it's too large.  Still, it's not enough of a difference for me to care.
  • Issues: none, really (other than the picture of Jeremy Clarkson - I'd have preferred not to see him in the window!)  There were a number of very small optional extras in this kit, such as more detailed wing mirrors and "anti-roll" bars (a Top Gear addition and not part of the manufacturer's specification for this vehicle, I suspect); I left these off.
    The wheels for this model are necessarily small; that may give trouble to some model-makers (indeed, I nearly lost the rear wheel treads several times!)
    Note that I have adapted my build of this kit somewhat.  Dave's original has a separate underbody, but I've just taken the printed "chassis" and attached it directly to the outer shell.  I think it works pretty well that way!
  • Overall: 4.5/5 .  This was easy to build and is very suitable for my gaming needs.  I think I'd have given it 5/5 if it didn't have the separate underbody and the picture of a grinning idiot in the window!

Conclusion

What can I say?  These are both fine models in their own ways.  FAB1 is the epitome of 1960s glamour, chic and hope for the future, whilst the Reliant Robin was a very easy build.  I hope to use both of these in my games, in due course.  Probably not in the same game, mind.

Saturday, 15 August 2015

Captain Scarlet Vehicles - in card!

Introduction

Any long-term followers of this blog may remember that I like to take a card modelling kit with me when I go on my summer holidays.  It's light and self-contained, requires only a few tools and no paints at all - and I can afford to bin the results if anything goes wrong!

This year, I added several sheets printed out from Dave's "Cut and Fold" Card Creations site.  These are all free-to-download kits and there are a great many interesting subjects; I'd encourage anyone with even a passing interest in paper modelling to browse this site!  Anyway, I chose to build several of the iconic Spectrum vehicles from the Captain Scarlet TV show, to go along with my 28mm figures from Crooked Dice.

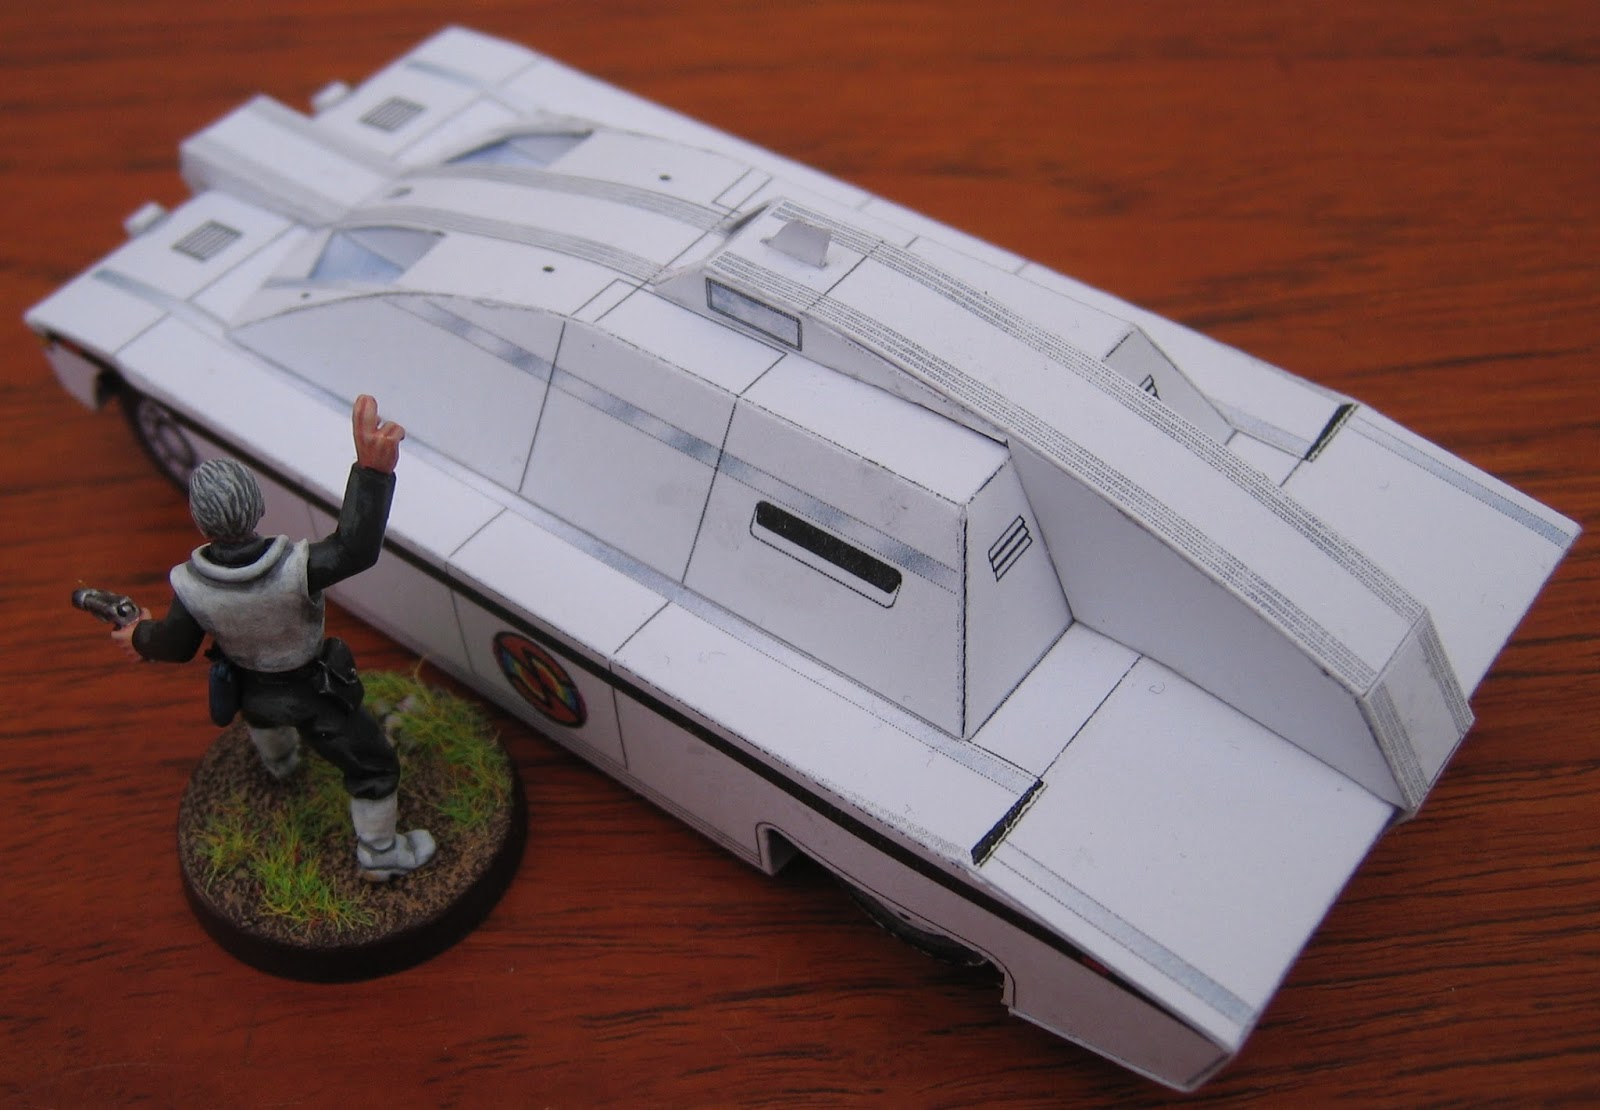
The SPC

The Spectrum Patrol Car is a basic light transport automobile.  It's fast (insanely so, compared to the roads and motorways that we know now!) and can carry 4 people.  A simple sports saloon from the future, as envisaged in the 1960s!


  • Size: This paper model is 10.2cm long.  By my reckoning, that works out at 1:53 scale (the TV original was nominally 5.4m long), which is a touch oversize for 28mm figures.  Still, it's pretty close to my preferred 1:56.
  • Issues: most of this kit is fairly straightforward and fitted well, though the central spine and fin is made from 3 very narrow parts that have to be laminated together.  That's definitely the most tricky part!
    The separate underbody does allow the wheels to be recessed, but makes it difficult to get them at the correct height.  My model looks as if the suspension has broken and the body has sunken down!
    Also note that as designed, the wheels in this kit are just a card disk,  I've added treads to them from another model, thus making the construction greatly more robust and able to withstand handling.
  • Overall: 4/5.  An excellent model, with a few minor quibbles that can be worked around by an experienced modeller.


The MSV

 In the Captain Scarlet show, the Spectrum organisation occasionally calls on the services of a Maximum Security Vehicle.  These are typically used as ultra-safe VIP transports; an MSV is supposedly proof against most weapons (up to and including a small nuclear bomb!)  Again, the vehicle can carry 4 people and travel at up to 200mph.


  • Size: In the TV show, an MSV is supposedly 7.3m long.  My model is 11.3cm, thus making it 1:64th scale.  That's really a touch small for 28mm figures.  If I make another of these then I would scale it up by 15% or so.
  • Issues: The central "cabin" has straight sides and a curved front: this proved quite tricky to glue flat to the lower bodywork.  In addition, the other parts of the superstructure then needed some slight adjustment to make them fit correctly.
    Again, the wheels were just card disks; I've added treads to them from another model.
    Finally, the front "bumpers" were rather small and fiddly.
  • Overall: 3.5/5.  The subject matter is excellent, but the kit didn't go together quite as smoothly as I had hoped.  It's still a pretty good kit, for all that!


The SPV

Every schoolboy's favourite was the Spectrum Pursuit Vehicle!  These large armoured cars were stored in hideouts all over the world for use whenever a Spectrum agent required; they could be magicked out of a disused mine entrance, an old barn or similar location on demand.

The SPV had 10 wheels, alternating between large and small along each side.  It also had an auxiliary track unit at the read which could be deployed on rough ground.  It was armed, armoured - and the crew faced backwards and drove it via a TV screen.  It's a SciFi geek dream!


  • Size: this model is 11.5cm long.  The original measures 7.6m, so the model's scale is 1:66th.  Like the MSV, this is really a bit small for 28mm figures and I would recommend that it is scaled up by around 15%.
  • Issues: for the most part, this kit fitted together really well.  The white nose bumper was slightly awkward, though not as difficult as I had feared it might be.  The only other parts worthy of comment are the side skirts, which have an awkward curve along the length of them.  I think that if I make another of these models then I might add formers of balsa wood or similar to help the side skirts to keep their shape
  • Overall: 4/5.  Another iconic vehicle, most of which is a very easy build with just a couple of tricky areas.

Conclusion


It is possible to buy plastic or metal versions of all of these vehicles; there have been a number of versions over the years.  However, you are then limited to the sizes produced by the manufacturers and I suspect that the collector's market has pushed the prices way beyond all but the most dedicated wargamers.

Card models aren't to everyone's taste, but if you have the time and the ability then you can build as many of these excellent vehicles as you like, to any reasonable scale, for very little cost.  If only Dave produced some Spectrum aircraft as well!

Now please excuse me: I have to go and finish building a 6-wheeled pink Rolls Royce...

Tuesday, 11 August 2015

Away in the Islands, summer 2015

Introduction

So, I haven't posted anything for a while.  Relax - this isn't because I've given up blogging, but rather because I've been away for my summer holiday.  We spent 2 weeks on the island of Barra, in the Outer Hebrides, off the west coast of Scotland.  It was cold and windy - the "summer" of 2015 has been dismal so far with temperatures up to 10 degrees Celsius below average for the time of year.  Still, we did a lot of walks and relaxed quite a bit.

A typically-crowded beach on Barra, on one of the better days of our visit
Apparently, it's been an excellent year for orchids.  We certainly saw huge numbers of several different sorts.  Here's one example:

So, what can I tell you about Barra that might be of interest to wargamers, model-makers or amateur historians?

Castlebay

The main settlement on Barra is Castlebay.  It's a somewhat obvious name, since the village lines the shore of a large bay - and there's a castle in the middle of the sea!  Kisimul Castle is on a rocky islet a couple of hundred metres offshore from the mainland of Barra and is the traditional seat of the MacNeill clan.  The MacNeills of Barra were famed (infamous?) as seaborne raiders; they terrorised quite a few other island and mainland communities during the Middle Ages.  Also, Barra was a hotbed of Viking activity long before that!

What you see of the castle these days is a restoration from the 1930s, so I've no idea how accurately it represents the original version.  However, one of the things that I like about it is that the interior of the castle is filled with buildings.  Too often, our wargames castles are barren, empty shells without any dwelling or utility rooms on the inside.

The well (which provided the castle with fresh water, despite its location on a rocky islet in the sea!) is in the centre in this picture, just in front of the partially-obscured door of the further building.

Dun a'Chaolais Broch

On a couple of occasions, we travelled from Barra to the adjacent island of Vatersay; there's a modern causeway linking the 2 islands so it is easy to drive from one to the other.  Near the road in the north of Vatersay, on the top of a small hill, are the remains of a probable broch.

Brochs are uniquely Scottish buildings from about 2000 years ago. found around the northern and western fringes of the country.  Originally, this structure would have been a round, dry-stone tower some 16m across and proportionally tall, with very thick walls.  The inside would have been divided into multiple small chambers.

No-one is sure how brochs were used (early theories that they were forts seem to be discouraged by modern archaeologists), but they may have been high status dwellings, watch towers or some combination of these and other factors.

Even though this site is essentially just a pile of stones with just traces of walls, it's still impressively large!

The Vatersay Catalina

Further south on Vatersay, but right beside the road, is the wreckage of an RAF Catalina flying boat that crashed on the island in 1944.  The aircraft was on a (night?) training flight out of Oban when it became lost and hit a nearby hill with the loss of several crew members.  RAF recovery teams dragged the wreckage down to the shore and took away the engines and some other parts.  The remainder of the aircraft has been left in place to this day.

There is a memorial at the site to the crew; it is well-maintained and respected (there was a wreath of poppies at the foot when we visited).  Around the highlands and islands of Scotland there are quite a few crash sites of long-range patrol aircraft, but this is by far the easiest to reach and has the most to see of any that I have encountered.

Visitors can walk right up to the pieces of wreckage; there are no barriers or warning signs.  It's quite a sobering moment, though.

Commonwealth War Grave

In the north of Barra there is the very old church of Kilbar.  This is most famous for a stone slab with early Christian symbols on one side and Viking runes on the other, possibly looted from Iona (I did say that the islanders from Barra had a reputation as raiders!)

However, something else caught my eye as well.  There's a marker at the gate to the cemetery proclaiming the presence of Commonwealth War Graves.  It turns out that there is just a single war-related grave here and it is inscribed with an Italian name.  I didn't write it down, so sadly I cannot remember it here.  I think that his first name was Enrico, though.

Further enquiries of a local historian revealed the following story: Enrico was a Jewish-Italian opera singer who happened to be in Britain when Italy entered the Second World War.  He was therefore detained and put on a ship, presumably to be deported.  However, the ship was torpedoed by German aircraft in the Bay of Biscay and sank.  Apparently bodies were washed up all along the Western Isles, including that of poor Enrico on Barra.

This version of events does raise a few questions in my mind, though:
  • If the ship was torpedoed in the Bay of Biscay then how did the bodies end up far away on the west coast of Scotland?  Perhaps it didn't sink immediately and drifted for a few days?  Or maybe it was further north than I've been told in the first place?  Possibly the currents or stormy winds were strong enough at that time to move the wreckage such a distance?
  • Enrico was not a member of any Commonwealth military force, so how did he end up in an official Commonwealth war grave?  My informant suggested that maybe this was because the British armed forces were responsible for collecting and burying the bodies of those killed at sea.  This is possibly correct, I suppose?  I had always assumed that Commonwealth war grave status was just for combatants, but I must be mistaken on this.

Conclusion

I've tried to avoid presenting a list of everything that we saw and did on Barra and the nearby islands.  Instead this article is edited to present just those items which (I hope!) might be of interest to the people that I imagine are my audience.

In my next post, I'll talk about the paper models I made whilst on holiday.  S.I.G!