Saturday 31 October 2015

Batrep: The Witch of Nether Thicket

Introduction

It's been my custom for several years now to play a themed game on or near Halloween.  This year, we got out my 17th century witches and witch hunters again, for another outing with the Song of Blades and Heroes rules.

The Scenario

We decided to play the Place of Power scenario from the basic SoBH rulebook.  In this, a terrain feature gives in-game bonuses as well as victory points to any magic user who is located in it.  An ancient runestone was located in the middle of the woods; perhaps the witches could use it to increase the efficacy of their black magic?

In a slight change to the published scenario, we decided that a witch would score 1 victory point for each 2 turns that she was in contact with the place of power, rather than 3 points only at the end of the game.  The basic scenarios in SoBH have no time limit and victory is effectively determined by who remains on the field of battle.  That being so, I saw no reason why the witches should get an extra 3 points if they had already won!  In addition, the per-turn bonus would add some time pressure to the game; it would force the opposition to deal with any witches rather than just hanging back and waiting.

The Forces

We played the game with 300 points per side, or near to that.  At most half of this could be spent on "expensive" models (50 points or more each).


For the witches, I chose the following:

  • 1 witch.  After all, she's the main point of the warband (and the only magic user in the game).
  • 1 ghost.  Not much of a fighter, but it should be able to scare away some of the opposition, right?
  • 2 hellhounds.  These are big, scary and mean!
  • 4 ghouls.  These are quite expensive, but their poison attacks and savage natures might be useful.
So, my plan was this: get the witch into contact with the place of power and start racking up victory points.  Use the hell-hounds to hunt enemy heroes and the ghost to scare off the common soldiery.  The ghouls are there to skirmish with anyone who tries to get smart and outflank me, or to assist in outnumbering an enemy hero.


Playing the forces of humanity, my sons decided to take:
  • John Sterne, the witch hunter.  Strong-minded and well-equipped, he's pretty much essential when facing such abominations.
  • Major Fairfax.  A decent military leader.
  • 4 musketeers.  It doesn't hurt to have some ranged firepower when faced with satanic horrors.
  • 4 soldiers.  A group of cheap lads, mostly useful to get in the opposition's way, I suppose.

The Game

So, how did the game play out?  Not as I had planned...


To start with, both sides advanced towards the central runestone.  If anything, the humans moved with a bit more purpose and organisation, due mainly to Major Fairfax's Leader ability.  A few long range shots were attempted, but these were all wide of the mark.


The ghost then caused consternation by advancing directly towards the largest group of soldiers ("Why yes, a ghost can move straight through a building").  Muskets and pistols were fired at the apparition, but it came on regardless.


Whilst the humans were distracted with the ghost, a huge hell-hound charged out of the gloom and bowled over the witch hunter.  Indeed, he had to use his hero's "once per game" re-roll to save himself from a brutal demise from the devil dog's jaws, but the re-roll converted his original throw of a deathly '1' into a respectable (but still losing) '5'.

A second beast followed, but before it could tear out the throat of the unfortunate man, one of the soldiers reacted and attacked it.  With contemptuous ease, the monstrous creature tore the poor squaddie into screaming, bloody chunks.


Despite Major Fairfax's cries of "Stand firm, my brave lads!", the common soldiers were appalled at the carnage of the gruesome kill; to a man they all turned and fled (though none of them ran off the table and away for good, sadly).

So far, this was going swimmingly for the witches!


Maybe I was cackling too soon, though.  In one turn, John Sterne regained his feet and gave the hell hound which was over him such an almighty buffet that the beast fell to the ground, momentarily senseless.  How the h**k did that happen?  I suppose that his Hero attribute gives him the right to perform superhuman acts of gymnastics, not to mention out-of-time judo skills...


Before anyone else could react (I threw a double activation failure for the first model in my next turn and therefore couldn't do anything), the witch hunter pulled out a pistol and shot the monster dead.  This guy is too much!


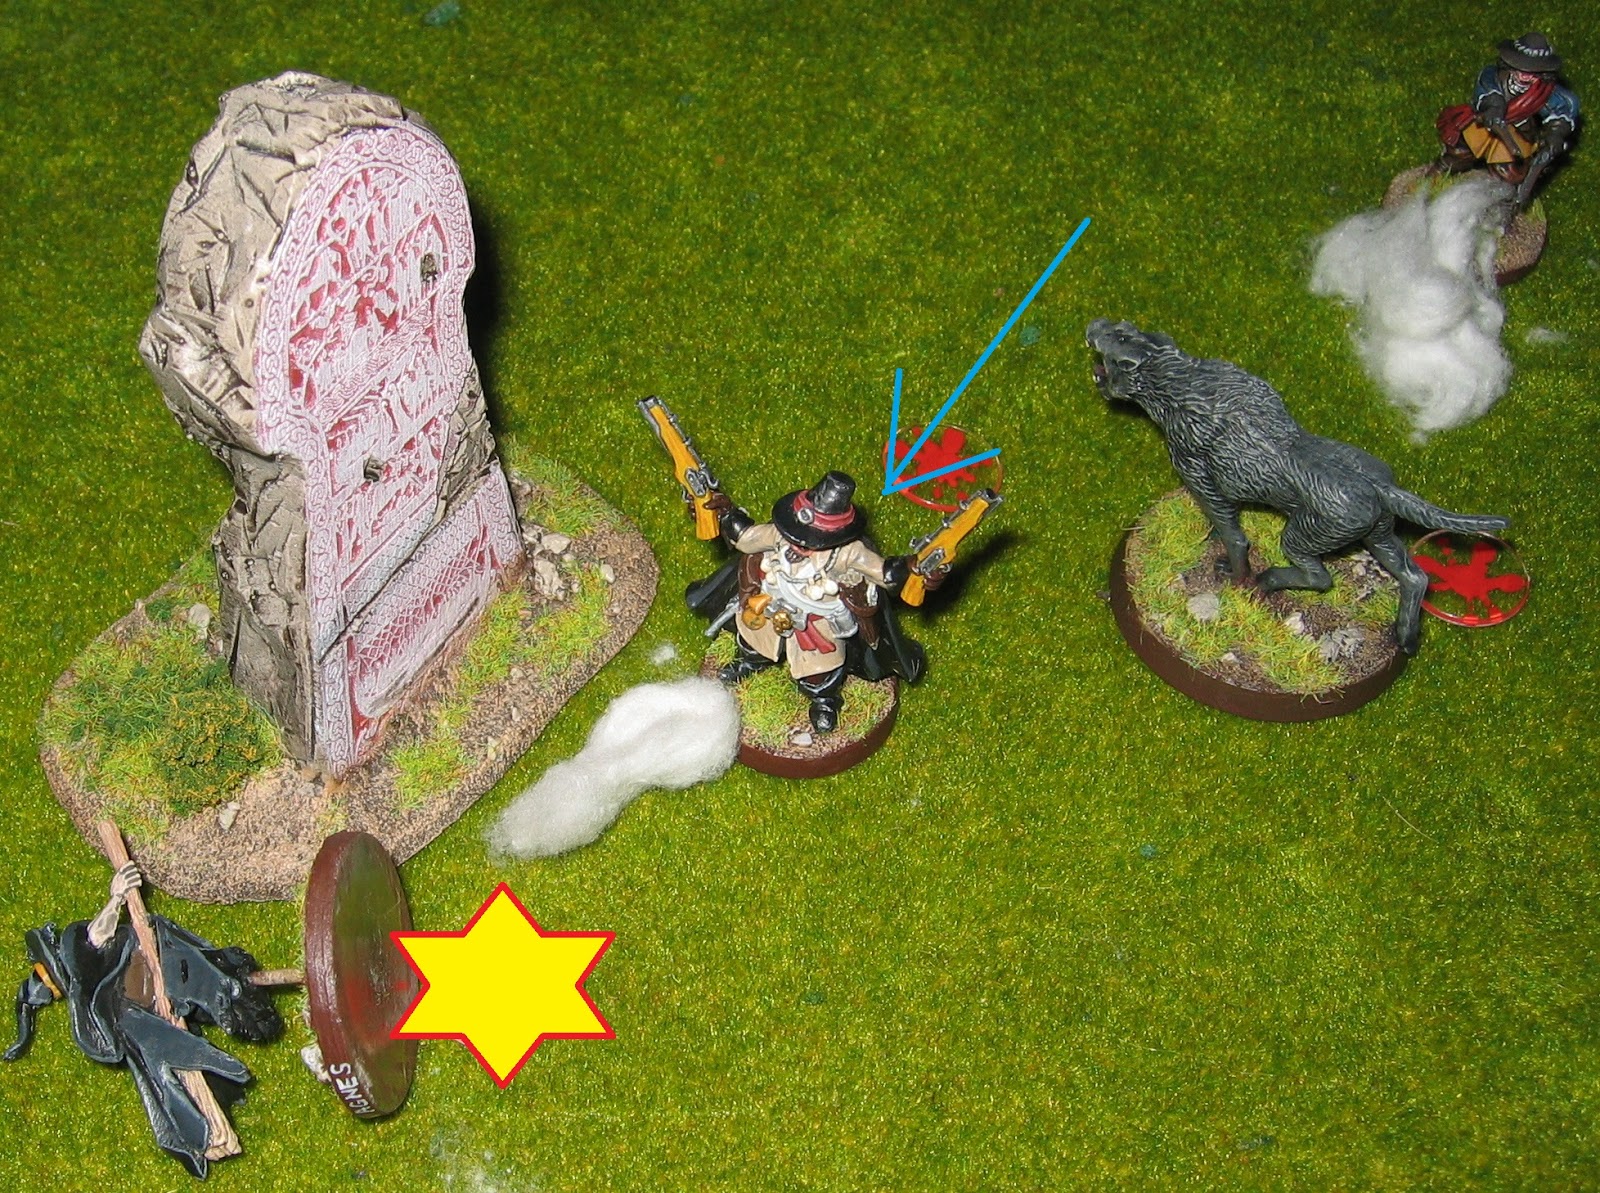
Whilst the rest of us just stood there, gawping, he stepped over the corpse of the hell hound, levelled his other pistol and shot the witch dead too (I threw another double activation failure for my first model and so missed another complete turn).  What the...


Encouraged by this (and by the shouted orders of Major Fairfax), several of the soldiers then charged at the second hell hound.  Whilst it was thus distracted and outnumbered, the witch hunter turned round and slew it too.

At this point, I conceded the game.  Whilst I still had the ghost and 4 ghouls, it didn't seem at all likely that they could wipe out the enemy force on their own.  So: the final tally was 1 witch and 2 hell hounds slain (5 victory points), versus 1 soldier killed (0 victory points) and 1 turn of communing with the runestone of power (0.5 victory points).  Despite it being Halloween, the forces of darkness were hammered!

Conclusion

I think that my plan was reasonable, but I was hampered by a series of very poor quality rolls just at the critical moments.  Of course, every roll in SoBH is critical - but some are more so than others!

As for John Sterne, the witch hunter - I'm beginning to really hate the man!  Of course, that's because I always play the evil side and I haven't really worked out how to deal with him...

Wednesday 28 October 2015

HotT: King of the Tribe

Introduction

Tonight, I was planning to show some miniatures that I'm working on for Frostgrave - but they're not quite ready yet.  Instead, here is my recently-completed Hero General for my slow-burn, 28mm Hordes of the Things Barbarian army.  This force has been gradually accumulating more elements over the years (and I do mean years), but I need to finish a few more yet before the army is large enough to play HotT.

The Boss


There's not really any doubt that this guy is the chieftain of the barbarian tribe.  Not only is he quite a big lad with a huge axe and an imposing head of hair in his own right, but he has a couple of guys to carry him on a shield to make him look even more "regal".  Mind you, I assume that he gets down when the battle starts; I don't imagine he'd be able to fight very effectively from up there.


The model is from Black Tree Design and it is one of my favourite centre pieces for a barbarian army.  The boss and his 2 supporters are all exceptionally-well muscled; I'm still trying to work out where they get all the steroids in Hyboria.  Perhaps there's a natural plant extract that performs the same role?


I like the fact that the lesser of the shield-carriers is using both hands, but the other lad is showing off by holding his side up with just one.  Watch out, now - don't drop the king or you'll be is real trouble!

All 3 of the men are wearing various scraps of chainmail, leather and gold jewelry, in approximately equal proportions.  This fits in very well with the cliched barbarian of fiction: there's a lot of posturing and showing off of bodies, weaponry and wealth.

Right, back to the painting desk - I've got work to do...

Sunday 25 October 2015

Zomtober 2015 - Week 4

<--  Week 3 is this way

Introduction

It's week 4 for Zomtober 2015; the last week of the event this year (it is the last week, right?  The 31st is a Saturday and the Zomtober week ends on a Sunday, doesn't it?)  So here's something slightly different.  It's still a duel, in the sense of one survivor base against one zombie base.  However this time I've chosen to build a "horde base" rather than just a single zed.

It's close to midnight and something evil's lurking in the dark...


This week's survivor is "Ola".  She's a stylishly-dressed, young, African-American woman who can't quite believe whats happening to her.  Indeed, she's trying to shut out the sight by covering her eyes (I had intended for the hands to be covering her mouth, but I mis-positioned the arms before attaching the separate hands).  Ola's body and head are standard pieces from a Wargames Factory set, but the arms and hands are heavily-modified parts from all manner of sources.


The zombies are, I think, some sort of dance troupe.  Their leader (I'll call him "Jacko") is also dressed up for a night out.  In this case, he has a red suit with black trim and shoulder panels, white socks and black shoes.  The torso for this figure is from a Studio Miniatures plastic zombie and the legs are from Wargames Factory.  Green stuff has been used to lengthen the trousers and add the jacket decoration.  After sealing the base, I applied gloss varnish to his hair and the black parts of the jacket to make them really shiny.


The other 5 zombies on the base are also plastic Wargames Factory/Studio Miniatures mash-ups.  In each case, the bodies and heads are unmodified, but the arms have been considerably altered to get them into the classic "zombie advancing" position.  Note also that these "supporting" zeds have been painted in somewhat muted colours so as not to draw the viewer's attention away from their leader.


The base is from Escenorama; I've discussed them before: here.  Suffice it to say that it was a hellish job to cut the base down to size (it was too thick to start with), but that it's a really nice moulding otherwise.

Conclusion


So here's what I think: Ola believes that she's having a nightmare and that she'll wake up any moment now to find that this isn't happening.  Maybe she's right.  But even if this is the stuff of nightmares, who says that the real world is any better?

Mind you, I think that the zombies are spending so much effort trying to match their dance steps that they aren't really paying attention to Ola.  Maybe they think that she'll be mesmerised into standing where she is rather than running away (like any sensible girl would do)?

Wednesday 21 October 2015

Treasure markers

Treasure!

When I bought my Basius II press-moulding pads, I chose to receive the Dungeon and Urban varieties.  Most of my model-making (at least with exotic bases) is for modern, post-apocalyptic settings and so the Urban pad seemed obvious.

At the time that I ordered it, I thought that I would maybe use only the 'clean' side of the Dungeon pad.  That side has plenty of flagstones and other stuff which could double up as modern day interiors (or perhaps as slightly rougher exterior paving - garden paths and the like).

The busy side of the Dungeon pad is full of piles of treasure, lost satchels, lockets and the like.  I didn't think that I'd get much use from it - but then I bought a big roll of green stuff and felt that I had to use the putty for something.  Suddenly, making some treasure markers seemed like an excellent idea!


So far, I've pressed 7 of these bases.  I've painted them up as part of a ruined city and added some snow to add to the sense of abandonment and desolation (though note that #7 isn't quite finished as I haven't snowed it yet).

The snow is done by adding white glue to the base and then sprinkling with sodium bicarbonate ("baking soda"); this is a very cheap, readily available, fine powder with a nice bright white colour.


The gem on base #7 is my first attempt at painting a large, faceted jewel and I'm not particularly happy with the way it turned out.  I did try to follow some online tutorials, but they were really dealing with simulating jewelry in computer graphics rather than with paint.  My attempt doesn't look right (not to me, anyway).

I'm making a whole bunch more bases from the same mould, though most of these have little or no treasure on them.  These will be used to base up some fantasy creatures and dungeon adventurers (or, in some cases, to rebase some of the older parts of my figure collection).  Look for one or more articles on these in a week or two.

I'm not entirely sure in which game I might use these markers, though.  Perhaps someone could suggest something appropriate :-) ?

Sunday 18 October 2015

Zomtober 2015 - Week 3

<--  Week 2 is this way

Introduction

Another Sunday, another Zomtober challenge entry.  Will the madness never stop?

Naw, it's all right really; I'm loving it!  I've probably painted more miniatures this month already than I did in the previous 3 months put together - and they're not all zombie-related either.  For Zomtober this week, we have an old mini that I've finally finished (after it had been on my workbench for what seems like years) as well as a brand new figure, built from start to finish in the last 10 days or so.

The Duel


Once again, I shall present a duel between a survivor and a zombie.  This time, the confrontation is between Father Murphy and Garden Party Zombie (hereafter "GPZ").


Father Murphy is an out-of-the-box build from the Wargames Factory "Apocalypse Survivors: The Men" kit.  I glued this model together many months ago and started the painting, but didn't get very far before I ran out of inspiration.  He seemed to be just another fairly bland, assault-gun-wielding, trenchcoat wearing action guy and that didn't excite me enough to complete the model.

As part of this Zomtober challenge, I looked at the figure again.  It suddenly came to me that a black shirt and a white dog collar would turn him into a priest.  Suddenly, the model had a completely different vibe!


GPZ is a "Zombie Vixen" (again, from Wargames Factory).  She's had a hat added from a Warlord Games set of Royalist Infantry, although I think it's sitting a little bit high on her head.  It seems that straw hats were all the rage for 17th century English peasants as well as for modern ladies...

Her base is made from a Basius II pad, though all of it apart from the fallen sign has been covered with flock.  The lettering on the sign is a home-made decal.


GPZ has been in the wars a bit; she has torn clothing, significant wounds to her leg and one arm is partly missing.  For all that, she is (was?) a tall, if somewhat skinny woman and probably has a certain amount of physical strength.


Who will win this encounter?  Father Murphy has obtained some heavy weaponry from somewhere, but does he know how to use it?  He's firing from the hip (never a good sign) and he seems to be aiming at her torso.  Whilst a burst from an M-16 will certainly chew up a zombie badly, it won't finish the job without a head shot.  Does he know what to do and is he capable of executing it?

On the other hand, GPZ looks somewhat surprised to find that she is indeed a zombie.  If she has any remnants of her previous humanity left then she might be too well bred to chow down on the vicar, at least at first.  How will this end?  I'm not sure...

Week 4 is this way -->

Thursday 15 October 2015

SAGA: There's no place like Home

Introduction

A couple of weekends ago, my friend Steve came over for a day's gaming.  I've already described our Black Powder game (the Battle of Grochow, 1809), but that was only a part of the day's activities.  For afters, we played a game of SAGA.  I took my Scots, whilst Steve opted for a Viking warband.

Homeland

Since I now have some Dark Age buildings (suitable for northern Scotland, at least), we chose the Homeland scenario.  In this game, one side attacks a settlement that is defended by the other.  That sounds simple enough, but there's a twist: each player bids for the "privilege" of defending.

Here's how it works: the attacker will use a full 6-point warband.  Both players secretly write down the size of the smallest force which they think can hold the buildings until the end of the game (6 turns, from memory).  Whoever bids lowest becomes the defender!

In the event, I decided that I would need 4 points of troops to defend, but Steve reckoned he could do it with 3 points worth.  So, Steve's Vikings became the defenders, but would have half the force that the attacking Scots would use.  I wasn't exactly gloating, but at this point I thought that I would be able to roll right over them and win the game easily.  Oh, yeah!

The Game


OK, here's the plan:
  • My thanes (4 mounted and 8 on foot) will advance up the centre and attack as soon as they're able.
  • 2 groups of warriors (10 and 6 strong) will work round the flanks and provide backup in case the nobles cannot defeat the Vikings all on their own.  They're marching round the flanks mainly because I don't want to cause a traffic jam in the centre, not because I'm being tactically sophisticated!
  • My warlord and 12 chanting monks will stay in the centre and offer moral support.  This is partly because they generate a fair number of SAGA dice and partly because if I lose my warlord in this scenario then I lose the game instantly  Although I'd love to have him fighting in the front rank, I'm not sure that I dare, at least until the defenders are considerably weakened....
Facing me, the Vikings have decided to abandon one building entirely, place 4 hearthguard in each of the other two (and their warlord in the further one), whilst keeping a reserve of 8 bondi (warriors) behind the village.


So, for the first 2 turns, the Scots rode, walked and (in some cases) jogged forward.  Not much else happened, except that the Vikings prepared to die honourably, with as many defensive SAGA abilities as possible.  I admit that I was a bit amused by Steve's discomfort on discovering that Vikings don't really have many defensive abilities available, no matter how many SAGA dice they roll!


In turn 3, it was my turn to be frustrated.  Carelessly, I put the SAGA dice that I had intended to use to activate the Thanes into the boxes on the chart which activate levies.  This was not at all what I had intended, but I'm too honest a player to back out from such an error and so the result stood.

The monks really sprinted ahead, whilst all the Scots thanes stood and watched.  Maybe it was the thought of climbing a wall into an enclosure filled with cattle, or perhaps it was the rather fierce-looking chickens pecking about in the centre of the settlement (my cavalry once had a very bad experience with some chickens), but the Scots nobility didn't move on turn 3.

At this point, I suddenly realised that the game was half-way over and none of my warband had even made contact with the Vikings yet.  Hmm, perhaps this wasn't going to be so easy after all.


The next turn, the Scots thanes attacked the first house.  Firstly the cavalry charged, then (once the defenders were fatigued) the large unit on foot assaulted the building.  Now, here's the thing: the Vikings don't really have any defensive measures on their battleboard.  But equally, the Scots don't have any offensive abilities.  This fight was resolved pretty much without any power-ups from SAGA dice.

So, the Viking hearthguard crouched behind their shields and the thick walls of the building and sacrificed as many attack dice as they were permitted in order to boost their defence.  Although the Scots then took no casualties, the Vikings were very hard to hurt; only 2 of the 4 defenders fell to this all-out assault.


To start the attack on the big house at the back, my flanking warriors moved forward.  They were countered by the reserve Viking bondi who, although they lost the fight, still inflicted some casualties and fatigue on the Scots.  The clock was running out, but I still hadn't managed to get near to the Viking chieftain and his retinue!


In the last 2 turns of the game, the Scots thanes pushed through the cattle and cut down the last 2 defenders of the rightmost hut.  However, to win they needed to clear all the buildings and the Viking warlord and his bodyguard still held the central building.

Wave after wave of Scots attacked the last dwelling, but the Vikings just hunkered down and blocked the entrances with shields and the bodies of the fallen.  One Viking huscarl fell to an unlucky spear thrust from the mounted Scots nobles, but the cavalry lost one of their own in return.

The Scots warriors at the rear were met by the Viking chieftain himself; they didn't even manage to wound him.  Even the monks joined in, frantically tearing at the barricades in their haste to reach the heathen.  But their faith didn't protect them and they died just the same.

And so the game ended, with the battered Vikings still holding out...

Conclusion

This scenario didn't play to either side's strengths, really.  The Scots' battle board doesn't have much in the way of offensive options; it's more about defence and counter-attack.  Equally, the Vikings don't have many defensive boosts.  Having said that, my attackers couldn't really have afforded to use many SAGA dice for power-ups anyway; they were all needed just to move the troops across the board.  Don't underestimate the effort this takes in a time-limited game and when the enemy doesn't plan on coming to you!

My initial belief in a walkover for the attackers was steadily sapped throughout the game as it became obvious how little progress I was making.  Perhaps if I hadn't messed up my activations on turn 3 then the game would have been closer, but this seems to be clutching at straws really.  I was thoroughly defeated by a stout defence and lack of time.

I'm already pondering alternate tactics that might have been employed:
  • For the attackers, perhaps one or two large, fast-moving elite units could have been used as the assault force whilst multiple small units of less expensive troops cheer them on without stepping from the baseline (i.e. spectators, just to generate the necessary SAGA dice!)
  • The defenders might experiment with small, throwaway units to advance and act as speed & fatigue "bumps".  By delaying and tiring out the attackers, they might disorganise the attack and buy enough time for the game clock to run out.

Sunday 11 October 2015

Zomtober 2015 - Week 2

<--  Week 1 is this way

Introduction

OK, so it's the end of the second week in October.  I'm taking part in the Zomtober challenge again and therefore I need to show at least one completed zombie or survivor.  Once again, I intend to present a duel and see what my readers think are the possible outcomes.

Joey vs Hot Chick Zombie (HCZ)


Let's start with Joey.  He's a plucky boy, probably about 10 or 12 years old.  The model is from Wargames Factory's "Apocalypse Survivors: The Men" plastic set, but with a couple of small changes.

Firstly, I've given him a baseball cap.  This was very simple: I cut the cap from one of the spare adult heads in the same set, cut off the top of the boy's head and glued the two pieces together.

Secondly, Joey is wielding a super soaker (a large water pistol, for those readers who don't have their own children).  This was scratch-built by cutting down the weapon on the boy's submachine gun arm and then adding plastic rod & modelling putty.

The painting on this model was very simple, though I tried to contrast the bright, plastic colours of his toy gun with the muted camouflage of the cap.


Why "Hot Chick Zombie"?  Well, if you'll pardon the apparent sexism, she's on fire!  The zombie is not totally consumed in flames, but does have something flammable burning in patches along her left-hand side and dripping on to the ground.  Whatever set light to her may also have destroyed her foot and hand, as these are missing, as is the left side of her face.

The zombie model is again from Wargames Factory, though this time from the "Zombie Vixens" set.  She's an out-of-the-box build, though with some green stuff "flames" added to leg, arm, hair and base.

Incidentally, the bases for both of these models are moulds from my Urban Basius II pad, though from relatively plain areas without much relief detail (these were tester pieces).


So, what is Joey doing?  Has he loaded his super soaker with gasoline, hoping to use it as a crude flamethrower?  Perhaps he's filled the toy with something caustic and intends to blind HCZ by squirting the fluid in her remaining eye?  Or is he just living in a fantasy world where squirting water over a playground foe whilst shouting "pew! pew!" is enough to win the game?

Given what I know of water pistols (they're inaccurate, have very short range and leak constantly), I really don't think that either flammable or corrosive liquids would be a good choice.  Equally, water isn't going to bother the zombie for long.

No, I think that Joey's only advantage here is that the zombie is considerably damaged and will probably be unable to move quickly, if at all.  Run, Joey!  Run!

Week 3 is this way -->

Thursday 8 October 2015

Black Powder: Grochow, 1809

Introduction

The battle of Grochow was fought on April 25th, 1809 between the Polish and Austrian armies (at least, according to my "Blunders on the Danube" scenario book).  An Austrian division under Von Mohr had been ferried across the river Vistula to threaten a Polish garrison, but Prince Poniatowski led 3 columns of Poles to contest this bridgehead.

Since I failed to find any corroborating data about this battle in any online source, the scenario book is the only detailed reference I have for the battle.  Indeed, one Wikipedia article mentions the correct date and place for the battle, but claims that it was fought between a different Polish leader and a Russian force!  Were the Russians invading Poland in 1809?  I'm sorry to say that my education has failed to provide much detail on wars in eastern Europe...

Either way, the scenario can be gamed as written even if there is some doubt (in my mind) about its authenticity.  So, what have we got?

The Scenario


In the game, 1 large and 2 smaller columns will attack Grochow.  We didn't have any Polish figures, so we substituted Steve's Russians instead.  This shouldn't make any material difference, as the number and classes of the units were given in "Blunders on the Danube" and we kept to those forces.  The attackers have 6 turns to take the town of Grochow; if they can do this then they win the game.

It'll be a difficult task, though.  The town is heavily garrisoned by Austrian infantry and can only be reached by passing through gaps in impenetrable forest.  There's also a small Austrian detachment in the village of Radzymin; will they be able to threaten the Russians' flanks or rear as the attackers pass by?


We decided to use my "Black Powder Personality Cards" once again.  The cards for the fairly poor quality Austrian commanders gave 2 of them a high level of decisiveness, though with their otherwise under-average abilities, this might be better termed "arrogance".


On the other hand, we had some personal difficulties in reconciling the highly skilled Russian leadership with the portraits on the cards!  It did cause a few hesitant laughs, for sure.

So, the numbers of units are about equal, but the Russians are mostly light cavalry with only a few infantry units.  The Austrians are the other way around: mostly infantry with only 2 units of cavalry.  The Russian leadership is much better, but even so, how is a mostly cavalry force going to assault a town?  It's going to be tough...

The Game


Near the town of Grochow, the Russians advanced rapidly and, with their skilled commanders, deployed easily into an attack formation.  Their plan was (I believe) to knock out the supporting Austrian infantry from both flanks of the town before turning inwards and assaulting the built-up area from 3 sides at once.  In past games of Black Powder, we've found that units in buildings are exceptionally hard to dislodge, so this plan was probably their best hope.  Still, it looked like a pretty tall order...


Straight away, one of the Russian attack columns came under heavy fire and was halted, disordered.  Even at this early stage, the assault looked unlikely to achieve its objectives.


In the sideshow near Radzymin village, a lone Austrian Hussar regiment saw off successive, but uncoordinated, charges from 2 Russian light cavalry units.  Indeed, in the first fight, every hit was saved and so neither regiment took any damage (I guess they just rode past each other, shouting insults).


This couldn't go on forever, though.  In the end, the irritated Russians brought up 2 fresh regiments of light dragoons and obliterated the tiring Austrian hussars.  Still, they'd tied up 4 times their own numbers for several turns...


Still trying to prove their worth, the Russian light cavalry regiment who had failed to damage their Austrian counterparts before now saw an opportunity to charge an enemy battery in the flank.  The artillery should have been toast, but once again neither side inflicted any casualties.  We had to look up the rulebook for this one, as it was a situation that none of the players ever imagined would happen.  Our reading was that the cavalry retired and the artillery held their position; no doubt the gunners jeered mercilessly at the backs of the retreating cavalrymen!

Sadly, but not unexpectedly, in the next turn this battery was caught in the other flank by the Russian light dragoons and annihilated.


Back at Grochow, the fighting was furious now.  On the defender's left flank, the attack had stalled, but a Russian column managed to charge the militia on the right.  Astonishingly, the raw Austrian troops wiped out their attackers.

In this they may have been helped by a blunder by the Austrian subordinate Oberst Anon.  He had tried to rally the damaged front line of militia, but instead caused them to fall back.  Miraculously, CinC Von Mohr roused himself from his normal inefficiency to order the fresh, reserve unit into position just before the Russians made contact.


With time running out, the increasingly desperate Russian commanders threw in their other flank attack.  This infantry unit was savaged by musketry as it charged, then fought to destruction by the large unit of Austrian regulars who were facing it.

The next volley from the Austrians also routed the one and only Russian artillery battery.  With no cannons and with only 2 infantry units left, the Russians decided that their chance of taking Grochow was negligible and so they conceded the game.

Conclusion

This is the first time that we've played a historical scenario, even if there is some doubt about who actually fought in the real life battle.  OK, we substituted one of the sides and used Russians instead of Poles, but that wouldn't have made any substantial difference.

As written, I cannot see how the Poles/Russians can possibly take Grochow in this game.  Sure, they have large numbers of light cavalry, but those aren't much use in an urban assault.  The attackers also have very good leadership and the defenders are poor in that respect, but all the Austrians have to do is stand there and get in the way  Their sub-standard generals don't really interfere with that!  

"Blunders on the Danube" is a scenario book written for "Field of Battle", but unless those rules operate very differently from Black Powder then it's hard to see what the attackers could do differently.  I commend Steve and A. for trying (and at least they did manage to savage the Austrian detachment at Radzymin), but really I don't think they were going to win this one!

Sunday 4 October 2015

Zomtober 2015 - Week 1

Introduction

It's Zombtober again (see Brummie's Wargaming Blog if you don't already know what Zombtober is)!  This will be my 3rd Zombtober and, as in 2014 and 2013, I plan to present a series of "duels".  Each week I'll show a new survivor and a new zombie, together with a short description of their current situation.  The question then is "what happens next?"; anyone can join in with opinions or theories.

B.A. vs "Little Girl Zombie" (LGZ)


For week 1, I've finished painting a couple of models that were not-quite-complete after the "Big Tidy".  These figures have been hanging about on my painting desk for a very long time, so Zombtober was the perfect reason to finish them.


"B.A." is, of course, based on the character of B. A. Baracus from the television series "The A-Team", as played by Mr. T (do none of these people have real names, rather than just initials?).  The model is from Foundry's SV037 "B Team" pack.  The figure is a little wooden in pose and I feel that the sculpting is a bit soft (especially of the face), but it is a very recognisable miniature and I'm happy to have it in my collection.


The little girl is, I think, from Studio Miniatures - though their website is down right now and I cannot verify this.  She's been in the wars a bit: her face (especially around the jaw and mouth) is all smashed up and she also has a gaping hole in the side of her torso.  However, she's still clutching her doll.

I painted the doll as a simplified version of "Upsy Daisy", from the popular kids TV series "In the Night Garden"; it seemed as good a starting point as any other.


I have no doubt at all that on an average day B.A. could overpower LGZ physically very easily, either by shooting her or in melee - it's just no contest!  However, I do wonder if his heart is in the job?  B.A. looks a bit vacant; he's either staring at something in the distance or he's lost in thought.  Either way, he's distracted.


If his head isn't in the game then LGZ might be able to bite B.A., though with a smashed jaw even that could be tricky.  No, I think that LGZ's best chances are either to freak out the big man by standing and staring at him, or possibly by moaning loudly enough to attract a pack of adult zombies.

So, who wins?

Week 2 is this way -->