Wednesday 28 November 2012

A Long Time Ago in a Small Town in Germany...

Introduction

Another Tuesday evening at the Helensburgh Games Club.  There are usually at least 6 kids wanting to play whatever game I host, so I'd better not disappoint them.  What to put on this time?  I know - I'll try out the Black Powder rules with my 6mm Napoleonic forces.  That'll learn them a bit of history, won't it!

Since this is only the second time I've ever played Black Power and since there's no-one else present who knows the rules, I've tried to keep it simple:
  • All generals have a command rating of 8.
  • All units are standard size and are made up of 4 bases of 6mm figures.  4 bases allows me to represent easily the difference between a unit in line (4x1), attack column (2x2), march column (1x4) and square (should be obvious!).
  • Each brigade is made up of 3 units and 1 cannon.  Most of the units are vanilla line infantry, though there is a scattering of light infantry, light and heavy cavalry as well.
Even with these restrictions, I'm sure I'll make mistakes in interpreting the rules under pressure.  As long as everyone enjoys themselves; that's what really matters!

Early Moves

The players chose name-cards for their commanders; there were a fair number of princes and archdukes on the Austrian side!  These names didn't have any game effect, but would (I hoped) help to set the atmosphere.  My pride in thinking of such a ploy was somewhat dented when I had to explain that the Austrian general "Hiller" was not the guy who led the Nazi party and that the French general "Grouchy" wasn't just someone with a bit of a sullen attitude.  I think that the players were just teasing me, but maybe not.  Oh, well!

To start with, all the Austrian generals and most of the French just made trivial adjustments to the positions of their forces.  When it was his turn, the French commander-in-chief was clearly frustrated by this.  His first order of the game was to his 1st division: "advance towards the enemy as quickly as possible!"  The appropriate command roll was made and gave each unit in the division 3 moves; this took the 5th Hussars and the 2nd Carabinieres to within spitting distance of the Austrians on the road.  The French general was horrified.  "How far did they move?!" he exclaimed.

However, the French attitude rapidly changed to one of glee as the Austrian general attempted a complicated move (rather than relying on automatic responses to the presence of the enemy) - and failed the command roll.  The 2nd Jaegers in march column on the road were obliterated by the French cavalry, taking the Austrian brigade commander with them.  The hussars then swept forward into the Austrian Cuirassiers.  Caught in march column as well, these too were destroyed - though the hussars took some hits in the process.  It was only a matter of time before the nearby Austrian artillery was also wiped out by the rampaging French cavalry.

Only a desperate fight by the Austrian 4th Hussars managed to halt the Carabinieres.  Eventually, these French cavalry were sandwiched between the Hussars and an Austrian infantry regiment who had marched at the double from the centre; this was too much for the Frenchmen and they broke.  Still, the Austrian right wing was devastated!

Piecemeal Attacks

Encouraged by this, the far French wing advanced.  Their infantry columns made an impressive sight, flags flying and drums beating as they marched forwards.

However, there was a solid line of Austrians waiting to receive them.  The Frenchmen were battered by a storm of musket and cannon fire; first one unit and then another broke and fled.

Finally, the Bavarian brigade in the centre decided to advance.  There was little in the way of opposition in front of them and it looked as if they should push aside the shaken 36th Austrian line regiment with ease.  The Bavarian cavalry charged, expecting to rout their enemies easily.  They inflicted 3 hits on the Austrian infantry and took 2 in return - but every single one of these five hits was saved with a roll of '6'.  This left the combat tied; the cavalry pulled back, while the infantry took a break test which caused them also to retire.  Vengeful Bavarian artillery eventually put paid to the 36th, but the Bavarian advance had been stalled.

Conclusion

At the end of the evening's play, one Austrian brigade had been effectively wiped out.  The central Austrian command was damaged and in disarray, but the far brigade had just held its ground and wasn't hurt.  The 2 French brigades were both shadows of their former selves, though each still had some combat power remaining, whilst the Bavarians in the centre were fully effective.  I'm really not sure which way it would have gone, had we played for longer!

Mistakes?  Sure, I made some.  Most obviously, I should have double-checked whether infantry that are threatened by cavalry must form square or if this is only may form square.  I also need to re-read the rules for manhandling artillery and I need to dig out my gun teams and limbers so as to give the players more choices there.  I should re-read the bits on free moves in the face of the enemy.  There's probably more, but that'll do for now...

Sunday 25 November 2012

Spaceballs!

Mine, all Mine!


Recently I mentioned briefly that I was stuck on several gaming/model-making projects (here).  Several of my loyal followers were kind enough to make some useful suggestions about these, especially for my Space Mines for Full Thrust.  This helped me to come to a decision on how to proceed, so here it is: my recipe for making cheap, simple space mines!
The USS Toronto about to enter a minefield

1. Make Bases


I used thick cardboard (mounting board), cut into rectangles of around 2" by 3/4" (5cm x 2cm).  This certainly fits the "cheap" requirement of the project; I have a large bag of offcuts of mounting board, bought from my local art shop for a very low price.
I don't think the exact size of each base matters, unless the rules you wish to use mandate this.  My favourite space rules, Full Thrust, treat each mine individually.  I think I prefer the idea of mines being an area feature instead, so some house rules are probably in order.

2. [optional] Shape Bases

It only took a moment to give each base a slightly smoother shape by trimming the corners off when they were all stacked together.  I could have continued further and rounded them with more cuts, but decided not to do this.

3. Drill Holes

 Again, it was fairly easy to make holes in the bases for the wire stands.  I just stacked the cardboard up until the height was about the same as the length of my drill and then bored 3 holes through each stack.

4. Add Stands

Next, I glued lengths of wire into each hole.  I used 20 gauge florist's wire (the plain or galvanised sort, not the plastic coated ones), cut into random lengths from about 3/4" to 1 1/2" (2cm to 4cm).  Again, this is really cheap and can be bought in bulk.  Annoyingly, I ran out after preparing a dozen or so bases.  I've been using the same packet of florist's wire for various pinning and basing jobs for at least 10 years, so it came as something of a shock to actually use up the last piece!

5. Fit the Mines

For my space mines, I am using some 6mm round beads.  These particular beads have indentations around the perimeter, inset with some sparkly stuff and they were somewhat harder to find than the very common plain round or faceted beads.  They're still cheap, though: a packet of several hundred only cost a pound or two.  The beads are easily glued to the stands - after all, they already have a hole drilled right through them!

6. Undercoat

I used a cheap, black aerosol primer to undercoat these models.

7. Paint

 Now here's the bit with which I really had difficulty: what colour is a space mine?  In the end I chose to paint the indentations (including the hole in the top) with a bright red.  Once that was dry I then covered the body of the mine with dark steel/gunmetal.  Job done.

And that's it.  Simple and cheap, for sure.  Effective?  You be the judge of that!  Once I obtain some more wire though, I intend to make many, many more of these.

Wednesday 21 November 2012

Lost Lands: The Howling!

Introduction

Ever since I obtained my copy of Adventures in the Lost Lands, I've been intrigued by the idea that we could play as the animals as well as humans or proto-humans.  Finally I got to try this out on an unsuspecting group of gamers at the Helensburgh Games Club.  This is what happened...

Setup

The players would each take 1 member of a pack of Dire Wolves.  They would have the task of hunting for food (of course) and seeing off any other predators (within reason).  To introduce a bit of character into the game, I gave them the further goal of scent-marking all the trees on the table.  They were let off from marking the forest; only the individual stands of trees needed to be treated in this way - I'm not totally unreasonable! 

Also, I did request that the players only communicate with each other by using barks, growls or whining.  One of them very sensibly pointed out to me that the wolves should be able to understand each others language, so I relented and instructed them that they could communicate in English - but only with single words at a time.

I made up individual character cards for each wolf in the pack.  All of them had some minor variations from the standard profile that I use for dire wolves:
  • Alpha is the leader: REP5, plus the Inspire attribute.
  • Fang is an up-and-coming challenger: REP5, plus ferocious.
  • Rex is a fast, strong young animal: REP4, plus Athlete.
  • Scar is past his prime: REP4, Slow
  • Fleabag is a low-ranking pack member: REP4, Clumsy
  • Fluffy is an adolescent at the bottom of the pack: REP4, Runt

The Dawn Patrol

The morning started off bright and fine as the Twin Pine wolf pack set off to patrol their territory.  Birds were singing and there was a freshness to the air that made the wolves feel glad to be alive.

Rex marking his territory
They jogged along joyfully from tree to tree, marking them as they went.  The animals spread out, so as to cover the ground better.

Fang and Scar went to investigate a strange smell that came from a small clump of vegetation near to the river.

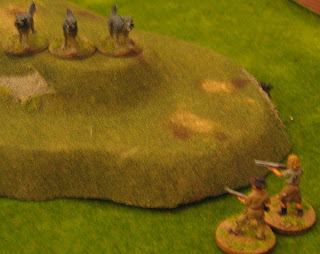
Without warning, a large sabretooth cat came round the corner of the hill.  It seems that the cat had also been investigating the vegetation, but it certainly wasn't going to put up with the smaller predators!

Alpha came towards his pack members from the other direction, only to discover a small pack of Thylacines who had been hiding from the Smilodon (sabretooth).

The sabretooth growled and charged at the 2 wolves in front of it.  Scar backed off, leaving Fang alone to face the huge beast.  It was a very one-sided fight that quickly ended with Fang's death!

At the same time, the Thylacines split into two groups and bolted.  Alpha pursued one group, caught up with one individual and killed it efficiently.  The remaining Thylacines fled.

This left 3 wolves in the vicinity of the smilodon.  The cat immediately charged Scar and wounded him, but Fluffy came in to defend his pack-mate and the older dog was able to regain his feet.  Alpha returned quickly from his pursuit of the Thylacines and attacked the smilodon from behind.  He immediately locked on and injured the larger animal.  The combat swayed to and fro for many rounds, with both Scar and Fluffy being thrown out of the fight on occasion - but they always returned and the sabretooth gradually weakened as Alpha never released his grip.

Eventually, all 3 wolves managed to lock on to the dying cat and hold it down until it collapsed from blood loss.  It fell near the body of Fang.

And what of the other wolves, during this titanic struggle?  Rex was still running around and marking trees, oblivious to the pack leader's demands for assistance.  I suspect that he would be severely chastised afterwards.  And Fleabag was roaming the woods, looking for squirrels!

Bringing Home the Bacon

For our second game of the evening, we reset the terrain a bit, shuffled the players around and reinstated Fang ("Son of Fang"?).  This time, the wolves were hungry and there was a lot less marking of territory.  The pack had a grim and determined air about them as they moved through the land.

Immediately, before anyone had moved, we rolled doubles and another PEF was placed close to the pack, right on the edge of the map.  This was resolved very quickly as a lost, lone Chalicothere.  Alpha, Fang and Rex immediately charged up the hill and attacked the poor beast.  With nowhere to hide, it didn't stand much of a chance, though its sheer size kept it going for a while.

While the pack leaders were bringing down their prey, the other 3 wolves disturbed a small herd of Miohippus close by.  Scar, Fleabag and Fluffy chased after them and nearly caught up, but the tiny horses were too nimble and they all escaped.

The 3 disappointed hunters continued over a nearby hill, only to come face-to-face with a strange pair of  apes.  The wolves had never encountered humans before and were initially a little hesitant.  Henry Orme and Lady Constance used this opportunity to fire their rifles at the animals, but both missed wildly.  The wolves responded by charging at the noisy, bad-smelling people!

Lady Constance stood her ground and fired again as Fluffy and Scar attacked her.  Her aim was dreadful; she missed and was torn to pieces within moments!

Henry Orme turned and ran when the wolves charged.  He couldn't outpace Fleabag, though; the animal caught up with him in the middle of the river.  However, Fleabag wasn't as successful as his companions and didn't manage to injure the man.  Although the wolf grabbed hold of his opponent briefly, Henry broke free and fired another shot.  He must have been in shock or something, for his aim was just as poor as before.  Again Fleabag charged, the man fled, was caught, broke free.  This pursuit eventually took the pair of contestants quite a long way from the rest of the pack and the fight was still unresolved when we had to pack up at the end of the evening (though I'd put my money on Fleabag, I think).

Fluffy and Scar were trying to decide whether the dead woman would be good to eat when they noticed movement from behind a nearby bush.  A pair of dodos came into sight...

...and the two wolves immediately decided that they fancied poultry for dinner instead.  They charged the birds; the outcome was predictable, though Alpha (having finally finished off the Chalicothere) decided to muscle in on Fluffy's bird and was indeed the one to deliver the fatal bite.

With the blood lust running high, Alpha and Fang decided to explore further.  The rivals startled another small herd of Miohippus near the forest (or was it the same herd as before?)  Unlike their less experienced brethren, this pair of top dogs each brought down one of the little horses quite easily.

Finally

So, this was different, but the players really enjoyed it.  Indeed, some of them demanded to run the PEFs and encountered creatures, even though these all used programmed movement.

The animals involved are mostly from very different eras and geographical regions.  But that's OK - it's a Lost World, where dodos can live alongside sabretooth cats and primitive horses!  I suppose I could try to model just one time period and location, but that wouldn't be as much fun, would it?

One change that I should have made was to restrict the number of kills that the pack could make.  It seems likely that real predators would have settled down to feast, rather than continuing to run after fresh prey (yes, Alpha, Fang - I'm looking at you!)  Still, this was the first time I've run a scenario like this.

From the positive reactions of the players, I will probably do this again sometime.  Maybe I could split the gamers into teams (opposing packs)?  Or have some players as the prey, with different goals?  Or introduce my Neanderthal figures?


Sunday 18 November 2012

Stalled Projects

Ennui?


I've not done very much model-making recently.  Partly this is the colder, darker season approaching rapidly; it does tend to sap my energy a bit.  Mostly it's just that many of my projects are either near their beginning or are stuck on some hard part.

If near the start of an item then it can be hard to motivate oneself; it seems like such a long way to completion after the initial flush of enthusiasm.  Alternatively, some projects bog down because I cannot figure out how to overcome some technical challenge, or I cannot decide on what end result I really want.

Here are a few of my projects which are currently stalled and awaiting difficult decisions...

Scenery and Cars

I have a bunch of card models to make up, for use with ATZ or other modern urban games.  Firstly, I have the Stoelzel's Big Box Store and Auto Park Playset (and I've just noticed the Trailer Town Playset is available as well, curse it :-) ).  I'd intended to make the buildings from both of these, but just haven't got round to it yet.  I'm also part-way through building some Ebbles/Genet "Folding Unit Structures", for use in a military camp.

I intend also to make a number of the vehicles from the Auto Park.  So far, I've completed one red convertible, so only 124 more pages of models to go :-) !  This is an interesting kit and will be a useful addition to my fleet of vehicles.

Obviously there's more work in building an open-topped car than a covered one, if only because the interior detail has to be done too.  However, it was the windscreen and (surprisingly) the underside that gave me the most difficulties.  Some of the Stoelzel's kits have fairly broad dark lines where the card needs to be folded and because of these it can be difficult to tell exactly where to score and crease the model.  Sometimes, as I found here, any minor inaccuracies didn't show up until many steps later in the construction, when it was too late to rescore and refold the card easily.  I'm particularly aware of the issue this week because I've also been making an Ebbles/Genet shuttle; that kit has very precise score lines and fits together perfectly.

Space Mines

I have an ambition to run a scenario involving an assault on a Starbase.  Part of the setup for such a game would be defensive minefields, but how are these to be represented?

I suppose that the minefields could be represented by counters.  However I'd really prefer a proper, 3-D model.  They'd have to be cheap, of course, if deployed in the numbers that I envision.  But what does a mine in space look like?

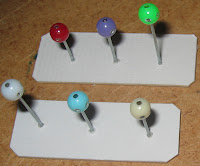
Here's the starting point on which I decided.  These are plastic beads, about 6mm across.  They're certainly cheap; you can buy many 100s for just a pound or two.  But can they be made to look like mines?

Here are my 3 attempts so far.  The group on the left uses the faceted beads.  Personally, I think they look quite effective - but outlining the facets is horribly time-consuming and not really suitable for mass production.  Bother.

In the middle and right are 2 trials using the round beads, but with different colour schemes.  They're certainly quicker and easier to paint, but I'm still not sure.  I might yet use base them in rectangular strips rather than on round bases.  Or change the colours.  Or give the beads to my daughter and find some other way of representing mines.  Aargh, I just don't know how to proceed!

Saga Scots

I've mentioned these guys before, in the context of not making much progress.  Indeed, they seem to be something of an albatross around my neck!  I bought my Viking warband last year and painted it up long ago, but I cannot play Saga until I have some opposition for them.

Finally I can report that I have finished 3 of the Scot's Hearthguard.  I've named them "Eochaid", "Ciniod" and "Domnall".  That only leaves the warlord himself, another 5 hearthguard and 16 warriors to go before I have a minimum-sized warband.  I keep telling myself that it should get easier; the less prosperous warriors will have much plainer clothing that will be quicker to paint.  Still, at this rate it'll be a long time before the party is complete :-( .


Wednesday 14 November 2012

TRWNN: The Gold Rush at Silver Falls

Introduction

In the small mining community of Silver Falls, a passing wagon has dropped a number of bags of gold in the middle of Main Street.  Probably this was an inside job; some accomplice has infiltrated the company and has surreptitiously thrown the money overboard whilst "guarding" the payroll.  Be that as it may, the sacks of gold have been spotted by a number of local ne'er do wells simultaneously; the one who ends up with the most will win.  There's a slight catch, though - each bag of coins is so heavy that a person can only carry one of them at a time.  Simplest thing is just to kill all the other gunslingers; then all the gold will be yours!

All of the initial 5 characters were either shootist or legend class and each had a number of skills as well.  They were armed with pistols, apart from Preacher Adams (who was crazy and had a sawn-off shotgun!)  Oh, I would be using the Bystanders card in the deck as well, just to make it more interesting!

Main Street

Straight from the start, Preacher Adams ran into the centre of Main Street and declared that all the gold was his.  This declaration was met with a certain amount of trepidation by the other players; the preacher's crazy attribute and shotgun made him potentially very unpredictable and dangerous!

Black Bart stuck his head round the corner of the store while the preacher was trying to load a sack of gold onto a nearby horse.  He barely ducked back in time as a blast from the sawn-off shotgun tore chunks out of the corner of the building.  Bart would have to spend a turn cleaning the splinters out of his eyes and finding his hat, but at least he was unhurt!

From the other side of the street, Blondie didn't give Preacher Adams a chance to reload.  He blazed away with his pistol; over the course of several activations he managed to score 6 hits before his gun ran empty!  Sadly for Blondie, 5 of these were scored on the horse behind which the preacher was sheltering; only 1 bullet grazed the man.  The horse was killed, though!

Black Bart recovered his composure and stuck his head back round the corner of the store.  From this angle, Preacher Adams was in the open and Bart put 2 shots into him.  Although Adams wasn't killed, he did collapse and remained unconscious for the remainder of the game.  While Blondie and Black Bart had been gunning down Preacher Adams, Santos had taken a chance to run in, grab a sack of gold and retire with it to the corner of the Trading Company building.

At this point we drew a Bystander card; this was resolved as an old enemy of Blondie's.  2 Gun Rafael burst out of the nearest door and challenged Blondie in a bad Mexican accent: "Hey, gringo!  You killed my donkey!  And my cousin!  And my best friend's uncle!  Now I kill you!"  He blazed away with both pistols, rolling something like 14 dice in total.  When the smoke had cleared, one pistol was empty and the other jammed.  Blondie had only taken a single slight wound, which he ignored due to his Hard as Nails attribute.  Rafael stood there, looking somewhat embarrassed.

Not fancying his chances at brawling with a legend, Rafael ran down the street to look for a quiet place where he could reload his guns.  Blondie started after Rafael, but his turn was interrupted when Santos shot him twice in the belly.  This knocked Blondie down, but they were just flesh wounds after all...

...so Blondie stood up, reloaded quickly and fired back at Santos.  He hit him in the left arm; this was very bad news for Santos as he wouldn't be able to reload his pistol - and the previous firing at Blondie had emptied his gun.

Duels

Black Bart had started forward to claim the gold, but was challenged by Cesar (a newly-arrived henchman of Preacher Adams).  The two of them exchanged many shots from their respective sides of the barrier of produce without hitting each other.  Bart came close a number of times, but always hit the bales of cotton instead.

Rafael returned past the saloon, having reloaded and fixed his guns.  He ran headlong into Blondie, who was coming down the street to look for him.  For a number of turns, the pair wrestled, but neither was able to defeat the other (the wounds that Blondie took from Santos were handicapping him considerably, thus allowing the gunman Rafael to fight on even terms).

The End Game

Finally, Cesar got a lucky hit on Black Bart, causing a serious arm wound.  Black Bart would not be able to reload; for the last few turns he only took slow, deliberate shots as blazing away would probably have rendered him weaponless.

Santos dithered around an outhouse for a while, but finally decided to take his sack of gold and run off (probably to find a doctor to look at his bleeding arm).

Up to this point, Jesse had hovered indecisively at the southern end of the town, waiting to see what everyone else would do.  He chose this moment to come round the corner and take a long range shot at Rafael (from behind).  Surprisingly, he hit Rafael in the leg and knocked him down - but still Blondie couldn't finish off his adversary and the brawl continued.

Finally, in the last turn of the game, Blondie broke away from his brawl and ran for the money.  Black Bart finally ran out of ammunition and also ran into the centre of the street to stand protectively over some of the sacks.  The 2 exhausted gunfighters were unable to hurt each other and the evening finished with the pair of them dripping blood all over the gold

Result

So, who won?
  • Santos ran off with 1 bag of gold, but was badly injured (1 serious, 1 flesh wound).
  • Black Bart gained 2 bags of gold, but also had 2 wounds (1 serious, 1 graze).
  • Blondie also had 2 bags of gold, but was injured 3 times (2 flesh wounds, plus an ignored flesh wound)
  • Jesse didn't achieve anything much.
  • Preacher Adams was severely wounded; his associate Santos didn't get any gold (but does get an honourable mention for putting some hurt onto Black Bart).
  • Rafael (the umpire's character) failed to get his revenge on Blondie this time, but hasn't given up hope!