Introduction
Last Saturday, Steve came round to visit and we spent much of the day gaming. First up, as always, was an outing for our 6mm Napoleonic forces. We did play a different game afterwards; you'll hear about that another time!
For the Black Powder game, a division of my 1809-ish Austrians took on a roughly equal quantity of Steve's Russians. There were only a few differences between the forces: the Austrians had slightly heavier cavalry but the Russians had more cannons. Also, many of my Austrian infantry units were larger than average, but General Gruneberg, my commander-in-chief, was addled with gout and had to be ferried around in a coach. Here's how it went...
The Scenario
Somewhere in north-east Austria lies the Falten Pass. A strategically-important road travels through a gap between rugged hills on one side and dense woods on the other. Each of the Austrian and Russian armies have sent a division on ahead to secure this passage, but these forces have arrived at much the same time. Orders are clear: the enemy must not be allowed to control the pass!
This will be a straightforward "last man standing" battle between 2 relatively equal forces. The only twist that we used was hidden deployment: a barrier of tall cardboard was erected down the centre of the table whilst we placed our armies on the board.
The Game
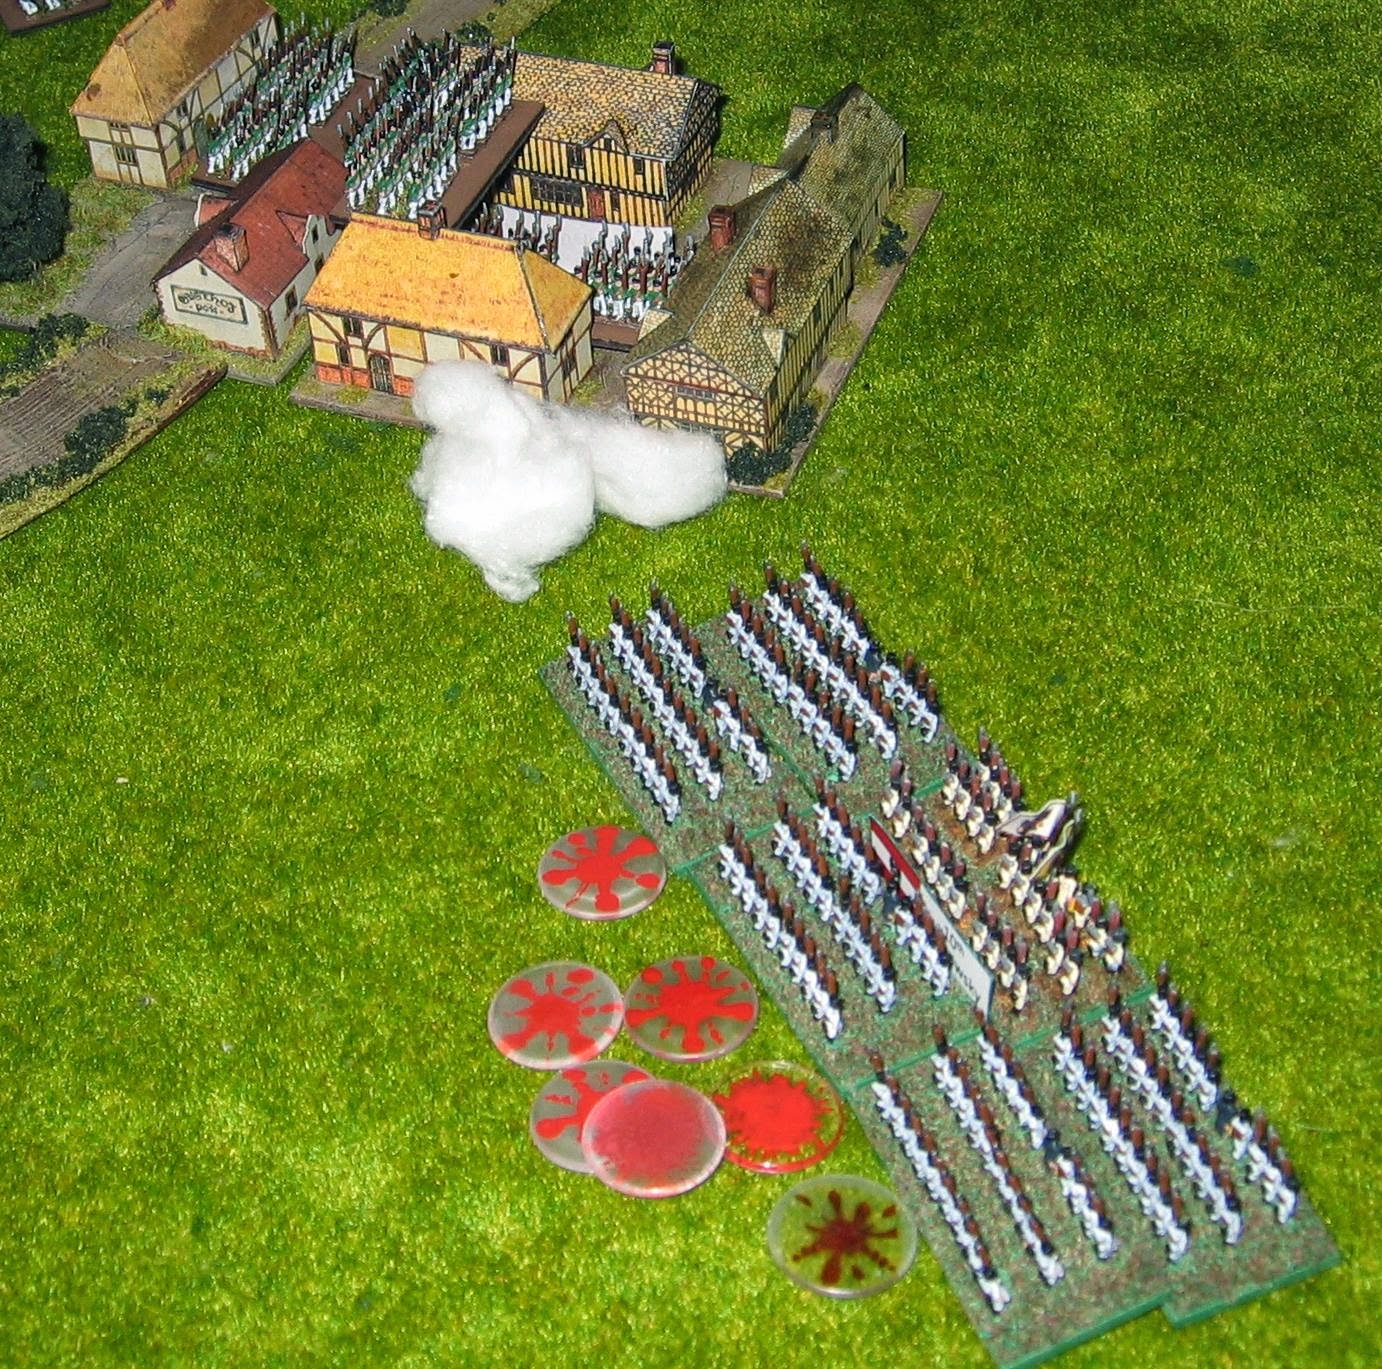
 |
| My brave Austrian infantry wait for the signal to advance |
When the barrier was removed, I could see that the Russian infantry formed a line across the centre, whilst small cavalry brigades were present on both wings. On the other hand, I had deployed all of my Austria line infantry towards the right, with cavalry to the left. My plan was to advance the infantry as fast as possible towards the Russian-held village, whilst the cavalry would screen and delay the half of the enemy army that faced them. Essentially, I'd follow the line of the road across the board.
Initially, my plan seemed to be working well. The infantry advanced (though the 2nd Brigade, on the near side, was a little sluggish) and their supporting artillery caused some confusion amongst the opposing Russian cavalry.
 |
| The Austrian 2nd Brigade advances, whilst everyone else just watches. Note the C-in-C's carriage in front of the village at the top left of the picture. |
Now things started to fall apart a bit. Major General Homburg's 2nd Brigade continued to advance in the centre, but the 1st Brigade (led by the less-than-brilliant Major General Von Tripp) halted. The Austrian heavy cavalry moved across from the far flank to support the infantry.
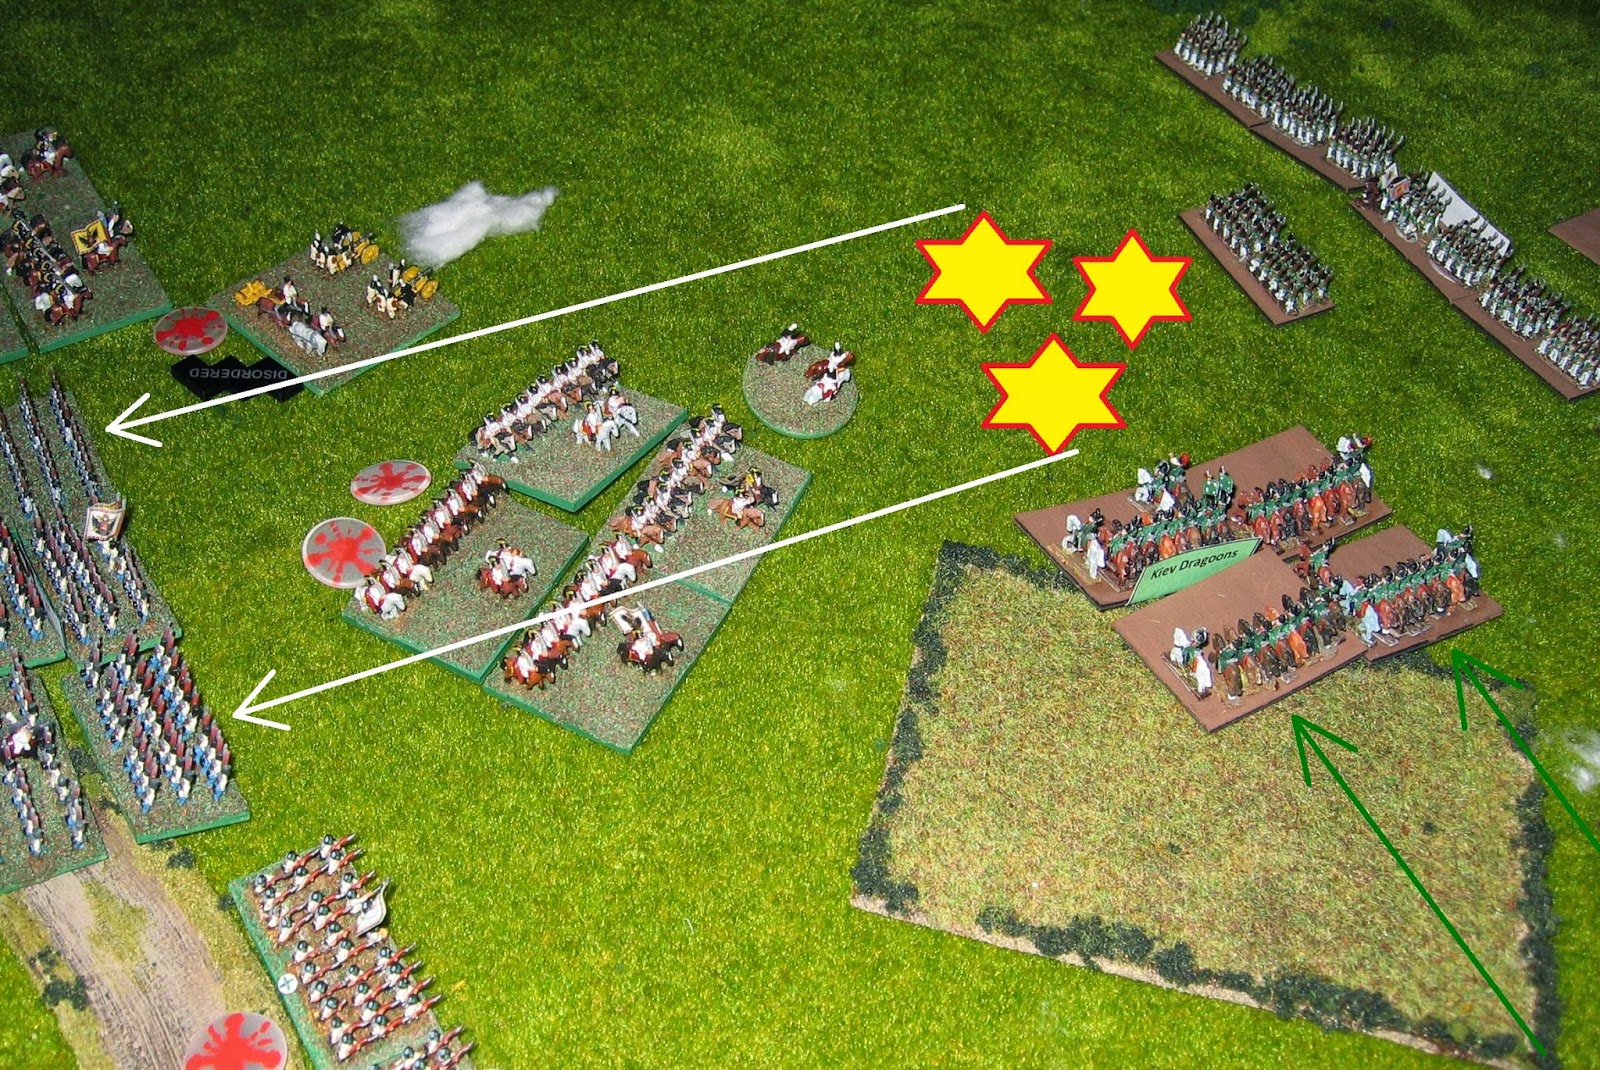
This is where it all went downhill very fast. Some of the Russian dragoons saw the exposed flank of the Austrian infantry and charged in. The poor infantry were caught completely by surprise and the unit was devastated!
The dragoons followed this up by charging a small detachment of Austrian grenadiers, but they had obviously blown their horses. Although General Homburg and his aides had to turn and flee to avoid them, the dragoons couldn't do more than make the grenadiers retire a short way.
Revenge was swift as the Austrian dragoons attacked the spent Russian cavalry whilst the reformed Austrian grenadiers poured fire onto their flank. This was too much for them and the Russian unit broke and fled.
Then the
second Russian dragoon unit attacked the 2nd Brigade's other large infantry unit. Again, the flank attack caused serious damage, though this time the infantry regiment retired, shaken. They might as well have routed off the field, though: since the brigade morale was now broken they would never rally and would automatically withdraw from any enemy approach.
Austrian cuirassiers now moved to finish off the enemy cavalry. Unwisely, they advanced into a firestorm as an enfilading Russian artillery battery shot them to pieces. Men and horses were torn apart and the unit just disintegrated as the few survivors limped away.
Well, this wasn't going at all the way I'd hoped! So far, my complete mismanagement had cost me an entire infantry brigade and half of my heavy cavalry with very little to show for it. At least Steve had the good grace not to gloat. Right, let's see if I can salvage anything from this mess...
OK, first let's eliminate the remaining, damaged Russian cavalry. The Austrian dragoons charged their Russian counterparts; in the ensuing fierce fight the Russians broke and the Austrians retired, shaken. Because the formation had already lost the cuirassiers, the heavy cavalry brigade was now broken and the Austrian dragoons couldn't be rallied. They retired to stand nearby the forlorn remnants of the 2nd Infantry, all of whom would have retreated precipitously had any enemy approached them.
 |
| A pause in the action |
By now, the entire Austrian centre was brittle and would have evaporated if anyone had looked at them sternly. On the left wing (top of picture), a few light cavalry and infantry units were valiantly holding off a large part of the Russian army. Actually, that's rather too grand a claim - in reality this part of the Russian force had a lethargic general who advanced his units with glacial slowness. It's nice to know that the Austrians don't have a monopoly on incompetent commanders!
So that leaves the untouched 1st Infantry Brigade on the right wing. Could
they save the day?
The 1st Brigade advanced and engaged the enemy under the watchful eyes of both their brigadier and the Austrian commander-in-chief himself. Actually, I suspect that the latter was just looking for a good inn where he could get a hot dinner and rest for a while in the parlour to escape the rigours of riding in a coach all day. He wasn't going to get his meal...
One unit attacked the village, but the Russian garrison were too strong and the Austrian infantry withdrew, shaken and disorganised. The other large regiment fared slightly better as they charged and routed another Russian unit in the open fields.
When the Austrians paused to redress their ranks, the garrison of the village poured a murderous enfilading fire into their flank. This was too much for the white-coats; they broke and fled. With that, the 1st Infantry Brigade was ruined. Since 3 out of 4 Austrian brigades were now demoralised, the entire army broke. In any case, the Light Brigade on the Austrian left flank was under increasing pressure from overwhelming numbers of Russian troops; it would probably have collapsed very soon as well. Game over!
Conclusion
What was left of the Austrian division probably could have conducted some form of fighting retreat, since the Russian cavalry units on one flank were totally destroyed and those on the other flank were heavily damaged (and there were no Cossacks around!). Still, 3.5 out of 4 Austrian brigades were shattered in exchange for 1 Russian cavalry brigade eliminated, so I can hardly pretend that this was anything other than a major defeat. Most of the Russian infantry were fresh and just needed good leadership to move into the fray.
Lesson of the day: watch those flanks! And beware of enfilading fire. Oh, also don't send in uncoordinated attacks by 1 or 2 units at a time. In fact, could I have done any worse?
On the comedy note, the small unit of Austrian Jaegers that belonged to the 1st Brigade blundered on their very first order. They spent the entire game hiding in the woods on the extreme right of the Austrian line, where they were too far away from their brigadier for him to issue them with a successful order. Since my Jaegers had a rather fearsome reputation from some of our previous games, this helped to put things into perspective...


Great report! I'm not fan of that era, but I'm getting increasingly interesting :)
ReplyDeleteAs for Jaegers - they belong in the woods!
Well, yes - Jaegers and woods do go together. The problem here was that they went so deep into the forest that the brigadier couldn't find them any more. I guess that they had a good time there whilst everyone else in the Austrian army was slaughtered! [What do Jaegers do in the woods, anyway? Shoot bears? Have picnics? Drink schnapps? Sing around camp fires?]
DeleteHaha, judging by our hunters they drink schnapps at home, take the rifle, shoot neighboring farmer's bull and then claim it looked like a wild boar. So yes...you were pretty close haha
DeleteNice batrep C6. Not a fan of the period but I can still appreciate a good post. Nice pictures too.
ReplyDeleteThanks, Bob. It's hard work editing down the full battle; I try to concentrate on the main action and omit all the peripheral stuff.
DeleteVery good write-up from what appears to have been a very one-sided affair.
ReplyDeleteThey say that no plan survives contact with the enemy, but I doubt they accounted for dice.
Well the Russians did get good dice on occasion, but then I think I probably did also. But my plan of attack was rubbish :-( ...
DeleteVery nice report. I like very much black powder in 28mm.
ReplyDeleteWhat did you change to play it in 6mm?
We didn't really change anything much. Here are some details:
Delete* We're using half of the distances in the rulebook, mainly because my table isn't 6' x 8'!
* Our collections are based on groups with 40mm frontages. A standard unit is 4 bases, a large one is 6 bases and a small unit is 2 bases. I suppose that if we ever wanted a tiny unit then it would be just a single base.
I do like small armies, 6mm is great. Yeah it all went wrong it does that some times. Just as well we play with metal figures and not living beings. Still if there is something you can learn from it you should do better next time.
ReplyDeleteYou're right, Clint. If I'd been a real Austrian General then I'd be horrified at the pointless slaughter for which I was responsible!
DeleteGreat batrep, nice pictures and explanations!
ReplyDeleteThanks, Phil. I'm always looking for ways to improve though, so if you have any suggestions then feel free to make them!
DeleteThat looks fantastic Hugh and it was a good write up.
ReplyDeleteThanks, Simon. I'll try to do better next time. At least I can hope that my readers got a good laugh out of it!
DeleteReaders of the series will contrast the active Russian dragoon commander with the extremely poor predecessors in the 2 previous meetings.
ReplyDeleteThe narrative omits to mention the plucky Austrian cavalry battery which bolstered the centre for 3 moves while all other units were on the verge of breaking.
Its fire (even when shaken by Russian counterbattery shooting) was fierce enough to dissuade any of the Russian infantry from advancing.
Otherwise there's an untold story on either flank.
The Russian hussars resisted heavier Austrian cavalry on the hilly side of the pass, both mounted arms fighting to a standstill.
The Austrian Jagers posed a potential threat if they could only infiltrate through the woods onto the Russian flank. They've been a nasty opponent in earlier games, and the Russian foot were delighted when the grey coated devils failed to show up.
Once again, Black Powder provided a traditional wargame with a strong narrative feel.
As for next time: The Czar takes a dim view of competent officers - dangerous, and potentially subversive. That lot will be posted to the Siberian inspection. Expect a more typical bunch of blunderers next time.
Finally, Hidden deployment, plus random commander rankings made for an exciting game. I deployed intending to launch an infantry attack on my right.
I found the attacking brigades facing all the enemy cavalry while being led by the most plodding commanders. A quick change of plan was required.
Yes, you're right Steve: I did omit a number of details. The Austrian horse battery in the centre made several near-legendary morale test saves and survived long past the point where all others might have fled and the Russian hussars stalemated the Austrian hussars and uhlans on the far flank. It was a good game (even though I screwed up royally!)
DeleteVery nice report
ReplyDeleteThanks, SK.
Delete