Showing posts with label Hasslefree. Show all posts

Sunday, 31 May 2015

The Crooked Dice Mystery Machine

Introduction

I've had my Mystery Inc team (also known as the "Scooby Doo gang") for some time.  These are 28mm models from Hasslefree and are, I think, fairly widely known about by those with an interest in such matters.  However, what about their ride?  The team need a vehicle.

In the original cartoon show they had an iconic van with an instantly recognisable colour scheme.  Oddly, there are many imitations and variations of this paintjob applied to a number of different types of real life vans - just google for "Mystery Machine" images.  These are owned by fans, re-enactors (?!) or (more likely) professional entertainers with reasonable budgets.

But what about 28mm models?  Well, there are several choices for the Mystery Machine.  Most commonly recommended are toy vehicles, but I find such toys to be badly scaled, often quite goofy-looking and frequently out-of-production and hard to find.  But there's another choice...

Another Option

Hidden away on the Crooked Dice website, listed under 'Heroes' (I think), is a 28mm model of a Transit van.  This clearly fits into the "cops and robbers" category of Crooked Dice's 7TV game, as the example paint jobs show.

But there is a US manufacturer called Company B who produce - amongst other things - decals for some fairly off-beat models.  For example, they make "police phone box" markings suitable for a Doctor Who Tardis as well as tank insignia suitable for the Japanese "Girls und Panzer" cartoon show (and if that isn't weird then I don't know what is!)

What's significant for my purposes here is that Company B produce Mystery Machine decals to fit the Crooked Dice van.  Yay!  So, at the Carronade show earlier this month I went to the Crooked Dice stall and bought a van.  An online purchase from Company B was delivered very quickly and I was in business.  Here we go!

The Crooked Dice Van

So, the Transit van comes as a resin body with 4 metal wheels and a small sprue of accessories.  I wouldn't be using the police light or siren, so I needed only the mirror stalks from the accessories.  The wheels have a guide on the backs of them that lines up with the resin body so that they fit at just the correct depth; this is a nice touch.

It took but moments to glue all the parts together.  On the whole they were well cast and required virtually no cleanup, but I was disappointed to find a significant air bubble in the resin, located just on the edge of a front wheel arch.  I probably spent more time repairing this defect and restoring the body shape around this area than I did with the rest of the construction.

After undercoating, I painted the body of the van with pale blue, then gave it a wash of a medium blue.  This is essentially a cartoon vehicle, so I didn't plan on a lot of weathering or details such as a numberplate!

The doors and windscreen were outlined with a very dark grey.  The same colour was used to paint the tyres, radiator vents and wheel arches.  These latter were exceptionally difficult, since there wasn't really enough space for a paintbrush and I did wonder if I should have painted the wheel arches before gluing on the wheels.

A silver colour (Humbrol aluminium enamel) was used for the hubcaps, bumpers (fenders if you're from the USA), door handles, headlamps, mirror stalks and radiator grill.  For really shiny, chrome-like effects I still prefer to use this Humbrol enamel paint, though pretty much everything else I do is in acrylic paints.

The silver bits were given a very thin black wash; this is most evident on the wheels.  A few extra details were added - the indicator and stop lights - and then it was time to do the windows.

I've not really painted windshields before, so I looked on the internet for references.  One that I found especially useful was a Flames of War article called Lumpy's Guide to Windscreens.  I tried to follow the "not-so-easy" method and I think it came out quite well.  Whoever you are, thanks to Lumpy!

Now for the decals.  The Company B decals are designed for this model and for the most part were easy to use.  Their target location was fairly obvious and the decals were sturdy enough and came loose from their backing paper easily.

I did have a slight problem with the larger, lower panel decals: they were too long for the bodywork!  In order to make them fit, I cut each of these pieces into 2 parts and removed about 2mm of decal from the cut edge.  This is visible if you look closely; there is a slight discontinuity in the pattern where the shortened parts meet.

The rear doors caused further issues.  In this case, it was because the hinges and handle were raised areas that would prevent the decal from sitting flush with the door.  I had to cut a hole for the handle into the right-hand decal and make slits near the upper hinges in both decals in order to make the decorations fit properly.

Conclusion

For the most part, this was a very straightforward model to build and paint.  There were a few minor hiccups which required a certain amount of model-making skill to fix, but nothing too bad.  This isn't a cheap piece though - neither the Crooked Dice van nor the Company B decals will ever compete in price with the second-hand toy market for Mystery Machines!  Still, I'm very pleased with the end result.

Wednesday, 20 May 2015

We don't need another hero...

More Heroes!

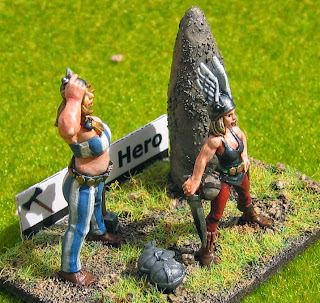
In my last post, I showed you my barbarian heroine, based for Hordes of the Things.  Well, I found that I'm quite partial to painting heroes & heroines, so here is another such HotT base:

Once again, these are Hasslefree figures.  They're called Rennie and Tilda by the manufacturer, but I can't help feeling that I've seen their likenesses somewhere else...

The composition is somewhat pedestrian and I feel quite annoyed that I couldn't come up with something a bit more exciting.  Having the 2 people and the menhir (made from a lump of milliput) placed at the points of a triangle on a flat base is...dull.  At least, that's what I think.

As always with my HotT bases, I've stuck a label to the back.  This indicates the affiliation of the model (the double-headed axe is for my barbarian army) as well as the classification (Hero, obviously).

 The hardest parts of these figures to paint were probably the hair colours (something with which I've never had much confidence) and - surprisingly - the wings on the helmet.  Both of these parts are very prominent on the models and therefore will get more attention, or so I suppose.  It certainly made me more anxious about getting the colours right!

The 2 stacked helmets on the ground are spare heads from a box of Gripping Beast Saxon Thegns (I didn't have any Romans!)  Being plastic, it's not impossible to carve out the face and leave just the helmet, though I couldn't face doing many more of these.

Now I find myself listening to Tina Turner - that song just won't leave my head...

Sunday, 17 May 2015

There was a young lady from Riga...

"There was a young lady of Riga,
 Who rode with a smile on a tiger.
    They returned from the ride
    With the lady inside
 And the smile on the face of the tiger."

[Limerick, traditional (?)]

So, another model has rolled off the production line.  In this case, it's a Hasslefree model called "Barbarian Libby".  She's destined to be used as one of the heroes for my slowly-forming Barbarian army for Hordes of the Things.  It's not difficult to find barbarian heroes from Hasslefree; sometimes it seems as if half of their catalogue fall into this category!

Sadly, my HotT barbarian army is not yet close to completion.  For years it has been low down on my list of priorities, though every now and again I do finish another base or two.  You can see mention of it in a few earlier posts, here (January 2014), here (November 2013) and here (also November 2013).

I'm not that happy with my painting on this model.  It's good enough for gaming, but the sculpting is so good that I felt the figure deserved only the best painting.  While my output is, I think, pretty decent, it's nowhere near the display quality that I'd have liked.  Ah well, we do what we can.

The tiger comes with its own round scenic base, so there wasn't much need for landscaping in order to produce a suitably heroic pose.  All I had to do was cut a circular hole in the square HotT base, glue in the model and then fill the gap.  I think that worked well; it's not possible to see the join.

Will they return from the ride with the lady inside the tiger?  I doubt it!  I think that this barbarian queen has her beast totally under control.

Thursday, 30 October 2014

Zomtober 2014: The Leftovers

Introduction

As I'm sure you're all aware by now, I've been posting a series of model "duels" for Zomtober 2014.  Each duel consisted of one zombie and one survivor, often with matching elements on the bases to tie the pair together.  However, I've also used my enthusiasm for the month's challenge to finish off some other models that were lying around on my workbench.  Here are some of the figures that just didn't fit into a duel, perhaps because I didn't have a matching opponent or perhaps because I just couldn't see the story behind any such confrontation.

Zombie and Survivors

There's a single zombie here, plus 4 survivors of various types.  From the left, they're by Studio Miniatures, Wargames Factory (men), Hasslefree, Wargames Factory (women), Wargames Factory (men).  All of them are pretty much "out of the box"; there's very little conversion work on these models.

The first and the last figures are recent builds; they're on resin bases by Escenorama.  Note that the zombie isn't alone: there's an arm reaching out of the displaced manhole cover beneath him.  It's not clear whether this belongs to one more zombie, or whether the sewers are full of them!

What's my name?

 My last model for tonight is not completed, but I have a reason for showing him anyway.  He's a somewhat overweight survivor who is dressed for the beach with shorts, a tee shirt and flip-flops.  However even if he doesn't have much else going for him, this man is wielding a solid oar in both hands.  I don't think the zombies will find him an easy target!

I still need to paint his belt; I think all other details have been done, but I could have missed something.  Also, I need to give this chap a name.  So here's the deal: what should I call him?  Please make as many suggestions as you like and I'll choose the one I like best.  I'd prefer either a first name or a nickname rather than a surname (and nothing too obvious, such as Juan, please!)  You have until Sunday next!