Mine, all Mine!
Recently I mentioned briefly that I was stuck on several gaming/model-making projects (here). Several of my loyal followers were kind enough to make some useful suggestions about these, especially for my Space Mines for Full Thrust. This helped me to come to a decision on how to proceed, so here it is: my recipe for making cheap, simple space mines!
 |
| The USS Toronto about to enter a minefield |
1. Make Bases
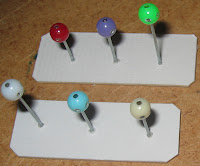
I used thick cardboard (mounting board), cut into rectangles of around 2" by 3/4" (5cm x 2cm). This certainly fits the "cheap" requirement of the project; I have a large bag of offcuts of mounting board, bought from my local art shop for a very low price.
I don't think the exact size of each base matters, unless the rules you wish to use mandate this. My favourite space rules, Full Thrust, treat each mine individually. I think I prefer the idea of mines being an area feature instead, so some house rules are probably in order.
2. [optional] Shape Bases
It only took a moment to give each base a slightly smoother shape by trimming the corners off when they were all stacked together. I could have continued further and rounded them with more cuts, but decided not to do this.3. Drill Holes
Again, it was fairly easy to make holes in the bases for the wire stands. I just stacked the cardboard up until the height was about the same as the length of my drill and then bored 3 holes through each stack.4. Add Stands
Next, I glued lengths of wire into each hole. I used 20 gauge florist's wire (the plain or galvanised sort, not the plastic coated ones), cut into random lengths from about 3/4" to 1 1/2" (2cm to 4cm). Again, this is really cheap and can be bought in bulk. Annoyingly, I ran out after preparing a dozen or so bases. I've been using the same packet of florist's wire for various pinning and basing jobs for at least 10 years, so it came as something of a shock to actually use up the last piece!5. Fit the Mines
For my space mines, I am using some 6mm round beads. These particular beads have indentations around the perimeter, inset with some sparkly stuff and they were somewhat harder to find than the very common plain round or faceted beads. They're still cheap, though: a packet of several hundred only cost a pound or two. The beads are easily glued to the stands - after all, they already have a hole drilled right through them!6. Undercoat
I used a cheap, black aerosol primer to undercoat these models.7. Paint
Now here's the bit with which I really had difficulty: what colour is a space mine? In the end I chose to paint the indentations (including the hole in the top) with a bright red. Once that was dry I then covered the body of the mine with dark steel/gunmetal. Job done.And that's it. Simple and cheap, for sure. Effective? You be the judge of that! Once I obtain some more wire though, I intend to make many, many more of these.


Great idea mate.
ReplyDeleteWell, it's not an original idea - others have made spaceships out of all manner of bits - but it'll do :-) .
DeleteThey look very effective and usable
ReplyDeleteThey'll work for me, I think. I just need a hundred or more extra bases :-) !
Delete