Introduction
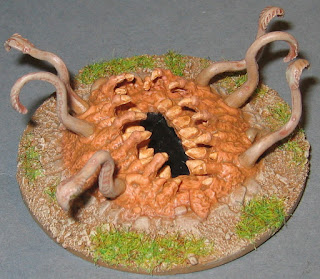
One of the several monsters I bought recently was the "91008: Desert Thing" from Reaper Miniatures. As with my other purchases, this was made from their "Bones" polymer material, which makes it very cheap. It's a very unusual monster; it is clearly an ambush predator that relies on its prey approaching its (static) hiding position close enough that it can entrap them, a bit like a gigantic, land-based sea anemone on our own planet, or a smaller version of the Sarlacc from Star Wars!
Now there are many excellent versions of this model available to view on the Internet; many of them put my own painting to shame. However, I deliberately made this up in a quick and simple manner, partly to save myself time and partly to show that it doesn't have to be hard. For any reader who says "I couldn't do it as well as you", here is my recipe!
Preparation
91008 comes as an 8-piece model. That may sound like a lot, but it isn't really. There are 6 tentacles, an inner "mouth" and an outer "shell" part.
As sometimes happens with Bones, one part - the outer shell - was slightly distorted. I started by straightening this, using alternate immersions in hot water (to soften it) and cold water (to re-harden the reshaped piece).
Once the parts fitted together to my satisfaction, I glued the mouth and shell parts to a solid base (in this case, a perspex disk) and added some sand and grit around the outside.
Block Colours
So, simple painting. I painted the teeth with white, the tentacles in lichen grey and the rest of the creature in (Caucasian) flesh. The surrounding dirt was undercoated with a mid, yellowish brown.
First Wash
I had intended to detail this model with a single, simple wash; here's the result of the attempt. I used a slightly darker brown and made up a fairly thin solution to paint on. As you can see, the creature still looks very pink and this wasn't really the effect for which I was hoping.
Second Wash
To counteract the pinkness, I gave the piece a second wash. This time, I used the same colour for the wash as I used for the dirt's undercoat. I also made it into a thicker, more-heavily pigmented solution. The monster now blends in with its surroundings much better, though its teeth have lost some of their brightness.
Finishing touches
To finish, I drybrushed the dirt twice (pale tan, followed by antique white) and then added some static grass patches around the outside. The model was then varnished for protection. Job done!
Conclusion
This isn't the best version of this model that I've seen, but it will do just fine for my gaming sessions. It was a very quick and easy piece to build, as well as being fairly inexpensive.
I'm thinking that this might see initial deployment in a "Tarzan-based" game of Pulp Alley that I hope to play in the next month or so. It would make a very good "extremely perilous" terrain feature, perhaps on a jungle path. Of course, I could also use it in a desert setting, or an alien planet, or...


Terrific posting Hugh. What a mighty beast and a great tutorial as to how you painted yours. You've certainly twisted my arm to pick one up as a result. First rate stuff and that Tarzan game of yours sounds very exciting :-)
ReplyDeleteWell, it's only a weeny monster, really. Easily big enough to engulf a person, mind...
DeleteNice, nuff said!
ReplyDeleteThanks, dGG. It's OK for a quick & simple job.
DeleteIt's another great monster from Reaper. Overall, I like your paint scheme, but I think you should make the teeth stand out more as in your third photo.
ReplyDeleteI was thinking exactly the same, Bryan - the second wash has coloured the teeth too much. I'll redo them and post an addendum...
DeleteVery nice, can see it having many uses.
ReplyDeleteI'm not sure that "nice" is the right word to describe this critter, Lee - but thanks anyway!
DeleteThat looks tremendous! What a great piece of work.
ReplyDeleteThanks, Michael; it's a very simple recipe but the model turned out quite well for all that.
DeleteEscaped from Tatoonine and appearing at a desert board near you. Excellent.
ReplyDeleteHmm - I wonder how these things breed and disperse their offspring? Perhaps they have spores?
DeleteCracking job C6! Gaping maw, check!
ReplyDeleteYup, teeth, tentacles and not a lot more, really!
DeleteNoooo, not before bedtime...
ReplyDeleteI'll be the one trembling in the attic with Grandpa's Webley close at hand.
I'm not sure that revolver bullets will do much to this beastie. Perhaps something with a bit more area effect, such as a flamethrower?
Deletehe creepier things you've produced, but I do like the way it melds into the terrain piece. Someone's in for a rough time when this appears on the table.
ReplyDeleteThanks, Joe. Since it's obviously a static animal (or plant?), it is effectively just a piece of dangerous terrain. *Very* dangerous terrain...
Delete