Tuesday, 29 August 2017

Hail Caesar: The Race for Ashkod

Introduction

My very first adult wargaming army was my 15mm Assyrians.  In the early 1980s they took on various forces owned by university friends - Saxons, Byzantines, Han Chinese, Carthaginians - using WRG Ancients Rules (5th or 6th edition, if I remember correctly).

I figured that the only way I would be able to field my Assyrians against a contemporary army was if I collected it myself, so I started to build forces for late Hebrews (Judeans), Midianite Arabs and Kushite Egyptians (the black, 25th dynasty).  Pretty much all of these could be used as enemies or allies for any of the others.

And that was that.  I moved away to take up my first job and suddenly was in a strange town, buying and renovating my first house and didn't have time to play wargames.  In any case, my enthusiasm for 1980s-style WRG rules had started to pale...

Roll on several decades and Hail Caesar was published by Warlord Games.  It's taken me a few years of wishing, but we finally played our first game of this last Sunday.
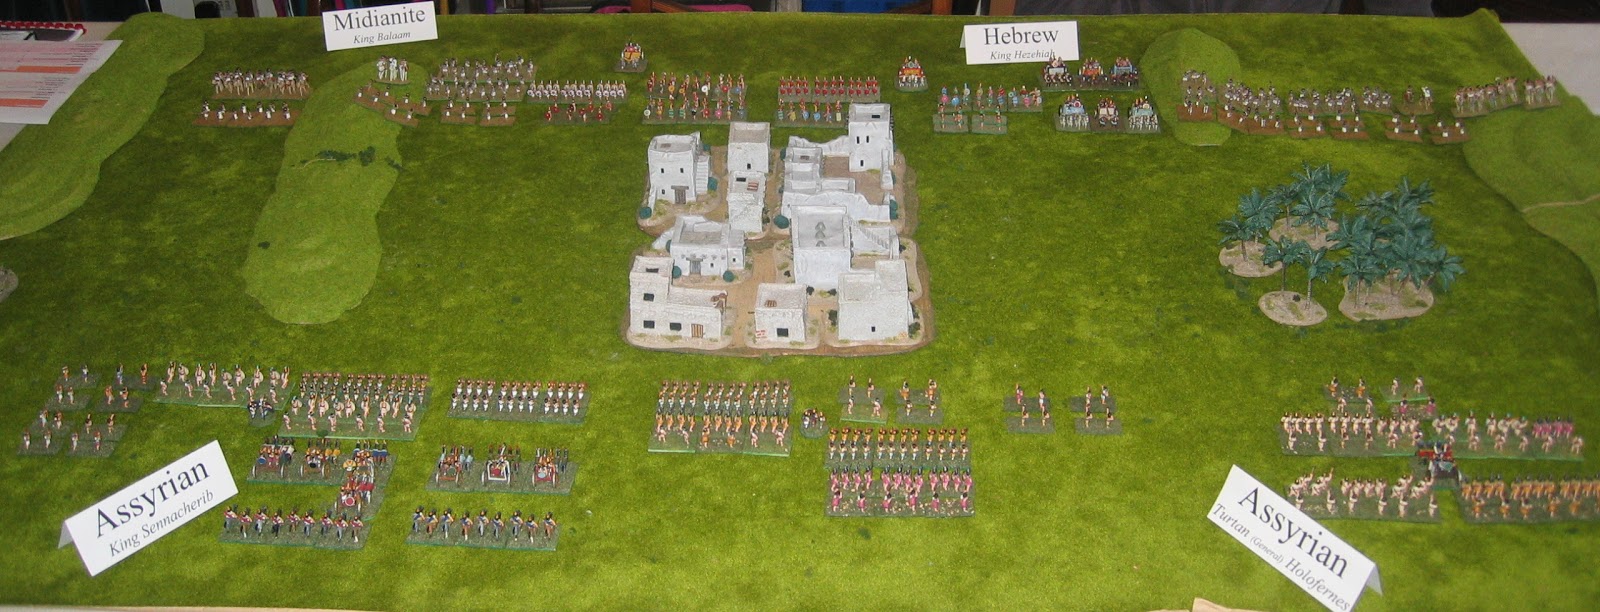


Setup

So, nothing too elaborate for our first outing with Hail Caesar.  This was to be a straight-up fight between 2 similarly-sized forces, with just a medium-sized town, some gentle hills and a small wood for terrain.  The town was divided into 4 sectors, each capable of holding one standard-sized unit.

Assyrians

  • 2 x mixed infantry divisions
  • 1 x light infantry division
  • 1 x royal division, entirely cavalry and heavy chariots.

Allies

  • 2 x Hebrew divisions, each a mixture of medium and light infantry.  King Hezekiah's division also had a couple of heavy chariot units.
  • 2 x Midianite Arab divisions, each a mixture of camels, light infantry archers, warbands and skirmishers.

The Game

  • An early series of good command rolls saw the Assyrian centre advance unopposed through the town, whilst the nearby Hebrews looked on, bemused.
  • Elsewhere, the Assyrians also seized the woods, though only with a very small force.
  • On the left flank, King Balaam's Midianites moved forwards swiftly and began to pelt the much larger Assyrian force with missiles.


  • First kill of the game went to some Assyrian skirmishers; some shooting and a failed morale roll saw opposing Hebrew skirmishers run away.  A small triumph, but still...
  • To the extreme right, a number of Midianite camels held up the Assyrian advance for pretty much the entire game, preventing their light infantry from supporting their skirmishers in the woods.


  • A determined Hebrew attack saw them gain a foothold in the town...
  • ...but another assault was repulsed bloodily, with both sides suffering heavy casualties.


  • The Midianites on the left had caused a lot of damage to the opposing infantry, taking only a few casualties in return.  Even though they were badly shaken, the Assyrians held their ground; they just wouldn't flee...
  • Near the town, the Hebrew mercenary medium infantry clashed with a lone Assyrian unit, but suffered greatly for their bravery.
  • An uncontrolled advance saw more Assyrians move deep into the Midianite lines.


  • The Assyrian light division and the Midianites on the right flank exchanged many arrows, but neither side seemed prepared to force the issue by charging into melee - at least until very late in the game.
  • Finally, King Hezekiah realised that there was nothing much in front of him other than some enemy skirmishers.  It took a few turns for his ponderous heavy chariots to catch these Assyrian levies (they kept evading!), but when he did so the outcome was completely predictable: the Hebrew chariots obliterated their foes.


  • Seeing that their skirmishers were on the verge of running away, the Assyrians' Royal Division launched a devastating mounted charge against their Midianite enemies, shattering and overrunning infantry and camels alike.
  • With other losses from the nearby infantry fights, the Midianite king's division just disintegrated; the few survivors hastened off the field.


  • Hebrew infantry pressed on through the town, but the fighting was bloody and they ran out of steam by the time they got to the half-way point.


  • Indeed, the Hebrews in the town were so exhausted that even a feeble attack by a tired Assyrian force was enough to destroy one unit.  This broke one of the Hebrew divisions, at which point we called it a day.

Winners and Losers

There's no doubt that this game ended in an Assyrian victory.  Indeed, they lost very few units - and almost all of those were expendable skirmishers.  However, there were not many units left in their army who didn't have a large number of casualties, so it was by no means a pushover!

I think that the crisis came early with the sluggishness of the Hebrew centre.  They should have advanced into the empty town easily; the failure to do so put them on the back foot throughout the game.  Although they eventually forced their way in the buildings, this was at a great (and ultimately unsustainable) cost.

On the left flank, the Midianite king gallantly held up 2 entire Assyrian divisions pretty much unaided.  However, he was too outnumbered and just couldn't convert the early casualties he caused into routing enemy units.  Eventually, the counterattack swept him away.

The right flank was a stalemate, with neither side's light forces able to gain any real advantage.


Conclusion

We will certainly play Hail Caesar again!  This was a fun game, though the multi-zone built-up area did cause us some confusion about rules.  Indeed, I've posted questions about this on the Warlord Games forum to see if anyone can offer a definitive interpretation.

So, our next game will probably not use buildings (or not many, at least!) and will have a more interesting scenario.  I'm hoping so, at least!

Sunday, 20 August 2017

Relic Knights: Black Diamond

Introduction

Last week, I showed my first faction for Relic Knights: the Shattered Sword.  This week, I've got another small faction completed, so here are my Black Diamond mercenary corporation.


Leopold Magnus


As with other factions, Black Diamond squads are led by a Questing Knight or a Relic Knight.  In this case, the leader is Leopold Magnus, a Questing Knight.  He's a cyborg of some type, considerably larger than a human and thoroughly evil.  Cross Darth Vader with The Terminator and you're somewhere close...

Leopold is accompanied by Static, his cypher (familiar).  This is a strange creature, a bit like a medium-sized dog with horns, but there's nothing remotely friendly about Static.


Diamond Corps


The foot soldiers for this faction are called Diamond Corps.  They're fairly ordinary human soldiers, armed and armoured in a style that is clearly derived from modern, real-world troops.  Consequently, there's not really much more that I can say about them.

Note that these models are not especially well-sculpted and they came to me second hand and already assembled (somewhat indifferently).  I've done what I can to rescue them, but they're not my favourite figures.  I believe these are 1st edition sculpts; the current Kickstarter 2nd edition versions are, by all accounts, vastly improved.


M-8 Blitz Autotank


The M-8 is a small, robotic tank.  It's not clear whether it is completely autonomous, or if it is controlled remotely by a human operator (in the same manner as a modern drone).  Whilst clearly not designed for front line warfare, it is a powerful unit in a small skirmish.


It has a quirky design that marks it out as a totally unique vehicle.  I rather like it...


One Shot and Fritz


Even though she appears to be just a slip of a girl, One Shot is a Relic Knight.  That means that she has a cypher (the little mannequin, Fritz) and also a relic (a large, stompy robot).

As with the Shattered Sword, the large walker/robot took longer to paint than most models because of its greater size.  However, it wasn't nearly as time-consuming as I feared it might be.  I have to admit that I'm rather pleased with the end result!


In this case, the walker/robot is armed with the largest sniper rifle anyone has ever seen.  Supposedly, in game terms, One Shot is an all-or-nothing model: most of the time she won't get to fire or will miss her target.  However, a single solid hit on a critical enemy model will be a game changer...


Conclusion

Once again, I've enjoyed painting these models (with the possible exception of the Diamond Corps: they were a bit of a chore).  I don't know how/when/if I'll ever use them, though I now have 2 completed forces for Relic Knights and therefore enough figures to play a game.  We'll see...


Sunday, 13 August 2017

Relic Knights: Shattered Sword

Introduction

I've been very quiet on the blogging front recently, but that doesn't mean I've stopped all hobby activity.  Far from it: I've been painting away busily, trying to finish - or at least put a serious dent in - 2 major projects.  One is to finish off all my Super Dungeon Explore figures (a difficult task, seeing as how I've got several unopened warband boxes yet to go) and the other is to paint my small (but growing) collection of Relic Knights miniatures.


I first came across Relic Knights at Carronade 2017, where my son and I played a small demo game.  For us this was very much the highlight of the show: he loved the Anime setting and I was intrigued by the card-based playing style.

I decided to buy some figures after Carronade; this decision was confirmed after another excellent demo game at Claymore 2017, though with a slightly newer revision of the rules.  Here is my first completed faction!


The Shattered Sword

Over the past few months, I've collected at least some models for 4 different Relic Knights factions.  These have all been sourced from eBay as second-hand bundles, as the new prices for this stuff is too much for my liking.  As a consequence, the collection I've been able to amass is an eclectic mixture of squads and heroes, rather than having any pre-planned composition.

Also, note that some of these models were built (but not painted, much) by a previous owner.  This wasn't always done to quite the standard that I would have achieved myself, so if a few of the figures look slightly odd in pose then it's not entirely my fault!

So, the Shattered Sword is an organisation of Space Paladins, perhaps somewhat akin to Jedi Knights in Star Wars.  They're pure of heart, well armoured and although they do use missile weapons and have psychic powers, their strength is in melee.


Francis Malory & Quill


There are 2 types of knight in Relic Knights: Questing Knights and Relic Knights.  Both types are heroes and are available to every faction.  Each knight has a "familiar" known as a cypher, manifested of mystical energy and (at least somewhat) matching that knight's personality.

The difference between the types is that a Relic Knight is more experienced and has found a relic to aid them; this seems to be almost invariably a large, stompy robot/walker.  On the other hand, a Questing Knight is more junior and is still searching for such a powerful artifact.


Francis Malory is a Questing Knight; his cypher is Quill, a giant, blue bird something like a hawk.


Swordsworn


Of course, each faction has foot soldiers, grunts, thugs or other minions as well.  In the case of the Shattered Sword, the basic troopers are the Swordsworn.  They're your fairly average space knights, dressed in white armour & blue cloaks and wielding power swords and blasters.


Paragons


The Paragons are heavy support troopers.  They are in much larger suits of armour/mini-mechs and are armed with star lances (yes they can shoot, quite effectively at that!)


In addition, the Paragons have rocket packs, so they can fly - or at least make short hops.  Note that the "exhaust" effect is something I scratch-built; it's not part of the models as supplied.  It helps to remind me of their flight capability, though (and it was fun to build!).

I'm not very happy with the way I painted these models.  They were the first Shattered Sword unit I built and I was still experimenting with how to paint a mostly-white figure.


Sebastian Cross and Rook


Finally, Sebastian Cross is a Relic Knight - he has found his ancient artifact, a large warrior mech.  His cypher is Rook, a miniature knight with a surprisingly dark look.

Sebastian himself seems to be extremely devout.  It's not obvious whether he's just praying/meditating before an action, or if he controls his mech/relic with thought power alone.


This relic is a huge model!  My white paint isn't particularly good quality and it needed at least 3 or 4 coats to achieve a decent finish.  Consequently the mech took several weeks to finish - probably longer than all the other models in this faction put together.

I'm assuming that the "vents" at the back are heat sinks, rather than being any form of jet propulsion.


Conclusion

I've enjoyed painting these models, though obviously they're not enough on their own to play a game.  Most of my Black Diamond (mercenary army) force is now complete and I've also got some Star Corsairs (space pirates) and Cerci Speed Circuit (boy/girl racers) to build.

I'm still not sure if this is just a passing fad for me, or whether it's the start of something more significant.  Probably the former, but you never know...

Monday, 7 August 2017

Claymore 2017

Introduction

Last Saturday was the date for Claymore, one of the 2 large wargaming shows in Scotland that I try to attend each year (the other is Carronade, held in Falkirk during May).  As is my custom for several years, I took my middle son (A.); he's turning out to be very keen on gaming days!

It's about a 2 hour drive from Helensburgh to Edinburgh.  I don't enjoy it much, but it must be tolerated if we're to have such a day out.  'nuff said.

Arrival

We reached the Edinburgh College venue some 20 minutes before the official opening time.  However, we were able to walk right in; plenty of folk were already there and we were by no means the first visitors.  It's nice not having to queue!

The first thing we did was to buy some tombola tickets from the SSAFA charity stall that was near the front entrance.  Of course, all of my tickets were losers - which I didn't mind at all as I regarded the small amount of purchase money as a donation anyway.  A. then defied the odds by winning on 3 of his 4 chances.  The prizes were mostly books on obscure subjects that will probably not be of much interest to us, but if nothing else this good fortune set us in an upbeat mood for the rest of the day!

Game 1: Relic Knights

We encountered Relic Knights at Carronade earlier in the year and enjoyed the game very much.  The Glasgow Games Group (G3) were back again; this time demonstrating the new, not-quite-released (?) 2nd (or is that 1.5th?) edition.  Would we like another game?  You bet!


So, I took some Star Corsairs.  I had an evil pirate chief and his mermaid cypher (familiar), a fallen knight and some scurvy underlings.  Oh, and a large energy cannon!  Our goal was to raid the planet; our objectives were an arcade game and a chocolate-vending machine.  Hmm, I think I might have aimed for something a little higher myself - but everyone has to start somewhere.

A. was defending; he had a poser hero (come on: anyone who wears a trench coat over a bare chest is a poser, even if it's a white trench coat.  Or they're a pervert, but that's not a line I wish to follow...)  He also had a couple of gals with big spanners, a bunch of street thugs and a very annoying princess dressed in a white skirt along with her rabbit-like cypher/familiar.  His goal was to reach the communication towers and call for help (what - don't they have mobile phones on this planet?)


  • My knight flew over a building to try to ransack the coin box from the arcade machine, but he was stymied by A.'s thugs.
  • The cannon gained a good, solid hit on the enemy princess; when the smoke cleared she wasn't there any more.  I hadn't killed her, though; she'd merely been whisked away to safety by her cypher.  Still, A.'s forces were a bit more circumspect after that!


  • My cannon scored several more crippling hits, but didn't quite wipe out the enemy street thugs (the last model in the unit was left on 1 hit point)
  • The pirate chief strode forward and took out the poser in the white trench coat with a single attack.
  • Princess Malya shot my fallen knight in the back and felled him.
  • After scoring 1VP for stealing some chocolate from the vending machine, my raiders traded blows with the pit crew.  I came off worse and lost my unit, but the cannon got revenge by obliterating the victors.
  • The last remaining street thug moved round the back of the secondary communication tower and spent 2 turns calling for help, despite my mermaid/cypher's repeated psychic attempts to dislodge her.
The final turn was really nail-biting and could have gone differently if my pirate chief had been able to reach the comms tower and interrupt the call for help (he was 1/4" too far away).  End result: 4VP to the Cerci Speed Circuit (defenders) and 3VP to the Star Corsairs.  A. steals a win from under my nose!


Game 2: Fury

Another game that we had seen at Carronade 2017 (but hadn't been able to get close to) was Fury, put on by the Leuchars Veterans.  They've run some very entertaining games in the past and I was keen to give this a go.

For anyone who hasn't seen the film ("Fury", of course), I'm not going to give too much away.  Suffice it to say that we had 4 Shermans versus 1 Tiger I, facing each other across a mostly-empty field.  Not really a good position to be in..


The Shermans were distributed randomly; I was given control of the mighty Fury whilst A. had the lowly Lucy Sue.  We charged forwards as fast as possible, laying down as much smoke as we were able.


The Tiger manoeuvred in a strange way and we ended up forming a firing line behind it at very close range.  I managed to set its engine alight before the other 76mm-armed Sheman blew the turret off.  Total casualties to the Americans?  Lucy Sue lost a track and could only turn right.

We came away from this game feeling slightly dissatisfied.  The models were beautiful; the premise for the game was reasonable and it flowed quickly enough.  However, something didn't quite gel.  Perhaps the movement rules were a bit too fluid and predictable, whilst the shooting rules were very random (requiring a series of high rolls to achieve anything much - not even much less for the Tiger!)  I don't regret participating - far from it - but it could have been better, I think...


Interlude

We ate our lunch outside in the courtyard, where there was plenty of seating and a little bit of occasional sunshine.  Having brought a packed lunch with us, we didn't have to wait in queues or suffer the indignities of show catering (though to be fair, I didn't even look at what the on-site canteen was selling.  They might have changed from the all-chips-and-pies fare they had on the last time I bought anything there, several years ago).


Game 3: Indonesia


The East Neuk Irregulars put on a small game with custom rules, based around a section of SAS troopers in Indonesia trying to reach a remote rendezvous in the 1960s.  This was a very lightweight affair, but quite fun all the same.  A. and I each took a squad of 4, but we decided to take different routes through the jungle.


  • One of my men fell down a ravine and was lost.
  • My remaining 3 men slaughtered quite a lot of local wildlife (one very dead pig, plus a clouded leopard which tried to attack me).  Note that I scared off the Orangutans; none of them were hurt.
  • I lost another man in a firefight with Indonesian militia and a third to an ambush.
A. looked to be doing better for much of the route:
  • A native guide led him into a militia patrol, which he managed to evade.
  • One of his men succumbed to snake bite.
  • Another man was lost in a firefight with militia.
  • At the last moment, A. lost a third man to an ambush.


So, by the time we reached the opposite corner and the helicopter arrived, both squads had been reduced to 1 man each.  Hardly a resounding success, though apparently the record in this game is just 2 survivors from a single squad.  Hmm, I think it may be a bit heavily weighted against the SAS!  Ah, well - at least both of us escaped.


Homewards

We finished relatively early, in the mid afternoon.  After chatting to some old friends, both A. and I felt tired and I had a long drive home as well.  Perhaps more to the point, we'd done some shopping and played some games.  There weren't any other participation games that we were itching to try, so we decided to quit while we were ahead.

Loot


Obligatory loot list:
  • Spray varnish (I always get this at shows now.  Since Royal Mail decided that they wouldn't carry aerosols, the only other option is a courier.  I'm not a big fan of courier firms delivering to domestic premises; they are expensive and seem to make quite a lot of mistakes).
  • Arab heavy cavalry.  A. wants me to start a Saracen warband to oppose his fledgling crusader force for The Crescent and the Cross rules.  I haven't really got the free time to do this right now, but I bought some figure anyway...
  • Some Pulp victims.  Who doesn't need a model of a woman tied between 2 stakes, about to be sacrificed to a volcano/giant ape/dinosaur/whatever unless the hero can reach her in time?
  • 3 tombola prizes, still with the tickets attached: 2 books and some eau de toilette.
  • The current edition of White Dwarf.  I'll flip through it before A. spirits it away.
  • Purple paint.  Because I need some purple for a couple of current projects...
  • Some certificates, rulers and other freebies from various participation games.

And there we have it, another year, another Claymore.  Time well spent.


Thursday, 29 June 2017

Perilous Island 3: At Death's Door

Introduction

Scenario 3 in the "Perilous Island" campaign book for Pulp Alley is set in a large customs warehouse, full of row upon row of crates.  The leagues are searching for a package that may contain clues to the location of Lord Darrow (the missing archaeologist), so they break in to the warehouse at night and hunt for the item, all the while avoiding (or overpowering!) the guards and each other.

Of course, I don't have a model of a large warehouse filled with shipping crates.  Instead, I decided to set the game in one of the Snake Cult's (see previous "Pulp" posts) outposts.  The cult was last seen being fought to a no-score draw in Perilous Island 2: Final Flight It's not unreasonable that while they and the Safari's characters are languishing in Lumbasa jail, the other two leagues in the campaign should raid their base!


The Setup


Somewhere in east or north Africa, the snake cult has complete control of a small village.  They have a big operation under way; the hamlet is full of crates of supplies and trucks - but for now there aren't too many cultists around.
The infiltrating leagues have decided to approach in the middle of the night, so visibility is reduced to 12".

Plot Points

Unwittingly, it seems, the cult actually have Lord Darrow's box [major plot point] hidden amongst their piles of goods.  There are also 4 minor plot points, any one of which might be able to reveal this important item:
  • Achmed: a night watchman.  Armed and potentially dangerous.
  • Baqil: another night watchman.  Also armed.
  • Jasar: the janitor.  Not particularly dangerous, but he might know a bit about recent comings and goings.
  • A catalogue/inventory: It's written in a simple code, but someone might be able to decipher the writings.  This document has been mislaid; it has been dropped on the road leading into the village.
To find the major item, a character must take any one of the 4 minor points into the centre of the board and query them [using finesse] to reveal the box's location.  It is then placed on the table close by and may be attempted as a normal, major plot point.

Terrain

We decided on the following effects:
  • Climbing 1 level of a building would be perilous.  Climbing 2 storeys would be extremely perilous.
  • Anywhere within 2" of a non-building terrain feature would be perilous (snakes come out at night to hunt), apart from the path through the rocks to the north (marked with a blue arrow, as one of Tarzan's entry points).

The Leagues

Tarzan's Jungle Alliance.
Tarzan is mighty, the gorilla is savage and the monkeys are numerous.

Stahl Helm's Doom Squad.
A relentless Nazi leads an assortment of sinister sidekicks and heavily-armed goons.  Plus a robot.

As mentioned before, the Snake Cult is providing "guest stars" in the form of the watchmen and the janitor.  Officially the Cult isn't involved though; the fate of these extras will not alter the league's reputation, experience or other attributes in the wider campaign.


The Game

In the first turn of the game, all four minor plot points were attempted:


Koko crept up behind Jasar in the dark.  The first thing the poor janitor knew of the ape's presence was when a large, dark arm wrapped itself around him.  Jasar tried to struggle [the plot challenge was against might], but he didn't have a chance of escaping.  1-0 to the Jungle Alliance!


Johann and Herr Stengel approached from the south.  In a staggering display of bad luck, Johann tripped over something unexpected in the road and knocked himself out.  Herr Stengel then groped about in the dark to see what was there, but ended up stubbing his toe badly against a large account book [in other words, both of them failed the plot point challenge for the inventory rather badly].


In the east, night watchman Achmed took his job seriously.  When approached, he fought like a dervish and immediately felled Ernst.  It took all their energy for Stahl Helm and Panzerbot 5 to avoid the guard's flashing blade [another set of terrible dice rolls by the Nazis!].


Meanwhile, Tarzan had no trouble at all in subduing the other watchman, Baqil.  2-0 to the Jungle Alliance!


Monkey Time!


Stahl Helm finally convinced Achmed to stop waving sharp objects around [so that's now 2-1 in favour of the Jungle Alliance], but Herr Stengel just couldn't find the inventory in the darkness.  Life was about to become a whole lot more chaotic for the spectacled Nazi, as the whole troop of monkeys made a beeline for him - they could hear the sounds of him scrabbling about on the road and thought that this needed to be investigated!

It wasn't all good for Tarzan's followers, though: Caesar was bitten by a snake as the monkeys passed near the well and Kurt arrived to protect his Nazi boss, having been delayed by a random event.


Within moments, the monkeys were all over the Germans, hooting, throwing things and generally getting in the way.  They weren't much good at brawling, but the little creatures had a reasonable Dodge ability and it was hard to prevent them from making a nuisance of themselves [Importantly, their presence prevented Herr Stengel from attempting to complete the Inventory plot point, much to his frustration].


Bullets and more Bullets


At the crossroads, all the remaining characters stumbled into each other at the same time.  Tarzan and his captive watchman turned a corner and came face to face with Stahl Helm and his captive.  Awkward...

Meanwhile, the Nazi goons attempted to pin down Koko and the janitor with machine gun fire and grenades.  This just served to annoy the great ape!


In a brief lull, Koko seized his chance to reveal the location of the final plot point.  He dragged the janitor into the middle of the crossroads, held him up and shook him until the terrified man pointed towards the stack of crates and squeaked "it's over there!" [Koko's finesse skill was not great, but it turned out to be enough (just!) for this task].

Quick as a flash, Tarzan jumped onto the baggage and after throwing a few boxes aside he came up with a package addressed to Lord Darrow.  [As in a number of previous games, the random challenge for the major plot point was against might, which Tarzan has in spades!  He does seem phenomenally lucky in this respect]


Having reloaded, Ernst and Panzerbot 5 blazed away at the gorilla.  Bullet after bullet hit Koko; he fell, stood up again and then collapsed once more, not to recover.  As the ape's grasp weakened, Jasar (the janitor) decided that he was needed somewhere else; he fled before any of the Nazis could corner him.

On the other size of the truck, Stahl Helm levelled his pistol and shot at Tarzan, but he missed.  Thus alerted, the jungle man dodged around the corner of the building and ran away with his prize into the night.


Back down the road, the monkeys finally made a mistake and Kurt, the Nazi muscle man, managed to grab the pair that were taunting him and bash their heads together.  He then stepped into the other brawl and rescued Herr Stengel from the attentions of the third creature - but it was too late.  Some time during the fight, the inventory must have been kicked away and was now lost in the darkness.

With signs that more cultists were coming to investigate the fracas, the Nazis left the village, not particularly well-rewarded for their efforts.


Conclusion

That was another excellent game, though a bit one-sided!  Final score:
  • Tarzan: 4 victory points (1 major and 1 minor plot point), though almost all of the Jungle Alliance were knocked out.
  • Nazis: 1 victory point (for 1 minor plot point).  They held the field and only lost 1 follower, but in the long run this didn't help.
I don't make a habit of commenting on poor dice rolling, as normally such effects are more in the mind of the player than in any scientific reality.  However in this game, the Nazis really did have a tough time.  In particular, Herr Stengel's repeated attempts to pick up a book in the dark were somewhat comical.  Perhaps he broke his glasses when he tripped initially and couldn't see properly thereafter?

It could all have gone very differently, of course.  If Koko hadn't managed to make the janitor reveal the location of the final prize then there would have been an almighty fight in the centre of the village.  Both sets of potential combatants would have been fairly evenly matched, I think: Tarzan and Koko would be better in a brawl, but the Nazis had all the guns...

Follow me for the next game in this series ==>

Friday, 16 June 2017

Bonsai? 28mm Tree!

Introduction

Did you know that it is possible to buy plastic bonsai trees?  I didn't know this, at least until very recently.


It went something like this: I was wondering how I could model a large, solitary tree for my African games (probably Congo and/or Pulp Alley).  I'm thinking of the sort of thing that frequently provides a focal point in the savanna, something like an acacia or baobab tree.  For whatever reason, my mind skipped from scale model vegetation to cheap, "fishtank" grasses and shrubs and from there to larger pieces.  A quick Internet search and I had discovered imitation bonsai trees!


Preparing The Tree

It turns out that there is at least one Chinese company which makes fake bonsai trees.  I saw these on eBay, put in an order for two of them and waited for the postman to arrive.  In due course, this occurred.  Here's some things about plastic bonsai trees:
  • They're very cheap.  I paid just over £2 for each item, including postage.  At this price, I figured that I could afford to bin them if they didn't work for my purposes.
  • They're also very crudely moulded, in brightly coloured polythene.  Not really like any real tree at all (bonsai or otherwise)!
So, what could I do with this?


  1. Firstly, I stripped off all the green foliage clusters.  In hindsight, this was a mistake because it took a surprising amount of time and I ended up spraying the foliage with the same colour of paint before putting it back on the branches.  I might as well have just left it where it was!
  2. Next, I glued the roots to an old CD, after first roughening the glossy surface of the CD with some coarse sandpaper.  This should help with adhesion.
  3. The base was spread with pre-mixed filler, paying particular attention to working it under the places where the roots arched upwards.  Once the filler was dry, sand and grit was glued all over the ground.
  4. I sprayed the model with a paint that was specially formulated for vinyl and other plastics.  This I obtained from an automotive store (Halfords, in the UK).  Usefully, for my purposes, the paint was a very dark grey/black in colour and therefore perfect as an undercoat.  It was quite expensive to buy, but really does seem to stick to the polythene in a way that a regular undercoat would not have done.

Finishing Off


    1. When the undercoat was hard, I dry-brushed the trunk and branches with a single coat of "lichen grey" (a slightly greenish-tinged, mid grey colour).
    2. I sprayed all the green foliage clusters with the same undercoat, then pushed them laboriously back onto the branches.  Should just have left them on in the first place...
    3. Next, I painted the foliage generously with "foam tack" glue and sprinkled it with Woodland Scenics "Fine Turf" flock.  Despite the "fine" in the name, this is a slightly coarse, ground-up sponge material that provided a useful texture for the leaves.
    4. Finally, once all the glue was dry, I sprayed the model heavily with sealer.


    Conclusion


    This was a very cheap and relatively easy model to build, at least when using glues and paints that are designed to work with soft plastics.  I think it will be a useful addition to many of my games tables.

    Of course, I did buy two of these trees, so I have another one to build as well.  I'm going to try some surgery on the second one, to reposition one of the branches so that the 2 models don't look completely identical.  How hard could this be?