Sunday 25 October 2020

Zomtober 2020, Week 4

<==  Missed week 3?  This way

Introduction

Well, I've managed to survive Zomtober for another year.  This is the last Sunday of the month, so with this post I have completed the challenge for 2020.  Doesn't it feel good 😁!

So, without further ado, here's another zombie/survivor duel.

Ritchie vs Dapper Old Zombie (DOZ)


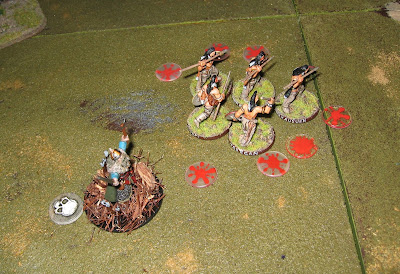
This "duel" is between "Ritchie" - a survivor and "dapper old zombie" ("DOZ").  Now, I try not to judge, but I don't think that Ritchie is the sharpest tool in the toolbox.  For starters, he cannot spell his name correctly (or at least, using the more common form: "Richie").


For the first time ever in a Zomtober pairing, I realised that I mounted both of these figures on identical bases.  Too bad - when I noticed the duplication it was much too late in the month to produce another, different model for either or both participants.

Ritchie is one of Offensive Miniatures "Street Kids", whilst DOZ is from Studio Miniatures.  I think the latter may be from a pack of "celebrity" zombies rather than rank-and-file, but if so then I don't recognise the reference.


Ritchie is armed with a petrol bomb, which has been universally ridiculed by "experts" as a terrible anti-zombie weapon.  It's hard to light and throw accurately - and even if you succeed in this then flames won't necessarily incapacitate a charging foe.  Instead, you'll simply be mauled to death by a burning zombie.


I believe that Ritchie has added yet another level of incompetence to the mix.  It looks to me as if he's using a champagne bottle for his Molotov cocktail.  Such bottles are very thick-walled and strong (so they don't blow apart when full of "bubbly").  I wonder if it would shatter and ignite the petrol when it hit the target, or merely bounce off and lie smoking in the gutter?

This survivor does get credit for heavy clothing and a face mask, though.  These may slow down or impede zombie bites and protect somewhat against splashes of infected blood.

Conclusion

The question, as always, is this: what happens next?  DOZ seems quite fit and active (for a zombie) and appears to have the edge in awareness as well.  I suspect that Ritchie's only chance is to weather the initial onslaught, break free (possibly discarding his anorak to the clutches of the zombie) and flee...


Sunday 18 October 2020

Zomtober 2020, Week 3

<== Go back here if you missed Week 2

Introduction

It's another Sunday in Zomtober!  [If you need help in understanding Zomtober then look up some of my earlier posts; I'm not going to explain it every time].  So, as is my custom, here's a "duel" between a survivor and a zombie.  Your job is to decide "what happens next?"

Bill vs Skateboard Girl


Today's pairing is a bit unusual (even for me), as the zombie has a name ("Bill") and the survivor doesn't.  In the latter case it's because I forgot to give her one; perhaps my readers could suggest a suitable name?

Anyway, for the rest of this article I'll call her "SG".  It's less of a mouthful than "skateboard girl".


So, I think the first question is this: is Bill a zombie at all, or is he a survivor who is posing as a zombie.  He might have reasons to do this, either to move more freely among real zombies or to scare off the less-determined surviving humans.


If it's just a ploy, I think it's a dangerous one.  SG appears to be lost in thought, or possibly is just humming along to whatever music is playing on her portable CD player.  Either way, she's about to be startled when she suddenly notices Bill's presence.  What will she do next?  She's heavily armed and seems strong and healthy (she's quite a big lass).


"Bill" is from Studio Miniatures; he comes from one of their slightly more specialised packs of zombies (as opposed to being one of the "horde").

SG is another model from the Street Violence range, sold by Wargames Foundry.


Conclusion

I'm quite pleased to be finishing some of my older Foundry models this month, after many years of neglect.  It's not much in material terms (the lead pile is still enormous), but mentally it makes me feel like I'm making progress.  Given another century or two I might even run out of unpainted figures, who knows?

So, questions:
  • What name should I give to SG?
  • Is Bill a zombie who looks somewhat like a survivor (healthy skin colour, no sign of wounds or ripped clothing)?  Or is he a survivor who is pretending to be a zombie (shambling walk, moaning)?
  • Will SG notice Bill before he "tags" her?
  • If she does, will her reaction be fight or flight?
  • Or will she do something else altogether, such as freeze in disbelief?  Or ask for an autograph?
Only you can tell...

Wednesday 14 October 2020

Dreadball: recently-finished figures

 Introduction

I've been working on some Dreadball figures recently.  As well as some MVPs and coaches/assistants, I'm experimenting with styles of painting for my mechanite/robot team.  See what you think.


The Mechanites


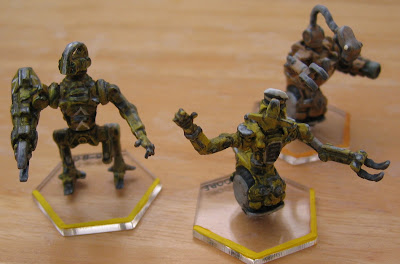
I have a mechanite team for Dreadball.  Indeed, I've had it for quite a long time.  However, until recently it languished in my "lead pile" of unassembled & unpainted miniatures.  This autumn, I'm trying to make some progress on these models and to date I've finished three of them: TRS-80, Commodore and VIC-20.


I'm aiming for a grungy, beaten-up look.  There are a handful of trivial conversions in my builds so far - for example, Commodore wears a yachting cap (who knows where the robot obtained that?).


These models are difficult to build, having a myriad of tiny pieces - all with some form of mould line that needs attention.  That's even leaving aside the game-affecting decisions on which arms/legs/torso/head to put together.

I'm finding them difficult to paint as well; there is a lot of detail on these models - but much of it is quite 'soft' because of the material from which they are made.  The paint jobs I have put on them took some time, yet I'm no happy with the results.  Are they too grungy?  Is the painting too sloppy?  Are the colour choices not good?  I can't quite put my finger on it...


Nightshade


In contrast, I painted Nightshade very swiftly.  From memory, most of the work was completed within a short evening (and alongside other work, at that).  He's a star player with a very shady past, so muted, sombre painting works well.  I'm particularly pleased with the eyes, which were something of an accident.  The whites add a tiny speck of light to what is otherwise a very dark figure.


Blaine


Now here's a coach/sponsor that I started a long time ago (painted the flesh) and then just stalled.  When I eventually decided to do him in a brown trench coat and metallic blue armour, the model was finished very rapidly.  I just wish I had done this long ago, instead of putting it off.  Now that he's finished, I'm quite pleased with the result.


Conclusion

I'm delighted with the way that Nightshade and Blaine turned out.  So why am I unhappy with the robots?  Ah, maybe I'm just my own worst critic, I dunno...

Sunday 11 October 2020

Zomtober 2020: Week 2

Introduction

OK, it's Zomtober, it's another Sunday - I can do this.  It's no big deal.  Just put up pictures of another zombie vs survivor "duel", like I've done before.  OK?  Here we go, then...


Polly vs Prison Escape Zombie


This week's confrontation is between a young woman called "Polly" and a zombie who is possibly in prison uniform.  Did he escape from a nearby incarceration facility?  Perhaps; the broken sign over which he is stumbling would add weight to his idea.  Let's call him "prison escape zombie" (PEZ).


Polly is a classic example of the concept that there is no dress code during the zombie apocalypse.  All I'm doing to say about her costume is that it is (to my way of thinking) a very weird assortment of styles and colours.

So, are these her working clothes?  Did she choose to dress this way when leaving home in the morning?  Or were these the only items of apparel that she could find?  All these theories seem somewhat implausible and I'm not entirely sure that I want to know the answer.

Polly comes from one of Wargames Foundry's weirder packets in the hit-and-miss Street Violence range.  I'm happy enough to have one such model in my collection, but I don't think I want a whole load more "sluts with guns".


In contrast, PEZ is a fairly plain zombie, dressed in a ripped (more accurately, shredded) tee shirt with orange trousers and gym shoes.  He's moderately damaged, both on the face and the belly - but is still lurching along.  PEZ is a Studio Miniatures model.


So, who will win this duel?  Polly seems totally relaxed and confident, she has a potent gun and seems healthy, aware and fit.  Is this a slam dunk for her?  Can anything go wrong?  Does PEZ have a chance?  You decide...


Bonus Article


Some weeks ago, when I was contemplating how to tackle the Zomtober challenge, I thought that it would be nice to include a scatter terrain or objective piece with each week's entry.  Well, I failed completely to have anything ready for Week 1!  However, I had one large (70mm?) urban base left from my long-serving, assorted packet of Escenorama resin pieces.


I also had a packet of "corpses" from TT Combat, plus quite a few bits from various Wargames Factory zombie & survivor kits.  I decided that I could put these all together to build a pile-of-bodies model.  Note that several of the contributor models have been converted, mostly to reposition limbs.


If you think that this is somewhat macabre then I agree completely.  My only defence is that this is no more associated with real life than is any zombie movie or book.

So, for bonus points, what happened here?  It looks as if someone with a gun shot down several zombies, maybe because they were feasting on the fat man.  But one of the models (centre) has no obvious injuries.  Is he/she dead?  Indeed, is he/she a zombie or a human?

Final thought: maybe Polly is feeling confident because she knows that she can kill any number of zombies; she may have been the cause of this massacre!  Just like swatting flies...


Sunday 4 October 2020

Zomtober 2020, Week 1

Introduction

It's been a while since I put any new items on my blog.  There are a number of reasons for this, some personal and some to do with the state of the world.  However, I never intended to stop forever.  So, here's a Zomtober post for 2020.

The rules of Zomtober can be paraphrased as this: "show at least one recently-completed zombie or survivor model every Sunday throughout October".  My self-imposed (and initially accidental!) extension to this is to show a zombie and a survivor, posed in such a way as to suggest an imminent conflict.  The question is then "what happens next?" - there's no right or wrong answer, but it's interesting to think about it.

By my reckoning, I've been putting up 'duels' for Zomtober for the past 8 years (I started in 2013).  It seems that the popularity of this event is waning, but still I'll post something for it, if only to amuse myself.

Here's a link to allow you to find all my Zomtober posts (old and new): https://colgar6.blogspot.com/search?q=zomtober


Denis vs. ILP Zombie


Why "ILP Zombie"?  Well, because he has a t-shirt with a logo that reads "I <heart> <pony>".  I don't know if anyone can make this out on his rather creased and folded shirt, but take my word for it - that's what the decal says.

ILP is a rather battered-looking zombie.  In particular, his face seems to be quite badly melted or otherwise damaged.  On the other hand (pun - geddit?), he is grasping what's left of someone else's forearm, so he is possibly more dangerous than he appears.


Denis is a youngish man who seems to be well-armed, fit and healthy.  He is, however, stuck in the fashions of the 1970s or thereabouts.  Does that matter?  Probably not - there's no evidence that his style of clothing or long hair would impede his ability to fight a zombie.


No, it seems to me that Denis' main problem is surprise.  He seems to be looking over one shoulder, as if the zombie has caught him at least partially unaware.  At the very least, his eyes and his gun are pointing in different directions and he might lose valuable time in correcting this.  But that would only matter if the zombie attacked immediately, without giving Denis time to react.  Right?


Denis is a Foundry "Street Violence" model.  I'm fairly sure he's from a packet of Russian mafia or hit men - something like that.  He's mounted on a resin scenic base from Escenorama.  "Street Violence" is a venerable range, but still in production.  I have quite a few unpainted pieces; some of them suffer badly from being wildly different sizes, but Denis is very reasonable in this respect.


ILP is an old Studio Miniatures zombie and is also on an Escenorama base.  I don't think he's the best zombie model I've ever seen - though not the worst either.  He'll do well enough as part of a horde, I imagine.


Conclusion

I don't think there is much doubt that Denis has the firepower to win a ranged fight.  So, will ILP just stand there and be gunned down?  Or will the zombie wrestle with Denis before he can shoot and chew on his sideburns?  What do you think?

Monday 2 March 2020

HAHA SAGA Escalation League - 2

<--  Part 1 is here, if you wish to start at the beginning

Introduction

So, this is Part 2 of our games club's SAGA Escalation League.  A group of us from HAHA (Helensburgh Alternative Hobby Association) are collecting new SAGA armies to a monthly timetable.  February's challenge was to expand the warlord and 1 point that we had produced in January by bringing a second point of troops.  Heady stuff!

6 of us met on the club's regular Thursday evening.  This was somewhat awkward, since I had planned (without thinking about it very hard) that in session 2 we would fight 2 vs 2 battles.  Of course, that only works if you have 4 or 8 players, or indeed any other multiple of four.

Instead, we decided to play 3 vs 3, with each side having 3 warlords and their respective 2-point entourages.  This makes for a fairly quick battle, so we managed to fit in 2 such games over the course of the evening.

Game 1

In the first game, both sides looked fairly evenly distributed across their base lines.

However, the Crusaders made a beeline for the Saxons...

...whilst the Jomsvikings and Skraelings defended the rest of the table against an aggressive, but somewhat disjointed attack from the combined Norman and Byzantine horsemen.

The isolated Saxons and Crusaders fought each other to an exhausted stalemate.  Much blood was spilt, but neither of these warlords could finish off his opponent before the end of the game.
Result: a significant (but not crushing) victory for the combined Jomsvikings, Skraelings and Saxons.

Game 2

We randomised the sides again and reset for another game.


This time, the Byzantines and the Saxons left their erstwhile allies and traded places.  Both sides tried to implement some form of strategy - but with too many commanders around, such ideas were short lived!


Instead, the Normans and the Jomsvikings knocked lumps out of each other whilst the Saxons hovered about in the centre, looking menacing but not doing much else.  The Normans had the better of it; their archers shot down the Jomsviking leader in exchange for a few peasants, whilst both sides lost some hearthguard.


Elsewhere, the Crusaders charged forwards at breakneck speed.  Initially this took the allies by surprise, but over time the Byzantines and the Skraelings surrounded their attackers and ground them down.  Eventually, only the Crusader leader was left, surrounded by a ring of his enemies.  He was slain by the Skraeling warlord in the last turn, though not before he had done a lot of damage (question: just how do you scalp someone who is wearing chainmail and a helmet?!)

Result: a narrow victory for the Normans, Saxons and Crusaders.

Conclusion

The sharp-eyed reader will have noticed that the Saxons were on the winning side in both games and therefore score 3 league points.  Equally, the Byzantines were on the losing side twice and only score 1 league point.  Everyone else who was present comes in second place with one win and one loss: 2 league points.

Standings are therefore as follows:
January
Starter for ten
February
Powers of two
March
Long live the peasants!
April
Bonus round
May
Armageddon
TOTAL
Byzantines112
Anglo Saxons336
Normans123
Jomsvikings123
Anglo Danes3(absent)3
Skraelings123
Crusaders224

For March's challenge, each warband must add a 3rd point to its strength - but these must not be hearthguard.  An additional 8 warriors or 12 levy will almost double the size of many of these warbands!

Friday 31 January 2020

HAHA SAGA Escalation League - 1

Introduction

I don't think I've mentioned this before on my blog, but a group of us are running an escalation league for SAGA at the Helensburgh Alternative Hobby Association (HAHA).

What is this?  Well, it's modelled on the "Tale of four gamers" concept which pops up in White Dwarf magazine every year or two.  At the simplest, a number of people commit to collecting forces for some game system over a fixed time period, playing such games as can be managed at regular intervals.

The full rules for our league can be found here: escalation-league.docx , if anyone is interested.

Starter for Ten

2 games in progress, with various dice, boards and other paraphernalia scattered around the edges 

Since this was the first meeting for our league, each participant brought along a warlord and 1 point of troops for their chosen warband.  Most people chose 4 hearthguard, but a few had 8 warriors as their 1 point's worth of troops.  Interestingly, everyone had selected a different faction, so we didn't have the monotony of 8 Viking warbands 😃.

There were 8 players present for this meeting, which was far more than I had imagined would be interested when the idea of a league was first proposed back in November 2019.  We even had a visitor who had travelled from Fort William (some 2 hours away) especially for the evening.  I hope we were sufficiently good hosts to make this level of dedication worthwhile!

The players were a mixture of veterans like myself and relative newcomers who wish to start playing SAGA.  Most/all of us are collecting a fresh army for the Escalation League, even if a few of us already have quite a lot of figures for other warbands.  After all, one of the main purposes is mutual encouragement!

The "Duel" Scenario

The format of the evening was a series of individual duels.  We created two simple 2x2 foot boards; the rules for the scenario were thus:
  • Each warband will deploy in the centre of one tile, diametrically opposite to their opponent (i.e. slightly more than a standard 'M' foot move from the table centre).
  • The game will last for 3 turns.
  • At the end of the game, any player whose warlord is standing on the board's centre spot will score 2 victory points.
  • Any player who eliminates his opponent's warlord will score 1 victory point (unless he/she is already scoring 2 points for 'centre of table').
...and that's it!  Really simple.

We managed to rattle through quite a few of these short matches over the course of 2 hours or so.  Some of the games were a bit slower where new players weren't as familiar with the rules as the old hands, but everyone played at least one match and most played two or three.

Highlights

Skraelings are massacred by a very skillful (and probably very lost!) Jomsviking warlord.

Saracens take the fight to Normans in what looks to be quite an uneven match

The "to hit" rolls from a boosted charge by Crusader knights.  They needed 5+ to hit and this looks like a dramatic result.  Ironically, the player had activated an ability that required him to re-roll 6s - ouch 😢!

Crusaders trying to toss the Jomsviking chieftain over a cliff and into the sea.  I cannot remember if they succeeded or not.

With all their hearthguards already dead or dying, Anglo Saxon and Anglo Dane warlords kill each other in a final, deadly embrace.

Skraeling (with Moose totem) and Anglo Saxon warlords fight to mutual exhaustion - but the Saxon holds the centre ground

Conclusion

As the primary organiser of this league, I was really not sure how the first evening would work.  I need not have worried: everyone had a great time and the "duel" format worked really well.

It became quite obvious over the course of the evening that some faction's battle boards are better suited to very small forces than others.  At the extreme ends, the Anglo Saxons couldn't use any of their abilities which work for very large units, whilst the Anglo Danes' "Intimidation" effect was particularly potent.

Even though there may have been some minor balance issues, everyone was good-natured and took their wins and losses gracefully.  It probably helped that about half the group (including myself) failed to score a single victory point all night - at least there wasn't one poor soul left alone at the bottom of the scoring!

Part 2 of the escalation league is here -->

Saturday 25 January 2020

Congo: Mungo Mah Lobeh, Game 5

Introduction

This is a rather delayed account of our 5th game in the Mungo Mah Lobeh campaign using the Congo rules.

Earlier games in the campaign can be found here:
Game 5 in the campaign was actually played last September - some 4 months ago - and I've been putting off the account since then.  Ah, well, here it is now:

Passing the Fang Territory


Scenario 5 is set up like this:
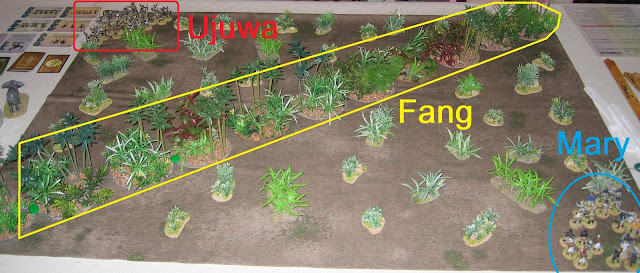
  • There's a band of jungle running diagonally across the table.  It's difficult terrain, but also is full of Fang cannibals.
  • Discoveries can be found in the jungle at various points.
  • The players start at opposite corners from each other.  Their primary goal is to exit at least 1 unit from the opponent's corner, success in this will gain a large number of victory points.
  • Secondary goals (i.e. other ways to score victory points) are as usual: obtaining discoveries, knocking out enemy characters, finding loot...

The Forces


Mary Kingsley's "White Men Expedition" force consists of:
  • Mary leads a unit of 5 Ascaris
  • A group of (3) white adventurers
  • The guide/kirangozi accompanies 4 soldiers
  • 5 ruga ruga (professional, but undisciplined native mercenaries)
  • The doctor is in charge of 5 young warriors


I'm not so familiar with Ujuwa the witch doctor's band.  However, I do know it has the following in it:
  • 4 bands of (young?) warriors.  One is led by Ujuwa himself, another by his soothsayer.  There may be 1 or 2 sacred warriors added to some of these bands.
  • 1 group of 6 bow-armed archers, led by a chieftain (?)
  • 1 group of 3 lightly-equipped scouts.

The Game


From the start, it looked as if the 2 sides had slightly different strategies.  Mary's column advanced fairly close together, aiming slightly away from the centre of the table.  On the other hand, Ujuwa's forces spread out to try to cover the entire length of the jungle.

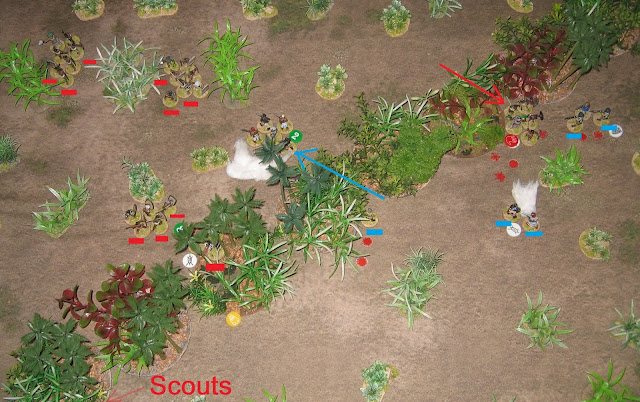
Note that I cannot actually see Ujuwa's scouts in this picture, or indeed in most of the others!  I know that they were present; they played a small - but significant - role in the forest tribe's achievements and I know that they ended up in the jungle at the bottom left of this picture.  I can only assume they've moved so fast that they are hidden in the foliage already.

Fang Cannibals


Hostile Fang tribesmen roamed about in the treetops, taking potshots with their poisoned blowpipes at anyone who came close.The first to feel their wrath were Mary's ruga ruga and (especially!) her soldiers.


Initially, The Fang were quite even-handed.  They also shot down 2 of Ujuwa's 3 scouts, leaving just a single quivering man holding on to one of the all-important discovery tokens.


Finally, Mary and her ascaris passed through the tree line without problems.  The adventurers who tried to follow were not so lucky: in a disastrous piece of bad luck (for Mary!), 2 of the 3 adventurers were hit and fell.

Mary's Dash


Mary and her small bodyguard of ascaris exited the jungle.  They were pleased with themselves for having passed unscathed and for having made a discovery en route [i.e. the #2 green token].  However, the way ahead was full of Ujuwa's tribesmen.


The ascaris attempted to skirt around the bands of warriors, but were caught when Ujuwa and his force attacked them.  Mary's force fled without taking any casualties, but were forced to drop their discovery.


From this point on, Mary and her ascaris ran for the corner as fast as they could.  This seemed to catch the tribesmen somewhat flat footed; none of them managed to intercept the white woman and her friends.  [Ujuwa's group had acquired a Movement stress token and didn't have the right card/dice to rally from it, whilst the other warband wasn't well positioned to attack].

At the last moment, the chieftain ordered his archers to shoot at the strangers.  It was a damaging volley, but not enough to halt the ascaris.


With one last bound, Mary and her ascaris left the table, thus securing a guaranteed 15 victory points for her side.

At the same time, the furthest-advanced tribal warband bludgeoned its way past the ruga ruga.  Casualties were heavy on both sides.

The last of the white adventurers also fell at this point, though I forget whether he was a victim of a Fang blowpipe or whether he was assegaied by a passing group of warriors.


Since the tribesmen now outnumbered the expedition considerably, they rushed forwards.  Ujuwa's band came through the jungle unhurt and fell upon the 2 remaining soldiers and their accompanying kirangozi.

In a small-minded act of petty revenge, the last of the ruga ruga shot the tribal soothsayer.  Amongst other things, this left a single warrior guarding the #4 objective for the tribal forces.


The End Game


At this point, the forest tribe held all four discovery tokens, as well as a loot counter [I forget how this was picked up - probably it was from a random event].  Excluding the items for which random victory points are awarded [i.e. loot and knocking out enemy characters], the scores so far were:

  • Mary: 15VP for exiting the table
  • Ujuwa: 16VP for 4 discoveries
In other words, it looked very tight, but probably a minor native win.


The doctor [who hadn't moved at all up to this late point in the game] thought he saw a chance of reversing this.  It may not have been good odds, but the lone warrior with the #4 objective was an easy target - if the doctor and his followers could catch the tribesman.


Unsurprisingly, the lone warrior fled when he saw the doctor's band approaching.  However, Ujuwa had to use his only movement card for this - and that meant his own band [with the #2 discovery which had been captured from Mary earlier in the game] was in range.

As a last, desperate, do-or-die action, the doctor and his band of young warriors charged Ujuwa and his group of warriors.  Even though slightly outclassed, the expedition's force triumphed, drove Ujuwa back and re-captured the #2 discovery.  Hurrah!


Finally, here's a picture of my elephant.  This was the nominated wildlife for the scenario, but no-one drew an animal token for the entire game.  The poor beast never made an appearance and is still waiting in the sidelines...

Conclusion

That was a very tense game, with the tribesmen [mostly] rampaging through the expedition's forces.  At the conclusion, Mary had just one unit left [i.e. the doctor's young warriors] plus a single ruga ruga, whilst Ujuwa had at least 4 units and a lone scout.  The Fang cannibals accounted for a lot of Mary's forces, especially the better quality groups such as the adventurers and the soldiers, leaving them easy meat for the tribesmen to finish off.

However, like all scenarios of Congo, victory isn't about destroying all the enemy forces.  So, what's the total?  Who won?

Victory Points

Ujuwa

  • 12VP for 3 discoveries [#1, #3, #4 were all held at the end of the game]
  • 1VP for loot
  • 4VP for knocking out the expedition's guide/kirangozi [a random roll, but I think this is the maximum that could be achieved]
Total: 17 victory points

Mary

  • 15VP for exiting the table
  • 0VP for knocking out the soothsayer [a random roll.  This is the least which could be scored]
  • 4VP for discovery #2
Total: 19 victory points

So, it's a very narrow victory for Mary's expedition, achieved in the last act of the game by the unlikely success of the doctor's desperate charge!  Ujuwa has every right to feel robbed by this; I expect he's plotting a terrible revenge for the 6th and last game in the campaign!