Sunday 31 May 2015

The Crooked Dice Mystery Machine

Introduction

I've had my Mystery Inc team (also known as the "Scooby Doo gang") for some time.  These are 28mm models from Hasslefree and are, I think, fairly widely known about by those with an interest in such matters.  However, what about their ride?  The team need a vehicle.

In the original cartoon show they had an iconic van with an instantly recognisable colour scheme.  Oddly, there are many imitations and variations of this paintjob applied to a number of different types of real life vans - just google for "Mystery Machine" images.  These are owned by fans, re-enactors (?!) or (more likely) professional entertainers with reasonable budgets.

But what about 28mm models?  Well, there are several choices for the Mystery Machine.  Most commonly recommended are toy vehicles, but I find such toys to be badly scaled, often quite goofy-looking and frequently out-of-production and hard to find.  But there's another choice...

Another Option

Hidden away on the Crooked Dice website, listed under 'Heroes' (I think), is a 28mm model of a Transit van.  This clearly fits into the "cops and robbers" category of Crooked Dice's 7TV game, as the example paint jobs show.

But there is a US manufacturer called Company B who produce - amongst other things - decals for some fairly off-beat models.  For example, they make "police phone box" markings suitable for a Doctor Who Tardis as well as tank insignia suitable for the Japanese "Girls und Panzer" cartoon show (and if that isn't weird then I don't know what is!)

What's significant for my purposes here is that Company B produce Mystery Machine decals to fit the Crooked Dice van.  Yay!  So, at the Carronade show earlier this month I went to the Crooked Dice stall and bought a van.  An online purchase from Company B was delivered very quickly and I was in business.  Here we go!

The Crooked Dice Van

So, the Transit van comes as a resin body with 4 metal wheels and a small sprue of accessories.  I wouldn't be using the police light or siren, so I needed only the mirror stalks from the accessories.  The wheels have a guide on the backs of them that lines up with the resin body so that they fit at just the correct depth; this is a nice touch.

It took but moments to glue all the parts together.  On the whole they were well cast and required virtually no cleanup, but I was disappointed to find a significant air bubble in the resin, located just on the edge of a front wheel arch.  I probably spent more time repairing this defect and restoring the body shape around this area than I did with the rest of the construction.

After undercoating, I painted the body of the van with pale blue, then gave it a wash of a medium blue.  This is essentially a cartoon vehicle, so I didn't plan on a lot of weathering or details such as a numberplate!

The doors and windscreen were outlined with a very dark grey.  The same colour was used to paint the tyres, radiator vents and wheel arches.  These latter were exceptionally difficult, since there wasn't really enough space for a paintbrush and I did wonder if I should have painted the wheel arches before gluing on the wheels.

A silver colour (Humbrol aluminium enamel) was used for the hubcaps, bumpers (fenders if you're from the USA), door handles, headlamps, mirror stalks and radiator grill.  For really shiny, chrome-like effects I still prefer to use this Humbrol enamel paint, though pretty much everything else I do is in acrylic paints.

The silver bits were given a very thin black wash; this is most evident on the wheels.  A few extra details were added - the indicator and stop lights - and then it was time to do the windows.

I've not really painted windshields before, so I looked on the internet for references.  One that I found especially useful was a Flames of War article called Lumpy's Guide to Windscreens.  I tried to follow the "not-so-easy" method and I think it came out quite well.  Whoever you are, thanks to Lumpy!

Now for the decals.  The Company B decals are designed for this model and for the most part were easy to use.  Their target location was fairly obvious and the decals were sturdy enough and came loose from their backing paper easily.

I did have a slight problem with the larger, lower panel decals: they were too long for the bodywork!  In order to make them fit, I cut each of these pieces into 2 parts and removed about 2mm of decal from the cut edge.  This is visible if you look closely; there is a slight discontinuity in the pattern where the shortened parts meet.

The rear doors caused further issues.  In this case, it was because the hinges and handle were raised areas that would prevent the decal from sitting flush with the door.  I had to cut a hole for the handle into the right-hand decal and make slits near the upper hinges in both decals in order to make the decorations fit properly.

Conclusion

For the most part, this was a very straightforward model to build and paint.  There were a few minor hiccups which required a certain amount of model-making skill to fix, but nothing too bad.  This isn't a cheap piece though - neither the Crooked Dice van nor the Company B decals will ever compete in price with the second-hand toy market for Mystery Machines!  Still, I'm very pleased with the end result.

Thursday 28 May 2015

A small Pictish village

Introduction

I paint a lot of figures, mostly 28mm, for gaming.  However, men alone aren't enough for a wargame; we need terrain as well.  Every so often, I realise that I can't play a scenario that I would like because I don't have the right setting.  So it was with SAGA, when I realised that at least 1 of the standard scenarios in the basic rulebook requires buildings.

Many people use MDF kits of timber-framed Dark Age buildings for their games of SAGA.  Theses are widely available from various manufacturers.  However, my Dark Age warbands are based in Scotland and although timber or wattle-and-daub structures would certainly have existed in parts, the more remote corners of the land might well have had differently-constructed buildings instead.

The Raw Materials

I discovered that Scheltrum Miniatures produced resin models of stone dwellings that would be very appropriate for far-flung communities of Picts or similar Celtic groups.  Low (wind-proof!), stone buildings with turf roofs are especially likely in areas with limited access to wood, such as the Hebridean Isles or some parts of the north of Scotland.  Having decided that I wanted these, I bought a few small dwellings.  That was at Claymore 2012, so almost 3 years ago (ouch!).

I realised afterwards that I also wanted some walls from Scheltrum to go with them, to place the buildings in a more interesting context.  The walls were purchased separately, probably at another show a year or 2 later (I cannot remember for sure).  And so it remained for a long while...
Planning the Village

Finally, earlier this month, I decided to act and build my village.  After all the procrastination, it didn't take much effort at all when I finally got down to it!

Firstly, I found some large pieces of scrap paper and drew out rough plans of how the building and wall pieces would be placed.  This achieved several things: it showed me what size of bases would be required and it ensured that I made best use of the pieces available.

Next, I cut out bases from 3mm MDF and transferred the plans roughly onto these.  I left a margin of about 1" around the edges of each base and beveled the cut edges (my jigsaw can make cuts at up to about 45 degrees off vertical, which is very useful for this type of job).

The obvious next step was to glue on the buildings and the walls.  This revealed a problem, though: the wall pieces didn't join cleanly to each other and certainly didn't join to the buildings.  There were huge, unsightly gaps everywhere!

Mind the Gap!

OK, not to worry.  I rolled blobs of Milliput into rough balls and then pushed these into all the gaps, trying to match the existing layers of stones in the walls.

The joints between the baseboards and the resin pieces still looked a bit abrupt, so I used some filler to blend these together a bit.  I also added a few lumps and bumps to the enclosures, to try to avoid them looking as smooth as billiards tables!

Painting

After adding a few patches of sand and grit (again, to break up any large, blank patches), I undercoated the models with my usual Halford's grey car primer.

Note that as an afterthought I added some "gates" to the 2 larger enclosures.  These were simply pieces of Renedra's wattle fence, cut to fit.

Finishing

To start the painting, I gave all the stonework a black wash, followed by a heavy drybrush of "lichen grey".

The dirt was undercoated with chocolate brown, then highlighted with a couple of lighter shades of tan.

To finish, 2 separate types of flock and static grass were applied, with special attention given to the bottom of the walls and other nooks and crevices.  The few details  (gates, doorways, the guy ropes over the roof of the largest house) were painted separately and then the models were sealed with varnish.  Done!

Conclusion

These pieces were surprisingly quick to build, mainly due to the relatively small number of colours and details on them.  They'll be very useful for outlying communities in games of SAGA, I think.  And it's such a relief to have completed this project - finally!


Sunday 24 May 2015

New Talent: A's first Elves

Introduction

My 12-year old son (I'll call him "A.") has expressed an interest in my model-making and gaming for some time now.  He was interested enough to find out that I had several sprues of Mantic elves lying about; these were things that I had picked up at occasional shows or in "lucky dip" bargain boxes.  Once A. had determined that I had no particular use for them, he asked if he might build and paint them.  I wasn't going to refuse and put him off the hobby, so I said that he could.  Some while later, here are the first results:

Elf bases for Hordes of the Things

1 base of Elf Shooters.
A. decided that he'd like the elves to be based in elements suitable for playing Hordes of the Things.  I helped him to choose the composition of these bases and showed him how to cut out the parts, glue them together, paint the figures and finish the bases.

I also suggested the colour schemes and painting techniques that would be suitable for a raw beginner.  However, I'd like to stress that I did no more that a small demonstration on maybe 1 figure and rescue a few of the bigger mistakes; the rest is entirely his own work.

A Hero base, with bodyguard, standard and pet!

3 Spear bases
I helped most with the decals, I think.  We searched for drawings of "firebird" or "phoenix" on the Internet and then I printed these out on decal paper.  I think we ended up with 4 distinct designs.  A. had a bit of trouble applying the decals despite my repeated demonstrations; I probably had to rescue about 1/2 of them.

Conclusion

All the elves together.  About 50% of the force necessary for a HotT army
These models are certainly not up to my own standard of painting.  Then again, I've been doing this for 40 years or more, so it shouldn't be any surprise.  While I know that the painting isn't as neat as it could have been with more practice, I am deeply impressed at what A. has achieved on his very first attempt at such models.

He's now wanting to build Tau for Warhammer 40K and more elves to round out this force.  Whilst I've got plenty more elf infantry sprues, I'd like to get him a wizard or 2, some cavalry and perhaps a few eagles; that sounds about right to me.  Hmm, I could be onto something here...

Wednesday 20 May 2015

We don't need another hero...

More Heroes!

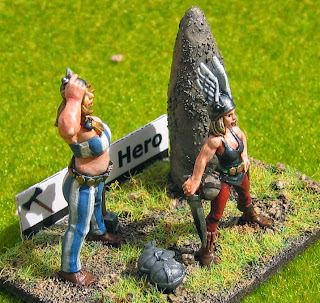
In my last post, I showed you my barbarian heroine, based for Hordes of the Things.  Well, I found that I'm quite partial to painting heroes & heroines, so here is another such HotT base:

Once again, these are Hasslefree figures.  They're called Rennie and Tilda by the manufacturer, but I can't help feeling that I've seen their likenesses somewhere else...

The composition is somewhat pedestrian and I feel quite annoyed that I couldn't come up with something a bit more exciting.  Having the 2 people and the menhir (made from a lump of milliput) placed at the points of a triangle on a flat base is...dull.  At least, that's what I think.

As always with my HotT bases, I've stuck a label to the back.  This indicates the affiliation of the model (the double-headed axe is for my barbarian army) as well as the classification (Hero, obviously).

 The hardest parts of these figures to paint were probably the hair colours (something with which I've never had much confidence) and - surprisingly - the wings on the helmet.  Both of these parts are very prominent on the models and therefore will get more attention, or so I suppose.  It certainly made me more anxious about getting the colours right!

The 2 stacked helmets on the ground are spare heads from a box of Gripping Beast Saxon Thegns (I didn't have any Romans!)  Being plastic, it's not impossible to carve out the face and leave just the helmet, though I couldn't face doing many more of these.

Now I find myself listening to Tina Turner - that song just won't leave my head...

Sunday 17 May 2015

There was a young lady from Riga...

"There was a young lady of Riga,
 Who rode with a smile on a tiger.
    They returned from the ride
    With the lady inside
 And the smile on the face of the tiger."

[Limerick, traditional (?)]

So, another model has rolled off the production line.  In this case, it's a Hasslefree model called "Barbarian Libby".  She's destined to be used as one of the heroes for my slowly-forming Barbarian army for Hordes of the Things.  It's not difficult to find barbarian heroes from Hasslefree; sometimes it seems as if half of their catalogue fall into this category!

Sadly, my HotT barbarian army is not yet close to completion.  For years it has been low down on my list of priorities, though every now and again I do finish another base or two.  You can see mention of it in a few earlier posts, here (January 2014), here (November 2013) and here (also November 2013).

I'm not that happy with my painting on this model.  It's good enough for gaming, but the sculpting is so good that I felt the figure deserved only the best painting.  While my output is, I think, pretty decent, it's nowhere near the display quality that I'd have liked.  Ah well, we do what we can.

The tiger comes with its own round scenic base, so there wasn't much need for landscaping in order to produce a suitably heroic pose.  All I had to do was cut a circular hole in the square HotT base, glue in the model and then fill the gap.  I think that worked well; it's not possible to see the join.

Will they return from the ride with the lady inside the tiger?  I doubt it!  I think that this barbarian queen has her beast totally under control.

Thursday 14 May 2015

SAGA: Ragnar vs the Monks

Introduction

Nearly 2 weeks ago, I mentioned in a post (here) that we had played some games and that I'd report on them in due course.  Well, you've already had the ATZ short story, so now it's time for the SAGA battle!

Clash of Warlords


"My lord, Abbot Killian is here to see you", the servant announced.  Macbheatha had barely registered this before the churchman and several of his attendants strode into the hall.  "Lord Macbheatha!" exclaimed the holy man.  "It won't do at all!  You must show the heathen that he cannot prevail!"
The Scots warlord sighed.  "Err, is your anger directed against some particular pagan, or do you simply disapprove of all such on principle?" he replied.
"Why, it's that Viking, Ragnar Lothbrok!" returned the churchman.  "He has erected a false idol near the bridge over the Clutha burn.  When our holy brothers started to destroy it, they were beaten most severely!  Ragnar must be punished.  You must challenge him and show the pagans that they cannot do such things!"
Wearily, Macbheatha reached for his sword and shield.

We played a 6 point game, using the "Clash of Warlords" scenario.  In this, each warlord can take 12 hits before falling; victory is determined solely on the number of such wounds suffered.  The gaining of territory or the destruction of other models counts for nothing in the end (though obviously it may confer a short term tactical advantage!)

I played the Scots and took a regular warlord, a mixture of hearthguard and warriors on foot, a few mounted hearthguard and a dozen angry monks.

My younger son (A.) played the Vikings.  He chose to take the special character Ragnar Lothbrok, small numbers of berserkers and hearthguard, a fair number of warriors and some levy archers.  Hmm, I thought: one of Ragnar's special abilities is that he can ignore the first 2 hits in each melee rather than a regular warlord's 1 hit.  This would make him a very tough customer in a game where such wounds determined the winner.

Early Moves

For the first couple of turns, forces on both sides moved forwards whilst the 2 warlords beat up on each other.  The Viking's attacks were ferocious, but the Scots lord's defence was sufficient to deflect them all.

The general fighting was opened by the Scots hearthguard.  Seeing that some Viking berserkers were in the lead and getting perilously close to Macbheatha, the thanes double-timed over the bridge and charged at the semi-naked axemen.

Some cunning use of SAGA abilities including the powerful A Barrier of Spears and some lucky dice rolling enabled the thanes to wipe out all of the scary berserkers for no loss whatsoever.  As the Scots' commander, this was excellent news and a brilliant start to the game!

...or so I thought.  A large group of Viking warriors charged down off the hill, shouting "Valhalla!" and banging their shields.  It seems that the berserkers are not the only models in the Viking army who can make violently aggressive attacks - and the Scots had burnt through all of their SAGA abilities for the turn already.  Bother!

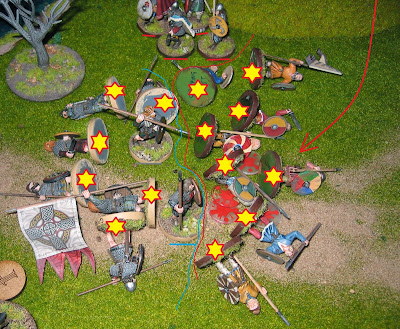
By the time the fighting subsided, just 2 of the thanes were left standing, surrounded by piles of dead and injured from both sides.

To finish the job, a small unit of Viking hearthguards then charged the tired pair of thanes.  Predictably, the Scots fell, though they did manage to take one enemy with them.

The remaining hearthguard of both sides now tried to intervene and break the deadlock between the 2 tiring warlords.  Almost predictably, all they achieved was mutual near-annihilation as the Scots were reduced to 1 horseman and the Vikings to a single bodyguard.  However, more Scots were pouring across the bridge and even the monks were getting close to the central duel.

At this moment, Nick (my brother-in-law, who was visiting from New Zealand and watching the game) told A. that his Viking levy archers were completely useless.  Just to prove him wrong, my son used them to shoot down the first rank of Scots warriors to cross the bridge.

In the ever-escalating tit-for-tat, the depleted Scots warriors crossed the bridge and killed the last Viking hearthguard.  In turn, the last unit of Viking bondi attacked and drove off those Scots.  However, another group of Scots warriors was just on the bridge, so could they do any better?

The fresh Scots warriors charged off the bridge, but took 1 casualty from the Vikings.  However, they scored a respectable 5 hits on the Norsemen in return.  That should do it, right: 5 hits, each needing a 5+ to save?

5 hits, each needing a 5+ to save.  What could go wrong?
Amazingly, all the Vikings made their saves and the Scots attack was repulsed.  Oh, fudge!  At least only 1 Scottish warrior had been lost.

Right, so let's send the Scots warriors back in for another attack.  This time, 3 Vikings fell for no loss.  Hurrah - at last we might be able to send men to help Macbheatha in his seemingly endless and pointless fight with Ragnar!

But it wasn't to be.  Ragnar finally managed to pierce Macbheatha's defences and wound the Scots lord.  That would be hard enough to claw back with a matching injury to Ragnar, but then the Viking archers shot another volley.  The last significant group of Scots warriors was slaughtered!

As if sensing victory, Ragnar now drove Macbheatha back, wounding him twice more in quick succession.  This was beginning to look like the end for the Scots; despite all the effort they had put in!

The few remaining warriors on both sides skirmished with each other, killing a few more fighters.  However, neither side achieved any decisive superiority.  Finally, the last remaining Viking shieldmaiden attacked the monks to try to prevent them from attacking Ragnar.  She fell to their anger, but not before she had created a martyr from one of them.

The distraction caused by this little skirmish allowed Macbheatha finally to score a hit on Ragnar.  Still, going into the last turn of the game, the odds didn't look good that the tired Scot would be able to achieve anything more against this legendary, rock-hard Viking.

Right, time to go for broke!  I put SAGA dice on every ability I could that might generate attack dice (not that many for the Scots battleboard!) and sent the monks in as well.  The 2 warlords disappeared under a pile of kicking, biting and swearing holy men.  No doubt there was the odd dagger used as well.  Injuries were received by both Macbheatha and Ragnar, but who would come off worse?

So here's the final tally: 5 wounds to Ragnar, but only 4 wounds to Macbheatha.  The Scots squeak a narrow victory at the last moment!

Macbheatha picked himself up from the dirt with the help of Abbot Killian and dusted down his tunic.  It was bloody and torn from the long fight; he'd need to get another one to replace it.  Drat; he'd really liked that tunic.

 He stared for a moment at the receding back of the Viking lord as Ragnar ran away, then shouted "Let that be a lesson to you.  And DON'T COME BACK!"