Thursday 18 July 2013

Full Thrust: Return of the Spider!

Introduction

Some time ago, I published a scenario entitled 'Arachnophobia', about an alien race of bio-ships with unknown motives invading a Federation star system.  This was, I thought, quite an interesting challenge for both sides, but 2 things didn't go quite right:
  1. There was no option in the scenario for peaceful contact (and therefore no reason for the defender not to start shooting as soon as possible).
  2. In the game we played previously, the intruder player was unfamiliar with the capabilities of the Sa'vasku bio-ships and tried to simply blast his way through the defenders' line.  That reflected poorly on the effort I'd put in to the game's design.
So, I thought it would be interesting to refine the rules a little and replay the scenario.  I present to you: Return of the Spider!

Updated Scenario Rules

  For the most part, the scenario works as before.  Here are some adjustments to the intruder's special rules, though:
  • Objective A: It's spawning time!  Additional rule: only 1 bioship may spawn in the planet's atmosphere per turn, though there's no limit to the number that may orbit the planet simultaneously.
  • Objective B: Curious.  No changes.
  • Objective C: Hungry!  No changes.
  • [New] Objective D: Friendly!  The intruder must 'visit' each defending ship and station [including the bulk freighter] by ending a turn with a bioship within 6" of it.  Additionally, a bioship must enter the planet's orbit to 'visit' it.  These targets don't all have to be visited in the same turn, but the game ends with friendly contact when all ships have been investigated in this manner.  Victory is determined by any shooting, thus: if neither side has fired then both sides win a major victory.  Otherwise, any side which damaged any opposing ship loses the game - a major loss if they damaged an enemy vessel or a minor loss if they fired and missed.  Any side that was fired upon but did not shoot back can claim a minor victory.
    Note that for these purposes, the spilled cargo from the bulk freighter counts as Federation items; the Sa'vasku may not fire on it without incurring a loss.
    Note also that the intruder player may not reveal his/her chosen victory conditions to the other side in any way until the game is over.  Absolutely no dropping hints!
Well, I'm not completely happy with these, but let's see what happens.  On to the game!

The Game

For this game, I played the Sa'vasku intruders and my sons took the defenders.  They chose a slightly different mix of ships in the Federation fleet from the previous game, with a wider range of sizes and capabilities.  The heaviest unit was the battlecruiser Invincible, stationed near the planet.  Assisting the distressed freighter were the frigate Trout and the corvette Betelgeuse.  Various light cruisers and destroyers made up the rest of the defending force.

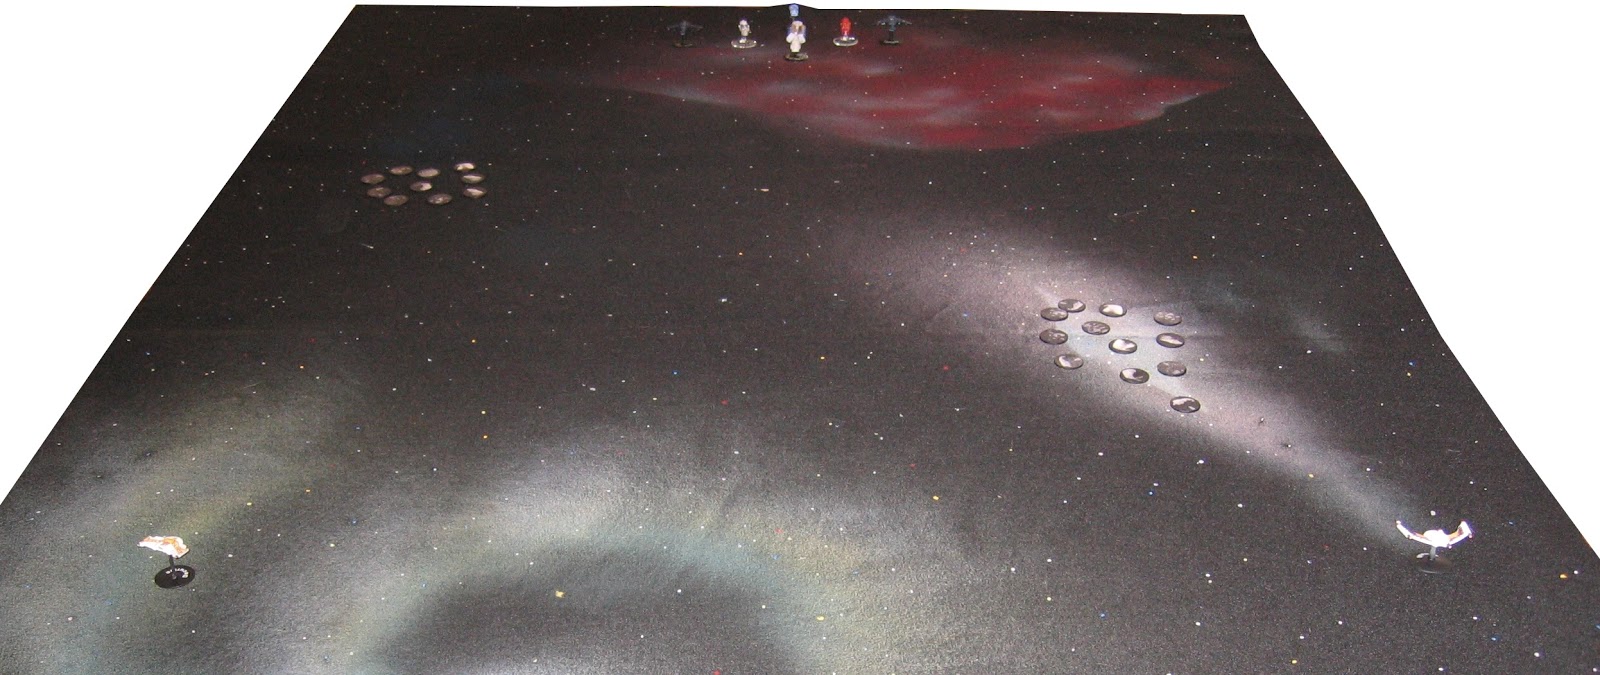
Straight away, before the first turn, I played a "V.I.P.s" card on the opposition.  There were some important alien guests visiting the Caledon system; the Federation players decided that they were currently on the M.D.B. Space Factory.  Although this facility was only lightly protected, it was extremely massive and would give them many places to hide, should the worst happen and the intruders attempt to take hostages!

For the first couple of turns, the Sa'vasku intruder ships performed a series of high speed passes and turns, showing off their extreme maneuverability and attempting to confuse the defenders.

The Federation battlecruiser and one of the light cruisers approached cautiously, while most of the rest of the fleet moved only very slowly, unsure how to react.

While they were trying to make up their minds, I played another event card.  This was a busy day in the Caledon system, as a previously undetected comet suddenly appeared.  I was hoping that it would hit the space factory or the bulk freighter (neither of which had much capability to dodge); at least the comet did appear on the Federation side of the table.

Sadly (for me, at least!), the comet missed all the Federation targets.  The Sa'vasku ships continued their high speed posturing, resulting in the 3 smaller ships heading for the planet while the battlecruiser Cisplantin was at the far end, approaching the spilled cargo from the freighter.

This was too much for the Federation admiral.  The corvette Betelgeuse was ordered to transport the V.I.P.s off the space station and take them safely away, warping to another star system if necessary.  No doubt the alien dignitaries weren't too happy about being hustled onto an uncomfortable little ship and taken to who knows where, but Starfleet security personnel were very insistent!

At the far end, the frigate Trout was the only Federation vessel nearby as the huge alien battlecruiser started to cut up the precious spilled ore with pulses of fire from its stingers.

At the same time, one of the younger Sa'vasku ships (Rituxan) reached orbit around the planet of Caledon.  It started to lay eggs, while the larger cruiser Carboplatin approached not far behind.
"Right, that's it.  We've been patient enough!" snapped Admiral Jeffries.  "All ships, open fire - nearest targets.  These guys don't want to be friends!".
The Invincible and the Toronto immediately targeted the other small intruder (Zofran) and, despite the range, hurt it quite badly.  The startled Zofran was already traveling fast; it now fled at top speed and vanished into the night!

Near the debris field, the Trout nobly obeyed orders and fired on the Cisplatin.  The frigate inflicted only a minimal amount of damage, then sat back and waited to be annihilated.  The great beast was focused on splitting open rocks to look for the munchy bits inside, but it did divert some of its energy to swatting the small Federation vessel.  Trout survived the Sa'vasku ship's return fire, but only just - her life support was failing and the ship-wide intercom was stuck on high volume (see non-critical hits).  Her captain ordered the now-deafened crew to abandon ship, hoping that the alien star-creatures didn't eat escape pods!

The Federation heavy units tried to catch the Sa'vasku cruiser, but were frustrated firstly by the comet  and then by the planet - they couldn't get a clear shot at the intruder.  Carboplatin used this opportunity to brush the planet's atmosphere, laying eggs as it went!

After spawning, the Sa'vasku cruiser and destroyer accelerated out of orbit and raced towards the MDB space factory, leaving the Invincible and Toronto struggling to keep up.  As she passed the station, the aliens fired upon it - doing moderate damage and (more significantly) hitting with a couple of the dreaded leech pods.  Both leeches then gnawed on the factory for several rounds before being hunted down and dispatched by factory workers with improvised weaponry.  This was more a means of unsettling the Federation players, rather than a serious attempt to destroy the facility.  It succeeded admirably in that!

Near the spilled ore, the other Federation squadron attempted to confront the Sa'vasku battlecruiser, only to find that the beast had accelerated straight past them far quicker than they had imagined possible!

Now the lighter Federation squadron found itself in trouble, as all 3 remaining Sa'vasku pounced on them (the battlecruiser executed another extremely high-G turn).  Fortunately for the defenders, the bioships had spent a lot of their power on manoeuvering and so their firepower was light - this turn.  Still, enough damage was done to the Los Angeles to reduce her thrust; she actually had to fire on one of the rocks that was directly in front of her in order to scatter it and avoid a fatal collision!
Endeavour suffered the indignity of a non-critical hit on her grey paint locker.  The atomised paint was then sucked into the life support systems and sprayed as a fine mist over much of the ship's interior!
Not everything went the Sa'vasku's way, though.  Return fire from Federation vessels did serious damage to the second alien destroyer, Rituxan.

The next turn should have been the Sa'vasku's finest hour.  The cruiser Carboplatin diverted virtually all its energy to stinger weapons and aimed at the destroyer Antelope.  However, the Federation admiral played a quick Targeting Glitch card.  The massive salvo from the intruder was instead directed on to the stationary and abandoned frigate Trout!
The bioship had taken light damage from the Federation heavy units whilst racing past them at long range, perhaps this caused the problem.  Or maybe the animal was just tired after spawning - who knows?  Whatever the reason, the derelict frigate was completely obliterated by the misdirected fire, while the Antelope then punched more damage onto the hapless cruiser!

In the final moments of the game, the Cisplatin tried to return to feeding on the debris from the freighter's cargo.  It managed to consume 1 rock, but was moving too fast and in slightly the wrong direction to be able to overrun any others.  The damaged Federation light cruisers and destroyer were fleeing, but the almost untouched Invincible and Toronto were approaching fast.  Weighing up the odds, the Sa'vasku battlecruiser gave a metaphorical shrug as it accepted that it and its consort cruiser wouldn't be left to their meal in peace.  Instead, the 2 remaining bioships used their superior speed to race off the board and out of reach of the human ships.

Conclusion

As the Sa'vasku player, I tried to draw the Federation fleet away from the spilled cargo that was my goal.  In this, I was partly successful, but at very high speeds it was difficult to manoeuvre so as to scoop up the small, tasty chunks.  At least all my ships escaped in the end, though the smaller ones were quite badly damaged.

The Federation were indeed confused by the intruders' antics.  Indeed, they may have been too confused because rather than attempting to chase the Sa'vasku ships, many of their vessels simply sat still and waited for something to happen.  This made it relatively easy for them to reinforce any given area, albeit after a slight delay to build up speed.

Moving the party of alien V.I.P.s onto the small police corvette was probably a big mistake.  The Sa'vasku could easily have targeted this ship before she reached safety.  Even though the range would have been long, the corvette would have been very easy to destroy or cripple.  However, I played in character - the intruders had no interest in the small lifeforms - and let them get away unharmed.

Saturday 13 July 2013

Zombies at the beach

It's Summertime!

In honour of the heatwave currently sweeping through the United Kingdom, I decided to put together a few shots of my zombies at the beach.  It's a bit hard to tell if they're enjoying themselves, mind.  Still, why shouldn't they have a day out?

Surfer and Lifeguard
The surfer is a Hasslefree model (HFZ208), while the lifeguard comes from Wargames Factory's Zombie Vixens plastic box set.

Beach Games
This pair are playing with a beach ball.  At least, there's a ball there; I'm not sure if they're actually playing with it or not.  She is BH07C "Salma" from Tengu Models, though I've sculpted a swimsuit on (the model came naked).  He is another Wargames Factory model, this time from their original Zombies range. 

Beach Shorts
Finally, the guy with the fancy shorts is looking for the bar.  I think.  Or maybe he's looking for brains...  Either way, he's another Wargames Factory zombie.

A Grand Day Out
It's a shame that I didn't base all of these figures for the beach - but most of my zombie games are set in the city and sand isn't really appropriate.  Still, they'll do well enough for a spur-of-the-moment idea like this.

Enjoy the sunny weather while it lasts, unless you're a gardener, work in a stuffy office, suffer from hay fever or are just a miserable git - in which case pray for rain!

Wednesday 10 July 2013

HOTT: The Dead Marshes

Introduction

The air was hot and heavy as the Knights of Lyonesse trekked through the wilderness.  Flies buzzed around the horses' heads, pestering them mercilessly.  Even though it was the height of summer and the sun had been blazing down from a cloudless sky for weeks, the ground on this desolate plain felt spongy and damp.  Every so often, one of the men-at-arms or an animal would stumble and grunt as they caught a foot on a muddy tussock of rank-looking weeds.

"Remind me why we are here, please?"  The speaker was Henri, Duc D'Alençon - a short man, though broad and muscular.  He was the leader of the expedition and, all things considered, was quite calm.

"My lord, we are following the foul necromancers of the Cabal.  All the indications are that we will catch up with them very soon.  And this time, they won't give us the slip!" replied Sir Guy de Lusignac, his lieutenant.
"At least," Sir Guy thought to himself "I really hope so.  Then we can finish them off and return to where we can get a decent meal and a drink.  I can't stand much more of this!"

An hour later, just past noon, the lead cavalry stopped and gave a shout.  When their commanders galloped to the head of the column, they saw the reason why: a line of armoured, skeletal warriors stood facing them, completely immobile in the typical fashion of the true undead.  But there were so few of them?  Even the more experienced knights were grinning broadly - this shouldn't take long at all!

The Scenario

This is, on the face of it, a straightforward battle using the Hordes of the Things rules.  The Knights of Lyonesse are attacking, whilst the undead army of the Cabal of the Black Hand are defending.  We used 48AP on either side, divided into 2 commands of 24AP each, though there's no reason why the same scenario couldn't be played with more or fewer troops.  So, what's the catch?

If you are regular readers then you'll know that I often like to shake things up a bit!  So, here are some scenario-specific rules:
  1. The Cabal are defending a small shrine, which acts as a stronghold if attacked or for the purposes of housing ensorcelled enemy heroes.  It may be small, but it's full of powerful black magics!  If the shrine is captured then the Knights win instantly.  Otherwise, either side wins if all the opposing commands are demoralised and at least one of their own is not.
  2. There are 2 large patches of fetid marsh on the field.  They are difficult terrain for movement and combat, but don't block line of sight.
  3. All the Cabal's horde elements start off the table (this is why they appear not to have as many troops as the knights!)
  4. The undead hordes can be summoned for the usual cost of 1 PiP each, anywhere within either patch of marsh (as the dead from a long-forgotten war are commanded to rise again).  This could even be in contact with an enemy element, flanking them or behind them - as long as the summoned horde is completely within the marsh.
  5. As is usual with horde elements, they may not move on the turn in which they are summoned, though they may attack if placed in contact with an enemy.  Of course, if a horde is destroyed then it becomes eligible to be summoned again in the Cabal's next turn; there is no limit to the number of times they may return.

The Game

The knights advance cautiously, trying to stick to the drier patches of ground.  As they passed some of the softer parts of the bog, the ground heaved and clods of dirt were thrown aside as numerous long-dead soldiers rose from their mass graves!  [The knights started with exceptionally poor PiP rolls, whilst the Cabal had very high rolls.  Indeed, the southern command of the knights didn't roll higher than a '3' for command points - and that only occasionally - until the game was all but over!]

Quickly, foot soldiers from the northern knight army moved to intercept the newly-arisen undead...

...and in the south, halberdiers fought the nearest skeletons whilst lines of archers slew many more of the risen undead.

So far, so good.  The cavalry in the centre advanced, trying to avoid the messy swamps and come to grips with the evil magicians around the shrine.  A magical assault caused their first casualty, however.  Two necromancers teamed up to target the Red Knight: one wizard used phantom marsh lights to distract the hero whilst the other entrapped him with sticky stuff!

In the northern swamp, the foot soldiers found it relatively easy to destroy each undead horde as the corpses rose from the waterlogged soil.  However, it was whack-a-mole: each time they dispatched a horde, another would just pop up to replace it, often behind them.  Worse, one of the stands of knights from the flanking force was attacked by a band of skeletal warriors.  The proud nobles couldn't refuse a fight and found themselves unable to disengage from the constant supply of enemies.

The archers were doing a good job of clearing the southern marsh.  Anything which appeared within their range was quickly dispatched back to its grave.  Even so, some of the passing knights were sucked into fighting the undead hordes.  Their impetuous nature drew them further and further into the bog, away from the protection of their friends, until one stand was overwhelmed and dragged down into the muddy pools [not a good place to be for impetuous troop types!].

Despite all the delays, magical and otherwise, the faster-moving northern knights were first to reach the main lines of the undead army.

The outnumbered forces of the Cabal tried desperately to hold on as the fighting quickly turned into a confused melee.  Troops from both sides fell, but overall the knights had the upper hand.

Not wanting to be left out of the fighting, Saint Florence (the paladin) charged the magician at the southern end of the undead line.  He had plenty of time to see her coming and her aura of faith meant little to him here, so close to the unholy shrine.  His lightning bolt hit squarely on her armour, knocking the damsel off her horse and leaving her flapping and tasered on the dirt.

Even though his command was beating back their enemies, Sir Guy couldn't shake a feeling of trepidation and impending doom.  It was almost as if something terrible was creeping up behind him!  A pair of brave young squires saw the marsh vapours start to coalesce behind their general and, without thought for their own safety, they charged the forming apparitions [sneakers].  The ghosts couldn't stand against such brash recklessness; they fled off the field like a sudden breeze.

Casualties for the northern commands Casualties for the southern commands

Up to this point, the casualties on each side had been fairly even.  However, now the forces of Lyonesse started to get decent command rolls and the Cabal didn't...

Suddenly, there were knights all over the defender's core forces.  First, one of the magicians fell to the Duc D'Alençon's skilful lance.  Then, the Cabal's heavy infantry - the Grave Guard - started to take losses.  The dark vampire knights were also wiped out by the determined chivalry of Lyonesse. Evil bat swarms hovered overhead, watching the battle unfold below them - but they were too indecisive to make any contribution [too few PiPs to move them!]. The evil shrine looked under real threat as the Cabal's lines contracted!

A last ditch piece of necromancy from the Cabal saw skeletons, ghouls and zombies arise on all sides of the archers, who had advanced into the swamp in a belated attempt to help with the assault.  However, the stout yeomen could sense a victory; they laid about their enemies fiercely with clubs, daggers and rocks.  The undead hordes wilted and crumbled back into the marsh from which they had come.

Then, quite suddenly, it was all over.  Both undead commands passed the demoralisation threshold and collapsed.  The remaining warlocks fled, leaving a few of their troops (and bats!) in a vain attempt to distract the victorious knights.  Mind you, it then took the forces of Lyonesse a considerable time to counter all the evil protections on the shrine in order to finally pull it down...

Conclusion

Well, that was interesting!  The "hordes from the swamp" idea worked well and seemed reasonably well balanced.  If anything, the value of the infantry and cavalry who were distracted by the ever-returning hordes was slightly greater than that of the hordes themselves, but against this the forces of darkness used a lot of command points to keep that threat going.  Mind you, I think that you'd need to be careful with the way the terrain was set up; it would be all too easy to create a very unbalanced game.

The same idea could extend to some other types of horde armies.  I could easily imagine masses of goblins boiling out of broken ground riddled with tunnels and holes.

Man of the Match

  • For the Cabal: tricky, but I think it has to be the hordes,  They distracted a sizable chunk of the opposing army and even managed to sucker some hot-headed knights deep into the swamp (where they were dragged down!).
  • Lyonesse: also tricky.  The regular Knight elements swept all before them, but the halberdiers and archers fought countless hordes of newly-risen undead in the sticky swamp and came out victorious.  On balance, I think I'd give it to the halberdiers, though they could probably all do with a good bath now.

Biggest Disappointment

  • Cabal: I think that the bats win this accolade quite easily.  There never seemed to be enough PiPs available to move them, especially just when it mattered towards the end of the game.  At least the sneakers tried to ambush the enemy general...
  • Lyonesse: The Red Knight (hero) and Saint Florence (paladin) were both pretty ineffectual.

Sunday 7 July 2013

Full Thrust: Klingon Honour

Introduction

A little while ago, I played a test game with my son, where a small Romulan squadron attacked a Ferengi convoy: http://colgar6.blogspot.com/2013/06/full-thrust-never-trust-ferengi.html .  I took an almost-identical scenario to the games club last Tuesday, where 2 novice players took on the role of Klingon cruiser captains tasked with guarding an important convoy.

The cruisers IKS Ragnarok and IKS Valhalla guarding a convoy, consisting of the Pride of the Orient, Madras Castle, Ivanhoe and LT-107.

Again, the convoy was intercepted by Romulan warships, in this case the battlecruiser Consul and the light cruiser Decurion.  This time the scenario was slightly different in 2 ways: the Romulans set up a bit further away from the convoy and there were a couple of small patches of asteroids on the board.

The Game

Before the first move had even taken place, the Romulan commander played a Moral High Ground card.  This meant that if the Klingons obliterated any enemy ship without giving the crew a chance to reach escape pods then the best they could achieve would be a draw.  Clearly they'd have to be careful not to overkill the Romulan ships!

On start of play, the Romulan ships immediately fired plasma torpedoes at their maximum range (a little one from the Decurion and a huge bolt from the Consul) and then cloaked.  The torpedoes fell far short of the convoy's position, but were launched just in case the Klingon cruisers had decided to accelerate rather harder than the sluggish merchantmen.

Since the enemy's position wasn't known, the convoy could do nothing but start to scatter.  We did debate whether bunching up might be better, so as to concentrate point defence fire on the inevitable torpedoes.  However, if we failed to shoot down the missiles then that would have caused all the ships in the fleet to suffer damage.

As it was, both of the Romulan ships uncloaked as soon as they had reloaded their torpedoes and fired at point blank range into the midst of the gaggle of civilian vessels.  There was nothing the horrified escort ships could do as 3 of their charges blew up immediately.  Only the huge bulk freighter Pride of the Orient survived, partly because she was targeted by the smaller torpedo and partly because of her sheer size - it would take a lot of damage to slow down such a massive vessel!

The Klingons did get some retaliation, though.  Valhalla was ignored by the battlecruiser Consul (which was concentrating on hitting freighters), so she fired on the larger ship at extremely close range.  The Romulan was not badly damaged, but she did take an engine hit that would soon prove to be very awkward.  Additionally, the engineer's secret still was hit; there would be no more Romulan ale this mission!

On the other flank, Ragnarok took on the smaller Romulan cruiser and did enough damage to scare her captain!

Immediately the Decurion cloaked and vanished; it looked as if she would be able to escape without any further damage.  The Consul decided to chase down the last freighter, though the engine hit limited the distance she could put between herself and the Klingon cruisers.

Valhalla was on a roll now.  She played a Panel Overload card before firing on the Consul again.  As it happened, enough damage was done to cause a threshold check anyway, even without the help of the card.  With a flurry of high die rolls, every system on the Romulan ship (apart from 2 phasers, life support and the bridge) was knocked out.  That's right: engines (2nd hit, so now completely inoperable), fire control, cloaking device, hyperdrive, screens, torpedo, warp core critical...everything!  The Consul staggered in space as great arcs of electricity rampaged through all the open spaces in the ship, destroying machinery and throwing her crew about like rag dolls.  She continued coasting through space, but without any ability to fire or control her movement.

Next turn, in a staggering display of scientific brilliance, the chief engineer on the Ragnarok coordinated the sensors on both Klingon cruisers and the Pride of the Orient to search for stray energy emissions from the cloaked Romulan light cruiser.  The Decurion was indeed within the triangle formed by the 3 ships!

"I can see you..." whispered the Ragnarok's captain to himself as he observed the damaged Romulan trying to slip away.  "Tactical - fire on my command.  Disruptors will be enough to finish her off, I think.  BAKH!"

The bolts tore through the surprised target, though at least some of the crew had time to reach life pods before the Decurion broke apart (the volley achieved precisely the number of hits needed to destroy the target, so no massive overkill there).

Both Klingon cruisers now turned to chase the damaged and out-of-control Consul.  They hoped to run her down, board and capture the Romulan battlecruiser.  That would have been a prize indeed, if it could be accomplished!  However, long before they could reach her, the Consul's warp core went critical and she blew up spectacularly (not helped by her captain desperately trying to repair a fire control system rather than the warp core breach, just so that he could attempt to kill the last freighter and finish the mission)!

Conclusion

 Well, that was an all-or-nothing game for the ships involved!  Status:

Klingons

  • IKS Valhalla (CA): undamaged
  • IKS Ragnarok (CA): undamaged
  • Pride of the Orient: minor damage
  • Madras Castle: destroyed
  • LT-107: destroyed
  • Ivanhoe: destroyed

 Romulans

  • Consul (BC): destroyed
  • Decurion (CL): destroyed 

As in the tester game mentioned at the start of this article, the Romulans concentrated exclusively on killing the freighters.  This did allow the defending warships free rein to fire on them and in the end this cost the attackers both of their ships.  I think the convoy would have to be very important for such an exchange rate to be worthwhile, but the scenario's victory conditions are a bit vague on exactly what has to be achieved to "win".

Tactically, it's obvious that area effect weapons such as plasma torpedoes are devastating against closely-packed freighters.  Even though the merchantmen started to scatter, their low thrust ratings meant that they hadn't moved far apart from each other and were easy targets when the Romulans fired their second salvo.  Maybe we should have bunched up and relied on the warship's defensive fire after all?

Wednesday 3 July 2013

Black Powder: The Road to Bad Wörgl

Introduction

Last weekend, we got out my 6mm Napoleonic forces and played another game of Black Powder with them.  Now my armies for this period are something of a mixture of bits and pieces, but I can put together a fairly decent-sized Austrian force (especially if I overlook the odd base of infantry with Hungarian uniforms in an otherwise German regiment!).  Against this, I can field a smaller force composed mostly of French, but with some Bavarian allies.  I needed to come up with a scenario where the victory conditions allowed the smaller force to have a reasonable chance, so a simple pitched battle wouldn't work.

The Scenario

Austrian forces are advancing in strength, trying to find a weak point in an over-stretched French corps.  A division led by General Wulfe has been ordered to clear the approaches to the town of Bad Wörgl; if this succeeds then the French invasion will be in jeopardy.  Hastily, a scratch group of French and Bavarian allies under General Le Beaux has been sent to intercept them.  Can the allies delay the whitecoats, or will they be overrun by the superior numbers in Wulfe's division?

So, here's how it works.  We'll play along the length of the table - there's a road from one end to the other.  Both sides will set their forces up in their marching positions, one at each end, just off the board.  Because they have fewer troops, the French are permitted 3 clear moves before the Austrians arrive - this should give them time to choose a defensive position and/or shake themselves out of march columns into battle formations.  Victory will be judged on how much the French can slow down the Austrians (somewhat vague, but good enough for a friendly game).

For leadership, we'll randomise the values.  Each French or Bavarian leader will have a leadership of 6 + 1d4 (i.e. from 7-10), whereas the Austrians will be penalised slightly by having values of 6 + 1d3.  Also, the French merit system allows them to swap leadership values between generals at the start of the game.  However, each Austrian or Bavarian leader must take the roll he gets.

Order of Battle

French

  • C-in-C: General Le Beaux (Leadership 7)
  • French Infantry Brigade: General Bonneville (Leadership 10) 
    • 4th Line regiment
    • 16th Line regiment
    • 32nd Line regiment
    • 26th Légère regiment
    • 2 x battery of foot artillery
  • Bavarian Infantry Brigade: General Hoffmann (Leadership 10)
    • 7th Line regiment
    • 13th Line regiment
    • 6th Light regiment
    • 1 x battery of foot artillery
  • Cavalry Brigade: General Lefèvre (Leadership 8)
    • 2nd Carabiniers
    • 5th Hussars
    • 2nd Bavarian light cavalry
    • 1 x battery of horse artillery

Austrian

  • C-in-C: General Wulfe (Leadership 7)
  • Main Brigade: General Schwarztodt (Leadership 7)
    • 1st Dragoons (heavy cavalry)
    • 11th (Archduke Rainer) Line regiment
    • 42nd (Erbach) Line regiment
    • 32nd (Esterhazy) Line regiment
    • 47th (Vogelsang) Line regiment
    • 1 x battery of foot artillery
  • Light Brigade: General Horta (Leadership 7)
    • 3rd Hussars
    • 2nd Uhlans
    • 2nd Jaegers
  • Reserve Brigade: Lieutenant General von Eugen (Leadership 7)
    • 7th Cuirassiers
    • 10th (Mitrowsky) Line regiment
    • 35th (Archduke Maximillian) Line regiment
    • 13th Grenze light infantry regiment
    • 1 x battery of foot artillery
Looking at this in hindsight, the Austrians didn't outnumber the French by as large a margin as I thought at the time, having an advantage of 10 regiments to 8.  Also, the French had more artillery batteries.  It's painfully obvious that I rolled the lowest possible leadership (7) for every Austrian general, whereas the French and Bavarians rolled above average.  Oh, well...

The Game

The French made use of their 3 free turns to advance their infantry down the centre, throwing 1 regiment out ahead as a skirmish screen.  On the right, the Bavarians made excellent progress and managed to site an artillery battery on Little Round Top.  However, all was not perfect as the 5th Hussars on the left refused all orders to move forward, citing the need to have a proper breakfast before saddling up!

Finally, the Austrians began to arrive.  The road was clogged with their main brigade, closely followed by the reserve brigade, whilst elements of the light brigade scouted on both flanks.

Battle was joined soon after, as cavalry on both sides forced the opposing infantry to halt and form squares.  Left of centre, a vicious but private little war erupted between the Jaegers and the French skirmishers.  On the far left, Austrian Uhlans attempted a wide flanking manoeuvre.

The French reacted to the flank threat; their reluctant 5th Hussars were ordered to charge the Austrian cavalry.  However, in a thunderous counter-charge, the Uhlans obliterated the French regiment for virtually no loss to themselves.  The victorious Austrian regiment then carried on towards the French rear, causing consternation for General Le Beaux.

However, a nearby French line regiment managed to catch the Uhlans in the flank and poured volley after volley of musket fire into them.  Surprisingly, the Austrian cavalry didn't suffer many casualties, but they did become disordered several turns in a row and were thus unable to move away to safety.  The Carabiniers waited in the distance, just in case the Uhlans made a break for it, but they weren't needed.  Eventually, the Austrian light brigade broke (lost enough units in other parts of the battle) and the Uhlans then retired off the field.

Battle was joined all along the line now.
  • On the right, the Bavarian infantry and their supporting artillery shot to pieces the Austrian 32nd (Esterhazy) regiment and the 3rd Hussars.
  • In the centre, a single brave French line unit assaulted the leading regiment of the Austrian main brigade [the 42nd (Erbach)].  Although the Austrians destroyed the attackers, the 42nd was left reeling and shaken; they retired into the nearby hamlet and General Wulfe spent much of the remainder of the game attempting to rally them.
  • The left flank saw the vicious struggle between the French skirmishers and the Jaegers continue.  Although the advantage seesawed several times, eventually the Frenchmen drove off the Austrians, only to be routed in turn by many fresh Austrian units from the Reserve brigade.

Finally, the Austrians untangled themselves enough for the 11th and 47th regiments to unleash a massive charge against the remaining French infantry in the centre left.  The assault columns rolled over the defending line with barely a scratch and in the ensuing collapse, half of the French artillery decided to flee as well.

Only the Carabiniers were available to plug this huge hole in the French deployment.  The 11th regiment promptly (and correctly) formed square in the presence of the French heavy cavalry, but the 47th blundered and turned to attack the Bavarians to the right.  The Carabiniers couldn't believe their luck as they charged the errant Austrian infantry in the flank - but even though they scored a very large number of hits, the 47th proved remarkably resilient and survived the attack (just!).  There was nothing the French cavalry could do except withdraw in disgust, as other Austrian regiments nearby would have overwhelmed them otherwise.

Finally, on the right flank the 13th Grenze formed assault column and charged the 7th Bavarian line regiment, who had come close to encircling the Austrian artillery.  The fight was short but extremely bloody, resulting in the Bavarian unit routed and the Austrian unit devastated.

Both the French and Bavarian infantry brigades had now collapsed, so the remainder of the French cavalry brigade withdrew in good order, leaving the field covered in shattered Austrian units.  The Austrian Reserve brigade still had plenty of infantry in good order, but they wouldn't be able to catch the enemy horsemen (though the last remaining Bavarian square, pinned by Austrian dragoons, looked very vulnerable).

Conclusion

We tried to set up a game here that was a bit more interesting than the traditional "line them up along the long edges and attack" scenario.  In this, I think we succeeded quite well.  As commander of the Austrians, I was continually frustrated by General Schwartztodt's inability to move his troops along the road - von Eugen's Reserve brigade eventually just went round them to the left.  The attack was certainly blunted, as none of General Wulfe's troops got anywhere near the French baseline.

For the French, the early plan had been to garrison the wood and village in the centre of the table.  Had they done this, I suspect it would have been very difficult to shift them.  However, there were no Austrians present when they arrived at this location; rather than sit down to wait, the French decided to continue their advance.  When they eventually made contact, it was in the open and the French and Bavarian units were somewhat separated, so they lost the advantage of a prepared defence.

Finally, Hussars on both sides were useless.  The Austrian 3rd Hussars were shot to bits by Bavarian artillery and infantry, like fish in a barrel.  On the other flank, the French 5th Hussars were reluctant to obey orders.  When they finally decided to charge, the Uhlans made mincemeat of them.