Sunday 29 September 2013

The Demon Biker

The Demon Biker


Today's post will be a short one, as I have only a single model to show.  He's a conversion from one of the 28mm Human Biker Gang figures from Westwind Productions.  These models are potentially very useful as there aren't many bikers on motorbikes available in 28mm, though there are plenty of such figures on foot.

However, the Westwind models are a real pain to assemble.  I've had to do quite a lot of work to make the separate arms and bodies fit together (and to hold on to the bike at the same time!)  This is well documented else where, so let's move on.

Having already put quite a lot of time into this model, I decided that it would be worth the extra effort to convert it into something special.  I had vague memories of a superhero/villain who rode a flaming motorcycle (I'm not really a comic book geek), so a little research led me to my version: The Demon Biker.

I added a bit of green stuff to the wheels and head in order to make the flames.  This wasn't at all hard, though I think I did a better job on the tyres than the person.  Rather than use one of the supplied (human) heads, I substituted a metal skull that I had in my spares box.  I had to build a bit of neck for the skull to sit upon, but again it wasn't much effort.


For the right arm, I carved away the existing weapon and drilled a hole for the haft of the "whip".  The handle was just a short length of plastic rod.  Surprisingly, the most difficult part was obtaining the chain for his weapon.  It took me many months of searching before I discovered that really fine chain was stocked by Hasslefree Miniatures, hidden under their "Accessories...Steampunk Stuff" category.  Once I had fixed the chain in place, I coated it liberally with super glue to make it hold in the right position.  Nevertheless, this may be a weak point on the model and I'll need to be careful not to collapse it with excessive handling.

Painting the main part was straightforward.  The bike was done in gunmetal and the rider in dark grey (2 or 3 different shades, depending on the piece of clothing).  Then I washed the entire model with black.  After all, most of this model is intended to sink into the background, so it shouldn't have a lot of detailing.

The flames were a different matter, however - they really had to draw the eye if the model was to work.  I spent a lot of time working up from reds and oranges through to pale yellow.  I'm still not really happy with the outcome, though I've given up tinkering in case I make things worse!

So, how will I use this model in a game of All Things Zombie (or indeed in any other game)?  I've no idea - but it must be possible!  Is he a force for good?  A damned soul bent on fiendish destruction?  Or completely neutral and even-handed in mowing down anyone who gets in his way?  What are his powers and motivations?  Does he have any vulnerabilities or weak spots?

Wednesday 25 September 2013

SAGA: It's *my* bacon!

The Scenario

For my second ever game of SAGA, we chose to play "The Escort" scenario from the main rule book.  My Vikings, laden with plunder, would try to escape past my son's Scots.  In the previous game, the Vikings had done quite badly.  Could they improve their performance now?

The Forces

Both sides would have 4 points worth of troops.  Although I now have 6 points of Scots painted up, the Viking force is the smaller and this limited the size of battle we could put on.

Vikings 

  • Warlord Leif Gunnarson
  • 1 x 4 Hirdmen
  • 1 x 4 Berserkers
  • 1 x 10 warriors
  • 1 x 6 warriors
  • 3 x baggage (1 group of pigs + old man, 1 group of pigs + rather corpulent monk, 1 flock of chickens + young boy.  The prisoners who were herding the animals had been warned of dire consequences if they misbehaved!)

Scots

  • Warlord MacBheatha
  • 1 x 4 thanes (mounted)
  • 1 x 4 thanes (on foot)
  • 1 x 8 warriors
  • 1 x 8 warriors

The Battle

The Vikings deployed both sets of pigs to one side, but the chickens were placed a long way off.  Since I only needed to get 2 of these 3 off the board in order to win, I regarded the chicken flock as a decoy.

Sure enough, in the opening moves the Scots cavalry tried to race round the far flank whilst most of the Vikings just advanced steadily.

Hmm, we're not having that!  Using the power of Frigg and of Thor, the large band of Viking warriors ran towards the Scots cavalry and forced 2 rounds of combat.

When the dust settled, 2 were dead on each side.  I'd hoped to wipe out the cavalry, but their defensive tactics compensated to some extent for being so heavily outnumbered.  Oh, well - 2 thanes for 2 warriors is still a good exchange.

Dismayed at the partial destruction of his mounted force, MacBheatha advanced towards the Viking lines with just a single body of spearmen to accompany him.

The Vikings were quick to take advantage of this splitting of the Scots force.  Leif Gunnarson grabbed the nearest group of warriors and charged with them into the opposing line.  Again, the Scots braced themselves defensively, but they still lost more figures and had to give ground.

"Odin and Valhalla!"

This left the Scots warlord, MacBheatha, somewhat exposed.  With a guttural roar, the Viking berserks ran from the back field and attacked him...

How many hits was that?!
Needing '5' or '6' to hit, the berserks threw an astonishing number of attack dice and scored many, many hits.  Even though MacBheatha had braced for defence, this was an unstoppable charge.  The Vikings cut him down, howled like animals and then danced on his body.

The frothing madmen didn't stop there, either.  Ignoring their fatigue, they charged on into the falling-back unit of Scots warriors.

Again, how many hits?!
Once again, the berserks obliterated their foes, though this time they took a couple of casualties due at least in part to their tiredness.

And still they weren't done!  With a last burst of energy, the remaining 2 berserks charged the small unit of thanes in the rear centre.  These armoured Scots were too tough for the exhausted Vikings though; they cut down the berserks, though not before one of their own had fallen.

Meanwhile, back at the chickens...

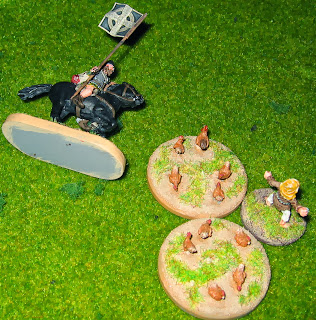
The remnants of the Scots cavalry finally stirred themselves.  They avoided the large band of Viking warriors who had attacked them before and headed for the chickens, determined to prove their valour.  Sadly, even this was too much for them as one of the horses was startled by a flapping fowl and threw its rider.

The remaining mounted thane attacked again, but this time the little boy guarding the flock threw a stone and hit the hearthguard in the face.  He, too, fell off his horse and was out of the fight.  Hmm - 2 hearthguard beaten by a baggage unit!

Mopping Up

 There were now only 2 Scots units left: a group of 7 warriors blocked the path ahead and the remaining 3 (foot) thanes were off to one side.

The warriors were pummelled, first by the Viking Hirdmen (3 casualties to each side)...

...then, after that attack failed, the Viking warriors in the centre had a go (3 for 0).  This left a single Scots spearman retreating through the trees.

In desperation, the remaining 3 Scots thanes approached from the flank.  This time, Leif Gunnarson decided to take them on himself.  A fresh set of Saga dice on the battleboard gave the Viking warlord a number of advantages as he charged the dispirited Scots and felled all 3 without even taking a scratch himself.  If only there had been a bard nearby to record such prowess!

Sensibly, the last remaining Scots warrior slunk away behind the hill rather than face the raiders on his own.  The remaining Vikings carried on their journey towards where their ship was awaiting them, tired but happy.  At least on this occasion, they'd be bringing home the bacon!

Conclusion

That was brutal!  The Scots were almost always on the defensive, mostly swapping attack dice for defence dice to try to stem the flood of casualties.  This certainly slowed the casualty rate, but it seemed that they just never had a decent chance to counter attack.  As for losing 2 hearthguard to a flock of chickens - that's just embarrassing!


Sunday 22 September 2013

Wargames Factory Conversions

Introduction

In my last post on the female apocalypse survivors from Wargames Factory (http://colgar6.blogspot.co.uk/2013/09/plastic-apocalypse-survivors-women.html), Zabadak observed that every build of the "fat woman" on the internet seemed to be armed with a rocket launcher.  I realised that this was right: the default weapon for this body is indeed the RPG.

Another follower (Simon Quinton) responded to my complaint about the lack of empty-handed arms in the kit by suggesting the use of arms from Wargames Factory's female zombie kit.

Between them, these comments got me thinking about what might be done differently.  This article is a quick response to those challenges.  I've got 3 Wargames Factory kits ("The Men", "The Women" and "Zombie Vixens") that should be more or less compatible with each other, so let's get creative.

Fat Lady

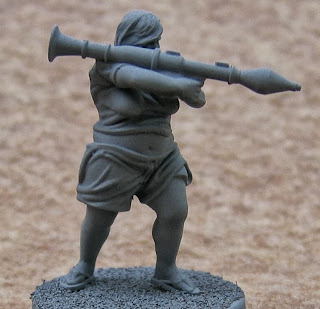
The default "fat woman with rocket launcher"
Each of the 3 identical frames in the women-survivors kit has 1 of these fat bodies.  There are 2 alternate heads to match, but on the same frame there is only 1 weapon option: the rocket launcher.  That's all very well for 1 or maybe 2 models, but I don't really want 3 fat women with missile launchers.

Staying within the same kit for now, the "extra weapons" frame has a different option for this body.  The fat woman can be armed with an AK-47 instead.  Great: fat lady with automatic rifle!  Well, maybe: the weapons frame only has a single copy of this option and in any case I'm not a big fan of heavily-armed civilians.  A few are OK, but I would prefer most of my figures to have either melee weapons or nothing at all.

For my 3rd copy of this body, I raided the other Wargames Factory survivors kit: "The Men".  It would have been really something if the arms from "The Women" and "The Men" were completely interchangeable so that arms for male body "G" also fitted female body "G", for example.  Sadly this isn't the way it works so I had to select parts based on the amount of clothing and the relative position/animation.

A little bit of filler was needed on this figure to hide gaps, but overall the parts fitted well.  Note that this model uses a different female head; it's not one of the official "fat" heads.  Works for me...

So what else can we do?

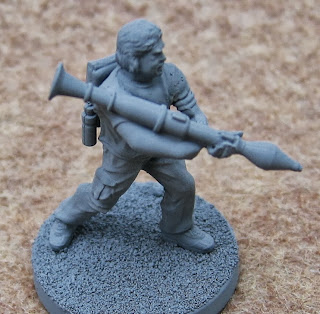
Right, let's mix up a few more parts.  Here's a male body from "The Men" armed with the rocket launcher from "The Women".  It works well enough for me (though I can now see some mould lines that I've missed when cleaning this miniature.  Bother; I'll need to go back and fix those).

Look out!  This one's armed!
This is a body and head from the "Zombie Vixens" kit, to which I have added an arm with a machete from one of the other 2 kits (I can't even remember which).  The occasional zombie should have a weapon, I think, if only to stop my "All Things Zombie" players from getting too cocky!

Actually, if I'd used a complete left arm and a non-scarred head then I think this model would have made a very good survivor instead.

It works the other way round as well.  Here is a body from "The Women" made up with arms from the "Zombie Vixens" kit.  I think I still need to do a little filling on the arms, but otherwise this is a decent civilian (though probably not for games much past Z+1 ?) .

Lastly, we have another "early days" survivor.  She's made up mostly from "The Women" (including the shoes!), but I've used Zombie Vixen arms on her.  The right arm is straight from the kit, but the left hand has been repositioned to be fending off an attacker rather than the default zombie "reaching out" position.

Conclusion

It's obviously possible to mix parts from the 3 kits mentioned.  Some of these conversions have required a little extra cutting or filling, but none of them were hard to do.

I think I'd avoid trying to swap bits with the earlier Wargames Factory (male) "Zombies" kit as it contains a very different style of figures.  However, I'm now wondering whether I could swap bits with the plastic zombies from Studio Miniatures.  Mind you, I don't know when I'll have time to paint these models as it is; it's not as if I really need more survivors or zombies!

[Update: for even more goodness along these lines, see The Color Blind Model Painter's similar article here: http://thecolorblindmodelpainter.blogspot.co.uk/2013/09/plastic-figure-mash-ups.html .  Highly recommended.]

Wednesday 18 September 2013

"Not Star Wars" Imperial Fleet

Introduction

An older Star Destroyer from the Star Wars universe.  This one is not from the Empire, but rather from the New Republic.

Here's something different.  All the spaceship fleets I've displayed on this blog have been "not Star Trek" (though some of them are a bit obscure for the casual fan).  However, I also have 1 "not Star Wars" fleet - the Imperial Star Navy!

Actually, I built this fleet mainly so that I could deploy hordes of TIE fighters and pretend to stand on the bridge of the flagship in a natty grey uniform whilst proclaiming "You are part of the Rebel Alliance and a traitor. Take her away!".  Everyone must bow to the will of the Emperor!

Design Philosophy

OK, enough with the megalomania and on to the ships!

I see the vessels of the Imperial fleet as slow and stodgy, so they all have relatively low thrust ratings (even the smallest ships).  They are large enough to absorb a fair amount of damage, but aren't very good at preventing it.  For this, I give them armour rather than screens; attacks will cause damage (with nice, cinematic explosions), even if it takes a while before the ship ceases to function properly.

As well as the usual beam batteries, the signature weapons of this fleet are fighters and ion cannons.  Fighters are already modeled in Full Thrust, so no problem there.  All larger ships in my fleet will carry some fighters; there won't be any dedicated carriers.

What about the ion cannon, though?  It seems to be a direct-fire weapon, as opposed to a seeking device.  I think it has a very potent effect if it hits but won't achieve anything if it misses, so no area effect.  There's a weapon out there that behaves something like this already: the UNSC graser.  Roughly speaking, this is a bit like a regular beam weapon (if expensive and massive!), except that each hit does 1d6 damage points instead of 1!  There's a bit more to it than this; follow the link to find out.

The Fleet

My Imperial ships come from Kallistra's useful "Space Dreadnought 3000" range.  Appropriately enough they are from the "Earth Empire" faction!  Note that I'm missing E3, that model was absent from the fleet pack I bought long ago.

The fighters are from Studio Bergstrom and are officially "Scythe Empire" fleet scale craft.  But we all know where the inspiration for these comes from, don't we :-) ?
An OpenOffice .odg document containing all the SSDs for this fleet is available: here.

My apologies for the slightly red tinge in the pictures below and for the silvering of the labels on the ships' bases.  These are both artifacts of my camera flash and are not present on the original models.

Manufacturer's DesignationPictureFull Thrust SSD
E1 Earth Empire Patrol Ship
E2 Earth Empire Destroyer
E4 Earth Empire Battlecruiser
E5 Earth Empire Dreadnought
E6 Earth Empire Super Dreadnought
TIE Bombers
TIE Fighters

Saturday 14 September 2013

HOTT: The village of Pao-ting shih

Introduction

Once again, the Black Mountain Goblins are on the move.  This time a raiding party is heading for the peaceful but remote village of Pao-ting shih.  The leader of a nearby monastery (Abbot Chao Kung) has foreseen this attack and has summoned Kung Fu warriors to aid in defending the local peasants.  He has also sent a plea to a band of mercenaries who are slightly further off, in the hope that they will side with their fellow humans against the green menace.  Will these motley forces be enough to stave off disaster?

The Scenario


This is a 48AP battle using the Hordes of the Things rules, so there are 2 commands on each side.
  • The attackers are all goblins - we used 1 army of foot troops (mostly hordes, but with some warbands as well) and 1 army of wolf riders.  Oh, and both goblin armies had a large number of trolls with them as well!
  • The defenders also have 2 armies.  The villagers (Kung Fu army) is deployed as normal.  However, the mercenaries - who have a distinctly Renaissance Italian appearance - such is the joy of HOTT - aren't initially on the board.  Instead, they will enter on the southern edge at any location or locations desired on their first bound or later, using PiPs as normal to make these initial moves.
  • The attackers win if they capture the village/stronghold.  The defenders win if both attacking armies become demoralised before they can capture the village.

 The Game

Masses of goblins advanced as fast as they could towards the village, intending to outflank the defenders on both sides and overwhelm them.  A few of the wolf riders peeled off to face the approaching mercenaries, hoping to delay them whilst the rest of the goblins did their grisly work.

In response, the Kung Fu heroes charged the goblin warbands, without much success on either side.  Bartolomeo Crespi, the leader of the mercenaries, led his small body of knights to meet the goblin riders, whilst his crossbowmen and artillery covered the open space beside him.  Some of the mercenary foot troops, including a pair of assassins, moved forward through the woods.

Chao Kung sat in front of the village, meditating as the defenders and attackers engaged all along the line.  Initially there was a lot of pushing and shoving, but the villagers were generally holding their own.  However, there were just too many goblins and a large column of green meanies started to outflank the battle line to the north.

Amazingly, the first casualty of the day wasn't one of the hordes from either side, but rather it was the mercenary knight general.  Bartolomeo Crespi and his bodyguard were set upon by wolf riders and fell to a 6-1 dice split!  Although the mercenaries didn't panic when their leader fell, the lack of a commander did limit severely their ability to move in the future.

In revenge, the assassins leaped out of the woods and attacked the general of the wolf riders, who just happened to be at the end of the first line of attackers.  The flying machine joined in as well (the mercenaries rolled a '6' for PiPs on the turn following the death of their general).  Taken by surprise, the evil goblin leader was quickly dispatched by the furious assault.

Let's see: only 2 elements removed so far - but they're both generals!

The Abbot Strikes Back

A sudden flurry of goblin successes wiped out half of the villagers.  Although the Kung Fu heroes further south were holding their own, Abbot Chao Kung suddenly looked very vulnerable to the large troll that was bearing down on him.

Alone on the very entrance to the village, Chao Kung and his deacon faced the foul-breathed monster.  As it turns out, clerics in HOTT aren't too bad in combat - they're not as powerful as heroes, of course, but still are capable of holding their own against many opponents.  In this case, the abbot was unmovable and the troll retreated in confusion, its tiny mind unable to figure out why it was retiring.

Then, suddenly, many fresh hordes of peasants appeared out of the village.  Encouraged by this, the abbot led them forward to drive off the attacking behemoth.

In the south, meanwhile, wolf riders and a troll attempted to attack the mercenary crossbowmen.  This was something of a disaster as the wolves were instantly destroyed and the troll was driven back (remind me not to attack shooters with riders ever again!).  The troll then stood around stupidly for several turns, picking crossbow bolts and cannonballs out of its tough skin, until it lumbered off back to the north (i.e. when I finally had enough PiPs to move the dratted thing!).

The End

There was deadlock in most parts of the battlefield by this time.  The southern goblin command (the wolf riders) eventually collapsed due to casualties, but the leaderless mercenaries couldn't reposition their forces quickly to aid the villagers.  In the north, the lines of attackers and defenders were fairly evenly matched - apart from in the extreme north, where the large goblin column started to move again to encircle the village.


Firstly, the flank attack wiped out the single base of villagers that stood between them and their goal.

Then the victorious goblins spread out and attacked the village itself.  Let's see: the attacking horde base has a combat rating of '2', while the stronghold gets a combat rating of '6', reduced to '4' because of the 2 goblin supporting units.  So the goblins get d6+2, the village gets d6 + 4.  A tie is no use for the goblins so to win they need a roll that is 3 higher than the defenders.  Goblin roll: '5', village roll: '2' - attackers win.  The greenies break in to the stronghold, ransack homes, terrify small children and generally make a nuisance of themselves!

Conclusion

This battle could have gone either way, I think.  The early loss of both the opposing generals in the southern part of the table really limited those armies from taking much further action, so it was left to the 2 northern commands to slug it out.  Surprisingly, the good heroes were ineffectual against the double-ranked goblin warbands and the trolls didn't accomplish much either.  In the end it was the hordes weight of numbers that tipped the balance.