Friday 24 December 2021

Santa versus the Hooligans

 Introduction

Many times over the life of this blog, I have run a Christmas-themed game of Hordes of the Things.  All of these can be found using this link: https://colgar6.blogspot.com/search/label/Santa .

The annual holiday game didn't happen last year (global pandemic, don't ya know!), but we're back in 2021 with a new battle.  This time, Santa's home is under threat from tribes of goblins and their associated wolves & trolls.  He has allied with a barbarian tribe (probably through promises of extreme feasting and loot, I imagine!) to defend against this threat.

The Forces

Each of the 4 bands was an independent 24AP army for Hordes of the Things.  The forces of destruction (two goblin armies) were controlled by my friend Steve, whilst the bringers of light and happiness were led by myself and my son.  I took the barbarians, whilst my son took Santa.  He (my son, not Santa!) had just received a vaccine booster shot the day before and hadn't slept well overnight.  This might go part way towards explaining some of the outcomes in the game!

Santa's Army

Santa's force is a mixture of elves, toy soldiers, fierce ice bears and hordes of snowmen.  It is described in more detail here: http://colgar6.blogspot.com/2013/12/hott-santas-army.html .
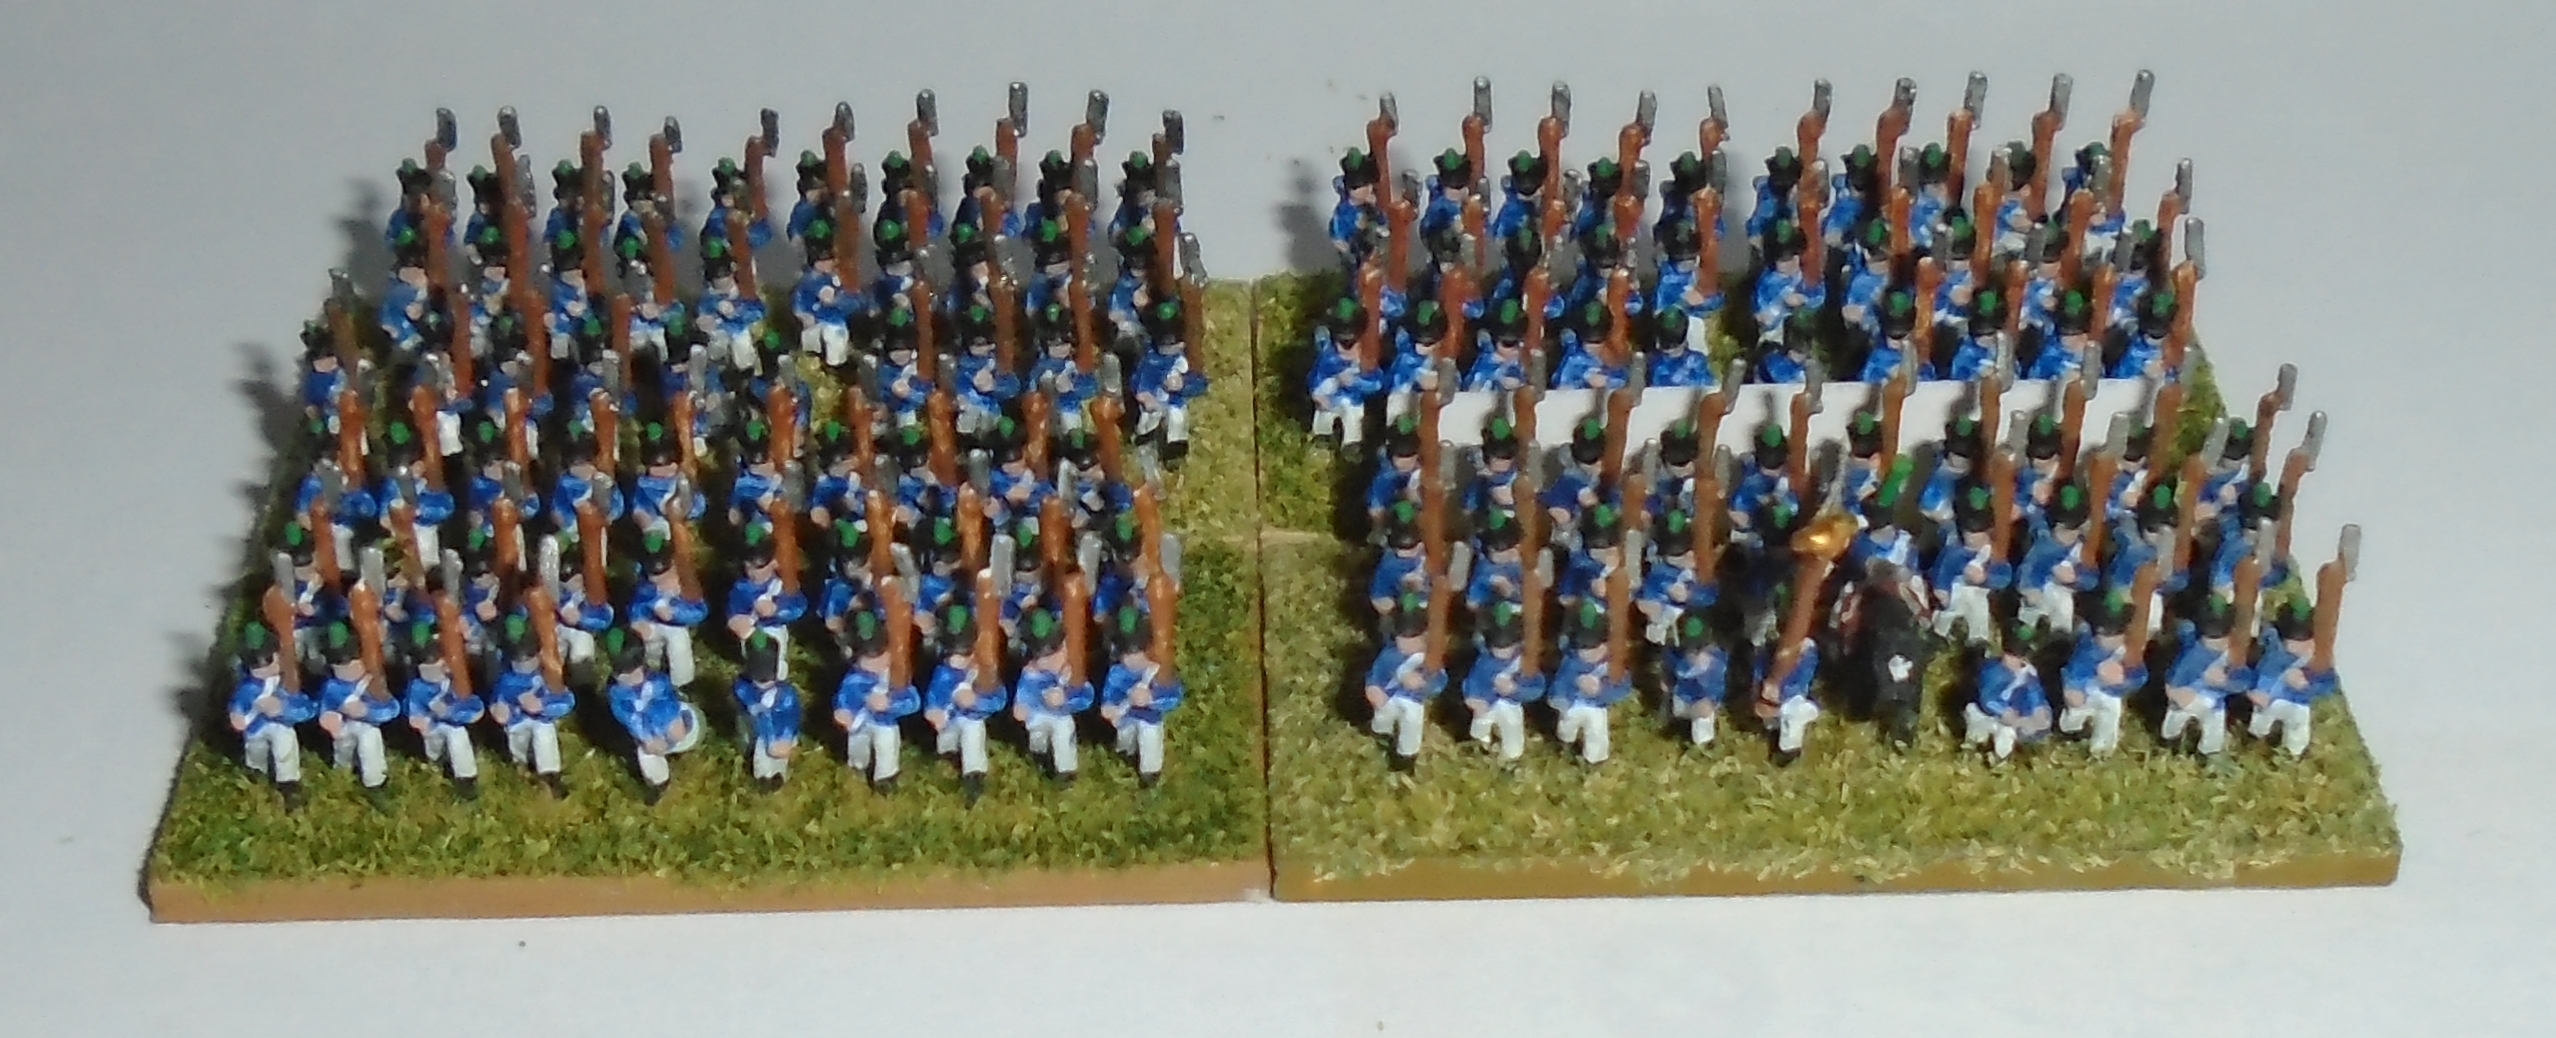
The Barbarians

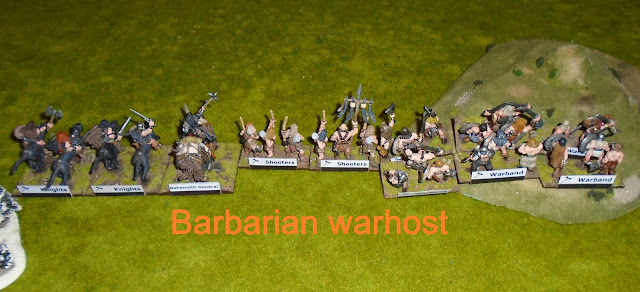
My barbarians have a lot of foot warband elements (as might be expected), some archers, some hard-charging panther-mounted knights and a general mounted on a woolly rhino.

The Goblin Raiders

Facing the barbarians we had a goblin force consisting of 2 trolls, hordes of goblins and a large number of wolf riders.  Also, the woods are full of  (unridden) wolves.

[Side note: this force looks like more than 24AP to me.  Oh, well - mistakes may have been made, but if so then it didn't affect the end result, as you will see].

The Goblin Hooligans

The goblin force facing Santa also had two trolls.  It was lead by some greater goblin warbands and had huge numbers of lesser goblins.  Even when deployed, these vandals pushed over the signpost which led to the North Pole, thus earning the title "the hooligans".

The Battle

Most of Santa's army ran forwards as fast as they could.  The sleigh flew past the goblin lines and circled overhead, impervious to all.  On the other flank, the barbarians advanced cautiously, not wanting to fight in the wolf-infested forest.


In return, the goblin warbands and trolls charged off their hill.  They caught the elves before they could shoot and annihilated them.  On the far flank, the ice bears tore through hordes of lesser goblins - but there were always more of the nasty little creatures joining the back ranks.


Santa's snowmen had a minor moment of success when they flanked, outnumbered and swarmed a troll, but this didn't make up for the losses they were taking.


Finally, Santa in his sleigh descended and attacked some of the goblin warband.  Whilst he was very successful against a small part of the goblin host, their general and remaining troll made a run for Santa's cottage!  Desperately, the barbarians attempted to (a) prevent the other goblin army from interfering and (b) move some troops sideways to support Santa.  However, this level of coordination was just too much for their hairy, unwashed brains...


Santa overran his first opponents and flew towards the troll (which had just wiped out Santa's artillery with contemptuous ease).  Nearby, the goblin general eliminated all the snowmen who had been respawned in front of the cottage.


With a shout of triumph, the goblin hooligan's big boss broke into Santa's home.  They pushed over the signpost, cut down the trees, smashed the crockery and ransacked the place (opening all the presents and leaving torn wrappings everywhere).  Oh, dear!


Meanwhile, the ice bears continued to torment the goblin hordes, but just couldn't make headway against the ever-replenishing numbers.  The barbarian knights were cut off and destroyed, though their woolly rhino just kept ploughing forwards, pushing back whatever got in its way.  Finally, Santa was left arguing with a large, smelly troll about the proper meaning of Christmas.  Game over!

Conclusion

Well, that was an abrupt ending!

  • The goblins timed their run for the cottage perfectly.  Santa simply couldn't catch all of them on his own and they breezed through the second echelon stuff that was left to guard the objective.
  • Santa sacrificed some of his troops early in charging forwards; the shooters might have been better employed waiting for the enemy to come to them instead.
  • The ice bears were bogged down fighting with vast hordes of goblins.  Even though they were generally winning each round of combat the bears had a long way to go before they could push the little monsters off the table.
  • The barbarians were mesmerised by the wood full of wolves; fearful of a flank attack if they tried to skirt around it and not confident of their chances if they attacked the forest head on.
  • When the barbarians eventually tried to redeploy, it was too complicated and too late.  All they did was sacrifice their mounted troops for no real gain.

So, a well-deserved victory to the goblin hooligans.  Let's hope that isn't an omen for Christmas 2021!

A Merry Christmas and a Happy New Year to all my readers!


Sunday 21 November 2021

HAHA SAGA Escalation League - 4

Introduction

We've now reached the fourth session for our SAGA Escalation league at the HAHA games club.  This is the bonus round and here's how it was described in the original manifesto:

Each participant will bring 1 extra item, to be judged on theme and painting quality.  This could be any of the following, or indeed anything else that fits:

  • a piece of scenery (Celtic cross, Viking longboat, Dark Age house, wood, marsh…)

  • extra – but not “regular” - figures for the warband (a bard, champion, mercenary group…)

  • game accessories (objective or fatigue markers: ox carts, groups of civilians, broken shields & wounded warriors, livestock, sacks/chests of loot…)

On the night, only 3 participants were able to enter an item, though all the members of the club (including the non-SAGA gamers) were encouraged to vote.  Let's see how they did:

Skraelings

The Skraelings chose to bring some civilians (though this might be hard to define in a tribal society!): a couple of fishermen in a canoe.  This piece is probably best thought of as a scenic accent, though I suppose it could be used as an objective or game marker.


Anglo Saxons

The Anglo Saxons brought a hut, along with the blacksmith who lives in it.  Seems like a very useful piece of scenery to me.


Crusaders

For the Crusaders, a warrior priest was added to their ranks.  A minor hero is surely going to help them in their fights against all the infidels!


Conclusion

As you can see from the votes cast (attached to each picture), the club members liked the Anglo Saxon hut a great deal; it scored more votes than the other two entries put together!  So we award a further 3 points to them for this excellent entry, 2 points to the runner up and 1 point for all other submissions.

After that, the standings now look like this:

January 2020
Starter for ten
February 2020
Powers of two
March 2020
October 2021
Long live the peasants!
April 2020
November 2021
Bonus round
May 2020
December 2021
Armageddon
TOTAL
Byzantines11(damaged)(absent)2
Anglo Saxons331310
Normans121(absent)4
Jomsvikings12(retired)(retired)3
Anglo Danes3(absent)(retired)(retired)3
Skraelings12328
Crusaders22116

So, onward!  There's only 1 one more round to go, after which all finishers should have a 4 point SAGA army and a bonus "extra" item.

On to the final round ==>

Sunday 14 November 2021

6mm: Irregular vs Heroics & Ros

Introduction

I have a fair-sized collection of 6mm Napoleonic figures.  However, there are never quite enough to form the truly grand armies I'd like for a large game.  In particular, I don't have too many French.

Virtually all of my 6mm forces are made up of models from Heroics & Ros.  However, I don't believe that H&R Napoleonics are currently available, though hopefully they will be re-issued sometime soon.

So if I wish to extend my army, what are the options?  There are other "6mm" manufacturers such as Bacchus and Adler, but I've always understood that these were rather larger (perhaps more like 8mm tall?) and stylistically rather different.  Please note that this last opinion is based on hearsay and rumour rather than personal experience; if it is in any way incorrect then I apologise profusely!

The other maker of "true" 6mm figures of which I am aware is Irregular Miniatures.  They've been around forever and have a reputation for cheap, but possibly less well-detailed models.  But at least their 6mm Napoleonics are still in production!

I thought it worth buying a battalion of infantry from Irregular to find out whether or not they are compatible with my H&R.  Here we go...

Irregular Miniatures

My standard Napoleonic line infantry "battalions" are 4 bases, each with 3 ranks of 10 figures.  Models from Irregular Miniatures are available in a number of different form factors - including blocks of 3 ranks of infantry.  However, I went for the standard 6-man strips for my unit.

This battalion is therefore composed of 19 x French Line infantry strips, plus 1 x French Line infantry command.  Because I only wanted 10 figures per rank on each base, I needed to cut apart some of the 6-figure strips into 2-man and 4-man parts.  This wasn't too hard, though it was a minor nuisance.


From the rear, it is clear that these French are not wearing backpacks.  That's slightly odd, but probably not too important.

Painting the Irregular figures was a little more difficult than I remember being the case for H&R.  Maybe I'm just older, more tired or have less good eyesight than before? Or maybe these models haven't got the fairly-obvious detail of the H&R ones.  Still, I think they turned out all right.

Heroics & Ros

As this is a comparison article, here are some of my existing Heroics & Ros figures.  The only real differences I can spot are that the H&R have shouldered their muskets on the left, whereas the Irregular are using their right shoulders for this and that the Irregular command figures have a moulded, semi-furled standard; the H&R just have a small square of flat metal.  Also, as mentioned above, the H&R are wearing backpacks; the Irregular are not.


From the back, you can also see that I've changed the style of the unit's nameplate for my newest models.  The 93rd Line have my older, all-white nameplates, without any specific battalion identifier.


Conclusion

OK, can you guess which unit is Irregular and which is H&R in this picture?  At first glance, without peering too closely at the image?

If you thought that the Irregular were on the right and the H&R on the left then you were correct.  But my view is that there isn't a lot of difference between them and I'll be very happy to mix units from these two manufacturers together in the same army.  In the end it comes down to which models are easier to obtain.

Of course, I've only tested infantry here.  The cavalry models might well vary rather more between the two producers.


Sunday 31 October 2021

Zomtober 2021, Week 5

<==  For week 4, go this way

Introduction

You lucky people!  There are 5 Sundays in October this year, so that means you get to see 5 Zomtober posts from me.  Here's the article detailing my efforts for this fifth week.

"B" vs Fairly Average Zombie

Here we have an encounter between "B" ( a member of my occasional "Men in Blue" quasi-governmental organisation) and a fairly average zombie (who will be referred to as "FAZ" for short).


"B" has an assault rifle in one hand and that ought to stand him in good stead.  However, he has a magazine in the other hand.  Is he in the middle of reloading and about to insert fresh ammunition into the gun?  Has he removed the magazine because his weapon is jammed and he's trying to clear the blockage?  Or is there some other reason for the magazine in his hand?


Whatever the reason, "B" seems to have been taken by surprise.  Although FAZ doesn't look especially threatening (for a zombie!), I imagine that he's still quite capable of inflicting a nasty bite..


"B" was built from the old Wargames Atlantic "Apocalypse Survivors: the Men" kit.  Although the original supplier is long gone, I believe that this has just been relaunched as part of Warlord Games' "Project Z" range.

FAZ is a mixture of parts.  Most of him comes from Studio Miniatures' plastic zombie frame, but the arm with the briefcase is from one of the old Wargames Atlantic kits (I cannot remember which one).


Conclusion

As always, it's up to my readers to decide what happens next?  Will B reload his gun in time to blow the zombie's head off?  Or, failing that, will he quickly reverse the gun and use it as a club to beat FAZ down?  Or is the element of surprise in FAZ's favor: will the zed close and bite B before the man can react?

What do you think?

The next Zomtober post is here ==>

Saturday 30 October 2021

Mystery Inc and the Spooky Forest!

 Introduction

It's the end of October and I haven't put on a Halloween game for 2 years (global pandemic, you know...).  Since my local club is now meeting again, it is time for a special event!

This year, I arranged a 4-player game using the Fear and Faith rules from Ganesha Games.  These are a version of the popular Song of Blades and heroes engine, adapted for horror (Gothic through to modern).  Without further ado, on to the report...

The Forces

Mystery Inc

These characters shouldn't need much introduction, I think.  Their stats are taken directly from the "not Mystery Inc" characters in the Kooky Teenage Monster Hunters supplement to Fear and Faith:

  • Fred (bold leader)
  • Daphne (fashionable monster bait)
  • Velma (intelligent scientist)
  • Shaggy (hairy dropout)
  • Scooby Doo (cowardly, greedy hound)

Girl Guide Camp

For reasons best known to themselves, the girl guides have camped in the middle of a gloomy, swampy forest.  They have several extremely competent ex-guides along as camp helpers and a surprisingly large assortment of weaponry.  Maybe this is preparation for their "Monster Hunting" badge?

  • Brown Owl ("spiritual" leader, assault rifle)
  • April (hockey stick, confident)
  • May (machine pistol, confident)
  • Sarah (ex-guide with crossbow and smart mouth)
  • Ann (useless adult helper, screamer)
  • Barbara (another ex-guide, the chosen one, sword, hero)

The Ghosts

So, the gloomy forest is haunted.  Who saw that coming?

  • Night Wraith (fearful, immaterial, warlock)
  • 2 x Reaper Ghost (fearful, immaterial, teleport)
  • 2 x Banshee (haunt, immaterial, morose)

Note that these characters cannot harm any humans in combat (because they are immaterial), although the warlock can cast damaging spells.  Instead, they use Fear to try to scare away the humans.

Equally, they are immune to physical attacks from the good side (though Fred & Velma both have the conviction ability and Brown Owl can lead a "spiritual prayer" - some form of girl guide chant, I imagine -  both of which could destroy such spectres).

The Children of the Fields

It seems that the curse of the forest has spread to nearby farmland as well.  A sinister individual has animated a number of terrors and brought them to aid in chasing off the humans.
  • Mister Wurzel (hard to kill, warlock)  Note that I couldn't find the model I wished to use for this character and had to make do with a ratman instead.  It's still somewhat appropriate, I think.
  • 6 x Scarecrow (mindless, zombie, short move)
  • 4 x bases of Rat Swarm (mindless, zombie, swarm)
Being mostly zombies, this force is slow, but very hard to destroy.  You can knock them down all you like; they'll just get back up again.  Mostly.

The Scenario

Setup


Setup is simple:

  • The humans set up at the camp in the middle of the table.
  • The monsters set up around any edge(s) they choose.  Note that the 2 banshees have the haunt special rule which ties them to a particular locality.  They were set up at the centre of their chosen haunted area instead (this could be anywhere on the table, as long as the haunted area didn't cover any of the campsite).

Winning & Losing

There are 6 objectives scattered around the table, all in different directions from the centre.

It takes a (human) character one action to investigate an objective:

  • 3 of these objectives are false leads and (once discovered) play no further part in the game.
  • The other 3 objectives are clues.
The humans win by picking up all the clues and then having the clue-holders meet together (in the centre?) to work out how to stop the monsters permanently (i.e by revealing the hidden projectors, taking off the villain's rubber mask, performing an exorcism or whatever...).

The monsters win by knocking out or scaring off all the humans.

The Game

Mystery Inc were very active right from the start.  They split up and looked for clues:

  • Shaggy and Scooby went straight for the picnic objective, had a look and decided it was important.  Thereafter they mostly bumbled around aimlessly, getting in other people's way.
  • Velma approached the shallow grave objective.  Initially she was put off by the nearby banshee, but when Fred arrived to help they saw it off with ease.  Sadly for them, the "shallow grave" turned out to be only some disturbed ground and a fallen branch that looked a bit like a cross.
  • Daphne wandered through the foggy forest, looking for the lost cat objective (but becoming a bit lost herself, it seemed)

The girl guides also scattered in every direction:

  • There was sporadic gunfire as Brown Owl opened up on the shambling scarecrows, but without much effect.  She did eventually manage to destroy one with a well-placed burst.
  • Barbara (the chosen one) ambushed Mister Wurzel.  The warlock was hard-pressed to defend himself, but just managed to stay alive for now.

  • Ann rushed too and fro, encountering the second banshee several times.  She probably thought there were such creatures everywhere; I don't think Ann realised that she was running in circles and meeting the same monster each time.  The end result of this was several debilitating rolls on the Insanity table and a lot of screaming from the terrified human.

The fight between Barbara and Mister Wurzel grew as other models from both sides approached.  Most significantly, the Night Wraith joined Mister Wurzel and between them the two warlocks threw curse after curse at the chosen one.  However, neither transfix spells nor lightning bolts had any effect; Barbara just shrugged them all off.


Daphne finally managed to grab the lost cat, though only when April came to help.  It was a real clue, so Mystery Inc had now found two of the three necessary items to solve the puzzle!


On the whole, the monsters were finding it hard to move their followers.  The scarecrows were unmotivated and slow, but one of the ghosts suffered a teleport disaster; it ended up in the far corner of the table.

At least the rat swarms were finally on the move, read to invade the campsite.


Seeing the danger, Fred and Daphne rushed over and attacked the rodent horde.  It turns out that the rats weren't as tough as might have been thought; they were easily scattered (i.e. "knocked down").  Before they could regroup, the humans destroyed half of the swarm (and yes, Daphne's killer heels did exactly that).


Meanwhile, Velma had been left a bit shaky after encountering the second banshee (i.e. one roll on the Insanity table).  Despite this, she rallied, stepped forward and disproved the apparition through the force of science - whereupon it vanished for good.


In their milling around, Scooby and Shaggy had become separated.  The former now found himself beside Sarah, manfully (womanfully and dogfully?) fighting a pair of scarecrows.  To everyone's amazement, Scooby knocked down his opponent and then destroyed it.  Personally, I think he caught his leg in the scarecrow's clothing and then ripped it apart as he turned to flee...


In the long-running fight near the swamp, May had been transfixed by a stray spell.  The poor little girl was rooted to the spot, unable to move for fear of the Night Wraith.

Things seemed to be looking up for the humans though: the chosen one finally chopped the head off Mister Wurzel, sending the heap of ragged clothes tumbling to the ground, dead.


...or was he dead?  Mister Wurzel rose from the mist, as whole as before (that's the hard to kill ability; it was triggered almost immediately by a nearby ghost scaring Brown Owl just out of picture).

The sight was too much for May; she collapsed in a faint and was out of the game.  Even Barbara stumbled back in shock and tripped over a tree root.


However, this was too little, too late for the monster side.  Having destroyed the guardian banshee, Velma recovered the ancient sword clue.  In the last turn of the game (because we had to pack up), she ran for the campfire where Scooby and Daphne were waiting with the other two clues.  She needed three move actions to make it in a single turn, but only rolled two successes and came up a little bit short.

Conclusion

So, who won?  If we had time for another turn, it was almost certain that Velma would have made it into the centre, thus completing all the clues and winning the game.  There was really nothing the monsters could have done to stop her.

In the end, both monster forces (the ghosts and the scarecrows & rats) had lost about half their models.  Against this, the humans only lost May, though Ann was pretty much a gibbering wreck and even Velma was feeling a bit "wobbly".  Can the monsters claim a moral victory for delaying the humans so much that time ran out?  Perhaps, perhaps not.

This scenario was designed to make the humans split up; it worked admirably in that respect.

I'm also pleased with the force compositions.  In particular, the ghosts were intended to be an unconventional threat, using fear as their main effect.  This seemed more appropriate than physical violence in a "Scooby Doo" game.  I think it all worked very well in the end.

See you next Halloween!


Sunday 24 October 2021

Zomtober 2021, Week 4

<==  Week 3 is back this way

Introduction

Another October Sunday, another Zomtober duel - you should understand the format by now, I hope...

Stewie vs Cart Guide Zombie

Today's encounter is between Stewie and "Girl Guide zombie with cart" ("GGZC" hereafter),  On the face of it, Stewie looks like a soldier but in my mind he is an "urban militiaman".  In other words, a self-appointed guardian of truth, justice and apple pie (as long as these concepts don't clash with his own prejudices).


I think that Stewie has come onto the streets, heavily armed, intending to face off against communists, hippies or some other existential threat.  Instead he has come across a rather pathetic, sick little girl - who is dragging a toy cart full of unsold packets of biscuits and a few body parts.


In this situation, Stewie is confused.  He's staring vacantly into the distance (I assume - it's hard to tell when he's wearing dark shades) and trying to work out what is the right thing to do.  Meanwhile, the zombie is inching ever closer to him.


The model for Stewie is one of  the figures from Wargames Foundry's Backstreet Militia pack.  He is mounted on an Escenorama resin base (I've almost finished the large pack of these I bought cheap several years ago).

GGZC is from a range of figures currently sold by Dragon Bait Miniatures (though I'm almost positive that I obtained mine from somewhere else, probably quite a long time ago).  She's fixed on a simple disk base that has then been covered in sand & painted.


Conclusion

I've laid out my thoughts on this encounter above, but somehow it doesn't seem totally convincing.  The zombie is well enough, but what about Stewie?  He's just standing there as if nothing was happening.  Is he all right?  Maybe he's listening to a radio earpiece and has forgotten to look down?  Maybe his shades are so dark that he cannot see properly?  Please, help me out here!

If you're interested in Week 5 then go this way ==>

Saturday 23 October 2021

HAHA SAGA Escalation League - 3

Introduction

Back in December 2019, a group of us at the Helensburgh Alternative Hobby Association (HAHA) planned out an escalation league for SAGA.  Each month we would bring along a warlord and 1 more point of troops and fight a battle.  The original rules for the league are set out here: escalation-league.docx

We only managed 2 sessions before covid struck and everything went on hold.  You can read about these here:

  1. Escalation league week 1
  2. Escalation league week 2

Well, this is a month of many "first in a long time" events.  We were able to restart the league and play round 3, finally.

The Setup

As per the schedule, each player brought along a SAGA warband consisting of their warlord and 3 points of troops - at least one point of which was not hearthguard.

I had been hoping to arrange a pair of 3-player every-man-for-himself matches for the evening, but with the numbers we had this wasn't possible.  Of the original 7 participants, 2 have moved away from the area in the past 19 months.  One of the remaining armies (the Byzantines) was involved in a terrible shelf-collapse accident on the morning of the club meeting and was therefore unavailable.  I really hope it can be restored in due course...

That left 4 players.  We (well, I) decided that we would play a 4-way every-man-for-himself match.  The scenario was simple: each player would enter on a different edge of a 4 foot square table.  In the centre was an objective.

If any player started their turn as the only force in contact with the objective then they would win the match.  Obviously, this means they would have had to move that unit into position on their previous turn, thus allowing all the other players a chance to respond!  We limited this automatic win to turn 3 or after, to prevent any cavalry-heavy force from dashing in before all the infantry warbands had marched any great distance.

The Game

The Saxons, Crusaders and Skraelings all advanced early on, whilst the Normans spent their time building up abilities and shooting long range volleys of archery.


Fighting started between the Saxons and the Crusaders.  Whilst this was distracting them, the Skraeling "beaver totem" warriors raced through the woods and hurled javelins into one group of Crusader reinforcements.


Then the Normans joined in.  A savage charge of knights almost destroyed one unit of Saxon hearthguard.


After a couple of turns, the Crusaders and Saxons had taken heavy losses (though oddly enough, the Saxons hadn't lost a unit - instead all of their units were reduced to just one or two figures)


This left the Normans free to attempt the objective.  Initial attempts by the Skraeling "beavers" to dislodge them were repulsed bloodily.


...but the other unit of Skraeling warriors (the "pumas") wiped out the nearest Norman knights and sent their warlord recoiling, thoroughly exhausted.


Now we came to an interesting issue that I hadn't forseen when I set up the scenario: the Warlord's Pride rule.  Put simply, a warlord must attack another warlord if able.  In this case, the Crusader general saw the Saxon chief and went for him, ignoring the possibly more significant targets who were actually on the objective.  The heavily-boosted Crusader overpowered his foe, but was considerably tired from the fight.


The Norman commander then saw the Skraeling chief and somehow mustered up enough energy to attack him (I think he used a battle board ability to throw off a fatigue and charge all in one go).  Both captains went down in a mutual knockout.


This left the Crusaders as the only faction with a leader.  He charged the Skraeling pumas - but because of his earlier fatigue the battle was a close one.  Once more, both sides fought to mutual destruction.


By this time there were very few warriors left, although some levy archers hung about the outer fringes.  The one remaining Skraeling beaver made it to the objective.  The last Saxon (a hearthguard) couldn't quite reach it.  That left the advancing Crusader crossbowmen as the only force which might dislodge the Skraelings.  They shot at him, scoring 3 hits.  2 of these were cancelled by the agility ability, leaving one hit to save on a 4, 5 or 6 - for the game.  The Skraeling made the saving roll and victory was theirs!

Conclusion

Well, that was bloody!  The Skraelings, Normans and Crusaders still had all of their archers or crossbows left, but virtually all the other figures had been removed.  Indeed, the Saxon band was reduced to a single model.  It makes me wonder, with all the leaders out of action, if any of the rank-and-file understood why they were fighting over a big rock in the middle of the board!

After round 3 the standings of the HAHA escalation league are this:

January 2020
Starter for ten
February 2020
Powers of two
March 2020
October 2021
Long live the peasants!
April 2020
November 2021
Bonus round
May 2020
December 2021
Armageddon
TOTAL
Byzantines11(damaged)2
Anglo Saxons3317
Normans1214
Jomsvikings12(retired)3
Anglo Danes3(absent)(retired)3
Skraelings1236
Crusaders2215