Friday 31 January 2020

HAHA SAGA Escalation League - 1

Introduction

I don't think I've mentioned this before on my blog, but a group of us are running an escalation league for SAGA at the Helensburgh Alternative Hobby Association (HAHA).

What is this?  Well, it's modelled on the "Tale of four gamers" concept which pops up in White Dwarf magazine every year or two.  At the simplest, a number of people commit to collecting forces for some game system over a fixed time period, playing such games as can be managed at regular intervals.

The full rules for our league can be found here: escalation-league.docx , if anyone is interested.

Starter for Ten

2 games in progress, with various dice, boards and other paraphernalia scattered around the edges 

Since this was the first meeting for our league, each participant brought along a warlord and 1 point of troops for their chosen warband.  Most people chose 4 hearthguard, but a few had 8 warriors as their 1 point's worth of troops.  Interestingly, everyone had selected a different faction, so we didn't have the monotony of 8 Viking warbands 😃.

There were 8 players present for this meeting, which was far more than I had imagined would be interested when the idea of a league was first proposed back in November 2019.  We even had a visitor who had travelled from Fort William (some 2 hours away) especially for the evening.  I hope we were sufficiently good hosts to make this level of dedication worthwhile!

The players were a mixture of veterans like myself and relative newcomers who wish to start playing SAGA.  Most/all of us are collecting a fresh army for the Escalation League, even if a few of us already have quite a lot of figures for other warbands.  After all, one of the main purposes is mutual encouragement!

The "Duel" Scenario

The format of the evening was a series of individual duels.  We created two simple 2x2 foot boards; the rules for the scenario were thus:
  • Each warband will deploy in the centre of one tile, diametrically opposite to their opponent (i.e. slightly more than a standard 'M' foot move from the table centre).
  • The game will last for 3 turns.
  • At the end of the game, any player whose warlord is standing on the board's centre spot will score 2 victory points.
  • Any player who eliminates his opponent's warlord will score 1 victory point (unless he/she is already scoring 2 points for 'centre of table').
...and that's it!  Really simple.

We managed to rattle through quite a few of these short matches over the course of 2 hours or so.  Some of the games were a bit slower where new players weren't as familiar with the rules as the old hands, but everyone played at least one match and most played two or three.

Highlights
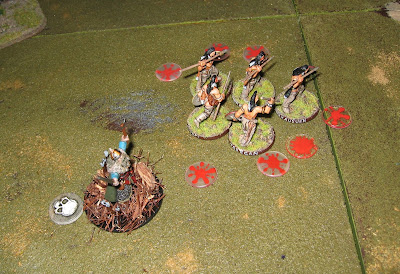
Skraelings are massacred by a very skillful (and probably very lost!) Jomsviking warlord.

Saracens take the fight to Normans in what looks to be quite an uneven match

The "to hit" rolls from a boosted charge by Crusader knights.  They needed 5+ to hit and this looks like a dramatic result.  Ironically, the player had activated an ability that required him to re-roll 6s - ouch 😢!

Crusaders trying to toss the Jomsviking chieftain over a cliff and into the sea.  I cannot remember if they succeeded or not.

With all their hearthguards already dead or dying, Anglo Saxon and Anglo Dane warlords kill each other in a final, deadly embrace.

Skraeling (with Moose totem) and Anglo Saxon warlords fight to mutual exhaustion - but the Saxon holds the centre ground

Conclusion

As the primary organiser of this league, I was really not sure how the first evening would work.  I need not have worried: everyone had a great time and the "duel" format worked really well.

It became quite obvious over the course of the evening that some faction's battle boards are better suited to very small forces than others.  At the extreme ends, the Anglo Saxons couldn't use any of their abilities which work for very large units, whilst the Anglo Danes' "Intimidation" effect was particularly potent.

Even though there may have been some minor balance issues, everyone was good-natured and took their wins and losses gracefully.  It probably helped that about half the group (including myself) failed to score a single victory point all night - at least there wasn't one poor soul left alone at the bottom of the scoring!

Part 2 of the escalation league is here -->

Saturday 25 January 2020

Congo: Mungo Mah Lobeh, Game 5

Introduction

This is a rather delayed account of our 5th game in the Mungo Mah Lobeh campaign using the Congo rules.

Earlier games in the campaign can be found here:
Game 5 in the campaign was actually played last September - some 4 months ago - and I've been putting off the account since then.  Ah, well, here it is now:

Passing the Fang Territory


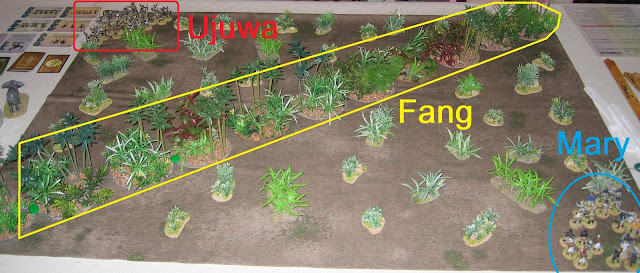
Scenario 5 is set up like this:
  • There's a band of jungle running diagonally across the table.  It's difficult terrain, but also is full of Fang cannibals.
  • Discoveries can be found in the jungle at various points.
  • The players start at opposite corners from each other.  Their primary goal is to exit at least 1 unit from the opponent's corner, success in this will gain a large number of victory points.
  • Secondary goals (i.e. other ways to score victory points) are as usual: obtaining discoveries, knocking out enemy characters, finding loot...

The Forces


Mary Kingsley's "White Men Expedition" force consists of:
  • Mary leads a unit of 5 Ascaris
  • A group of (3) white adventurers
  • The guide/kirangozi accompanies 4 soldiers
  • 5 ruga ruga (professional, but undisciplined native mercenaries)
  • The doctor is in charge of 5 young warriors


I'm not so familiar with Ujuwa the witch doctor's band.  However, I do know it has the following in it:
  • 4 bands of (young?) warriors.  One is led by Ujuwa himself, another by his soothsayer.  There may be 1 or 2 sacred warriors added to some of these bands.
  • 1 group of 6 bow-armed archers, led by a chieftain (?)
  • 1 group of 3 lightly-equipped scouts.

The Game


From the start, it looked as if the 2 sides had slightly different strategies.  Mary's column advanced fairly close together, aiming slightly away from the centre of the table.  On the other hand, Ujuwa's forces spread out to try to cover the entire length of the jungle.

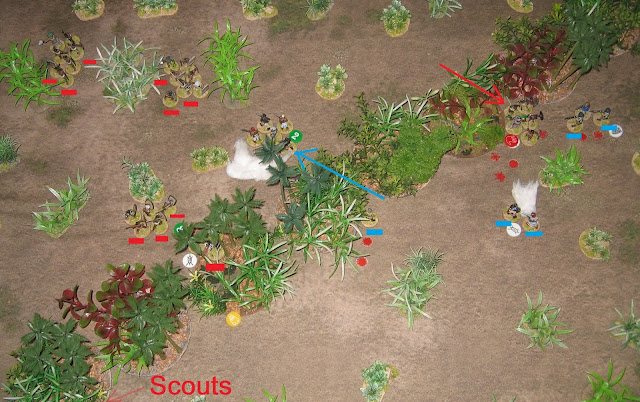
Note that I cannot actually see Ujuwa's scouts in this picture, or indeed in most of the others!  I know that they were present; they played a small - but significant - role in the forest tribe's achievements and I know that they ended up in the jungle at the bottom left of this picture.  I can only assume they've moved so fast that they are hidden in the foliage already.

Fang Cannibals


Hostile Fang tribesmen roamed about in the treetops, taking potshots with their poisoned blowpipes at anyone who came close.The first to feel their wrath were Mary's ruga ruga and (especially!) her soldiers.


Initially, The Fang were quite even-handed.  They also shot down 2 of Ujuwa's 3 scouts, leaving just a single quivering man holding on to one of the all-important discovery tokens.


Finally, Mary and her ascaris passed through the tree line without problems.  The adventurers who tried to follow were not so lucky: in a disastrous piece of bad luck (for Mary!), 2 of the 3 adventurers were hit and fell.

Mary's Dash


Mary and her small bodyguard of ascaris exited the jungle.  They were pleased with themselves for having passed unscathed and for having made a discovery en route [i.e. the #2 green token].  However, the way ahead was full of Ujuwa's tribesmen.


The ascaris attempted to skirt around the bands of warriors, but were caught when Ujuwa and his force attacked them.  Mary's force fled without taking any casualties, but were forced to drop their discovery.


From this point on, Mary and her ascaris ran for the corner as fast as they could.  This seemed to catch the tribesmen somewhat flat footed; none of them managed to intercept the white woman and her friends.  [Ujuwa's group had acquired a Movement stress token and didn't have the right card/dice to rally from it, whilst the other warband wasn't well positioned to attack].

At the last moment, the chieftain ordered his archers to shoot at the strangers.  It was a damaging volley, but not enough to halt the ascaris.


With one last bound, Mary and her ascaris left the table, thus securing a guaranteed 15 victory points for her side.

At the same time, the furthest-advanced tribal warband bludgeoned its way past the ruga ruga.  Casualties were heavy on both sides.

The last of the white adventurers also fell at this point, though I forget whether he was a victim of a Fang blowpipe or whether he was assegaied by a passing group of warriors.


Since the tribesmen now outnumbered the expedition considerably, they rushed forwards.  Ujuwa's band came through the jungle unhurt and fell upon the 2 remaining soldiers and their accompanying kirangozi.

In a small-minded act of petty revenge, the last of the ruga ruga shot the tribal soothsayer.  Amongst other things, this left a single warrior guarding the #4 objective for the tribal forces.


The End Game


At this point, the forest tribe held all four discovery tokens, as well as a loot counter [I forget how this was picked up - probably it was from a random event].  Excluding the items for which random victory points are awarded [i.e. loot and knocking out enemy characters], the scores so far were:

  • Mary: 15VP for exiting the table
  • Ujuwa: 16VP for 4 discoveries
In other words, it looked very tight, but probably a minor native win.


The doctor [who hadn't moved at all up to this late point in the game] thought he saw a chance of reversing this.  It may not have been good odds, but the lone warrior with the #4 objective was an easy target - if the doctor and his followers could catch the tribesman.


Unsurprisingly, the lone warrior fled when he saw the doctor's band approaching.  However, Ujuwa had to use his only movement card for this - and that meant his own band [with the #2 discovery which had been captured from Mary earlier in the game] was in range.

As a last, desperate, do-or-die action, the doctor and his band of young warriors charged Ujuwa and his group of warriors.  Even though slightly outclassed, the expedition's force triumphed, drove Ujuwa back and re-captured the #2 discovery.  Hurrah!


Finally, here's a picture of my elephant.  This was the nominated wildlife for the scenario, but no-one drew an animal token for the entire game.  The poor beast never made an appearance and is still waiting in the sidelines...

Conclusion

That was a very tense game, with the tribesmen [mostly] rampaging through the expedition's forces.  At the conclusion, Mary had just one unit left [i.e. the doctor's young warriors] plus a single ruga ruga, whilst Ujuwa had at least 4 units and a lone scout.  The Fang cannibals accounted for a lot of Mary's forces, especially the better quality groups such as the adventurers and the soldiers, leaving them easy meat for the tribesmen to finish off.

However, like all scenarios of Congo, victory isn't about destroying all the enemy forces.  So, what's the total?  Who won?

Victory Points

Ujuwa

  • 12VP for 3 discoveries [#1, #3, #4 were all held at the end of the game]
  • 1VP for loot
  • 4VP for knocking out the expedition's guide/kirangozi [a random roll, but I think this is the maximum that could be achieved]
Total: 17 victory points

Mary

  • 15VP for exiting the table
  • 0VP for knocking out the soothsayer [a random roll.  This is the least which could be scored]
  • 4VP for discovery #2
Total: 19 victory points

So, it's a very narrow victory for Mary's expedition, achieved in the last act of the game by the unlikely success of the doctor's desperate charge!  Ujuwa has every right to feel robbed by this; I expect he's plotting a terrible revenge for the 6th and last game in the campaign!

Saturday 18 January 2020

More Painting...

Introduction

It's been a long time since I put up a post listing recently-painted models.  Here's some that I completed in the last month or so.

The Models

Who doesn't need a skull gateway in their terrain collection?  This one has been in my "undercoated and waiting for paint" pile for many years - but now it's done!  It's part of Scotia Grendel's "Boat of the River Styx" set

Another shot of the gateway.  I'm experimenting with a backdrop; here's the piece with a printout of a picture found by searching the internet for "gates of hell".

Next up: a monocycle from 1st Corps.  The kit comes with a Vickers K gun (light machine gun); I decided not to use that as I didn't want my monowheel to look like a military experiment.

Another view of the monowheel.  I'm sure I'll find a use for it in some 1920's pulp game...

This is the warlord for my SAGA Saracens.  As you can see, he's not especially militant, though I'm sure he'll fight just as well as any other warlord in the game when pressed!
The mounted figure is from Perry Miniatures, whilst the bodyguard/parasol holder/standard bearer is from Eureka Miniatures.

I'm mildly concerned about the weight of the parasol (it's a metal piece!) putting stress on the composition.  Still, I used a steel wire to hold it up - so everything ought to be fairly robust.

Last summer, I took a bunch of plastic sprues on holiday and assembled all of them.  These are the last of that batch to be painted: some Gripping Beast Arab heavy cavalry, intended for my SAGA Saracens.  I'm a bit annoyed that I positioned the shield arm so awkwardly on the front model.

I've had flushes of enthusiasm for SAGA: Age of Magic for some time now.  The simplest way (for me) to create an AoM warband is to add some extra elements to an existing, historical army.  Here's a magician who can be used with my Saracens... 

A back view; I've named this figure "Jafar".  It seemed appropriate...
.  The model is "Araves Sorcerer B" from Shieldwolf Miniatures, though the basing is entirely mine.

Here's something a bit bigger - that's a 50mm base and the model is perhaps 3 times the height of a 28mm man!  This is Talos, from Crooked Dice.  Although sold officially as the masterpiece creation of a (modern) mad scientist, I intend to use him/it for anything from ancient Greek myth through to Lost Civilisation pulp (and perhaps even for 1970s spy-fi as well?). 

Another shot of the big boy.  Is that a mainframe computer with lots of blinking lights in his abdomen?  Perhaps he can be "hacked" or switched off?  Or do you have to use the traditional method of defeating him - by unscrewing a plug in his ankle?

I'd originally intended to finish my witch ducking stool in time for last Halloween's game, but I didn't manage.  At least it will be ready for next Halloween, right?  Model is from Colonel Bills.

Here's a very simple objective marker: a couple of pizza boxes on a base.  The boxes are free printables for a 1/4 scale dollhouse.  They're slightly fiddly to build at this scale, but not too bad if you are used to card modelling.
So, who comes to mind first: turtles, or Shaggy & Scooby?

A while back, I mentioned that our regular group of Pulp Alley players were upgrading their experienced leagues with more skills and/or figures.  Here's a rifleman for Al Masudi's Snake Cult.

Finally, my local club (Helensburgh Alternative Hobby Association, HAHA) is running a SAGA escalation league over the first few months of this year.  I've decided to build a Skraeling force - it's something I've wanted to do for a long time and this is as good a time to get started as any.  Here's the Skraeling war chief from Footsore Miniatures...

I like to give names to my SAGA figures.  In this case it's virtually impossible to find authentic names for Thule culture "indians" (and I suspect that much modern knowledge of their clothing, equipment, warpaint and behaviour is inferred - or made up - as well).
I've chosen instead to give my models "Algonquin" native names.  These are mostly made up by modern Americans as well, but at least such names are widely available; they will suffice for my purposes.  I'm still wondering whether it's OK to call one of my figures "Hiawatha"...

Conclusion

This may seem like a lot of output but before you despair remember this: these models are from at least 1 month of painting (possibly 2 or more, my memory is hazy).  Also, that time period covered a long Christmas/New Year break and many long, dark winter nights when other activities weren't very appealing.  Besides, I've so much more to paint; I'd better crack on with it!

Monday 13 January 2020

Pulp Alley Perils: Predator

Introduction

As I mentioned in my last post (Pulp Alley Perils: Introduction), my friend Steve has come up with a detailed set of rules for what we've called the "Predator" class of perils.

The Predator is a type of danger that will (to a greater or lesser extent) stalk or chase a character.  As such, it might represent a swarm of tropical bees defending their nest, a gang of pickpockets, an officious Gestapo agent ("papers, please!") or an angry rhinoceros.  Or many other things, indeed.

Over to you, Steve:

The Predator

Following our last game I've contemplated mobile perils like the Nazi agents and the angry buffalo.  As we've gained experience playing Pulp Alley, we've become adept at avoiding the normal static perils.  We typically only brave the peril if baited with a plot point, or if it represents terrain that we absolutely must cross.

I enjoyed the element of risk introduced by the mobile perils.  The possibility to lead them toward another player's characters added an extra aspect to the game.

Here is a simple model for a peril which attacks the player characters.  I've named it the predator, it fits snugly into existing pulp Alley mechanisms.

Each predator is assigned a range, movement and optional special behaviours called traits.
For example: 
The Buffalo
Range 8"
Move 4" / 2d10
Traits Impetuous

Roll the move dice (2d10) when a character (target) moves within the range of the buffalo (8" in this example).  The buffalo travels its move distance toward the target (4") for each success.  No successes no movement, one success 4", two successes 8".

If the predator contacts the target then a peril occurs, and is resolved as normal.

The predator normally stops on reaching the target, though traits can adjust this behaviour.

Traits

Traits are simply special rules that apply to the predator.  Predators may have no traits or several.

  • Feeble: The predator is removed if the target passes its challenge.  This represents a weak or timid or easily eliminated threat.  Removal overrides any post-challenge actions caused by other traits.
  • Pack (N): A pack of N relatively weak threats, similar to feeble, but with N "lives".  One member of the pack is removed each time the target passes their challenge.  The pack is removed (see Feeble) when its last member is eliminated.
  • Ambush: The predator only moves if it rolls sufficient movement to reach its target.  A classic ambush predator that lies low and attacks from a short distance.
Predators may have only one (or none) of the final three traits:
  • Elusive: The predator always deploys in cover.  If its move finishes the open, it returns to the closest cover.  Specific definition of cover may be used to fine-tune behaviour.  For example,
    - a swarm of bees would return to their hive.
    - a vampire might return to any shadowy corner, except sacred ground.
  • Impetuous: The predator moves the full distance rolled, and may move beyond its target.  The target suffers a peril even if the predator overshoots.  Example: a bull or rhino that will build up a head of steam during its furious charge.
  • Hit and Run: After resolving a challenge, the predator rolls its movement again.  It moves the rolled distance back in the direction it came.  Example: a pack of small yappy dogs or smaller monkeys, individually timid but brave in numbers.
The predator provides a flexible method for single threats, or packs and swarms of smaller creatures.  Range and movement can be adjusted to represent the tenacity of the predator.  Traits permit different behaviours.

Example Predator Perils

  • Rhino : Short sighted, easily provoked, faster than you'd imagine - the original "battle unicorn".
    Range: 8"
    Move: 4" / 3d6
    Traits: Impetuous.
    The Rhino's move is potentially greater than its range.
    The Impetuous trait means it can charge through and past its target.
  • Bees defending their hive:
    Range: 12"
    Move: 3" / 4d6
    Traits: Ambush, Elusive (returns to hive).
    Several movement dice, threat level increases with proximity.
    Ambush means the swarm will not leave the hive unless they can reach and imperil the target.
    Elusive sees the bees return to their hive after an attack.  (Elusive specifies return to cover, in this case the hive is specified).
  • The Mummy: Classic Universal studios version, slow, but always on your tail.
    Range:16"
    Move: 4" / 1d12
    Traits: None
    Long range and big movement die guarantee pursuit.
    Single die and short move mean it will rarely catch a running target, but trip, or stop to investigate a clue, and your adventure may be over.
  • Macaque troop: Small nosey monkeys. Raid your pack / pockets for food, may bite.
    Range: 8"
    Move: 4" / 2d8
    Traits: Hit and Run
    These fellows will back off as soon as they've relieved you of your sandwiches.
  • Small stray dog: More bark than bite, but what other perils might the bark attract?
    Range: 12"
    Move: 4" / 3d10
    Traits: Feeble, Hit and Run
    Fairly mobile, but a limited danger.
    Will not stand its ground, and disappears in the face of determined resistance.
  • Young conscripts: acting tough but fearful for their own safety.
    Range: 6"
    Move: 6" / 1d6
    Traits: Pack (5)
    As likely as not to challenge characters getting too close.
    Reasonable staying power from Pack (5), but won't resist a determined show of force.

Conclusion

So, is this useful inspiration?  Or possibly unnecessarily complicated?  Please let us know your thoughts!

Pulp Alley Perils: Introduction

Introduction

If you are a long-time reader of my Pulp Alley battle reports then you'll know that I like to extend the basic scenarios a bit, especially when defining perils.

Perils are at the very heart of a game like Pulp Alley and it is necessary to define them when setting up a scenario.  Usually - or at least in the rulebooks that I have seen - perils are strongly tied to a geographical feature or stationary character.  For example, jumping from a balcony or approaching a footpad might be deemed perilous before a game starts.

Static perils are often placed to limit freedom of movement in such a way that they provide a choice: take the risky shortcut or go the safer long way around.  There's nothing wrong with this approach; indeed it is absolutely necessary.  But for me, it's not enough.

Types of Peril

Here are some ideas that I've tossed around for expanded classes of perils.  Each of these is just a headline and a few examples at the moment, though I may come back to some or all of them in future articles:
  • Static (i.e. the traditional Pulp Alley peril, as defined in the rulebook): jumping across a ravine, entering the reach of the chained-up guard dog, climbing a cliff, defusing a bomb.  You know the peril is there, but you have reasons for going that way and taking the chance.
  • Juggernaut: column of army ants, flowing lava, crowd of rioters, incoming tide.  An extreme peril that moves inexorably, probably in a fairly predictable speed and direction.  This imposes a time constraint, as objectives could be made inaccessible or even destroyed late in a game.
  • Act of God: lava bombs, earthquake, lightning strikes, hidden sniper.  The peril pops up randomly, frequently and pretty much anywhere; no-one is safe.  Very chaotic (and not an idea I think I'd use much).
  • Trap: man-eating plant, quicksand, hit-and-run car.  You don't know that the peril is there until you step on it (and therefore are unable to avoid it, except perhaps by not going into certain areas of the table).  It's possible that this is just a more restricted version of the Act of God, in that it's a one-off rather than repeating and that it may be limited in where it may occur (a hit-and-run automobile would only make sense on a highway, not in an adjacent house).
  • Wandererguards in a military base, jungle animals.  A very simple concept which I've used in a number of my Pulp Alley games: a peril that moves in a random direction and random distance at the end of each turn.  Sometimes these work well, sometimes they just vanish into the corners of the table and are ineffective.
  • Predator: again, guards, animals, gangs of cutthroats.  This is a sophisticated version of the Wanderer mentioned above.  It's an idea that we toyed with for the buffalo and the Nazis in my last Pulp Alley game (Blood Sacrifice!).  Since then my good friend Steve has taken that experience and has written down a much more detailed (and hopefully, much more workable!) set of ideas.  These will be the subject of my next post, so watch this link: Pulp Alley Perils: Predator.

Conclusion

There is no need to have any of the above as detailed rules, of course.  It's entirely possible to make up special characteristics for perils in Pulp Alley on the spot, or to define only straightforward, static perils.  Or indeed, to use pre-written scenarios with their own special rules and therefore never have to invent anything.

That's all fine - but experience suggests to me that ideas generated in the heat of the moment sometimes work and sometimes don't.  By thinking about it in advance, you can improve the flavour of your games.