Sunday 31 October 2021

Zomtober 2021, Week 5

<==  For week 4, go this way

Introduction

You lucky people!  There are 5 Sundays in October this year, so that means you get to see 5 Zomtober posts from me.  Here's the article detailing my efforts for this fifth week.

"B" vs Fairly Average Zombie

Here we have an encounter between "B" ( a member of my occasional "Men in Blue" quasi-governmental organisation) and a fairly average zombie (who will be referred to as "FAZ" for short).


"B" has an assault rifle in one hand and that ought to stand him in good stead.  However, he has a magazine in the other hand.  Is he in the middle of reloading and about to insert fresh ammunition into the gun?  Has he removed the magazine because his weapon is jammed and he's trying to clear the blockage?  Or is there some other reason for the magazine in his hand?


Whatever the reason, "B" seems to have been taken by surprise.  Although FAZ doesn't look especially threatening (for a zombie!), I imagine that he's still quite capable of inflicting a nasty bite..


"B" was built from the old Wargames Atlantic "Apocalypse Survivors: the Men" kit.  Although the original supplier is long gone, I believe that this has just been relaunched as part of Warlord Games' "Project Z" range.

FAZ is a mixture of parts.  Most of him comes from Studio Miniatures' plastic zombie frame, but the arm with the briefcase is from one of the old Wargames Atlantic kits (I cannot remember which one).


Conclusion

As always, it's up to my readers to decide what happens next?  Will B reload his gun in time to blow the zombie's head off?  Or, failing that, will he quickly reverse the gun and use it as a club to beat FAZ down?  Or is the element of surprise in FAZ's favor: will the zed close and bite B before the man can react?

What do you think?

The next Zomtober post is here ==>

Saturday 30 October 2021

Mystery Inc and the Spooky Forest!

 Introduction

It's the end of October and I haven't put on a Halloween game for 2 years (global pandemic, you know...).  Since my local club is now meeting again, it is time for a special event!

This year, I arranged a 4-player game using the Fear and Faith rules from Ganesha Games.  These are a version of the popular Song of Blades and heroes engine, adapted for horror (Gothic through to modern).  Without further ado, on to the report...

The Forces

Mystery Inc

These characters shouldn't need much introduction, I think.  Their stats are taken directly from the "not Mystery Inc" characters in the Kooky Teenage Monster Hunters supplement to Fear and Faith:

  • Fred (bold leader)
  • Daphne (fashionable monster bait)
  • Velma (intelligent scientist)
  • Shaggy (hairy dropout)
  • Scooby Doo (cowardly, greedy hound)

Girl Guide Camp

For reasons best known to themselves, the girl guides have camped in the middle of a gloomy, swampy forest.  They have several extremely competent ex-guides along as camp helpers and a surprisingly large assortment of weaponry.  Maybe this is preparation for their "Monster Hunting" badge?

  • Brown Owl ("spiritual" leader, assault rifle)
  • April (hockey stick, confident)
  • May (machine pistol, confident)
  • Sarah (ex-guide with crossbow and smart mouth)
  • Ann (useless adult helper, screamer)
  • Barbara (another ex-guide, the chosen one, sword, hero)

The Ghosts

So, the gloomy forest is haunted.  Who saw that coming?

  • Night Wraith (fearful, immaterial, warlock)
  • 2 x Reaper Ghost (fearful, immaterial, teleport)
  • 2 x Banshee (haunt, immaterial, morose)

Note that these characters cannot harm any humans in combat (because they are immaterial), although the warlock can cast damaging spells.  Instead, they use Fear to try to scare away the humans.

Equally, they are immune to physical attacks from the good side (though Fred & Velma both have the conviction ability and Brown Owl can lead a "spiritual prayer" - some form of girl guide chant, I imagine -  both of which could destroy such spectres).

The Children of the Fields

It seems that the curse of the forest has spread to nearby farmland as well.  A sinister individual has animated a number of terrors and brought them to aid in chasing off the humans.
  • Mister Wurzel (hard to kill, warlock)  Note that I couldn't find the model I wished to use for this character and had to make do with a ratman instead.  It's still somewhat appropriate, I think.
  • 6 x Scarecrow (mindless, zombie, short move)
  • 4 x bases of Rat Swarm (mindless, zombie, swarm)
Being mostly zombies, this force is slow, but very hard to destroy.  You can knock them down all you like; they'll just get back up again.  Mostly.

The Scenario

Setup


Setup is simple:

  • The humans set up at the camp in the middle of the table.
  • The monsters set up around any edge(s) they choose.  Note that the 2 banshees have the haunt special rule which ties them to a particular locality.  They were set up at the centre of their chosen haunted area instead (this could be anywhere on the table, as long as the haunted area didn't cover any of the campsite).

Winning & Losing

There are 6 objectives scattered around the table, all in different directions from the centre.

It takes a (human) character one action to investigate an objective:

  • 3 of these objectives are false leads and (once discovered) play no further part in the game.
  • The other 3 objectives are clues.
The humans win by picking up all the clues and then having the clue-holders meet together (in the centre?) to work out how to stop the monsters permanently (i.e by revealing the hidden projectors, taking off the villain's rubber mask, performing an exorcism or whatever...).

The monsters win by knocking out or scaring off all the humans.

The Game

Mystery Inc were very active right from the start.  They split up and looked for clues:

  • Shaggy and Scooby went straight for the picnic objective, had a look and decided it was important.  Thereafter they mostly bumbled around aimlessly, getting in other people's way.
  • Velma approached the shallow grave objective.  Initially she was put off by the nearby banshee, but when Fred arrived to help they saw it off with ease.  Sadly for them, the "shallow grave" turned out to be only some disturbed ground and a fallen branch that looked a bit like a cross.
  • Daphne wandered through the foggy forest, looking for the lost cat objective (but becoming a bit lost herself, it seemed)

The girl guides also scattered in every direction:

  • There was sporadic gunfire as Brown Owl opened up on the shambling scarecrows, but without much effect.  She did eventually manage to destroy one with a well-placed burst.
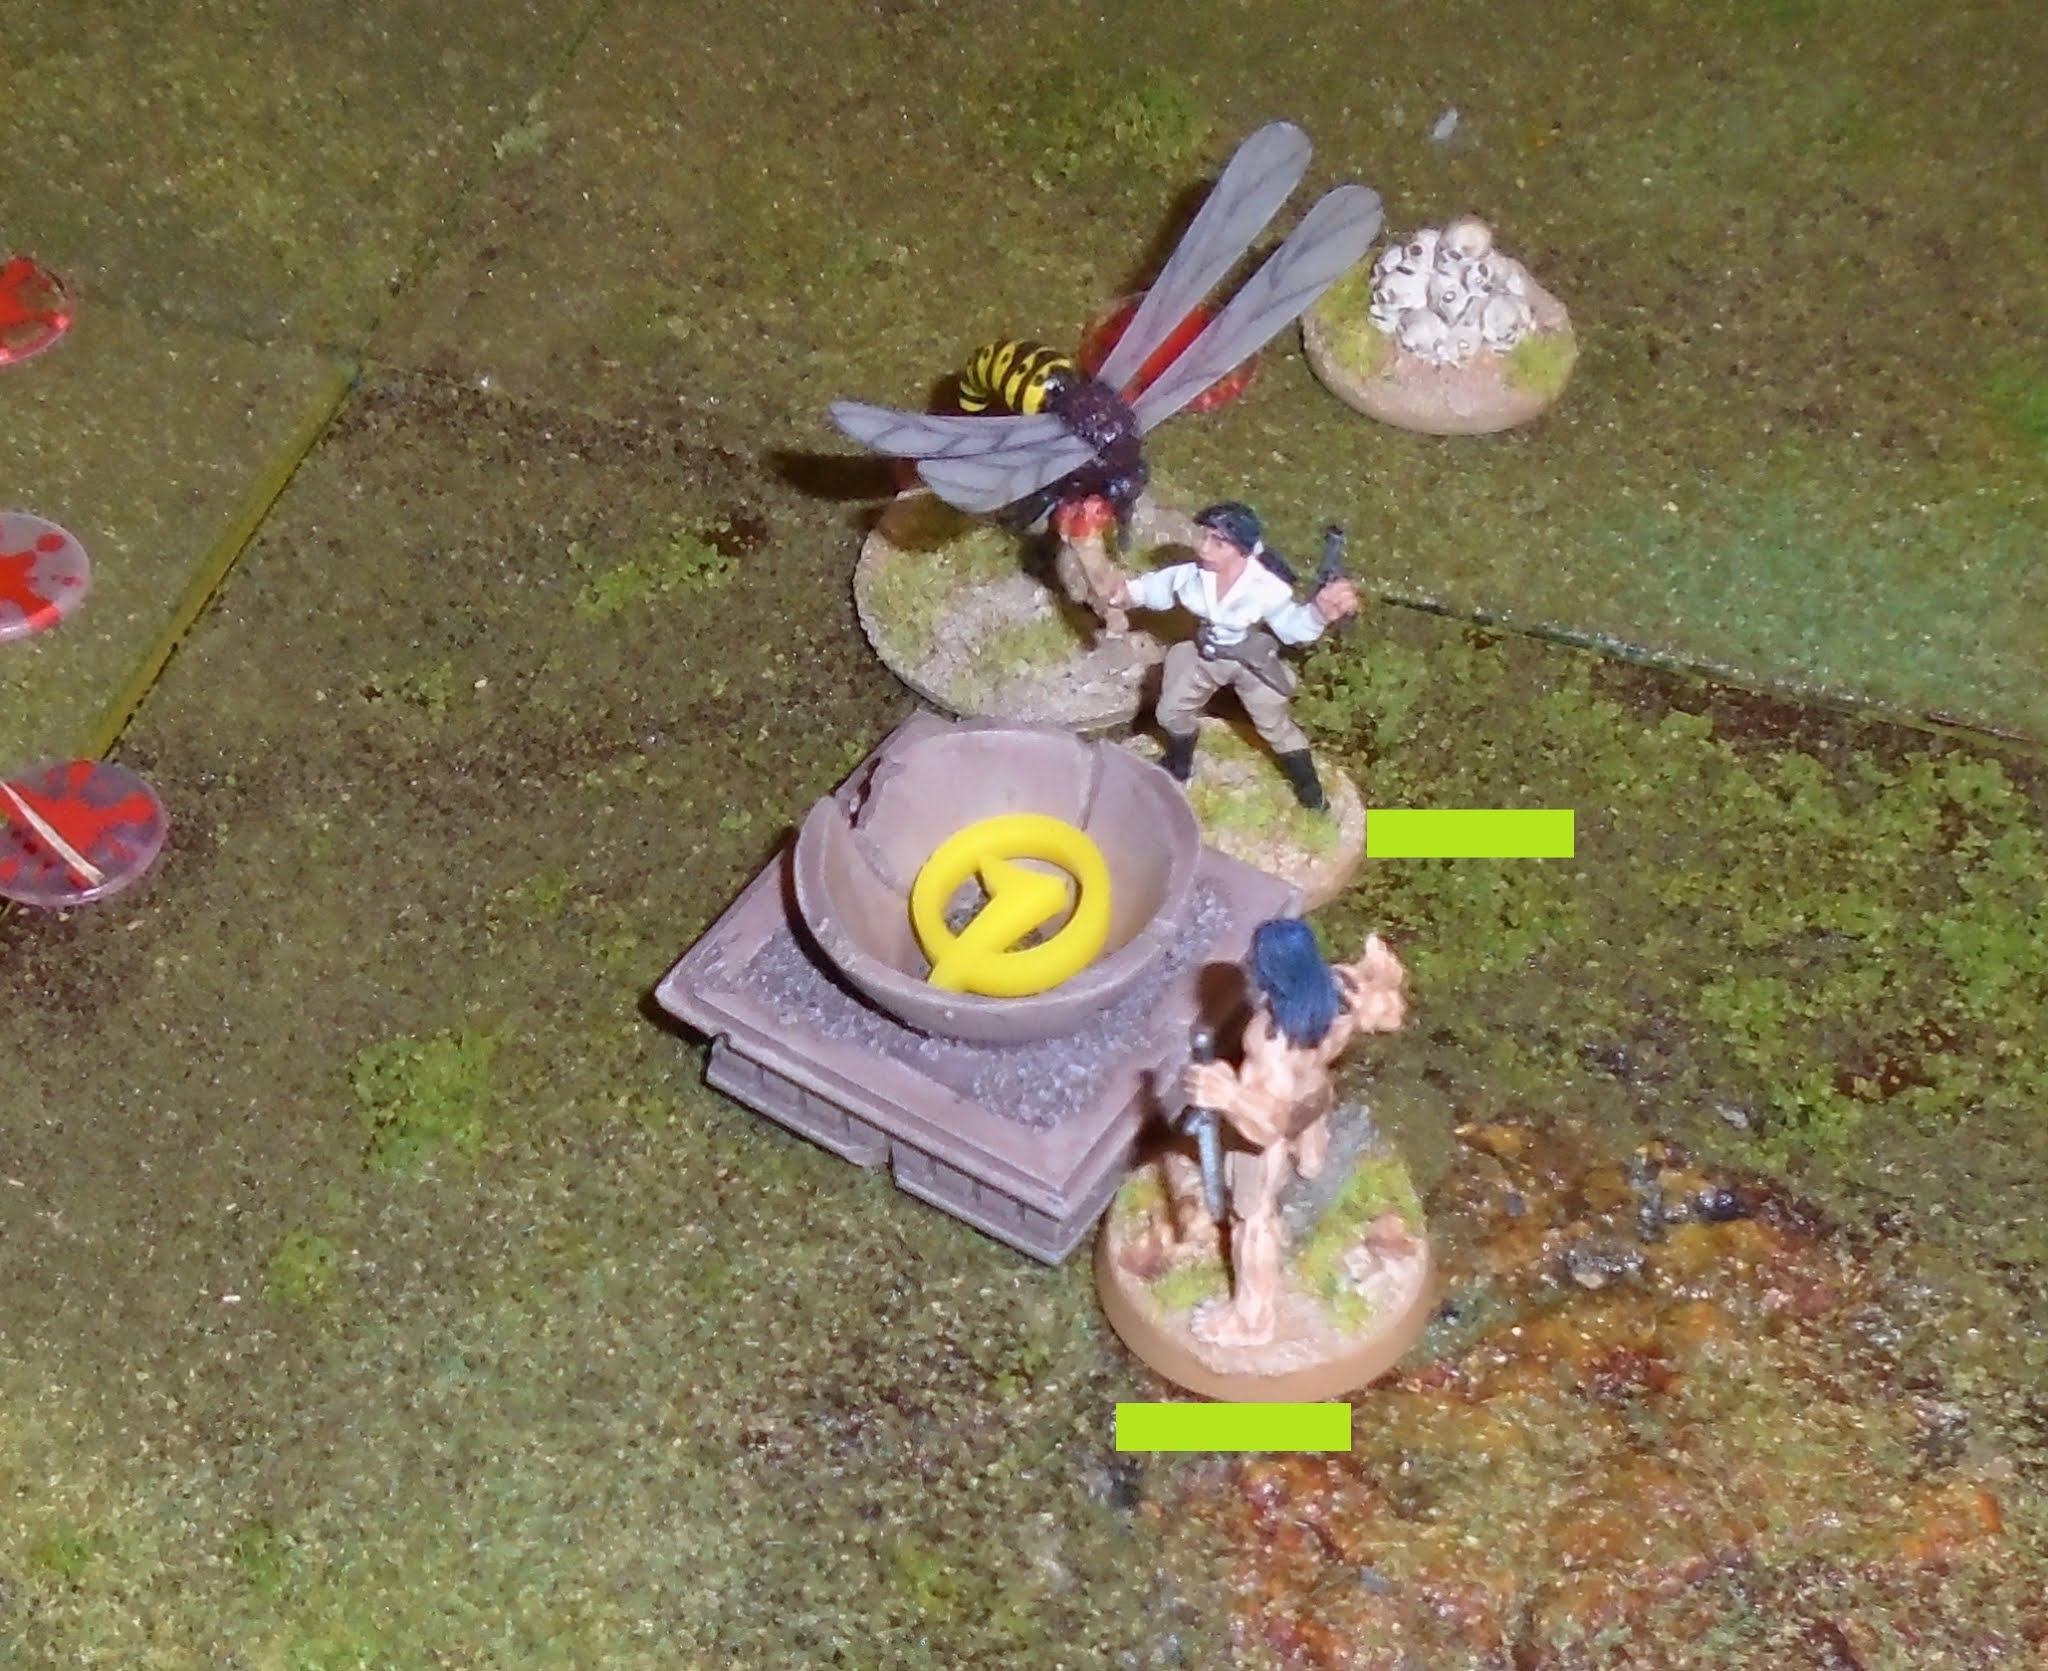
  • Barbara (the chosen one) ambushed Mister Wurzel.  The warlock was hard-pressed to defend himself, but just managed to stay alive for now.

  • Ann rushed too and fro, encountering the second banshee several times.  She probably thought there were such creatures everywhere; I don't think Ann realised that she was running in circles and meeting the same monster each time.  The end result of this was several debilitating rolls on the Insanity table and a lot of screaming from the terrified human.

The fight between Barbara and Mister Wurzel grew as other models from both sides approached.  Most significantly, the Night Wraith joined Mister Wurzel and between them the two warlocks threw curse after curse at the chosen one.  However, neither transfix spells nor lightning bolts had any effect; Barbara just shrugged them all off.


Daphne finally managed to grab the lost cat, though only when April came to help.  It was a real clue, so Mystery Inc had now found two of the three necessary items to solve the puzzle!


On the whole, the monsters were finding it hard to move their followers.  The scarecrows were unmotivated and slow, but one of the ghosts suffered a teleport disaster; it ended up in the far corner of the table.

At least the rat swarms were finally on the move, read to invade the campsite.


Seeing the danger, Fred and Daphne rushed over and attacked the rodent horde.  It turns out that the rats weren't as tough as might have been thought; they were easily scattered (i.e. "knocked down").  Before they could regroup, the humans destroyed half of the swarm (and yes, Daphne's killer heels did exactly that).


Meanwhile, Velma had been left a bit shaky after encountering the second banshee (i.e. one roll on the Insanity table).  Despite this, she rallied, stepped forward and disproved the apparition through the force of science - whereupon it vanished for good.


In their milling around, Scooby and Shaggy had become separated.  The former now found himself beside Sarah, manfully (womanfully and dogfully?) fighting a pair of scarecrows.  To everyone's amazement, Scooby knocked down his opponent and then destroyed it.  Personally, I think he caught his leg in the scarecrow's clothing and then ripped it apart as he turned to flee...


In the long-running fight near the swamp, May had been transfixed by a stray spell.  The poor little girl was rooted to the spot, unable to move for fear of the Night Wraith.

Things seemed to be looking up for the humans though: the chosen one finally chopped the head off Mister Wurzel, sending the heap of ragged clothes tumbling to the ground, dead.


...or was he dead?  Mister Wurzel rose from the mist, as whole as before (that's the hard to kill ability; it was triggered almost immediately by a nearby ghost scaring Brown Owl just out of picture).

The sight was too much for May; she collapsed in a faint and was out of the game.  Even Barbara stumbled back in shock and tripped over a tree root.


However, this was too little, too late for the monster side.  Having destroyed the guardian banshee, Velma recovered the ancient sword clue.  In the last turn of the game (because we had to pack up), she ran for the campfire where Scooby and Daphne were waiting with the other two clues.  She needed three move actions to make it in a single turn, but only rolled two successes and came up a little bit short.

Conclusion

So, who won?  If we had time for another turn, it was almost certain that Velma would have made it into the centre, thus completing all the clues and winning the game.  There was really nothing the monsters could have done to stop her.

In the end, both monster forces (the ghosts and the scarecrows & rats) had lost about half their models.  Against this, the humans only lost May, though Ann was pretty much a gibbering wreck and even Velma was feeling a bit "wobbly".  Can the monsters claim a moral victory for delaying the humans so much that time ran out?  Perhaps, perhaps not.

This scenario was designed to make the humans split up; it worked admirably in that respect.

I'm also pleased with the force compositions.  In particular, the ghosts were intended to be an unconventional threat, using fear as their main effect.  This seemed more appropriate than physical violence in a "Scooby Doo" game.  I think it all worked very well in the end.

See you next Halloween!


Sunday 24 October 2021

Zomtober 2021, Week 4

<==  Week 3 is back this way

Introduction

Another October Sunday, another Zomtober duel - you should understand the format by now, I hope...

Stewie vs Cart Guide Zombie

Today's encounter is between Stewie and "Girl Guide zombie with cart" ("GGZC" hereafter),  On the face of it, Stewie looks like a soldier but in my mind he is an "urban militiaman".  In other words, a self-appointed guardian of truth, justice and apple pie (as long as these concepts don't clash with his own prejudices).


I think that Stewie has come onto the streets, heavily armed, intending to face off against communists, hippies or some other existential threat.  Instead he has come across a rather pathetic, sick little girl - who is dragging a toy cart full of unsold packets of biscuits and a few body parts.


In this situation, Stewie is confused.  He's staring vacantly into the distance (I assume - it's hard to tell when he's wearing dark shades) and trying to work out what is the right thing to do.  Meanwhile, the zombie is inching ever closer to him.


The model for Stewie is one of  the figures from Wargames Foundry's Backstreet Militia pack.  He is mounted on an Escenorama resin base (I've almost finished the large pack of these I bought cheap several years ago).

GGZC is from a range of figures currently sold by Dragon Bait Miniatures (though I'm almost positive that I obtained mine from somewhere else, probably quite a long time ago).  She's fixed on a simple disk base that has then been covered in sand & painted.


Conclusion

I've laid out my thoughts on this encounter above, but somehow it doesn't seem totally convincing.  The zombie is well enough, but what about Stewie?  He's just standing there as if nothing was happening.  Is he all right?  Maybe he's listening to a radio earpiece and has forgotten to look down?  Maybe his shades are so dark that he cannot see properly?  Please, help me out here!

If you're interested in Week 5 then go this way ==>

Saturday 23 October 2021

HAHA SAGA Escalation League - 3

Introduction

Back in December 2019, a group of us at the Helensburgh Alternative Hobby Association (HAHA) planned out an escalation league for SAGA.  Each month we would bring along a warlord and 1 more point of troops and fight a battle.  The original rules for the league are set out here: escalation-league.docx

We only managed 2 sessions before covid struck and everything went on hold.  You can read about these here:

  1. Escalation league week 1
  2. Escalation league week 2

Well, this is a month of many "first in a long time" events.  We were able to restart the league and play round 3, finally.

The Setup

As per the schedule, each player brought along a SAGA warband consisting of their warlord and 3 points of troops - at least one point of which was not hearthguard.

I had been hoping to arrange a pair of 3-player every-man-for-himself matches for the evening, but with the numbers we had this wasn't possible.  Of the original 7 participants, 2 have moved away from the area in the past 19 months.  One of the remaining armies (the Byzantines) was involved in a terrible shelf-collapse accident on the morning of the club meeting and was therefore unavailable.  I really hope it can be restored in due course...

That left 4 players.  We (well, I) decided that we would play a 4-way every-man-for-himself match.  The scenario was simple: each player would enter on a different edge of a 4 foot square table.  In the centre was an objective.

If any player started their turn as the only force in contact with the objective then they would win the match.  Obviously, this means they would have had to move that unit into position on their previous turn, thus allowing all the other players a chance to respond!  We limited this automatic win to turn 3 or after, to prevent any cavalry-heavy force from dashing in before all the infantry warbands had marched any great distance.

The Game

The Saxons, Crusaders and Skraelings all advanced early on, whilst the Normans spent their time building up abilities and shooting long range volleys of archery.


Fighting started between the Saxons and the Crusaders.  Whilst this was distracting them, the Skraeling "beaver totem" warriors raced through the woods and hurled javelins into one group of Crusader reinforcements.


Then the Normans joined in.  A savage charge of knights almost destroyed one unit of Saxon hearthguard.


After a couple of turns, the Crusaders and Saxons had taken heavy losses (though oddly enough, the Saxons hadn't lost a unit - instead all of their units were reduced to just one or two figures)


This left the Normans free to attempt the objective.  Initial attempts by the Skraeling "beavers" to dislodge them were repulsed bloodily.


...but the other unit of Skraeling warriors (the "pumas") wiped out the nearest Norman knights and sent their warlord recoiling, thoroughly exhausted.


Now we came to an interesting issue that I hadn't forseen when I set up the scenario: the Warlord's Pride rule.  Put simply, a warlord must attack another warlord if able.  In this case, the Crusader general saw the Saxon chief and went for him, ignoring the possibly more significant targets who were actually on the objective.  The heavily-boosted Crusader overpowered his foe, but was considerably tired from the fight.


The Norman commander then saw the Skraeling chief and somehow mustered up enough energy to attack him (I think he used a battle board ability to throw off a fatigue and charge all in one go).  Both captains went down in a mutual knockout.


This left the Crusaders as the only faction with a leader.  He charged the Skraeling pumas - but because of his earlier fatigue the battle was a close one.  Once more, both sides fought to mutual destruction.


By this time there were very few warriors left, although some levy archers hung about the outer fringes.  The one remaining Skraeling beaver made it to the objective.  The last Saxon (a hearthguard) couldn't quite reach it.  That left the advancing Crusader crossbowmen as the only force which might dislodge the Skraelings.  They shot at him, scoring 3 hits.  2 of these were cancelled by the agility ability, leaving one hit to save on a 4, 5 or 6 - for the game.  The Skraeling made the saving roll and victory was theirs!

Conclusion

Well, that was bloody!  The Skraelings, Normans and Crusaders still had all of their archers or crossbows left, but virtually all the other figures had been removed.  Indeed, the Saxon band was reduced to a single model.  It makes me wonder, with all the leaders out of action, if any of the rank-and-file understood why they were fighting over a big rock in the middle of the board!

After round 3 the standings of the HAHA escalation league are this:

January 2020
Starter for ten
February 2020
Powers of two
March 2020
October 2021
Long live the peasants!
April 2020
November 2021
Bonus round
May 2020
December 2021
Armageddon
TOTAL
Byzantines11(damaged)2
Anglo Saxons3317
Normans1214
Jomsvikings12(retired)3
Anglo Danes3(absent)(retired)3
Skraelings1236
Crusaders2215


Wednesday 20 October 2021

Ambush Markers for 28mm Figures

 Introduction

Games such as Paleo Diet: Eat or be Eaten allow models to go into hiding, in order to spring out later and ambush some passing prey.  This supposes that the local geography is sufficiently covered with enough small cover that can be used for such a purpose, but I'm very happy to accept such an assumption.  After all, most real-world landscapes aren't flat and featureless.


If you are anything like me then your default mechanism to mark a figure's status is to place a coloured token beside the model, or perhaps on the model's "character card", if it has one.  This has several issues, though:

  1. It's not very pretty.  Tokens like this are completely functional and after all, what is the point of playing games with miniatures unless the visual aspect is a major part?  Otherwise, just use cardboard counters for everything.
  2. The token can be confusing if several models are close together (with which figure does this token belong?), or - if placed off-table on some "stat card" - they can be forgotten in the heat of the moment.

An Alternate Ambush Marker

So, at almost no expense, I've been experimenting with a different way of showing that a figure is hiding in cover.  It seems obvious in hindsight: I've created some vegetation-based markers.  You really cannot see Talut the hunter hiding in the picture above, can you?


How To...

How did I create this marvel of illusion?  Well, I started with a 3D-printed "base ring".  I cannot remember for certain, but I might have bought mine here: https://protechmodels.co.uk/products/base-convertor-25mm-to-32mm-gw-sityle .  I'm sure that other makes and models exist, though do remember to check the sizing is suitable for your figures!


Normally these are intended to "enlarge" an existing figure without requiring it to be rebased, though the rings can also be coloured or painted and used to identify different factions.  This latter would be especially useful if you have a civil war going on, or are playing a game with novices who cannot tell that this particular soldier belongs to tribe A whilst that almost-identical figure is loyal to tribe B.


However, here's another way they can be used:

  1. Cut the ring in half (i.e. into 2 semicircles).
  2. Carve away any "shelf" which would sit under the figure's base (in the photo of the ring above, that's the "hexagon" inner part).
  3. Paint in the colour of dirt, then stick a mixture of vegetation on to the top of the half ring (especially tall grasses and small shrubs.
When you wish to show that a figure is lurking, just place one of these semi-circles around the  model's base.

Conclusion

This project may seem blindingly obvious, but I assure you it took me some time to come up with the idea.  Maybe I'm slow or something?  Once conceived, it took very little time or money to build these markers.

I suppose that the same concept could be used to create other status markers as well.  For example, I could imagine how I might design "on fire", "frozen" or "tangled" markers, if I needed them.  Mind you, I don't think these would stack very well; they wouldn't really work if your model was hiding, on fire, tangled and frozen all at the same time!

Sunday 17 October 2021

Zomtober 2021, Week 3

<== Back to Week 2

Introduction

It is another October Sunday, so it's time for a Zomtober post!  By this time, I imagine all my readers know the drill...


May vs Bible-Waving Zombie

Here's a confrontation between May, a small Girl Guide (Girl Scout in some parts of the world) and a fairly ordinary adult zombie.  I'll call him "bible-waving zombie" (BWZ for short), since the book he has in his hand is just about the only thing to make him distinct from any others of the walking dead.


BWZ is constructed from a Studio Miniatures plastic body and head.  From memory, I took the arms out of a different kit; probably one of the old Wargames Factory ones.  He's a fairly plain "lurcher", though he carries a fairly large bible in one hand.  It's not obvious how he came by this item, but he seems intent on using it as a makeshift club.  Or maybe BWZ has simply forgotten that the item is in his hand?


May is, I think, a bit unusual for a Girl Guide.  She has acquired a firearm from somewhere - I think it looks like a silenced machine pistol.  She's bracing the gun in both hands and appears to be aiming appropriately.  However, just in case the zombie escapes her initial attention, May also has a knife in a sheath attached to her belt.  Indeed, she seems to be living up to the Girl Guides' motto: "Be Prepared"!


Just to show that she hasn't left all childish things behind, May is wearing her favourite purple and blue satchel - the one with the pink unicorn design on the back.


Conclusion

So, does the zombie have a chance?  Is May completely in charge of this situation?  Usually when I pose one of my Zomtober duels the outcome is in doubt, or at the very least an argument can be made for either side to be victorious (or neither, which is quite a popular choice!).  However, this pairing seems to be much more one-sided.  Or is it?

What do you think?

For week 4, follow me! ==>

Thursday 14 October 2021

Pulp Alley: Forbidden City (Perilous Island, Game 9)

Introduction

It has been nearly 2 years since the last installment of our Perilous Island campaign.  You all know why this delay has occurred: Covid 19.  Well, I'm pleased to say that things are opening back up where we live and this has permitted us to meet up again and play another episode.

For those who cannot remember anything about the campaign at all, I suggest you start at the beginning: Tarzan and the Lady.

If you just need a quick catch-up on the last episode then it is here: Blood Sacrifice!

Otherwise, continue reading here for the next part in this thrilling tale!


The Scenario

In their search for Lord Darrow (the missing archaeologist), the leagues have followed the trail of clues (or each other!) across Perilous Island.  Now they have reached the entrance to the Forbidden City - the semi-derelict city of the ancient Enocheans.

All the signs tell them that they must enter the city, but there are several problems:

  • Firstly the gate can only be opened by performing a complex ritual on three separate altars simultaneously.
  • Secondly, the gate is guarded by a huge, animated bronze statue.  How will our adventurers cope with this?
  • Thirdly, the scenario only lasts 6 turns before the ground shakes, meteors and lightning crash down and the tunnel entrance is reduced to rubble!


The Leagues

The Snake Cult


In the red corner, we have Al Masudi and his giant pet snake, followed by various devotees.  Since the last game, he has spent some experience points to gain the Commander skill, which gives him even more level-2 followers.  One of these is a cheetah (Al Masudi has a fondness for exotic animals, as can be seen in several earlier episodes of this campaign), whilst the other is another marksman.

In addition to the regular crowd, the cult has obtained the services of a local Nghai hunter, just for this mission (he's the guy dressed in the red fez.  I was running out of suitable models as we were playing away from home and I hadn't anticipated the need for quite so many native models).


Tarzan's Jungle Alliance


Marked by green are Tarzan, Koko the gorilla and various simians (small apes).  Again, Tarzan has expanded his roster a little by virtue of experience or reputation (I forget exactly which) and there are more simians than previously.

Tarzan also has a Nghai hunter in his party and in addition to this he has Lady Elaine Darrow, the missing archaeologist's daughter.  She seems to think that this party has the best chance of tracking down her lost father, at least for now.


Sir Henry's Safari


Finally, in blue, we have Sir Henry, Alain Quartermain, Captain Goode and a bunch of ascaris, plus Lady Constance (Sir Henry's niece, I believe).  As with the leagues above, Sir Henry has an extra ascari follower and he also has a Nghai hunter attached to his party.  [I was astonished to find out that all the leagues had made friends with the Nghai; they must be a very trusting tribe].


The Opposition


The table is set up with 2 types of danger:
  • The Golden Guardian is a giant, mechanical man.  He will try to protect the gate from all who seek to pass.  Whether this is because they haven't got the correct identification or whether the guardian has malfunctioned after eons of wear and tear is left to the reader.
  • There are a couple of nests of giant waspquitos near the gate.  Initially there is just a single lookout insect at each location, but they move in a semi-random manner towards the closest player model.  If they contact a figure then that contact is perilous and another wasp exits the nest to take up the lookout position.


Turn One


Out of the initial hands dealt to 3 players, we had three "Play Immediately" cards.  This is quite unusual, though something like it has happened before in one of our other games (Swamp of Terror).  Still, it looked as if the winner of the scenario would gain some extra resources in addition to the glory of being top!


Predictably, the leagues moved towards the gate in turn 1.  There were a few variations in this, though:

  • All three players moved their main character towards the altar nearest to them.
  • Since Tarzan didn't need to run this turn, he spent an action to exercise his new Summon skill.  A couple of baboon swarms answered his ululating call.
  • The Safari moved several ascaris onto the top of the nearest cliff.  This server 2 purposes: they were relatively close to the gate and might be able to rush it when (if!) it opened and also they had good visibility to much of the table (i.e. they could shoot things!)

Maybe the ascaris were a bit too close to the gate, though?  The guardian rumbled over and stomped one of them into the ground.  First blood to the monster!


Turn Two

Another "Play Immediately" card was drawn.  The stakes were rising quite high for this game!


The cultists all formed a line as they marched forwards.  In a spoiling move, Koko the gorilla ran to the tail end and roared [he has the Shock skill].  This manoeuvre was intended to scare some of the lesser cult members into the farther wasp's nest at the top of the picture, where they would be stung to death.  It was partially successful in that several cultists (including their highly-strung cheetah) were indeed startled by the sudden commotion and they did all pile forwards into the wasp's nest - but the wasps failed to injure anyone.  Oh well...


The rest of the turn played out like this:

  1. Tarzan activated his altar with ease.
  2. Al Masoudi also activated an altar.  This was all going swimmingly.
  3. Sir Henry decided to throw a spanner in the works by refusing to attempt his part of the ceremony this turn.
  4. Various cultists and ascaris engaged in firefights from the opposite sides of a small rock.  Many bullets were expended, but all of them pinged and whined off the cover without doing much damage.
  5. The ascaris on the cliff pinned down the cultists in the wasps nest, though once again the amount of cover prevented any injuries.


This time, the guardian strode towards Hurkey (one of Tarzan's followers).  It didn't quite reach the monkey so it shot beams of searing light at him instead.  The little animal dodged aside nimbly and avoided any harm [against the odds, mind].


Turn Three

Sensing that everyone was somewhat annoyed with him for his spoiling tactics, Sir Henry quickly lit the fire at his altar.  He then played Buy Some Time to extend the scenario to 7 turns.  Well, that should be enough, right?


Having scared half the cultists last turn, Koko returned to investigate the grave (minor plot point).  He used a Secret Path to avoid the increasing number of wasps that had now emerged from their nest [perhaps he swaggered in a hypnotic manner that made the wasps drowsy?  Or he managed to convince them that he really didn't have any jam sandwiches?  Who knows the ways of a gorilla?].

Without being pestered by the giant bugs, it was relatively easy for Koko to collect evidence of the demise of yet another member of the ill-fated Darrow expedition.


In past games, the cult's giant snake has dispatched a number of monkeys with ease and it was no surprise when it slithered forwards and engulfed another one.  However, this time the simians fought back!

First, in an act of desperation, Caesar took on the serpent and - amazingly - landed a hit on the monster without receiving any injury himself.  Encouraged by this, Kobo ran in to the fight and landed a couple of blows.  This turned out to be on a vital spot (Lucky Strike card) and suddenly Kobo's decent 2 hits turned into an unstoppable 4 hits.  Both simians pummeled the snake with rocks and sticks and bit & tore at it until the creature stopped moving!  [The snake lost 2 successive fights, failed all its health checks and then fluffed the necessary recovery roll at the end of the turn.  This was the Day of the Monkeys!].


Of course, the simians have another nemesis: the cultist grenadier is very fond of blowing up small, furry animals.  He threw a bomb into the melee and the explosion caught Caesar by surprise, tossing the monkey aside like a rag doll.  Oh, well...


Otherwise, in turn three:

  1. Sir Henry performed his part of the ceremony flawlessly.
  2. Al Masoudi attempted to light a fire on his altar and failed!  Worse than that, he injured himself in doing this.  None of the other cultists were free to aid him, either.
  3. Tarzan, noting that the ceremony was already lost for this turn, didn't bother to attempt his part.  Instead he used Summon to call more swarms of jungle creatures [more baboons - some had been lost in skirmishes with Saeed, the cult's brawling specialist, and some snake swarms as well.  Note that all of these swarms had the same capabilities, even if the model was represented by baboons or snakes].

Hurkey continued to dance around the metal guardian.  The huge, living statue made multiple attempts to crush the presumptuous beast, but once again the monkey dodged aside [truly, this was heroic stuff from little Hurkey!].


Turn Four

  1. Tarzan lit the fire on his altar [again?  These flames just wouldn't stay alight; they went cold at the end of every turn].
  2. Al Masoudi lit the fire on his alter.
  3. Sir Henry couldn't strike a light to ignite his altar.  In desperation, both Alain Quartermain and an ascari tried to help him out, but neither of them managed either.
  4. Various minor league members ran around the field screaming, followed by the ever-growing number of angry wasps [these were all attempts to lead the wasps into someone else's "territory", usually with only partial success]
So, once again the gate-opening ceremony failed.  It's only turn 4, though - there should be enough time yet, shouldn't there?


This time, the guardian pulverised an unwary cultist.


Turn Five

OK, let's try again.  Sir Henry and his cohorts tried to light a fire on the altar, again without any success.  There were massive groans of despair from all the players at this!


Again, Tarzan didn't waste time in attempting the already-failed ceremony, but instead summoned more jungle swarms.

Much squabbling was done by various minor league members, which served mainly to rouse even more wasps.


Seeing no need to attempt his part in the ritual either, Al Masoudi left his altar and attacked the gorilla [who was busy trying to pull the arms off the cult's Nghai hunter].

It seems as if the cult leader had bitten off more than he could choose, though: Koko won the fight and then used his Savage skill to fight again - winning that too.  Al Masoudi was left battered and down in the dirt!


The guardian continued to pick off one model per turn.  This time one of Tarzan's many swarms was the closest model to the gate and therefore the focus of the behemoth's wrath.


Turn Six

OK, this is getting desperate now - can nobody open the gate?

Tarzan was first to attempt the ritual this turn, but this time he failed it.  Lady Elaine, having retrieved the ancient sword [minor plot point] came to assist despite being pestered by Captain Goode and a giant wasp.  She couldn't light the fire either.


Since the ritual was already compromised, the rest of the ever-diminishing crowd of characters squabbled among themselves and tried to avoid the attentions of the ever-growing number of giant waspquitos.


One cultist couldn't take the strain any more and made a break for the still-closed gate.  He screamed at it to open [perhaps "open sesame" or some such phrase?], but the doorway remained stubbornly shut.  Then the guardian picked him up and crushed him to death.


Turn Seven (extra time)

Do you remember that Sir Henry had played a Buy Some Time card much earlier?  That event caused the game to extend into a seventh turn - but this would absolutely be the last turn possible.  Could the remaining leagues sort out their differences and force the gate open?  Even if they did complete the ritual and the portal opened, would it be in time for anyone to enter the Forbidden City?  Let's find out...


First to go was Sir Henry.  He lit the fire on his alter without too much trouble.


Next up was Al Masoudi.  He had recovered consciousness after the beating he took from Koko, but was far from at his best.  Even so, the cultist leader dragged his battered body over to the nearby altar and completed his part in the ritual, under the watchful eye of the gorilla.


Could Tarzan finish the ceremony and cause the gate top open?  He could - he did!  With the last altar alight, the gateway to the ancient city groaned and creaked as the barrier withdrew.  The path was now open!


Now for the difficult part - was anyone close enough to make use of this success?

The cult's cheetah darted like lightning, raced past the guardian before it could react and vanished into the dark tunnel.


Behind the big cat, the two ascaris from the cliff top came huffing and puffing along.  They just made it into the doorway as well before the ground shook and started to split apart.  All the other characters were forced to beat a hasty retreat as an earthquake split the ground, demolishing the entrance and burying the guardian in a newly-formed crevasse.


Victory

Who won?  Well it's something of a technicality, since everyone had fun and since all the leagues can progress.  Still, for the record:

  • Tarzan and his followers had 3 minor plot points (the altar, the grave investigated by Koko and the ancient sword picked up by Lady Elaine) and therefore scores 3VP.
  • The Safari held 1 minor plot point (their altar).  Although Captain Goode had taken the pile of skulls minor plot point early in the game, he was knocked down later in the game and lost this.  So, just 1VP.
  • The Cult also achieved an altar plot point, but didn't even attempt any others.  I think they were so focused on escaping through the portal that they weren't interested in such distractions.  Again, just 1VP.
Nobody went after the Guardian - the major plot point.  Even Sir Henry, who seems to like facing off against huge monsters, decided early on that this construct was nigh impossible to injure.  Indeed, all the players rapidly figured out that the guardian could only attack (and defeat) at most one character per turn,.  The rather callous tactic employed was then to present it with a new minion to squash once per turn and otherwise try not to provoke it too much.


Conclusion

Well, that went down to the wire, in extra time!  By the end all the players were rooting for each other's heroes as they struggled to light the altars and complete the gate-opening ritual.  They barely did it, but a few characters managed to get through before the gateway was closed forever.

These few who entered will allow the rest of the leagues to proceed to the next scenario.  Mind you, those characters who didn't go through the gate [i.e. almost everyone!] will be delayed and won't join the next game until its turn 2.  Presumably the cheetah and two ascaris lower ropes over the wall, switch off the city's defensive mechanisms, find another way in or otherwise use their presence in the city to help those who are left outside.


The wasps were interesting.  We made up their behaviour on the fly and that wasn't great - the rules for deploying and moving them were poorly defined.  Still, we worked around this and by the end they had changed from being a minor nuisance to a considerable irritant.  Which is how it should be for such creatures, I think.

Man of the Match

I'm really not sure how to decide this, as none of the characters performed exceptionally above their expected behaviour.  Possible candidates:
  • The cult's cheetah, which was knocked down a number of times.  Each time, it just got back up quietly and continued doing its master's bidding.  Nothing dramatic, though it was first through the collapsing gate.
  • Tarzan's simians.  As a group, these tend to be picked off quickly by other leagues or by hazards.  In this game they did a bit better.  Although they all succumbed in the end, Hurkey evaded the guardian's attacks for 2 turns and Caesar & Kobo turned on the giant snake and beat it senseless.
  • Koko the gorilla.  He frightened half the cult so that they ran into a wasps' nest, he beat the cult leader senseless and he tied the arms of a Nghai hunter into knots.  And dug up a shallow grave.

Most Useless

Again, I don't think there are any truly obvious candidates for this title.  Still, here are a few suggestions:

  • The cult's snake.  Normally this thing is a monster; it goes where it pleases and does what it likes.  Today it was stopped early in the game by a couple of monkeys.
  • All the league's leaders.  Each of them failed to light their altar in a different turn, thus causing the ritual to fail time after time until it was almost too late.
  • Tarzan's swarms.  Although they looked impressively numerous, they had little impact since Tarzan quickly ran out of Fate cards to play for them and without this boost they were easily seen off.