<== Back to the previous episode
Introduction
It's been a while since we played our last game of Pulp Alley (see here for
Swamp of Terror!), but we finally managed to gather all the players in the same place yesterday.
According to the rules for the Perilous Island campaign, we should progress to Act III once one league had collected 4 pages from the journal of the missing explorer, Lord Darrow. We had decided early on that while this would be fine for a 2-player campaign, it might lead to an interminable number of games for our 3 player setup. Instead, we ruled that we would progress once any single league had collected 3 journal pages.
Well, it's been a while and I failed to notice that Tarzan's league already had collected 3 pages. By rights we should have moved on to the next set of scenarios. However, we still hadn't played once of the Act II scenarios ("Blood Sacrifice") and so we decided to do that anyway. We'll move on to the final stage of the campaign from our next game onwards.
The Leagues
All of our leagues had by now acquired 25 or more reputation, thus entitling them to an extra roster slot. The Safari and Tarzan each took another follower, whilst the Cult of Hanesh decided to upgrade a (level-1) follower into a (level-2) ally instead.
Similarly, each league had acquired a number of experience points and now seemed like a good time to spend some of them on permanent upgrades:
- The cultist leader, Al Masoudi, spent 4 of his 5 experience points to purchase the Commander skill, thus adding 4 more slots to his roster. These were filled with a level-2 rifleman and a level-2 animal (Steve wanted a cheetah, but for now I only had a leopard model. I'll get a cheetah in due course).
- Tarzan decided to spend 4 of his 5 XP on the Summon skill, intending to surround himself with hordes of monkeys, jungle birds or the like. However, I completely forgot to use this during our game! I think it will take some time to get used to it...
- Sir Henry (Safari) chose to save his 2 XP for later.
Tarzan's Jungle Alliance
As usual,
Tarzan led a collection of animals:
Koko the gorilla,
Caesar the clever simian and 4 lesser
simians. This also seemed like a good time to spend 3 backup points on a level-3
lion, just for this game.
Sir Henry's Safari
Sir Henry's league is as it was before, but with the addition of another (level-1)
ascari. He did, however, spend some of his great wealth on a rocket pack.
Personally I think this piece of equipment must be something that Sir Henry had taken from
Stahlhelm's Nazis (the 4th league that we had in early games during this campaign, until that player dropped out). The members of that group still pop up in our games from time to time, usually as perils or other non-player characters. Since the Nazis have a robot soldier, it isn't stretching things too far to assume that they also had an experimental rocket pack - which
Sir Henry either bought or had stolen...
The Snake Cult of Hanesh
As mentioned above,
Al Masoudi (the cult's leader) has acquired more level-2 allies. He now has quite a large, disreputable crew.
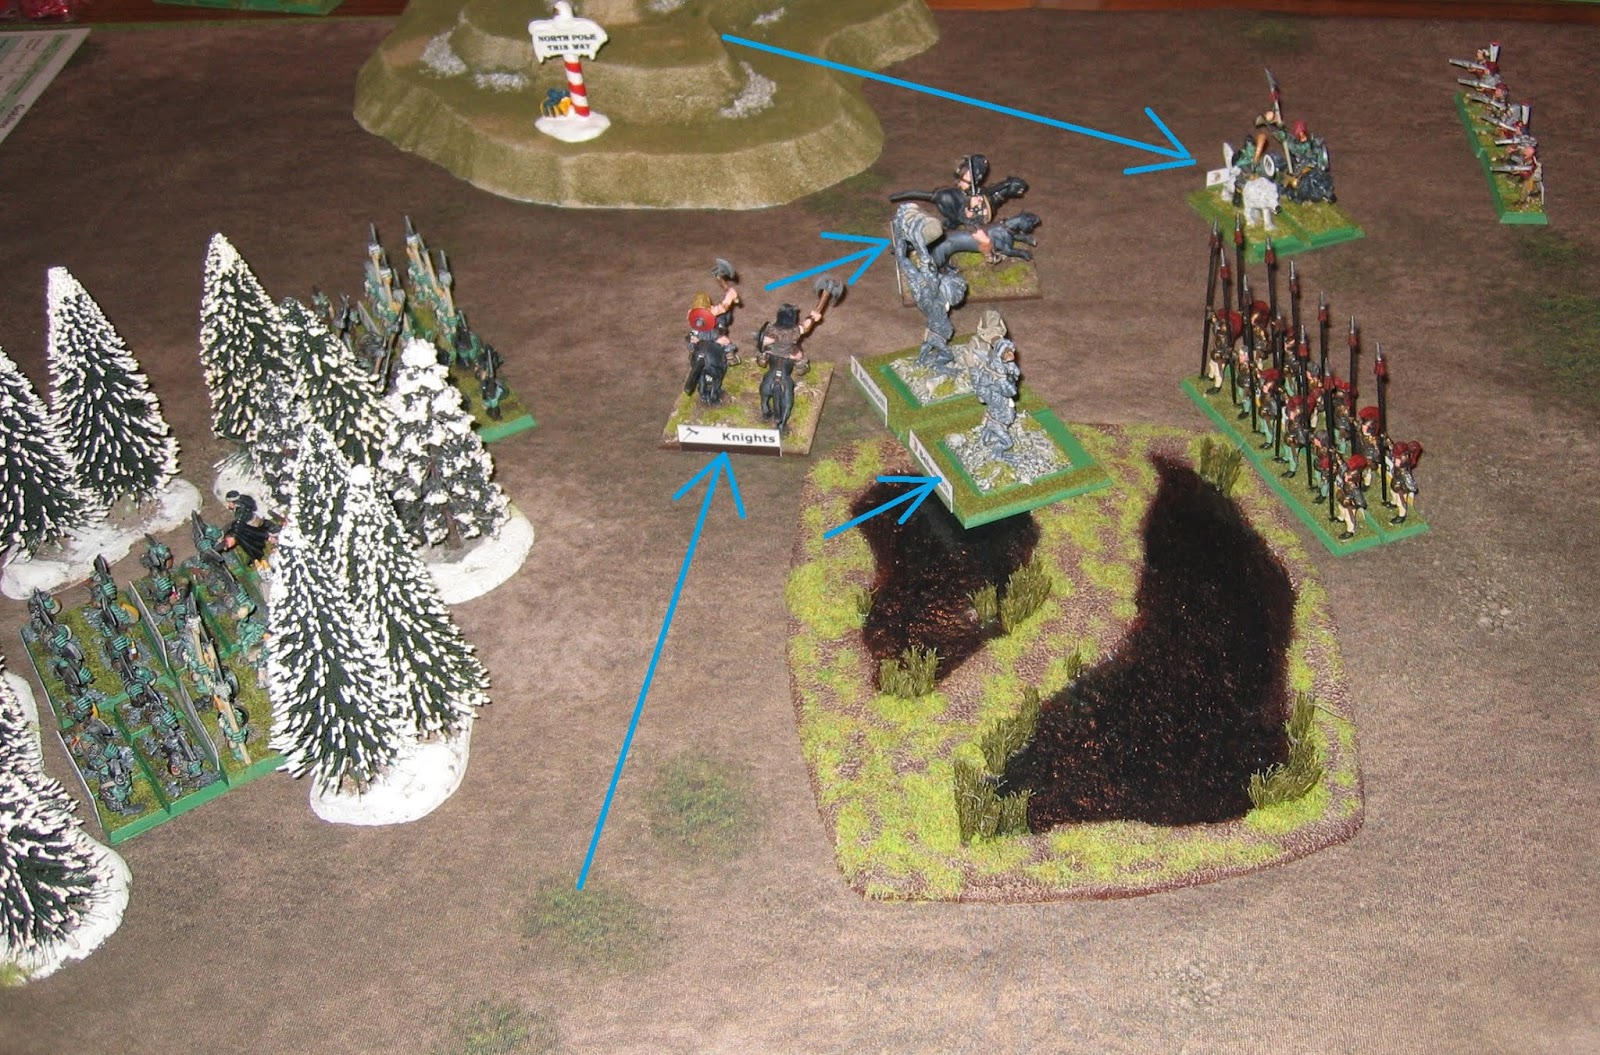
The Game Setup
As required by the scenario, we rolled to see who would be sacrificed by the local witch doctor - and to what. The dice spoke and came up with Duncan (from Lord Darrow's expedition) would be sacrificed to the Great Gonga. Since I have a nice model of a damsel-in-distress that I had been wanting to use for some time, this was adjusted to Miss Duncan instead.
Plot Points
- Miss Duncan, tied between 2 stakes in the centre of the table (major plot point)
- The witch doctor (minor PP). Note that he is surrounded by a number of acolytes/bodyguards, thus making it perilous to approach within 6" of him.
- Glowing green crystals (possible perilium deposit, minor PP).
- Pile of skulls (possible mysterious remains, minor PP).
- Strange statue (minor PP, guarded by a mystical force field).
- Expedition radio (minor PP)
- Enormous footprint (minor PP)
These last two plot points were added because we had 3 players; they're not in the scenario as written. However, we've found that multi-player games need proportionally more plot points than 2-player games - otherwise it alters the balance between solving clues and fighting other leagues too much for our taste.
Perils
- The quicksand in the north of the table is perilous (well, duh!)
- The witch doctor's bodyguards make it perilous to be within 6" of him
- 4 Nazis provide some mobile perils. At the end of every action phase they will move 6" towards the nearest enemy. If they have a clear line of sight and are within 6" then that enemy takes a peril. Should a model move within 6" of a Nazi during its own activation then it also takes a peril.
If the peril is passed then the Nazi is defeated and removed from the table. On a d6 roll of 4+, the player who faced the peril may replace the Nazi anywhere on the table, as long as the new location is more than 6" from all enemies.
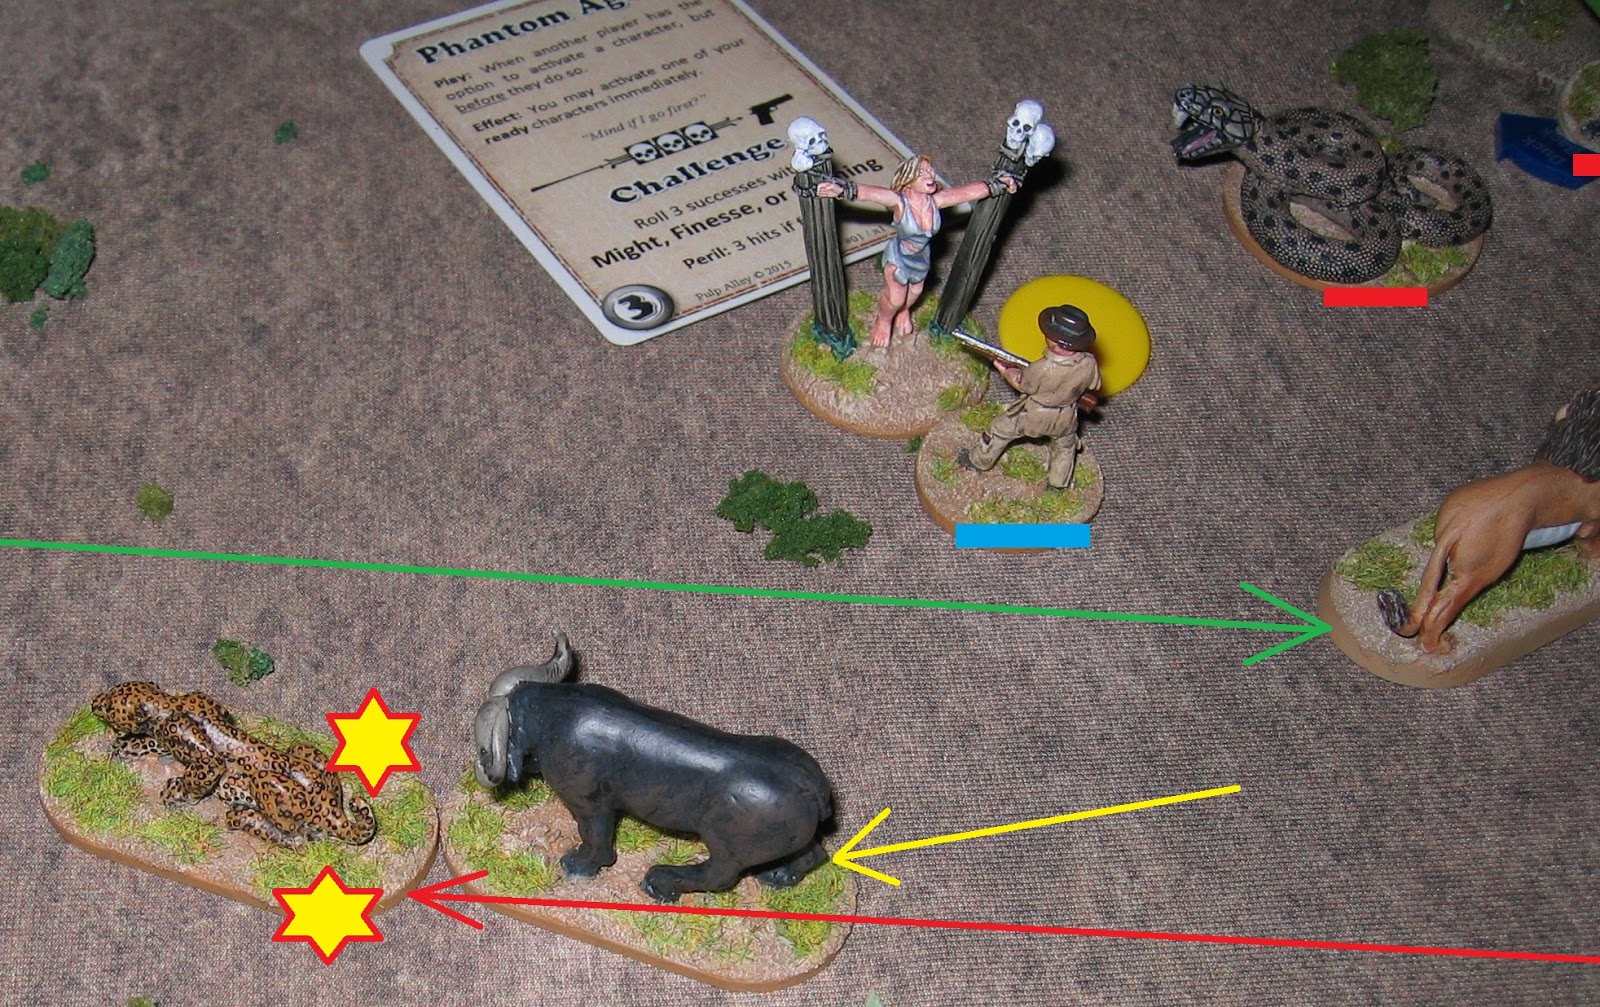
- A grumpy buffalo is perilous when in contact with a player's model.
Since that would be too easy to simply avoid, it also has the following rule: every time any model moves within 10" of it, the buffalo will move d10" towards that model. That gives the possibility of someone running screaming through an enemy camp, followed by an enraged bull!
Note that in our game this made the buffalo extremely active - it knocked out at least 3 characters. If anyone wants to reuse this idea then I would suggest that either you make the distance much shorter (such as 6" and d6"), or else use a dice roll to trigger the buffalo's movement. Perhaps it should move d12" if anyone comes within 12", but only on a d6 roll of 4+? Or something like that...
Blood Sacrifice!
Sir Henry moved first in our game. Without any hesitation, the intrepid explorer used his rocket pack to fly over the jungle, past Nazis and other perils. He landed in the central clearing, just a few steps from where Miss Duncan was tied between the posts.
Of course, the buffalo then spoiled this piece of derring do a bit by charging out of the jungle straight at the gentleman. I imagine it was startled and enraged by the noise and/or smoke from the Englishman's strange device.
Sir Henry was too old a hand to be bothered by this; he nimbly sidestepped the beast's charge. However, the buffalo was now in the middle of the table and would react to pretty much any movement apart from around the fringes.

Most of the other players advanced cautiously, approaching their nearest minor plot points to try to gain an early lead. Sir Henry continued his heroic dash by befuddling the buffalo with a Secret Path card (am I the only person who thought about the similar incident from Crocodile Dundee when this happened?).
He then blew it completely by failing to untie the damsel in distress. The challenge to undo the knots required 3 successes and Sir Henry only achieved one. By this time, half of the Snake Cult was closing in on him...
To add to the Safari's woes, Alan Quartermain investigated the glowing crystals - only to find out that they weren't real. The light filtering through the jungle canopy shone on a rock in such a way as to make it shine, but it was just a very ordinary rock when seen close up.
Meanwhile in the north, the cultist's grenadier was up to his favourite tricks: throwing bombs at monkeys! 2 of Tarzan's simians thought they were safely hidden in the foliage, but the grenade still injured Caesar.
In a hooting, screeching fit of revenge, a couple of the remaining apes charged at the cultist. He dodged out of their grasp - straight into the quicksand!
The central clearing was now filled with animals racing all over! Tarzan's lion ran one way, whilst the cult's snake and leopard went the other, all in attempts to distract the buffalo. In the end, the maddened bull decided to chase down the leopard and gore it to death.
At the half-way point of the game, here is how things stood:
- Tarzan had collected a minor plot point, but had made heavy weather of it and wasn't well positioned to intervene in the central struggle.
- The cult's brawling specialist ignored his friend who had fallen in the quicksand and dispatched both of the simians with brutal efficiency.
- Sir Henry finally freed Miss Duncan from the sacrificial posts, only to be attacked by Tarzan's lion. Astonishingly (to me, at least), the lion had the worst of the exchange. There were words that, if not exactly swearing, were strong expressions of disbelief...
- Al Masoudi and Captain Goode both vied for the witch doctor's attention, whilst the latter's bodyguards attempted to stab them both. Goode went down several times, but just wouldn't give up and kept returning to the fight (and, importantly, thus prevented the cult leader from solving this plot point).
- The buffalo continued its rampage, knocking out Lady Constance (safari) and a simian (Tarzan).

Saeed, the cultist knifeman, killed off the two simians. While he was thus occupied, the cult's grenadier reached for the radio but couldn't manage this and stay afloat at the same time. He vanished into the quicksand with a soft, sucking sound.
As this happened, there was a crashing sound. Birds flew up from the bushes, calling wildly. The Great Gonga had arrived! He was the most enormous, black gorilla that anyone had ever seen - easily bigger than any other land creature anyone had seen.
Oblivious to the rapid approach of
Gonga,
Sir Henry and the miraculously-recovered
lion tussled for possession of Miss Duncan...
...whilst Al Masoudi and Goode continued to fight the witch doctor's bodyguards and each other just to survive.
Gonga was obviously infuriated by the puny beings who had stolen his sacrifice. He tore into the melee and gave the
lion an almighty buffet.
Sir Henry managed to duck and step backwards with Miss Duncan...
...but it was only a temporary reprieve. The gigantic monster tossed the
lion aside and continued his relentless pursuit of the humans. To his credit,
Sir Henry managed to wound the beast - but this just maddened
Gonga even more!
As
Sir Henry and
Gonga fought, the
lion recovered and stood up. The cult's
snake immediately struck at it, though neither creature could gain the upper hand.
Then,
Alan Quartermain decided to fire into this melee on the grounds that anything he hit was good. His shots missed the
lion but struck the
reptile, which then collapsed into the dirt. [
I think this might be the very first game where the cult's snake has failed to terrorise its enemies and has instead been knocked out!]
As we entered the last turn, the situation was thus:
- Gonga and Sir Henry were fighting for possession of Miss Duncan in the central clearing. If Sir Henry could just survive until the end of the round then the game would end and he would escape with his prize!
- Al Masoudi and Goode still wrestled [inconclusively] with each other and with the witch doctor's bodyguards.
- The buffalo was annoyed enough to be chasing a couple of ascaris through the jungle.
- Remnants of all 3 leagues hung about the fringes, not particularly wanting to get involved in any further fighting.
Pretty much the only minor action in turn 6 was this: Tarzan's lion ventured into the quicksand. The clever animal grabbed the sinking radio [minor plot point] and dragged it to the side.
A couple of cultist minions stood nearby and even took a shot at the lion, but this was ineffectual.
Everyone held their breath as the main event came round: could
Sir Henry survive another round against the monstrous ape?
Gonga pummelled the man mercilessly, reducing him to a d6 health [
i.e. the lowest one can be and still stand up in Pulp Alley]. Then, with the last attack of the game,
Gonga landed a final, single blow.
Sir Henry needed to roll a 4+ on one d6 to survive. If he could do this then his league would have 3 victory points and would win the game, not to mention the enormous kudos he would acquire. It was a 50:50 chance, but sadly he rolled low and fell to the ground.
Gonga sniffed contemptuously at the stricken man, grabbed Miss Duncan in a huge clasp and strode off into the jungle with the screaming damsel...
Final Results
- Sir Henry's Safari nearly pulled off a considerable coup, but ended up unlucky and empty-handed after the shining crystals proved to be an illusion. 0 victory points.
- The Cult of Hanesh made an early gain when their leader effortlessly grabbed the strange statue. However, they then seemed to get bogged down in indecision and pointless fights. 1 victory point.
- The Jungle Alliance concentrated on minor objectives and managed to claim several of them (Tarzan scored the large footprint, the lion rescued the radio and Koko grabbed the mysterious remains - though this was something of a poison chalice as Koko contracted Fungus Lung for his trouble). 3 victory points and the winner!
Conclusion
 |
| The Blood and Glory card was only drawn on the last turn, when there was barely any fighting! |
Well, that was another fun game! Mind you, I think it was notable for dithering all round. Once many of the minor objectives had been claimed in turn 2 or 3, all three leagues had models that bickered and skirmished around the jungle fringes rather than pile into the central, sacrificial glade.
The Nazis were fairly ineffectual as perils, being dispatched with surprising ease and (mostly) not returning to the table. After maybe a couple of turns, they had all vanished without being a significant hindrance to anyone.
On the other hand, the buffalo was a holy terror, chasing down pretty much anything that moved! For certain it dispatched 3 characters - the tally may have been greater than this but my memory isn't good enough. Eventually it was lured away into the south west, where it played tag with Tarzan and a couple of ascaris for the second half of the game.
Sir Henry's gamble very nearly came off. Perhaps if his ascaris had been more central then they might have softened Gonga up with rifle fire and permitted the great white hunter to triumph? Or maybe not. Either way, he's acquiring quite a reputation as a man who enjoys wrestling with the most fearsome monsters!
Tarzan and Koko were disappointing; they gained minor plot points easily enough but against little or no opposition. The temporarily-allied lion was much more impressive, fighting Sir Henry, the giant snake and Gonga (though without actually winning any of those fights) before grabbing a final objective. On a more personal level, I was thoroughly delighted when the simians pushed the pesky cult grenadier into the quicksand 😁.
As for the cult, once again their leader carried the show pretty much alone; he was let down by incompetent underlings. Al Masoudi must be getting so tired of this, but that is the lot of a would-be evil overlord. So it is written!