Sunday, 18 November 2012

Stalled Projects

Ennui?


I've not done very much model-making recently.  Partly this is the colder, darker season approaching rapidly; it does tend to sap my energy a bit.  Mostly it's just that many of my projects are either near their beginning or are stuck on some hard part.

If near the start of an item then it can be hard to motivate oneself; it seems like such a long way to completion after the initial flush of enthusiasm.  Alternatively, some projects bog down because I cannot figure out how to overcome some technical challenge, or I cannot decide on what end result I really want.

Here are a few of my projects which are currently stalled and awaiting difficult decisions...

Scenery and Cars

I have a bunch of card models to make up, for use with ATZ or other modern urban games.  Firstly, I have the Stoelzel's Big Box Store and Auto Park Playset (and I've just noticed the Trailer Town Playset is available as well, curse it :-) ).  I'd intended to make the buildings from both of these, but just haven't got round to it yet.  I'm also part-way through building some Ebbles/Genet "Folding Unit Structures", for use in a military camp.

I intend also to make a number of the vehicles from the Auto Park.  So far, I've completed one red convertible, so only 124 more pages of models to go :-) !  This is an interesting kit and will be a useful addition to my fleet of vehicles.

Obviously there's more work in building an open-topped car than a covered one, if only because the interior detail has to be done too.  However, it was the windscreen and (surprisingly) the underside that gave me the most difficulties.  Some of the Stoelzel's kits have fairly broad dark lines where the card needs to be folded and because of these it can be difficult to tell exactly where to score and crease the model.  Sometimes, as I found here, any minor inaccuracies didn't show up until many steps later in the construction, when it was too late to rescore and refold the card easily.  I'm particularly aware of the issue this week because I've also been making an Ebbles/Genet shuttle; that kit has very precise score lines and fits together perfectly.

Space Mines

I have an ambition to run a scenario involving an assault on a Starbase.  Part of the setup for such a game would be defensive minefields, but how are these to be represented?

I suppose that the minefields could be represented by counters.  However I'd really prefer a proper, 3-D model.  They'd have to be cheap, of course, if deployed in the numbers that I envision.  But what does a mine in space look like?

Here's the starting point on which I decided.  These are plastic beads, about 6mm across.  They're certainly cheap; you can buy many 100s for just a pound or two.  But can they be made to look like mines?

Here are my 3 attempts so far.  The group on the left uses the faceted beads.  Personally, I think they look quite effective - but outlining the facets is horribly time-consuming and not really suitable for mass production.  Bother.

In the middle and right are 2 trials using the round beads, but with different colour schemes.  They're certainly quicker and easier to paint, but I'm still not sure.  I might yet use base them in rectangular strips rather than on round bases.  Or change the colours.  Or give the beads to my daughter and find some other way of representing mines.  Aargh, I just don't know how to proceed!

Saga Scots

I've mentioned these guys before, in the context of not making much progress.  Indeed, they seem to be something of an albatross around my neck!  I bought my Viking warband last year and painted it up long ago, but I cannot play Saga until I have some opposition for them.

Finally I can report that I have finished 3 of the Scot's Hearthguard.  I've named them "Eochaid", "Ciniod" and "Domnall".  That only leaves the warlord himself, another 5 hearthguard and 16 warriors to go before I have a minimum-sized warband.  I keep telling myself that it should get easier; the less prosperous warriors will have much plainer clothing that will be quicker to paint.  Still, at this rate it'll be a long time before the party is complete :-( .


Wednesday, 14 November 2012

TRWNN: The Gold Rush at Silver Falls

Introduction

In the small mining community of Silver Falls, a passing wagon has dropped a number of bags of gold in the middle of Main Street.  Probably this was an inside job; some accomplice has infiltrated the company and has surreptitiously thrown the money overboard whilst "guarding" the payroll.  Be that as it may, the sacks of gold have been spotted by a number of local ne'er do wells simultaneously; the one who ends up with the most will win.  There's a slight catch, though - each bag of coins is so heavy that a person can only carry one of them at a time.  Simplest thing is just to kill all the other gunslingers; then all the gold will be yours!

All of the initial 5 characters were either shootist or legend class and each had a number of skills as well.  They were armed with pistols, apart from Preacher Adams (who was crazy and had a sawn-off shotgun!)  Oh, I would be using the Bystanders card in the deck as well, just to make it more interesting!

Main Street

Straight from the start, Preacher Adams ran into the centre of Main Street and declared that all the gold was his.  This declaration was met with a certain amount of trepidation by the other players; the preacher's crazy attribute and shotgun made him potentially very unpredictable and dangerous!

Black Bart stuck his head round the corner of the store while the preacher was trying to load a sack of gold onto a nearby horse.  He barely ducked back in time as a blast from the sawn-off shotgun tore chunks out of the corner of the building.  Bart would have to spend a turn cleaning the splinters out of his eyes and finding his hat, but at least he was unhurt!

From the other side of the street, Blondie didn't give Preacher Adams a chance to reload.  He blazed away with his pistol; over the course of several activations he managed to score 6 hits before his gun ran empty!  Sadly for Blondie, 5 of these were scored on the horse behind which the preacher was sheltering; only 1 bullet grazed the man.  The horse was killed, though!

Black Bart recovered his composure and stuck his head back round the corner of the store.  From this angle, Preacher Adams was in the open and Bart put 2 shots into him.  Although Adams wasn't killed, he did collapse and remained unconscious for the remainder of the game.  While Blondie and Black Bart had been gunning down Preacher Adams, Santos had taken a chance to run in, grab a sack of gold and retire with it to the corner of the Trading Company building.

At this point we drew a Bystander card; this was resolved as an old enemy of Blondie's.  2 Gun Rafael burst out of the nearest door and challenged Blondie in a bad Mexican accent: "Hey, gringo!  You killed my donkey!  And my cousin!  And my best friend's uncle!  Now I kill you!"  He blazed away with both pistols, rolling something like 14 dice in total.  When the smoke had cleared, one pistol was empty and the other jammed.  Blondie had only taken a single slight wound, which he ignored due to his Hard as Nails attribute.  Rafael stood there, looking somewhat embarrassed.

Not fancying his chances at brawling with a legend, Rafael ran down the street to look for a quiet place where he could reload his guns.  Blondie started after Rafael, but his turn was interrupted when Santos shot him twice in the belly.  This knocked Blondie down, but they were just flesh wounds after all...

...so Blondie stood up, reloaded quickly and fired back at Santos.  He hit him in the left arm; this was very bad news for Santos as he wouldn't be able to reload his pistol - and the previous firing at Blondie had emptied his gun.

Duels

Black Bart had started forward to claim the gold, but was challenged by Cesar (a newly-arrived henchman of Preacher Adams).  The two of them exchanged many shots from their respective sides of the barrier of produce without hitting each other.  Bart came close a number of times, but always hit the bales of cotton instead.

Rafael returned past the saloon, having reloaded and fixed his guns.  He ran headlong into Blondie, who was coming down the street to look for him.  For a number of turns, the pair wrestled, but neither was able to defeat the other (the wounds that Blondie took from Santos were handicapping him considerably, thus allowing the gunman Rafael to fight on even terms).

The End Game

Finally, Cesar got a lucky hit on Black Bart, causing a serious arm wound.  Black Bart would not be able to reload; for the last few turns he only took slow, deliberate shots as blazing away would probably have rendered him weaponless.

Santos dithered around an outhouse for a while, but finally decided to take his sack of gold and run off (probably to find a doctor to look at his bleeding arm).

Up to this point, Jesse had hovered indecisively at the southern end of the town, waiting to see what everyone else would do.  He chose this moment to come round the corner and take a long range shot at Rafael (from behind).  Surprisingly, he hit Rafael in the leg and knocked him down - but still Blondie couldn't finish off his adversary and the brawl continued.

Finally, in the last turn of the game, Blondie broke away from his brawl and ran for the money.  Black Bart finally ran out of ammunition and also ran into the centre of the street to stand protectively over some of the sacks.  The 2 exhausted gunfighters were unable to hurt each other and the evening finished with the pair of them dripping blood all over the gold

Result

So, who won?
  • Santos ran off with 1 bag of gold, but was badly injured (1 serious, 1 flesh wound).
  • Black Bart gained 2 bags of gold, but also had 2 wounds (1 serious, 1 graze).
  • Blondie also had 2 bags of gold, but was injured 3 times (2 flesh wounds, plus an ignored flesh wound)
  • Jesse didn't achieve anything much.
  • Preacher Adams was severely wounded; his associate Santos didn't get any gold (but does get an honourable mention for putting some hurt onto Black Bart).
  • Rafael (the umpire's character) failed to get his revenge on Blondie this time, but hasn't given up hope!


Sunday, 11 November 2012

In Praise of Plastic Women

Introduction

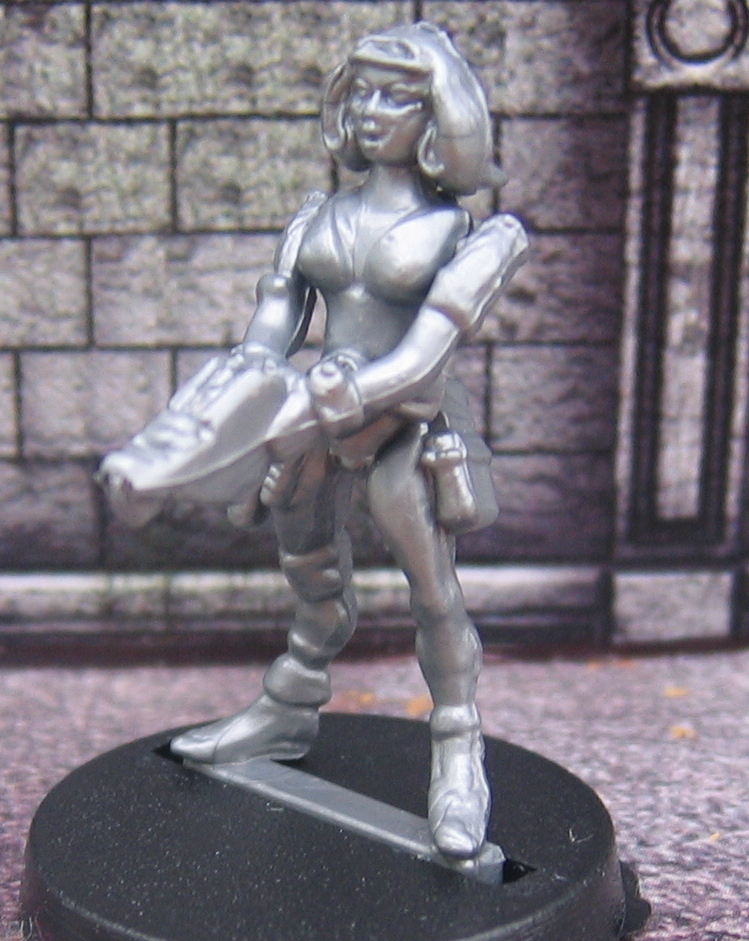
Most 28mm models of modern civilians are male, whether armed or not.  There are some females available, but for cheapness nothing beats em-4's gangers.  2 of the 5 figures on each sprue are female; here's one of them:
Um.  It's not the most impressive figure, is it?  Neither the sculpting nor the moulding of the model are up to the standards of the industry's best.  However, it is plastic and it is cheap; these put together make this a converter's dream!

OK, let's see what we can do with this...

Green Eyes

Here's one I painted a long time ago.  This figure has been cleaned up a bit (mould lines removed, filler applied to the shoulders and other places), but is otherwise just a straightforward paint job.  This is "Green Eyes", a junior gang member or not-very-confident zombie apocalypse survivor.

Jade

One of the interesting things about the em-4 plastic models is that each figure comes in 3 parts: body (legs & back torso), upper (front torso and head) and arms/weapon.  They're designed so that you can mix and match the parts, up to a point.  Jade is made from the same legs and arms as before, but using a different front/head part.  She's also a gang member, but looks quite a bit more confident.

Sally

As well as the plastic parts, metal weapon and torso/head parts are available from em-4.  Sally has been made from the same body as before, but with some of these metal parts.  She has "big hair", a considerable scowl, some form of body armour (chainmail?!) and carries an autocannon.  This time I decided that the skinny legs were not what I wanted, so I gave her a knee-length skirt from green stuff.  Not someone I'd like to meet in a dark alley!

Penny

Finally, Penny uses the same legs as all the others and the same top and backpack as Green Eyes.  She's a more significant conversion, though.  Firstly, she has some hiking shorts instead of the lycra leggings.  All the bottles, holster & other gear have been removed from her belt.  Finally, instead of a pistol she holds an R/C unit.  This is used to direct her friend, the robot "B-9" [The robot is probably made of fibreglass or plywood.  I don't think it would be able to hurt the opposition - but it should have rules which would encourage creative game-play!  I'm working on it...]


Ramblings

One of these days, I'd like to run a zombie game set in a Science Fiction convention.  This is, of course, at least partly in homage to the book "The Night of the Living Trekkies".  The book wasn't bad, but the trailer was awesome!  When/if I do this, Penny and her robot will appear, as will my Star Trek re-enactors Pike and Pavel (last seen being chased by zombies here).  Plus many other stereotypes and characters yet to be decided...

Wednesday, 7 November 2012

5150: Installing the Acoustic Sensor Net

Introduction

The planet of Tantalus III was recently the scene of a violent confrontation between a group of Klingon spies and a patrol from the Planetary Defence Force (PDF): here.  PDF troops have scoured the area but have been unable to find either the insurgents or several of their missing soldiers.  The local army headquarters have come to the conclusion that the Klingons must have a well-camouflaged underground base and have ordered that acoustic probes be installed to cover the area, in order to discover the location of this base.  They couldn't be more wrong...

The Setup

5 teams of the Planetary Defence Force were deployed to install acoustic sensor probes.  3 of these teams were experienced (REP4), whilst 2 groups were rookies (REP3).  3 troopers in each team carried a gauss rifle.  The 4th member had a light support weapon of some kind - mostly chain guns with the occasional rocket or grenade launcher.  The platoon also had the services of a lightly-armoured "Valkyrie" scout walker with REP 4 crew members.

The rules for installing the acoustic sensor net were simple.  A team would take an entire activation to deploy a sensor, each sensor would have an effective radius of 18" and the PDF would "win" when every part of the board was in range of at least one sensor.

Just to keep the players on their toes, I deployed 3 PEF (possible enemy forces) markers.  2 ended up in the large wood in the centre and the 3rd was behind the far right hill.  Unknown to the players, these PEFs were all decoys that would resolve as "nothing there".  The real threat came from underground...

The Game

To start with, the troops advanced slowly, dutifully emplacing sensors as they went (the small, blue markers).  2 of the 3 PEFs moved into sight and were discarded, leaving just a single, stubborn PEF in the woods, refusing to move.  The players quickly realised that the near side of the table wasn't covered adequately by their sensor grid, so team 5 dropped back to fill in the gaps.

After a number of sensors had been positioned, the combined activation dice came up as a '7' and I dutifully placed a bug hole.  Twice as many bugs as troopers were indicated, so 48 in total (counting the walker as equivalent to 4 people).  That's a lot of bugs!

The players panicked for a moment and the walker "buttoned up" (shut and locked all its hatches!), but quickly the troopers decided to use their firepower.  It turns out that 5 fireteams with automatic weapons can kill about 15 or so targets that aren't under cover every turn.  I'm not counting the walker because throughout the game its gunner rolled very poorly; its vulcan gun barely claimed 1 victim per turn.  The bugs froze for a couple of turns (missed activation rolls);it began to look as if the troopers would finish off this swarm without even breaking a sweat!

Of course, we then rolled another '7' for activation; a second bug hole appeared amongst the ruined buildings.  This time, 96 bugs emerged.  I promptly ran out of models and had to resort to placing I.O.U. counters (each red marker is worth another 10 bugs).

The troops didn't even get a chance to move before another swarm of bugs arrived.  This time they were flyers and they arrived right behind team 5.  Indeed, team 5's position now looked extremely precarious; they were sandwiched between the aerial newcomers behind them and the huge swarm in front of them, just the other side of the hill!

While this happened, the walker advanced in an attempt to stomp on the remaining bugs from swarm A.  Two of the critters leaped out of the way, while a third scuttled nimbly up a leg and onto the top of the vehicle.  The airwaves went blue as the vehicles's commander called for assistance into his comm unit.  "Get it off us!  Someone, please - shoot it off!  All fireteams, target the Valkyrie!  Ah - just small arms, though - don't use the rocket launcher!"  Fireteam 4 duly hosed the scout down with its minigun (and killed the beastie) before they ran further up the road.

Teams 2, 3 and 4 then fled up the road, followed some way behind by team 5.  The huge swarm B and the winged swarm C hadn't yet reacted to this when a 4th group of bugs appeared - this time almost straight in front of the fleeing soldiers.  Some days it's just not worthwhile for a squaddie to get out of bed.  Again, the red tokens are each an I.O.U. for 10 more bugs; I really ran out of models badly in this game!

The soldiers didn't get much further before the monsters were upon them from all sides!  Several men were killed immediately, though interestingly the flying bugs had a hard time against teams 4 and 5.  The specialist in team 2 did surprisingly well against warrior bugs from swarm D; he survived an attack by several bugs by firing his grenade launcher directly down the throat of one of the vicious creatures.

Team 1 was alone on the other side of the wood.  They had an easier time of it because only a couple of bugs found them.  Still, one of those managed to kill a trooper before being gunned down, whereupon the 2nd bug charged and did the same again.

The walker was now in serious trouble.  A large number of bugs assaulted it and even though many were crushed underfoot by the driver's cunning manoeuvres, 10 of them still managed to climb onto various parts of the machine.  It was probably only a matter of time before one of them managed to find a weak spot and disable the vehicle.

The winged beasties may not have been as deadly as the other creatures, but they did hold up teams 4 and 5 until the ground-based swarm arrived.  As the game ended, it was looking pretty grim for the last few soldiers...

The End

Well, that didn't go as I had expected!  Those "4 times number of humans" swarms are incredibly nasty; once that occurred there wasn't really much chance for anyone who didn't run immediately.  To be fair, the players did run, but then were even more unlucky that more swarms appeared to their sides and in front of them.  Truly, I think that Tantalus III will have to be abandoned to the bugs now!

A couple of members of team 1 would have escaped, had we continued.  Probably.

Sunday, 4 November 2012

Shapeways Models

Introduction

I've watched the development of 3d printing techniques with considerable interest over the past few years.  This is the technology where a 3d software design is downloaded from a computer into a machine which then carves or fuses those instructions into a real, solid item.
At the moment the equipment to accomplish this is beyond all bar the most serious private individual, but there are companies who will take your design and print it on their machines.  The best known of these is Shapeways.  Many people upload model starship designs to the Shapeways web site; most of these can then be bought by a 3rd party (such as me).  Recently I ordered a few such models...

White Detail

The first choice one has to make when ordering 3d prints is the material from which they should be constructed.  Shapeways offer 8 or 9 different choices for these items, but actually I believe that many of these are just differently-coloured versions of the same basic stuff.  There is, however, a strong price gradient between the cheapest, lower detail matrix and the most expensive, best detail material.


For these Tiberian Pugius destroyers, I chose the "White Detail" material; this is a compromise between definition and price (mind you, they still cost quite a bit!)  I'll use them as smaller, old-style Romulan ships for Full Thrust.  It's hard to see in these pictures, but the smooth surfaces really are quite smooth, though there's some roughness around the edges.

Undercoated

Here's another shot of a Pugius destroyer, along with a S'ten Vastam light cruiser.  This time, the models have been undercoated; the Pugius is looking quite clean.  However, the S'ten Vastam is distinctly rough; it looks as if it has a hairy fringe all round the model.  Note that this is definitely how it was manufactured; it's not a result of me undercoating the model in a dusty room or anything like that!

Bellerophon

Finally, this is a photo of a completed, painted Bellerophon class light cruiser; I've named her "Endeavour".  Not the Star Trek "Voyager" at all, no sirree!  Any resemblance is purely accidental, I'm sure...

Again, this model has some definite rough edges, although I suspect and hope that they won't be noticeable at normal viewing distances.  Still, they really annoy me!  Bear in mind, though, that all of these models are between 1.5" and 2" (4-5cm) in size, so they're really quite small.

Conclusion

I'm impressed at the variety of offerings that are available at Shapeways.  For starship models, there is a useful discussion here, though I'm aware that there are also many naval models and World War I aircraft for sale.  The detail is not as good on the finished item as I'd like, though they are getting better all the time.  The cost is still relatively high as well, so this isn't the way to construct your horde armies.  Metal, resin or injection moulded plastic are all better quality and cheaper - for now.  But watch this space: I'm reasonably confident that this technology is going to become very significant within the next 5 years or less!


Thursday, 1 November 2012

HOTT: All Hallows Eve!

Introduction

Since this week's Games Club night was the day before Halloween, I decided to host something involving spooks and other night terrors.  I'm something of a traditionalist at heart, so I chose to put on a 72AP game of Hordes of the Things (HotT), pitting the resurgent Knights of Lyonesse against my undead army: the Cabal of the Black Hand.

As before, the forces of Lyonesse comprise many noble knights with a scattering of heroes, an aerial hero (Bertrand de Fleury, a distant relative of Sir Alain Fleury who died fighting goblins here) and a paladin (Saint Florence of Artenay).
Against them, the Cabal's army is led by magicians and has hordes of ghouls, skeletons and zombies.  Also of note: the near flank has some sneakers (ghosts/spirits), the centre has an evil undead hero and many bats, while the far wing has a large mounted contingent.

The Battle

The small border village of Valence-sur-Aignan is under threat from an invasion of evil creatures, worshipers of darkness.  To protect the village, the Knights of Lyonesse have ridden hard since their victory over the goblins in the Black Mountains (here).  Will their valour be strong enough to save the townsfolk, or are they too tired to resist the forces of evil?  Read on...

In the centre, the Cabal's hordes shambled forwards as fast as they could (which wasn't very fast!).  The far wing of Knights started to move out to meet the undead cavalry, but then hesitated and ground to a halt (very poor dice rolls for PiPs).  In the centre, long-range magic was very effective at disrupting and destroying the Lyonesse infantry.  It looked as if the Cabal had chosen well in mounting their invasion near Halloween; the dark gods were favouring their dice rolls considerably!

The story was much the same on the near wing.  A combination of fast-moving sneakers and bats plus hostile magic served to break up the Knight's forces.  Meanwhile, the undead hordes advanced through the woods, obliterating everything in their path (mostly squirrels).

It looked as if the Cabal had made a slip, though.  Bertrand de Fleury saw the enemy commander-in-chief casting spells a long way from his troops.  The hero spurred his winged horse into the air, flew over the battlefield and challenged the horrible wizard to a duel.  However, the magician cast a dark web over Bertrand and his steed, ensorcelling and capturing both of them!

In the centre, the Cabal sent huge flocks of bats forwards to pester and confuse the knights.  The men destroyed most of the critters with ease, but again this caused them delays and broke their momentum.

In the swirling melee, the Red Knight came face-to-face with the undead champion.  He was still distracted by swarms of bats and this was his downfall: the boney wight wounded him and the knightly hero fell.

It was the far wing of the army of Lyonesse that was the first to flee.  The skeleton riders crunched through their terrified human counterparts.  Hampered by indecision (poor PiP rolls), the knights had little chance to react and were routed by the rampant undead.  Even some of the hordes managed to kill the knights who tried to face them, the Cabal's forces were so outrageously lucky!

Bertrand de Fleury finally managed to escape from his captivity and return to the field.  We'll never know how he managed this, for he returned just as the central command of the knights' army also became demoralised.  Bertrand took one look at the devastation and fled (and wow - Aerial Heroes can flee a long way!).

It was up to the near wing of the army of Lyonesse to attempt to regain some honour.  By now, some of their cavalry had managed to circumvent the dark wood and trickled in to attack the pair of chanting wizards who commanded the opposing forces of darkness.  The first knights to attack were fried to a crisp by a well-placed fireball from the junior magician; the senior spellcaster didn't even deign to notice the attack.

The ghosts assailed the knights' commander, confusing him with visions of his dead ancestors.  Although he managed to shake off these apparitions, he was then unable to join in the assault on the Cabal's leaders.

Finally, some of the forces of Lyonesse managed to charge the Cabal's nearest sorcerers.  Saint Florence slew the lesser magician in a fit of holy righteousness, but once again the ordinary knights who attacked the other wizard were destroyed by foul magics.

Conclusion

This last loss, combined with the destruction being wrought by the undead hordes emerging from the far side of the woods, was the final straw.  All 3 Lyonesse commands were now in full retreat, whereas the armies of darkness were barely damaged.  There must have been something in the air that night, for the knights lost pretty much every die roll that mattered, while the Cabal won theirs.  Truly the townsfolk of Valence-sur-Aignan would remember All Hallows Eve with horror!