Sunday, 19 April 2015

Battle Report: Jason and the Harpies

Introduction

A week ago, I promised that there would be 3 battle reports as a result of a recent all-day gaming session.  The first two have already been published:
Well, it's time for the 3rd (and last) of this group of games.  It's a slightly larger game of 7th Voyage that involves Jason and the Argonauts vs. a flock of Harpies!

The Scenario

The gods have punished King Phineas for some impiety by turning him blind, exiling him and sending harpies to plague him constantly by stealing or fouling his food (wow, these Olympians don't mess about, do they?!)  However a seer has prophesied that the hero Jason has been chosen to end this punishment and drive off the bird-women monsters.  Shame that Jason can't restore Phineas' sight as well...

We're going to play this as an almost-standard Steal mission, straight from the 7th Voyage rulebook.  The main difference is that in our version, Phineas will be the "item" to be fought over, rather than a fabled and magical Gift of the Gods.  Since he is blind, he may only make 1 move per turn (of 6") and then only if he is guided by a rescuer.

Phineas may not be attacked by the harpies because they've been tasked with tormenting him and not slaying him.

The Heroes

The Argonauts entered the table from the southern side in a fairly classical formation, with heavy infantry in the centre and skirmishers on both flanks.

  • Jason the Argonaut (star, in the centre with the blue crest)
  • Meleager (co-star Brother in Arms, back rank, blue armour and bare head)
  • Antigone ("also starring" Amazon, with the long green dress, beside Jason)
  • 5 veterans with shield, armour and spear or sword.
  • 8 psiloi with javelins or bow.

The Harpies

The winged monsters set up in a ring around Phineas, centred on the ruined theatre in the middle of the table.
  • Podarge, "also starring" harpy leader.
  • 9 harpies with a mixture of sword, spear, bow and claws

The Game

Although the table had quite a bit of vegetation on it, the Argonauts decided to march straight up the middle, between the broken columns and towards the theatre.  All of the action would occur in just this quarter of the battlefield.

"Stand aside, please!" called Jason to the harpies.  His men may have felt uneasy at the dark shapes crouched on broken columns and ringing the ragged man who stood alone in the centre of the ruins, but the hero showed no sign that he was perturbed.  "We're just going to collect Phineas and then we'll leave".

The harpies were clearly not impressed by this bravado; they had no intention of giving up their plaything!  Uttering a series of awful screeches, the flock leaped into action.  Some of the monsters took wing and flew overhead to look for an opening, whilst others rushed forwards and attacked the heroes.  Laokoon, taken by surprise at the swiftness of this assault, fell immediately.  Antigone was engaged by Podarge, the leader of the harpies, and immediately took a wound from the terrible creature's attack.
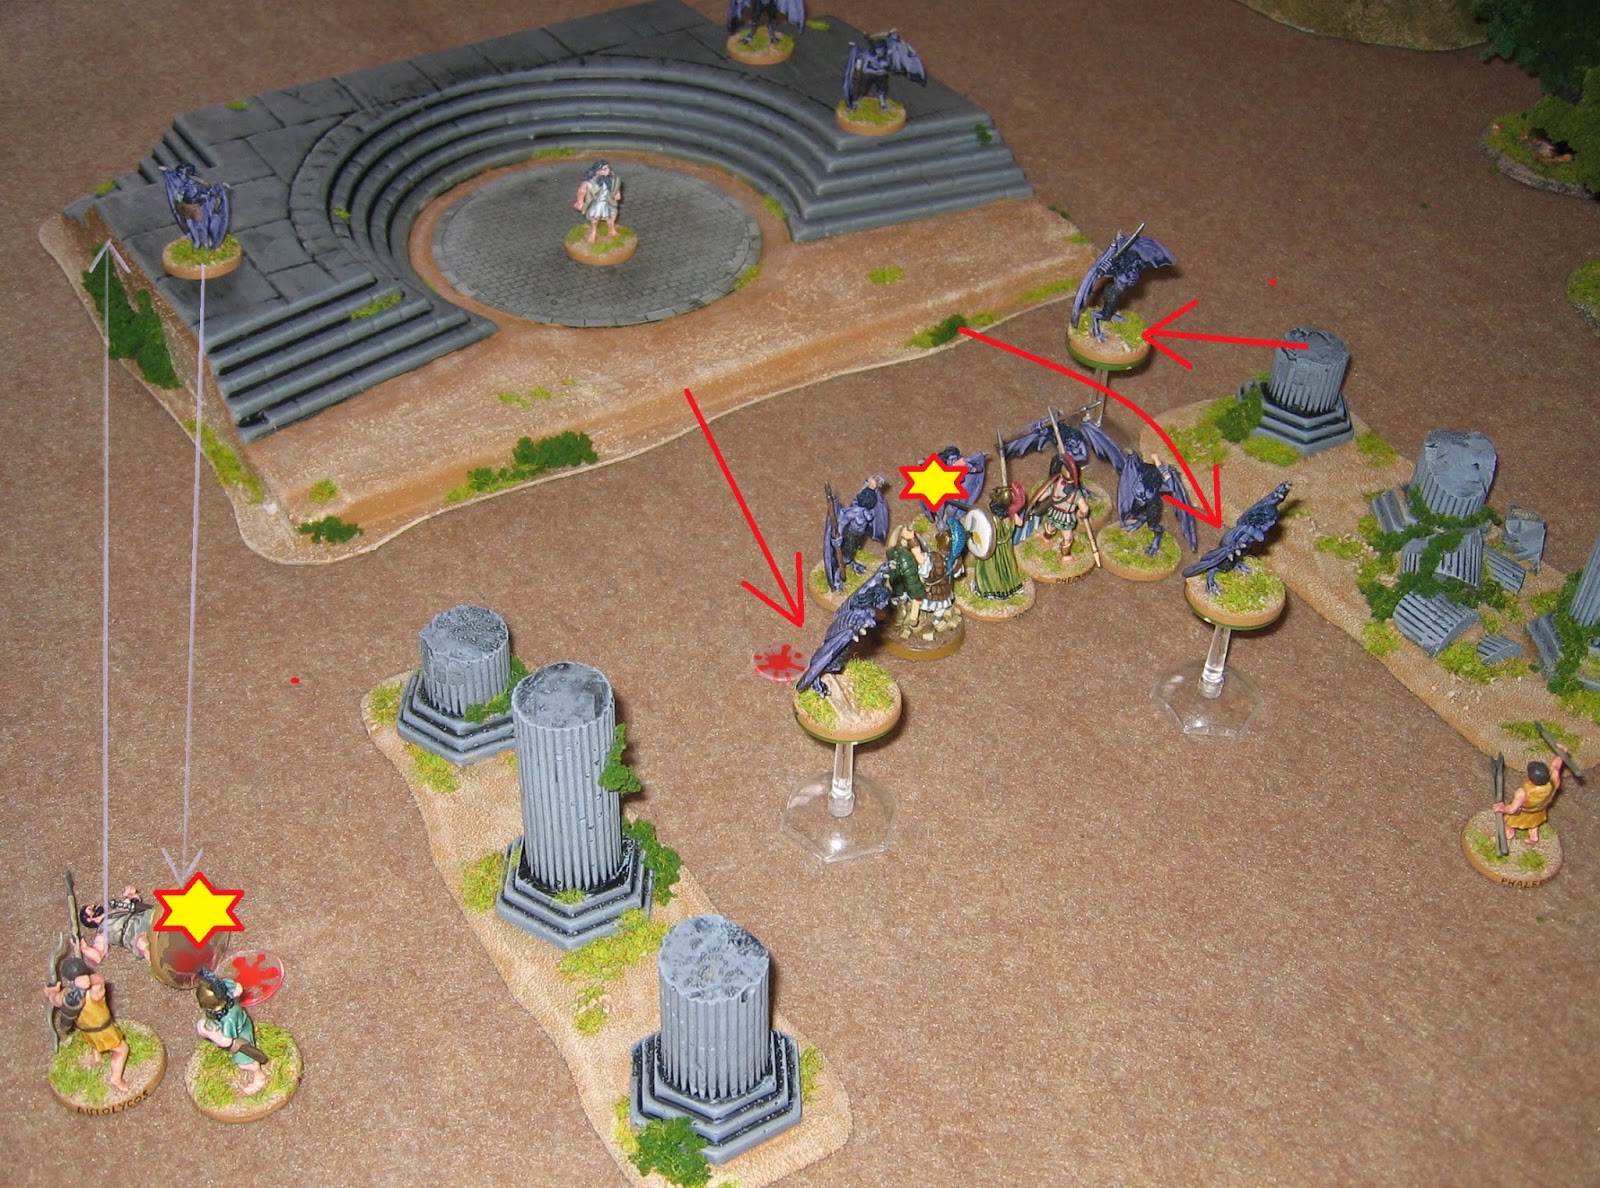
The men struggled to regain their composure, though Antigone the Amazon struck back at the harpy leader and drew blood.  More harpies flew overhead and it looked as if the leaders of the heroes would be swiftly surrounded and cut off from their friends.

On the left flank, psiloi loosed arrows at one of the harpies, but came off worse when one of them was slain by the harpy's return shot.

Quickly, Argonaut reinforcements rushed forwards.  Meleager took some of the pressure off Pheidippides, who had been holding 2 harpies at bay all on his own.  This wasn't without cost, though; Meleager's new opponent promptly injured him.  Apart from this, the tide started to swing, with both Jason and Pheidippides both managing to wound their opposite numbers.  Also, in a bravura show of marksmanship, Phaleros threw a javelin high at one of the flying harpies and pierced the creature's wing.

Almost unnoticed, the 3 psiloi on the right flank ran past the columns and towards Phineas.  Could they get there and rescue him before the harpies could react?
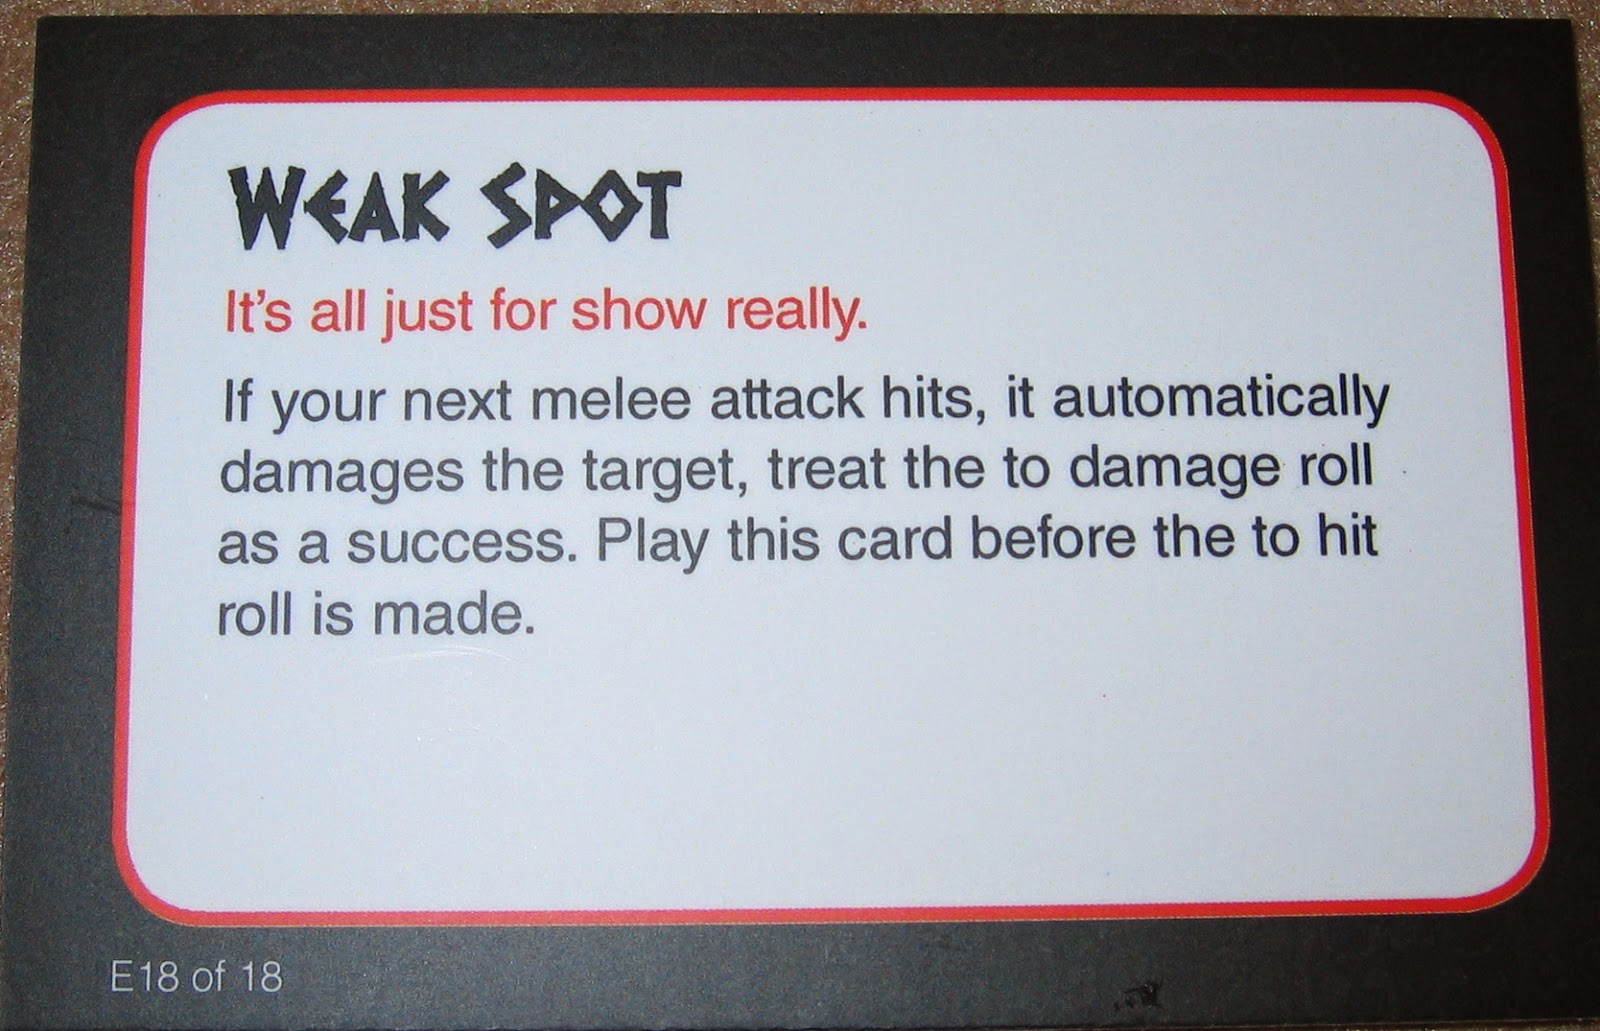
This was the moment that the harpies chose to play a "Weak Spot" event card.  The monster facing Jason struck at him with a blow that was obviously intended to hamstring him.  The clumsy strike missed, but it was obviously a feint as the harpy's next attack struck the hero in the arm and gashed him badly [sometimes this happens - the harpy missed the easy shot at the weak spot but then made the much harder, normal strike!].

The other harpies renewed their assault as well, killing the brave Pheidippides and moving to block the 3 young lads who were attempting to outflank them.  Augeas ran up to assist Phaleros, just as the harpy he had injured landed in front of him, snarling with rage.

For the Argonauts, Amphion (the last hoplite reserve) ran along the line of the columns to try to relieve the pressure on their leaders.  Encouraged by this. Meleager slashed at his opponent and drew blood from the foul monster.

In the chick fight in the centre, Antigone finally saw an opening and stabbed at Podarge.  Stupefied, the harpy felt the spear bite deep; she slid off the Amazon's weapon and fell to the ground, mortally wounded.

At the back, one of the javelinmen distracted the harpy in front of him, whilst his colleague ran past and grabbed the startled Phineas by the elbow.  "Come with me if you want to live!" the lad shouted - but already further harpies were taking to the skies in pursuit.

As Phineas and the psiloi ran and stumbled away from the theatre, the Argonauts struck back with renewed vigour.  Antigone ran to cover the brave lad, whilst both Jason and Augeas slew their opponents.  Another javelin-man ran up behind a third harpy and struck the creature a damaging blow from behind, whilst the Greek archers on the left flank finally achieved a hit on their opposite number.

The harpies gave chase to Phineas and his would-be rescuers, shrieking loudly.  Still, with their leader dead they seemed to be a bit sluggish and not as many of them reacted as before.

Jason now ran to assist the pursued humans, but he was too late.  Antigone spun round and impaled the harpy who was approaching her from behind; she left the creature dying in the dust.  At the same time, the Greek archers scored further hits on the harpy with the bow and killed the monster outright.

This was the final straw for the remaining harpies.  With 5 of their number down, the rest became shaken and most of them fled.  In turn, that meant that the flock was wiped out and all of the remainder also took to their wings and made off.  Jason and the Argonauts were victorious: Phineas was saved!

Conclusion

Although the final tally looks lop-sided (50% of the harpies dead in exchange for 2 hoplites and 2 psiloi), the game felt really close right up to the end.  Casts without some form of star leader are very brittle when they start to take casualties!

The Argonauts' flanking manoeuvre always seemed like a forlorn hope; there were just too many unengaged harpies and they might have been able to block such a move.  Surprisingly, it worked pretty much as intended - perhaps because the monsters just didn't have enough activations to chase the psiloi as well as fight the hoplites.

Could the harpies have made more use of their distinct characteristics (especially flying and screech)?  Possibly they could have used the flying to outnumber and surround the small groups of humans one at a time, but as it was the screeching was very effective in bringing further harpies into the fight.  It really did feel like fighting a flock of enraged birds!

(Wo)man of the match: Antigone, for sure!  She single-handedly slew the harpies' leader and then finished off another monster.  Jason struggled to deal with just one of the creatures and none of the other humans or any of the harpies were particularly distinguished in the fight.  Credit to Agaios, the teenager who ran through the harpies in just a tunic to rescue Phineas, though.

Wednesday, 15 April 2015

Battle Report: The Hunt for the Calydonian Boar

Introduction

In my last post, I promised that there would be 3 battle reports arising from my Saturday of gaming.  I gave you Robin Hood in "Song of Blades and Heroes" already; this time it's 7th Voyage and a visit to mythical Ancient Greece!

The hunt for the Calydonian Boar is a strange tale from the Olympian age.  Put simply, a monster boar was ravaging the district of Calydon in Aetolia.  The local king sent out a summons for heroes that was answered by many, including the Argonaut Meleager and the huntress Atalanta.  However, some of the others present objected to a woman taking part in a "man's" activity and this dissent spilled over into violence, resulting in a number of deaths.  I'll not reveal the classical ending here - you can do your own research to find out who lived and who died.  However, I will tell you that I believe Meleager fancied Atalanta (he certainly took her side), but she did not return his feelings!

The Hunt for the Calydonian Boar

This will be a standard Slay! mission from the 7th Voyage rulebook.  I've decided on quite a small skirmish, so we're playing it at 100 ratings on each side.  The original boar hunt involved 30 or 40 named heroes, but I'm going to rationalise this by claiming that the other hunters are spread out over a wide area; this scene represents just the climactic moment of the hunt.

The Heroes

  • Meleager, "Brother in Arms" co-star.
  • Atalanta, "Enchanting Beauty" co-star.  She has the magical Horn of the Hunt, which makes her fearsome when it is blown.  This could be used to scare any enemy extras, but importantly it means that she doesn't have to take fear tests herself when approaching the monster.
  • Laokoon and Amphion, veterans with spear, armour and shield
  • Eupythos, psiloi with bow

The Opposition

  • The Calydonian Boar, monstrous beast.  On its own this is worth more than the 2 co-stars; it's really nasty!
  • 4 dissenters (psiloi with javelins).
It might seem odd that the boar is "allied" with men, but in reality they have shared aims (drive off/kill the heroes) and little else in common.  Indeed, I was sorely tempted to make the dissenters subject to the boar's fearsome trait themselves, but in the end decided to avoid such a complication.

The Terrain

This skirmish was fought in a heavily wooded valley with a stream running through it.  Underbrush and trees would prevent movement and provide cover, while the stream could be waded at half speed, or crossed at the fords without penalty.

The Game

The heroes advanced cautiously across the ford.  There was no sign of the monster, though they could glimpse men hiding behind the trees up ahead.  "It's only a pig" said Meleager.  "I don't know why everyone is making such a fuss about this.  Just how fierce could it be?  Yes, I'm sure that it's bigger than average, but the whole "monster" thing is some peasant's exaggeration, if you ask me".

Just then, one of the dissenters jumped out of cover a good javelin's throw away.  "Go back to your cooking and spinning, woman." he shouted.  "We'll kill you if you come any further; you've no business here!"  Atalanta drew an arrow and shot him dead.

Meleager cheered.  "All riiight!" he crowed as he ran forwards to shield Atalanta.  "My turn now, if you please, my lady".  But it was Eupythos who shot dead the next enemy, after the dissenter foolishly peeked out of the tree in which he was hiding.

"Look out!" cried Atalanta, but it was too late.  Amidst a crash of breaking branches, a gigantic pig charged out of the undergrowth straight at the heroes.  It was as large as a horse - not as tall, perhaps, but longer and heavier and it had a wicked set of teeth set in an enormous jaw.  The creature's bull rush bowled Meleager over and he was gored as he fell to the ground.

At the same time, one of the dissenters used Atalanta's distraction to throw a javelin at her.  It hit the woman in the side and caused a painful flesh wound.  [Wow, both co-stars reduced to a single remaining hit in the same turn.  That's not good.].

This seemed like the perfect time for the heroic side to play a "High Drama" event card!  They won the turn's initiative roll by 1 and gained 2 extra Audience Appreciation tokens from the event.

Atalanta scurried backwards, out of javelin range, while Laokoon ran forward to help fight the boar.  While the creature's attention was on the newcomer, Meleager scrambled to his feet again.

Between them, the 2 hunters managed to knock the boar off its feet, at which point Laokoon stabbed it with his spear.  If it bleeds, it can be killed, right?

Atalanta took her revenge on the dissenter who had injured her.  As the man stood still, perhaps as shocked as the heroes by the sight of the monster, she shot him down.

But the beast wasn't finished yet!  It sprang to its feet and delivered terrible wounds to both Laokoon and Meleager.  Laokoon crumpled instantly in a heap, but Meleager swayed and stayed on his feet, pale as a ghost.

"Err, that can't be right.  Meleager should be dead, shouldn't he?" I can hear you all thinking.  Technically he had lost all his hits, but I quickly played a "Taking Your Time" event to draw out his death scene.  Cunning, huh?

Amphion now charged at the boar, but he missed his footing and slipped.  The creature was on him in a flash and had inflicted a mortal bite to the poor veteran.  But Meleager, dazed as he was, took the opportunity to sink his sword into the monster's side [so that's 2 of its 3 hits gone now].

The dying hero sank to the ground as Atalanta blew her horn and ran forwards.  The wounded boar used a "Flee" event card to put some distance between itself and the vengeful huntress, but it was still in bowshot range.  Before it could reach cover, Atalanta had loosed another arrow at it.  3+ to hit, with 1 Audience Appreciation token that I could use to adjust the score - and I rolled a '1'.  Some choice words went through my mind at that moment, I can tell you!

But then I remembered that Atalanta had 1 point of Luck, which could be used to re-roll a single dice once during the game.  If ever there was a time to use a re-roll, this was it!  The re-throw was a '6', so a palpable hit!

Now I just needed to wound the beast, needing a 5+.  OK, so I rolled again: a '4'.  Billions of blistering blue barnacles!!!  Ah, but the Audience Appreciation token could be spent to add +1 to this, even after the roll was made.  Hurrah - the boar was indeed wounded for the 3rd time and with that it expired.  The game was won by the heroic side!

Conclusion

This was an exciting game and went right down to the wire before the heroic side scored a narrow victory.  I did consider using 2 boars on the monster side to make it a rather bigger encounter, but in the end I think it worked well as a small skirmish.

One thing to note about very small skirmishes in 7th Voyage is that the morale tests for Shaken (50% casualties) and Wiped Out (75% casualties) can be devastating, especially as the former can trigger the latter if even a small number of extras flee .  In this game, both sides passed all such tests, but that's not guaranteed.

Good Points

  • The event cards were very characterful and gave some interesting decisions (do I use this card now for a +2 on the next dice roll to keep my hero safe, or do I keep it until I can play it for the printed text?)
  • The range of traits really do make a difference to the way that the extras play, let alone the stars.  I don't think that many men would have charged the monster in this scenario, but my brave veterans with Martial Training did so.

Not so good Points

  • Character design in 7th Voyage (and 7TV too, I imagine) is fiddly and requires much toing and froing in the rulebook.  This would be helped enormously if there was an online tool for building  your stars!
  • I still feel that melee combat is a bit static (I use each action to try to hit, then you hit back with your actions.  Repeat until someone is lucky enough to score damage).  Yes, I know that there are options to push back or knock over an opponent - and we did use these occasionally.  But they are choices and the default choice is usually just to go for a damaging blow instead.

Sunday, 12 April 2015

Battle Report: Robin Hood's Escape

Introduction

Today, my friend Steve visited and we spent the entire day gaming.  This doesn't happen very often, usually because of health issues or family needs in one or both of our households, but sometimes we do find a suitable conjunction in our calendars.

Anyway, we played a total of 3 miniatures games: 1 of Song of Blades and Heroes and 2 of 7th Voyage.  All of these will be described in due course.  I finished off the afternoon by introducing Steve to The Awful Green Things from Outer Space, in which I played the Green Things and lost very badly.  Still, I did destroy the crew's robot.

So, back to the first game...

Robin Hood's Escape


After the disaster at the tournament, the captive outlaw Robin Hood was thrown into the dungeons of a small castle to await the king's justice.  Maid Marion has learned of this and has vowed to assist him in escaping.  She has tricked her way past Sir Godfrey, the castellan, and his guards and has managed to open Robin's cell and pass him a sword.  Can the pair now escape to the safety of the outlaws' forest?

The Scenario


Robin and Marion must escape to the edge of the table behind the forest.  To do this, they will need to overcome or evade the guards at the castle and flee before a large relief force of the king's men arrives.  Some help is available though: there are some further outlaws in the forest.

Victory conditions are simple: if both Robin and Marion escape then the outlaws win a major victory; if Robin escapes alone then the outlaws have a minor victory; if Marion escapes but Robin doesn't then the sheriff has a minor victory, while if neither Robin nor Marion escape then the sheriff wins a total victory.

The outlaws take the first turn.

Forces

In the Castle

  • Outlaws: Robin Hood and Maid Marion.  Robin is armed, but doesn't have his bow as that sort of thing isn't stored anywhere near the dungeon.  He can collect a bow as he leaves the castle, though.  Marion has the 'distract' ability (in Song of Blades terms, this is just entangle) to represent the confusion caused by an apparently-loyal subject suddenly exhibiting such rebellious behaviour.
  • Sheriff: Sir Godfrey, 2 men-at-arms, 1 crossbowman.

Reinforcements

  • Outlaws: Little John and 4 merry men.
  • Sheriff: Sheriff of Nottingham, Guy of Gisborne, Sir Walter, 2 crossbowmen, 9 men-at-arms.
The sheriff has a lot more men than the outlaws, but most of them are rabble and are therefore not very good.  His knights are better than the average merry man, though.

The Game

Straight away, Marion told the castellan that she was absolutely not helping Robin Hood to escape, but instead just making a simple visit to enquire after the prisoner's welfare.  In the background, Robin slew one of the guards.

The outlaw chieftain continued his rampage; he charged at the confused knight and ran him through.  However Hodge, the remaining man-at-arms, was a bit quicker on the uptake than his boss had been.  "You bitch!" he shouted at Marion.  "You'll pay for this!".  He stepped forward and smashed Marion to the ground.

Bruised but still defiant, Marion clung to the enraged guard and impeded him enough for Robin to turn and slay him too (gruesome kill).  This was too much for the remaining crossbowman, who half ran and half tumbled down the steps to get away from the victorious outlaw.

The sheriff's column were still marching steadily along the road (I just couldn't get them to move any faster!), though the knights and crossbowmen were running on ahead.  They could see outlaws on the edge of the forest now, even though they were't yet aware of the breakout attempt at the castle.

Thinking that they were safe now, Robin and Marion ran down the steps of the castle.  They hadn't realised that the last remaining guard had stopped nearby.  He fired his crossbow and although the bolt missed, the distraction caused Robin to fall down several steps (ouch!).

Recovering quickly, the master archer loosed an arrow of his own at the troublesome crossbowman and slew him (another gruesome kill, but there were none of the Sheriff's men in range to be bothered by this).

Did the crossbowman die in vain?  Perhaps not, for the delay had allowed the vanguard of the sheriff's column to reach the road junction.  Just as Robin and Marion ran down the path towards their friends, Sir Guy of Gisborne stepped forward from his men to challenge the outlaw!

On the fringes of the forest, Sir Walter held off the merry men by hiding behind a hedge.  The outlaws loosed a few desultory arrows at him, but the knight was untroubled by this.  However, after a few turns, Little John had had enough.  "Sod this!" he exclaimed as he strode forward and felled Sir Walter with a single blow from his staff.

Seeing all the reinforcements coming, Robin and Marion attempted to evade - but Guy was too quick and managed to catch up.  "Coward!  Face me and die!" he shouted at his rival.

A file of soldiers followed the sheriff's orders and engaged Little John in an attempt to isolate and (ultimately) surround him.

As Marion ran past on her way towards the forest, Robin and Guy fenced each other for several turns.  They were evenly matched; neither could land a telling blow on the other.  Sometimes Guy forced Robin to take a step backwards, whilst on other occasions Robin landed a blow that was only deflected by the knight's armour.

All the time, more men-at-arms were arriving, though they were not yet close enough to intervene on Guy's behalf..  Little John attempted to reach his friend, but was constantly engaged by the sheriff's spearmen.

Just short of the forest, the fleeing Maid Marion was intercepted by the Sheriff.  He had been skulking in the background until this point, urging his men forward.  However, when he saw Marion alone in the distance, he caught up and grabbed her by the arm.  "Not so fast, my lady" he said.  "You seem to be running away, but from whom?  What is your part in this affair?"

"Of course I'm escaping, you idiot!" she replied.  "They're fighting back there; I don't want to get hurt!"  The sheriff was distracted momentarily, but he recovered quickly.  "No, I think you're assisting the outlaw, Robin Hood!" he returned.  "You're going to spend a good, long spell in a dungeon.  Let's see if that changes your disrespectful tone" (muah ha ha!)

Just as Guy forced Robin backwards again, one of the merry men loosed another arrow and finally achieved success.  He hit a man at arms who was charging towards him and felled the soldier.  Not only that, it was another gruesome kill, which would mean a morale test for all the sheriff's men that were within 'L' distance.  Fortunately, Guy of Gisborne was fearless, which made him immune to such tests - the rabble soldiers weren't so important.

As if the prospect of the men-at-arms running wasn't bad enough, this single casualty took the sheriff's forces to half strength, which would cause a morale test for all the remainder - including Guy.  But hey - he was Q3+, so I wasn't too worried.  3 dice, needing 3+ on at least one of them?

Predictably, I threw the dice for Guy's morale test and got 2, 2, 2.  He panicked and fled so fast that you couldn't see him for dust.  Most of the remaining soldiers also fled, though the few that lingered were no match for the outlaw heroes (and they knew it).

The sheriff was, surprisingly, unaffected by this rout.  Perhaps he was too far away to see the full extent of the disaster, or perhaps he just expected his minions to let him down like this.  Anyway, he decided to retreat voluntarily.  "This isn't over!" he hissed to Marion.  "Enjoy your life with the outlaws while you can, for it won't be long before they are all destroyed and you can then rot in a dungeon forever!"  With these parting words, he ran off before the triumphant Robin and his men could reach him.

Conclusion

A major victory for the outlaws.  Not only did Robin and Marion escape, but none of the merry men were hurt!  That is to say, none were killed, though both Robin and Marion must have had scrapes, cuts and bruises from their adventures.

As the player of the sheriff's forces, my main consolation is that the evil man didn't kill any of his own men during this game.  I think that's the first time that he hasn't knifed at least one underling who failed him!

So, Song of Blades and Heroes delivers again!  There were some moments of high drama and the game never felt hopeless for either side right up to the end.  Very cinematic.

Having said that, I'm thinking of removing the rabble characteristic from the sheriff's men-at-arms.  It means that he'd have fewer of them, but they wouldn't be quite such pushovers!

Tuesday, 7 April 2015

Lost World: the Lucid Eye Simians

Introduction

It's been a long while since I posted anything about my Lost World collection.  It's a genre which hasn't had much coverage on my blog.  Indeed, it's been 2 1/2 years since I wrote about the large beasties (megafauna).  That doesn't mean that I've given up on it, though.

A couple of recent events have reawakened my interest in the Lost World setting.  Firstly, Steve Barber Models has announced a reworking of the old Prehistoric Settlement game; there will be a nice range of cavemen and Ice Age beasties to support this.  Secondly, the well-known figure sculptor Steve Saleh has created the Lucid Eye range of figures, currently available from Arcane Scenery.  These are specifically aimed at Lost World/Hollow Earth scenarios and the range already has such curios as Atlanteans, Neanderthals and Amazons.  However, the figures that immediately caught my eye were the simians.

Lucid Eye Simians

I've been looking for figures that I could use as early hominids for almost as long as I've been collecting prehistoric figures.  They have to be more than apes, but not as advanced as (or recognisable as) early humans.  As soon as I saw the Lucid Eye simians, I knew that they would do nicely!  They might or might not be based more on fiction than on palaeontology (I'm not an expert on this), but for my purposes that doesn't matter at all.

From the left, "Kobo", "Hurkey", "Skeech" and "Zaius"
 There are 2 packs of simian figures in the range at the moment.  Firstly we have a set of 4 ape men in assorted poses.  They all have weapons; 2 of them have well-made flint spears whilst the other pair have a tree branch and a large bone.  Are they intelligent and skilled enough to have created the spears themselves?  Or did they pinch them from some nearby humans?  I'm not sure and I think I would have preferred less advanced tools - perhaps a simple sharpened stick or a handy-sized rock instead.  Oddly, it only occurred to me after painting these models that I could have converted them very easily.  D'oh!

The SCT32 pack of 4 simians is currently retailing for £7.49, plus postage of course.

I'll call him "Caesar"
 Next, we have the alpha simian.  He's much the same size as the other creatures, but has perhaps a more thoughtful (yet still challenging) stare rather than the raw aggression of the other members of the tribe.  Alpha also has a flint spear, though again it would have been very easy to replace it with a tree branch or some other type of tool.

SCT31 Alpha Simian costs £2.99, thus making him almost twice as expensive (ape for ape) as any of the grunts (and I use that term intentionally!).

 Here's the entire tribe, all together.  It would be very nice if another set or two of simians were to be produced (perhaps some females or adolescents?), but this isn't really necessary.  I could easily build quite a large troop from the models already available, especially with some conversions of their weapons and some different painting (darker for the leaders, grey for the older hominids, perhaps?)

These hominids are actually quite small models.  I've mounted them on 20mm washers, rather than my normal 25mm bases.  They're definitely not in the "giant killer ape" category (unless used with 15mm figures), but then there are plenty of models of gorillas or yetis to fill that niche already.  No, these will do just fine as early hominids in my games.

I can also see them being used as Tarzan's ape family in a more Victorian setting, or even as hostile natives in a remote part of any Pulp world.  Finally, these models are very reminiscent of the chimps and other simians in the "Rise of the Planet of the Apes" film.  They could easily be used in a modern setting as hyper-intelligent laboratory animals bent on escaping from their slavery - change their flint spears for stolen pool cues or cattle prods.  Now there's an idea for a game!

Tuesday, 31 March 2015

Dreadball: Match Day!

Introduction

"Play Ball!"
The last time I wrote a post about Dreadball, several of you asked for pictures of a match in progress, or perhaps a "highlights" set.  Well, I thought about it, but decided to try something different.  When we played our next game after that, I put my camera on a tripod and took 1 picture after each and every move.  The edited series of pictures was then loaded into Windows Movie Maker and strung together to make the movie you can see below.

Match Day

"Welcome to Riverside Stadium on this fine Spring evening.  Tonight, the Pink Ladies are at home to the Sky City Slammers and we expect to see some fine Dreadball action.  The Ladies are riding high in the Colgrain League this year after some big wins early on, but defeat in a recent game shows that they can be beaten.  On the other hand, the Slammers have everything to prove after a series of mediocre results."

"Both teams are humans, of course and will therefore have similar physical characteristics of speed, strength and so on.  Don't be fooled into thinking that their gameplay is the same, though: the Pink Ladies place a lot of emphasis on running interference and extreme levels of coaching, whereas the Slammers rely on allowing individual players to take the initiative.  We'll see tonight which strategy works better."

"For this game, the Ladies have announced that they'll be fielding "Wildcard".  The brunette is very fast and skillful, but doesn't always seem very engaged with her team.  The Slammers have the contract for "Lucky" Logan; he's always a tough opponent.  Interestingly, neither of these players wears a helmet on the pitch, relying on speed and luck to avoid serious injury.  We'll see how well that works!"


Conclusion

I'm not sure how well this format works.  Obviously there is quite a bit of shake, partly because I don't have a remote release for the camera and partly because people sometimes knock things as they walk past.  There's also quite a lot of clutter around the edges, including intermittent hands, dice and tokens.

It took probably a couple of hours to annotate the 90 or so original images, followed by 5 minutes or less to actually make the movie, so it's quite a lot of work.  And that's without any attempt at adding a soundtrack!

Still, it's good that we try these things occasionally, isn't it?  This was a new technical challenge to me and one that I hope I (and maybe others?) can learn from.


Friday, 27 March 2015

The Lords of Strathclyde

Introduction

A few weeks ago, I showed Coroticus, the warlord for my in-progress SAGA Strathclyde force.  I bought this starter army at Claymore, in August last year, so it's about time that I made some progress on it.  Today it's the turn of the warlord's inner circle/hearthguard, the "Teulu".

The Teulu

I have 8 models here, so that accounts for 2 points of value from the 4 point SAGA starter army.  If you leave the warlord out then these guys are half the cost of the warband all on their own!

All of the Teulu are riding ponies and carrying short spears, swords or both.  7 of the 8 men are clad in mail, though interestingly the one in the pale cloak and blue/white tunic (at the back left) has a leather cuirass instead.  I've just realised that this detail isn't really visible in any of the pictures, though the last image shows a little bit.

The figures are from Gripping Beast, whilst the shield and banner transfers are from Little Big Men.

One of the Teulu carries a horn and I've converted one of the others to carry a banner.  Both of these figures cannot really carry shields in their left hands.  I did want these upper class warriors to have all the best equipment though, so I attached the shields to their backs instead.

The standard bearer already had a leather strap across his shoulder (for his scabbard, really), so I didn't feel the need to add any extra support for the shield.  However the horn blower looked odd with nothing to hold the shield on his back.  I gave him a strap of green stuff across his chest and shoulder; at least it looks plausible to me as a support.

Most of these men have either patterned tunics (using my "not tartan" style) or they have decorative borders on their cloaks, or both.  Their clothing and shields are also somewhat brighter and more colourful than the average Dark Age citizen.  These, along with the armour and relatively abundant equipment, mark them out as richer and generally higher status individuals.

As with all my SAGA forces, the bases carry useful information.  In this case, the grey border marks them out as belonging to the Strathclyde faction (it's very useful to be be able to tell the factions apart during a game!).  In addition, they all have suitable names, just to give the force a bit more character.  Of course, being Welsh (and ancient Welsh, at that), I cannot pronounce some of them...

Conclusion

I've still got 2 points of warriors to paint, so that's another 16 ponies.  I'm beginning to hate preparation work for these animals, as they all have quite a bit of flash and damage that needs to be cut off.  I think that some of Gripping Beast's horse moulds have been very heavily used!  Still, the basic warriors are fine figures; they should be much plainer than the Teulu and therefore simpler to paint.

It'll be interesting to try an all-mounted force in SAGA, especially one that has the option of part of the force arriving during the game - from any table edge!