Showing posts with label Amera. Show all posts

Saturday, 7 July 2018

Batrep: Tintin in Tunisia

Introduction

Another Thursday, another night at the Helensburgh games club.  This time, it's Pulp Alley again, with a 4-player game set amidst the ancient ruins of a Carthaginian or Greek colony in Mediterranean North Africa.  We had 2 of the same players as the last game which involved these leagues; the other 2 players were new to Pulp Alley.

The Setup


In the remote, ruined town of Hadrumetum, someone has been conducting unauthorised excavations.  According to local reports, this was a large, well-organised group - possibly from somewhere in central Europe.  Rumours suggest that they weren't interested in the archaeology but were instead looking for something very specific, though no-one knows what was their target.

It appears that the foreigners have left their camp temporarily; no-one knows why.  This would be a good time to descend upon it and find out what's happening!

The table is set up as follows:

Objectives:

  • The major plot point is the loaded truck in the middle of the site.  It's full of crates and looks as if it is ready to depart.  Perhaps the site owners found what they were seeking and it's in one of the boxes?  Got to be worth a look!
  • 4 diggers/camp servants are minor plot points.  They might be able to tell something useful about recent events, if you can speak their language (and not scare them too much!).
  • The camp radio and a packed suitcase are minor plot points; they could have clues as to the identity of the Europeans.
  • This is an ancient and interesting site: the ancient pile of skulls may reveal information about the original site's history.  There's also a rare purple orchid growing here; it's said that the pollen from this flower has medicinal properties, or perhaps it can be used for dark science.  Both of these are further minor plot points.

Dangers:

  • The camp fire is still smoking and occasionally spitting out embers; it is perilous.
  • The amphitheatre has steep side walls.  Attempting to cross these where there are no steps is perilous.
  • Climbing one of the ruined pillars (should anyone care to try it!) is also perilous.
  • The area is infested with poisonous snakes.  Swarms of these move at the end of each turn (1d6" in a random direction); any model which activates within 3" of such a swarm will be subject to extreme peril.

Combatants:

The semi-deserted site and its mysteries have attracted the attention of four leagues:

Idaho Smith (and the M.I.T. Archaeolgical Society)

Idaho Smith, Marion Allen, Kerem, Indiana (the bloodhound), Mother and Lady Constance
Idaho used his Network of Supporters to recruit Lady Constance, a keen amateur historian and accomplished shot.

The Mummy

The Mummy, and 3 fearsome Tomb Guardians.  He also has a scarab swarm (not shown in this picture)

Tintin

Tintin, Snowy, Captain Haddock, Professor Calculus

Doctor Demento

Doctor Demento and 4 of his Zorgl slave creatures.  The Doctor hasn't waited for the start of the game, but is already investigating the purple orchid with a view to extracting rare & deadly chemicals from it.

The Game


Before Tintin could even move, his followers were beset by horrors!  A skeletal warrior clawed its way up from the sands to attack Snowy [courtesy of a hostile Fate card], whilst a scarab swarm scuttled towards Professor Calculus.


Snowy dodged his boney attacker easily enough, then Tintin emptied an entire clip of bullets into it to destroy it for good.


On the other side, Captain Haddock ran to the rescue of Professor Calculus.  He stomped all over the beetle swarm, dispersing it temporarily.

These actions didn't injure any of TinTin's followers, but they did delay them considerably.  It looks as if someone was trying to interfere with their plans!


In another opening skirmish, a Tomb Guardian charged and felled Kerem, but was then shot down by Marion Allen.


Elsewhere, Doctor Demento wasn't even slightly bothered by the approaching snakes.  Kicking the nearest serpent out of the way, he collected the purple orchid with ease.


Not so the Mummy!  The undead lord approached the camp radio, but he just couldn't figure it out.  Hardly surprising, really: they don't have such things where he comes from...


Things were still not going well for Tintin's followers.  Professor Calculus approached an Arab digger, but the rough workman knocked him down [the Professor failed a peril when attempting this plot point].

Snowy ran up to help, but was subjected to a desperate, flailing charge by a Zorgl.  The little dog didn't jump out of the way quickly enough and took a nasty buffet to the side of the head.


After a couple of turns, this is how things stood:
  • Tintin himself had moved only a short way before he was attacked by a pair of Tomb Guardians.  Someone really has it in for him!
  • Zorgls advanced quickly; they seemed to be everywhere; chasing Snowy, grasping at an Arab digger and uncovering a pile of skulls!  One of them was even reaching for the door of the truck in the centre of the campsite.
  • The Mummy was still struggling with the new-fangled technology of the radio.
  • Idaho Smith and most of his group were conferring on how best to avoid the spluttering camp fire on one side and the nest of vipers on the other.  They did at least pick up the luggage which had been left nearby.


The Zorgl continued to chase Snowy, but this time the little dog evaded the clutches of the hairy monster.  It was then attacked and knocked down by an unlikely alliance of Captain Haddock attacking it from one side and a Tomb Guardian on the other.  However, the Zorgls in our games have an incredible reputation for passing health checks for recovery; the creature just stood up again.


Tintin evaded the other Tomb Guardian and ran towards the truck.  As he did so, he heard the crack of a rifle - but the shot wasn't aimed at him.  Instead, it bowled over the Zorgl who was on the other side of the vehicle [I told you that Lady Constance was a fine shot...


...and that was her last bullet.  Things were looking up!]


Tintin's optimism was short-lived, though:
  • The Mummy finally figured out the radio; he then decided that he was now familiar enough with machinery to approach the truck.
  • Tintin was still under threat; this time it was a Zorgl which left the Arab digger it had been pestering in order to attack the boy reporter.
  • Snowy, newly recovered from the ringing in his ears, raced around the ruins towards the now-unclaimed digger.
  • Doctor Demento strode purposefully into the centre of the amphitheatre and unleashed a mind blast on all those around.  Whilst this affected a goodly number of foes [i.e pretty much all of The Mummy's and Tintin's leagues!], most of them were stout enough to avoid any ill effects.


Indeed, Doctor Demento spent pretty much the entire second half of the game amusing himself in this manner; standing in the same spot and issuing blast after blast to discomfort all those within the central area.  There were usually at least one or two enemies each turn who just couldn't take the pressure in their brains, though the repeated blasts of psychic energy were probably an irritant rather than a game-changing tactic.


Idaho Smith and his group had finally plucked up courage to pass by the campsite snakes.  However, Mother wasn't careful enough; she was bitten by a particularly aggressive asp and collapsed immediately [a "3 successes or take 3 hits" peril is almost impossible for a mere follower to pass; she was very unlucky to draw this].


Once past the snakes, Indiana charged the nearest enemy.  This happened to be one of the (many!) Zorgls who were clustered around the truck.  The wily dog showed several moves [Old One-Two, One Way or Another] before sinking his teeth into the hairy monster's leg - only to find that his best bite had no effect after all [Hit or Miss]!


Finally, one of Tintin's group attempted a plot point!  Snowy grabbed at the hem of an Arab digger's rode - only to find that the "digger" was just a dummy, a crudely-made scarecrow.  Strange...


After his initial rush, Indiana was unable to keep up the momentum.  He was knocked down by the Zorgl, but Idaho Smith raced in to help his beloved dog and flattened the Zorgl in return.

Meanwhile, the nearest other Zorgl had recovered from its bullet wound and was trying again to get into the truck's cab.

At the back, Marion Allen had decided to start up the other, unladen truck in the hope of ramming & disabling the laden one in case anyone else looked like they were going to drive it away.  It was a good plan, but the door to this second vehicle seemed to be a bit stiff...


In a desperate attempt to talk to one of the last unclaimed Arab diggers, Captain Haddock sucker-punched the Zorgl who stood in his way, before playing a "Stay Down" card to prevent it from recovering immediately.  However, the good Captain then had an attack of the vapours [i.e. one of Doctor Demento's mind blasts got through to him] and by the time he had recovered from that it was too late to complete that plot point successfully.


The Mummy's scarab beetles approached another Arab with a view to carrying him off for a terrifying questioning by their boss at a later stage.  Only here's the thing: this "digger" was also a scarecrow, a poorly-dressed imitation of a real man.  What on earth was going on?  [No, seriously - there aren't many Red Herring cards in the rewards deck, so how did we manage to draw two of them so close together?].


"Everybody was Zorgl fighting..."
As the end of the game approached, the Mummy decided to stop the Zorgl who was trying to make off with the truck.  The undead lord ignored the other nearby squabbles (Tintin vs a Zorgl, Idaho & Indiana vs a Zorgl) and instead marched towards his chosen victim.

Firstly, he moved close and issued the Mummy's Curse [because otherwise that turn he'd have had to charge the closest enemy - Tintin].  The curse incapacitated the Zorgl temporarily; when the creature stood up again at the end of the turn, the Mummy charged into combat and felled the hairy beast [he used a "Finish It!" fate card to make certain that the Zorgl wouldn't just get back up].

Incredibly, the Mummy took some hurt himself from this encounter!


Idaho and Indiana backed away from the remaining Zorgl, freeing it up to attack the Mummy.  Between this melee and Idaho's shooting, the Mummy took another hit and started to look a lot less tough than he had before.  Importantly, this had preventing him from reaching the truck door - so far.


Sensing an opening, Idaho set his dog on the stumbling Mummy; if Indiana could just clear the enemy out of the way then Idaho would have one chance to reach the truck.  He even made the fight a bit more vicious by playing a "Rivalry" card - but nothing came of it.  The bloodhound and the reanimated corpse remained locked in combat with neither side prevailing.  There was no way past for the archaeologist to claim the prize.


Marion Allen had managed to start up the second truck, though she hadn't yet had time to move it and achieve the rest of her plan (to block the laden truck & prevent it from leaving).

Finally, there were only two characters left to activate in the very last turn of the game.  The last Zorgl attacked Tintin, but this time the young man fought back.  He slammed its head against the side of the vehicle and the monster slumped down, temporarily unconscious.

That left Tintin as the only character still to have a go in the last turn of the game.  So far, his league had failed to claim any objectives, but he now had a clear route to the truck.  That's a major objective; if Tintin could claim it then the 3 victory points would be enough to win the game.  No other league had more than 2VP at this point...


Nothing could stop Tintin now!  He leaped into the truck and looked for the button to start the engine.

The truck's controls were smashed and broken.  Glancing behind him, Tintin could see that all the crates and boxes in the rear were empty and torn.  The whole thing was a setup!  But who had known they were coming, in order to populate such a ruse?  And why?

[Another Red Herring?  What are the odds of that?!   Hmm, it looks as if there is more to this than meets the eye...]


Final results


It's a tie for first place!  Doctor Demento achieved 2 plot points (the purple orchid and the pile of skulls)...


...and Idaho Smith also had 2 minor plot points (the luggage and an Arab digger - a real man rather than one of the scarecrows used to confuse everyone else).


The Mummy's crew had just a single plot point (the radio)

Lastly, Tintin and his followers didn't achieve any plot points at all.


Conclusion

That was a thrilling game, but with a totally unexpected twist at the end!  Of the 8 minor and 1 major objectives, only 5 minor plot points were achieved.  3 of the rest were Red Herrings; the final minor plot point was not attempted successfully.  It seems that there are other forces at work here.  Perhaps those mysterious central Europeans who set up this dig aren't all they seem?  But then what are they trying to achieve?

Zorgls are tough!  They passed every single recovery roll that they made; if they were knocked down then they just got back up; I lost count after 5 recoveries in a row.  At 50% odds, you'd think they would fail some of these rolls occasionally, but in this game the only time a Zorgl was knocked out permanently was when someone played a Fate card to prevent it from even making a recovery roll.  Something very similar happened in the last game too [and this is how reputations born...].

Maybe another game is needed to settle this once and for all?!

Monday, 4 May 2015

Amera: the Terrace

Introduction

I managed to play a couple of games today with my sons, whilst the visiting relatives were out shopping in the big city.  To tease: I'll have reports of a small All Things Zombie game and a larger SAGA battle some time soon - but not today!  Instead, now is the time for description of another vac-formed terrain piece from Amera.  So, what have we got here?

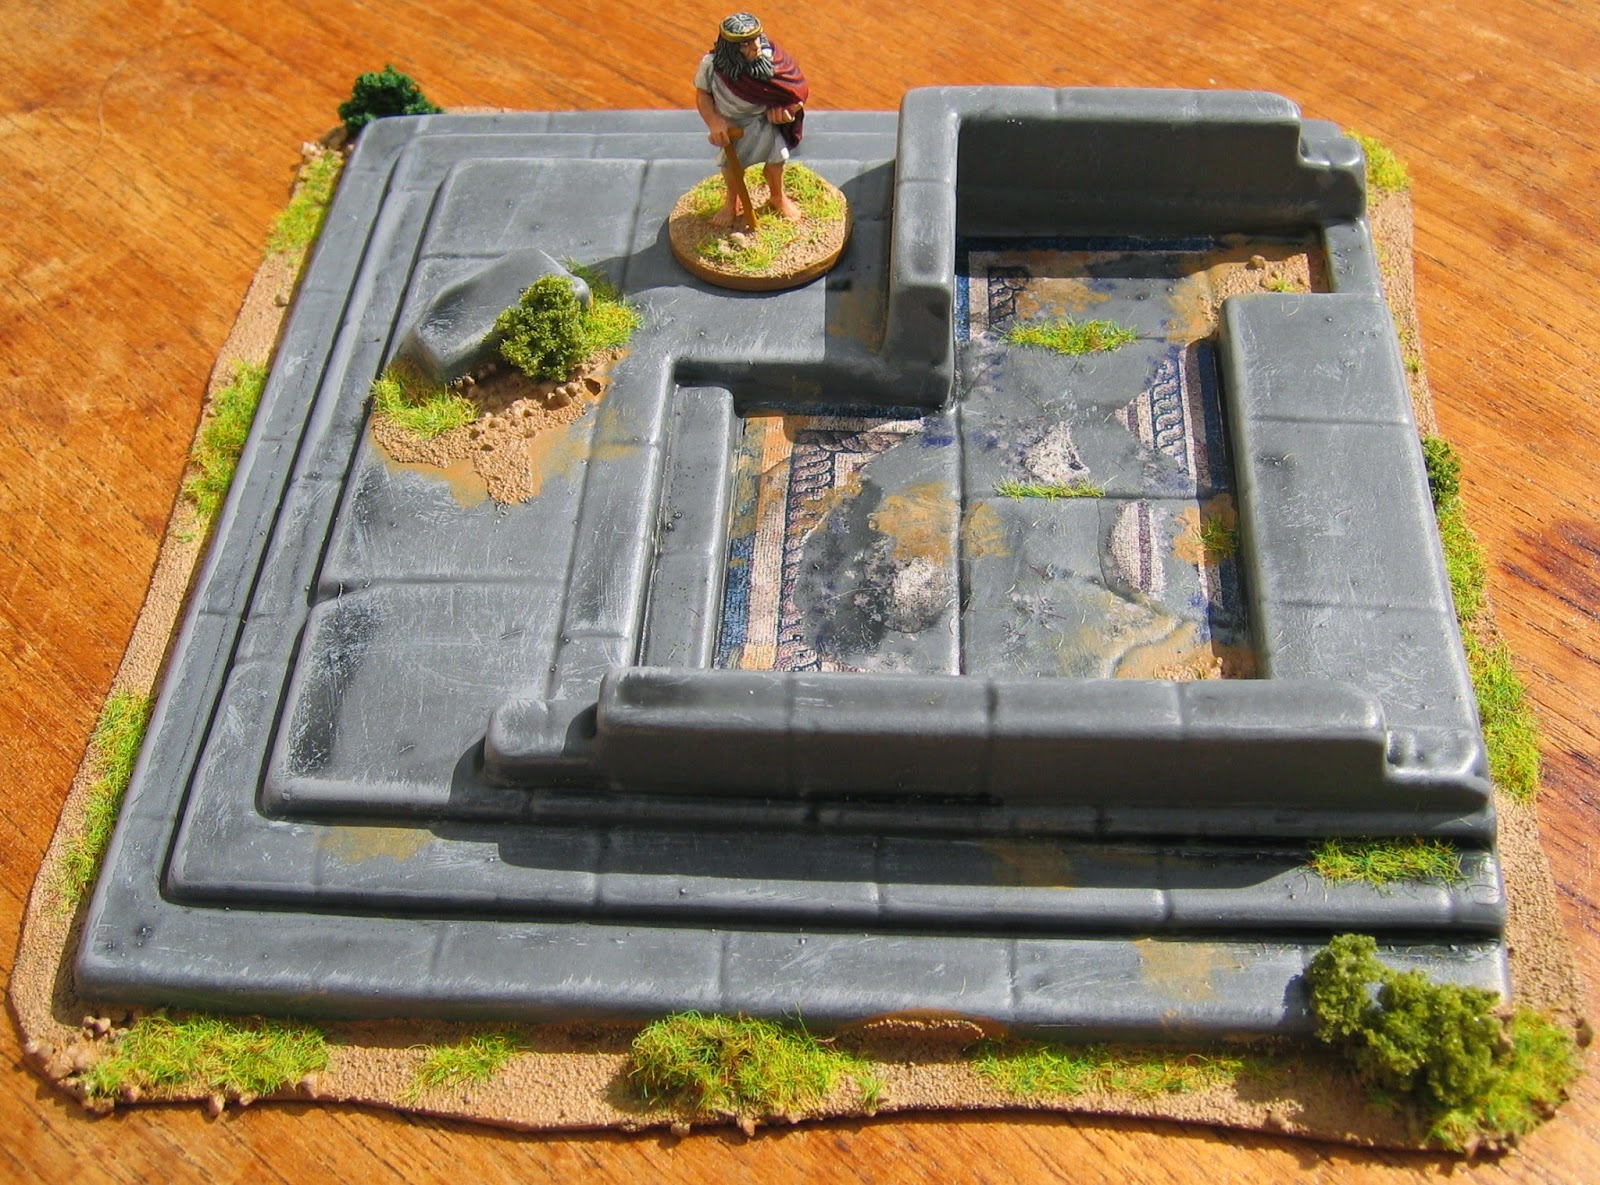
F207 Terrace Ruins

F207 Terrace Ruins is the smallest of the various Amera terrain pieces that I've bought so far; excluding the rim at the base it measures just about 15cm (6") square.  It comprises a series of wide, shallow steps leading into a building with low walls and a sunken floor.  The building has a step up to a small back door, or maybe it's the start of a further staircase, or a fallen block across a passageway...

This was a very simple piece to finish.  I've followed my normal method for "ruins", though it probably takes longer to describe than it does to paint:

  • Trim the base to produce a slightly less regular outline than the model had before.
  • Coat the rim with tacky glue and sprinkle with grit and sand.  Do the same for a few patches inside the ruin where dirt has accumulated.
  • Undercoat with grey car paint.
  • Wash the stonework with black.
  • Drybrush the edges of the stonework with pale grey.
  • Paint the dirt with a middle brown - I used DecoArt "cocoa".
  • Highlight the dirt with tan, then again with "antique white" ( a pale tan).
  • Stick some clump foliage and static grass to the model, concentrating on the rim and on the joints between the flagstones.


I thought that the terrace looked a little bland even after this, so I added one last touch.  I found some pictures of Roman mosaic floors from the internet and printed one of them out (at a size of 3" x 2", from memory).  I then tore this into fragments and used some of them to decorate the sunken part of the building.  Obviously this was a high-status building before it was ruined!

Conclusion

The Terrace Ruins is a strange piece of terrain.  On the face of it, it doesn't look to me to be particularly ruined.  Apart from a single block of masonry, the walls and floor slabs seem as if they might have been designed to be as they are now, though for what purpose?  I suppose that there might be other blocks missing; they might have been carted away by locals to use as an easy supply of building materials rather than left lying about.  We'll never know...

Even if the walls were higher before being ruined, I still cannot quite work out what the sunken "room" might have been.  It seems odd to climb the terrace steps only to then descend into the building.  I don't quite see the point of this.  Mind you, the lowered area would make a brilliant water feature if filled with some suitable clear compound (see my earlier ruined bathhouse for a similar concept).  If converted in this way, the steps down into the terrace building would make a bit more sense, I think.  Perhaps this was a reservoir or the rather fancy head of a spring or well?

Or maybe I'm over-thinking this; at just £3 this is cheap terrain and I should just accept it as such!  I'll most certainly use it for my Greek Myth games, as well as any other genres which require some ruins of antiquity for the opponents to fight across.  Maybe some pulp archaeologist could lead an expedition to figure out what was the purpose of this building?

Saturday, 21 March 2015

Raising the Flag

Introduction

A little while ago, I showed how I had painted the Amera F214 Castle Keep.  At the time, I observed that the model would be improved by the addition of a flag.  Even though this was really a throwaway observation, I thought that I detected a subtle note of disappointment from my loyal followers that I hadn't attempted such an enhancement already.

Well, I haven't been able to come up with any compelling reason why I couldn't add a banner to the model, so I sat down this morning and got on with it.  Total time spent was perhaps 30 minutes on the build and rather more on the computer (designing the flag), so this wasn't a difficult project!

Materials

 The flag itself is made from paper.  I drew a suitable shape on the computer and filled it with an appropriate design (the golden, double-headed eagle on a black background matches the heraldry used by some of the Sheriff of Nottingham's men-at-arms in my Robin Hood collection).  This paper flag was then fixed to a simple flagstaff made from 2 pieces of bamboo skewer, notched slightly and glued perpendicular to each other.

Since I wanted the flag to be removable (partly for ease of storage and partly so that I could use different banners in the future), I made the pole much longer than you might have thought necessary.  The socket itself was created by cutting down the casing of a cheap pen that had just stopped working, very conveniently for me!

To brace the socket and prevent it from tearing off the model, I cut out 4 right-angled triangles from thick plasticard (though I imagine that any stiff material - scraps of cardboard, MDF or plastic - would do).  Originally I had made these triangular, with shorter sides of about 2.5" (8cm).  However when I tested them, I realised that they were too deep and so I cut the tips off them.  These parts are structural rather than aesthetic and therefore my original mistake won't matter in the finished model, but it does show once again the importance of dry-fitting everything before applying any glue!

Assembly

Working from the underside of the model, I drilled a hole in the middle of the keep.  This was just large enough for the flagpole to fit loosely.

 I cut down the pen casing to the right length and glued it over the hole, taking care to ensure that it was perpendicular to the surface.  Note: check the length before gluing!  You really don't want the pen to stick out below the base of the model!

The last part of the construction was to glue the 4 supports around the pen casing, thus giving the socket a considerable amount of support.

Finally, turn the model over and drop the flagstaff into the hole.  Simple!

Conclusions

  • The flag and staff were made very quickly and without much attention to detail, but there's no reason why one couldn't spend a lot more effort on such a piece.
  • I did consider placing the socket in one of the corners of the keep, instead of in the centre.  However it would have been greatly more difficult to work with the sloped plastic that is found there, so in the end I went with the much simpler option: the middle of the courtyard.
  • When the flag is removed, the hole in the courtyard is barely visible (and would be even less so if I dabbed a little black paint over the edges of the drilled plastic).  I can still use the keep without a banner, if I desire.


Tuesday, 24 February 2015

The Amera Castle

Introduction

I'm a great fan of vac-formed plastic for terrain.  It's light and cheap and easy to work.  Some people may find the lack of detail to be an issue, but it doesn't bother me.  I have fond memories as a child of buying many of the old Bellona pieces, though sadly they are long gone and there doesn't seem to be much archive data about them on the internet.

The parcel from Amera, with a 12" (30cm) ruler for reference and some of the packaging material removed to create a better view.
 A short while ago, I ordered a few products from Amera.  My first thought when the parcel was delivered was "Oh, my - it's a huge box".  Dimensions are given for each of the products in their catalogue, but I hadn't paid much attention to them.  OK, that's not really a problem - terrain features shouldn't be too cramped or else figures won't fit in them!

The Castle Keep (F214)

Rather than describe all the pieces in the box, I'll show how I handled just one from start to finish.  This is mainly because it's the model that I've finished; the others have all been started but progress on them hasn't been as swift.  Hopefully this will also give you the idea that these pieces are really quick and easy to prepare.

The castle keep consists of a small rectangle of crenelated walls set on a hill, with a broad staircase leading up one size.  The hill is about 13" (33cm) across and the battlements are perhaps 5" (13cm) from the ground.  It may not be obvious from the picture, but there are small, flattened areas all over the hill, presumably so that figures on standard 1" (25mm) bases can stand there.  In the same vein, the staircase has a flat platform every few steps, easily big enough to hold a 28mm miniature.

I started by trimming the square base into a more rounded shape using a heavy pair of scissors.  This was fairly tough work; the plastic was about at the limit of thickness that my scissors could handle (and I wouldn't use high quality dressmaking scissors for this either - they would end up blunt or worse).  Partly I wanted to reduce the possibility of the sharp corners snagging on anything either during a game or in storage and partly I wanted to improve the appearance by removing the hard, straight edges from the base of the model.

Once trimmed, I coated the non-masonry parts of the model with tacky glue and then sprinkled this with grit (in clusters), followed by sand.

The piece was then undercoated.  I used the last of an old can of Games Workshop's "Roughcoat", which is (was - they don't make it any more) a mildly-textured spray paint.  It's as if there were some very fine grains of sand in the paint, which makes it very good for otherwise featureless terrain.  Now that I've finished the can, I'll have to look in my local hardware store for a similar type of spray from a different manufacturer.

After the undercoat, the masonry was given a wash with thinned-down black paint.  When that was dry, I dry-brushed the walls with a light grey.

On to the ground.  The dirt received a base coat of chocolate brown (raw umber), followed by dry-brushes of 2 successively paler browns.

Finally, flock and clump foliage was glued to the model fairly liberally.  In doing this, I tried to follow the following principles:
  • don't flock over the "standing spots" where miniatures might be placed.
  • vegetation often looks better in clumps, rather than spread evenly over the whole area.
  • foliage is very good for covering up imperfections - either where the painting isn't very neat or where the underlying model isn't as good as it might be.  I placed a lot of clumps around the edge of the base, especially in the slightly unnatural "gulley" where the hill starts to rise from the flat base.

Conclusion

Big isn't difficult!  This model took no more than an hour or two of effort (though considerably longer than that in drying time).  It was also cheap; the castle keep cost no more than 2 or 3 28mm metal miniatures from the likes of Hasslefree. or maybe 10 plastic figures.  It's not a perfect representation of any real-life building, but it is designed for gaming and will work very well in that role.

Hmm, I wonder if I should have added a flagpole right in the centre?

Addendum

Simon Quinton has asked how big the stairs are on this model, so I've added another picture to the article.  The lowest flat part of the staircase is the smallest, but even that has the width for a 30mm base (just). A small part of the 30mm base overhangs the step below, though I think it wouldn't be enough to destabilise a model.  The 30mm base fits easily on any of the other platforms and on many parts of the path leading up to the keep as well.

The 25mm base has no trouble at all in fitting on any of the steps or other flat spots.

Further Addendum

To see this castle in use, have a look at this battle report: Robin Hood's Escape.

Sunday, 25 May 2014

Amera: The Lost Bathhouse of Queen Semiramis!

Introduction

Previously, I reported how I had completed the amphitheatre from Amera.  In that article, I mentioned that I was also working on another terrain piece from the same company.  Well. here it is...

Apologies for the out-of-focus photo; I don't know what happened here...
This model appears in the Amera catalogue as F218 Temple Ruins.  I could have just painted it up as it was, perhaps adding some cabalistic symbol in the middle of the floor or a suitably ruined altar somewhere.   But that's been done by others; I wanted to do something a bit different.

I chose instead to turn this into part of a ruined palace. My version will become the long-lost bathhouse of the semi-legendary Queen Semiramis, where she was reputed to relax after ordering the execution of one of her many enemies.  20 young maidens would apply scented oils, play soothing music and recite poetry for her pleasure, or dive for the golden coins which the queen would scatter across the bottom of the pool.  Or so the stories say...

The Build

Firstly, I built up the front wall of the baths with a couple of layers of very thick plasticard.  I used a combination of sharp knife and a triangular needle file to mark the slabs on the upper surface, measuring carefully to ensure that the sizes matched that of the rest of the model.  A few of the slabs were made to look broken, again with knife and file.  Once this was all glued in place, I added Milliput quite liberally to fill gaps and to blend in with the somewhat rounded edges of the vacuum-formed main piece.

I've also softened the base of the model by shaping the edge into gentle curves.  As I explained in my previous Amera article, my hope is that the lack of straight lines will make the rim less obvious once the model is deployed on a gaming table.

Now on to the painting.  To start with, the bathhouse ruins were undercoated in grey.  I use a spray primer that is sold for car bodywork, bought from Halfords, but any grey undercoat should work.

The stonework was easy to paint.  I gave it a black wash and then a heavy drybrush with light grey.  Job done!

The dirt around the rim was slightly different, but not particularly difficult either.  For this I did the basecoat with a medium brown paint to which I had added a bit of sand, for texture.  Once this was dry, it was drybrushed twice with successively paler brown colours.

Once all the paint was dry, I stuck some vegetation on the model.  This is an area where a serious model-maker could really go to town and I did consider buying some brass-etched ivy and other such material.  However, in the end I decided to keep it simple.  My vegetation is fairly weak, but at least it was quick and easy.

Now for the water.  I painted the pool with a murky colour made from a mixture of leafy green and a touch of dark brown.  Once the initial coat was dry, I added a number of coats of gloss varnish.  These were diluted somewhat in the hope that the varnish would settle into a very smooth, even level.  However it didn't quite work out that way and so the surface is slightly rippled.

For a finishing touch, I printed out some pictures of water-lilies, each about 6mm across.  I used a hole punch to cut these out of the paper and then added a notch with a sharp knife, thus forming a green, "pac-man" shape.  I added one last coat of varnish to the bath, undiluted this time, and used this to stick on my lilies.

Conclusion

I've enjoyed making this ruined bathhouse.  It's a bit different from most of the models I build, but it was very easy to do (though it took quite a long time for all those coats of varnish to dry).  I'll be able to use it for pretty much any games that are set in the eastern Mediterranean, I think.  Perhaps Jason and the Argonauts will encounter some horror that's made its home in the murky depths?  Or maybe archaeologists will face off against Nazis in a race to save the supposed treasures hidden beneath the waters?  Maybe it's the only source of water in a wide, arid desert and both/all sides must capture it to survive?  Who can tell?