Showing posts with label Klingon. Show all posts

Sunday, 12 September 2021

The incident at Station X

Introduction

On a barely-charted jungle planet, remote from normal shipping lanes, the Federation have permitted the establishment of a private research station.  Ostensibly this group of scientists, led by the fiercely intelligent Professor Frinkle, are there to develop new medicines and cures.

A garbled message from the base is received by the USS Matakishi - a Federation starship commanded by the inspiring Captain Bellamy.  It reads:

"...madness...overstepped...chemical...unwilling...too much...help...".

The ship's comms officer has determined that the transmission is being jammed.  By looking at a list of base personnel, it is thought to have been sent by Doctor Smith, the research centre's second-in-command.  Bellamy decides to investigate immediately and leads a small away team to the planet's surface.

However, he's not the only one to show an interest.  The Klingon vessel P'Rang has also intercepted the message and her captain Mor'tah has ordered that "Federation combat drugs" research is in violation of some treaty or other and must be seized, for the safety of the Empire.

Setup

This was a 3-player game of Pulp Alley, using my newly-completed Alien Jungle and my slightly older Salad Box Science Base.  The terrain was set up as follows:

  • Most areas of vegetation would be difficult (i.e. if anyone ran through them then they would take a peril).
  • 2 of the areas of vegetation (the one with the pit beast and the one with the Venusian death lilies) were dangerous.  No running was permitted and even walking would trigger a peril.
  • All building interiors were also difficult.
6 minor objectives were set up in buildings and around the base:

  • A microscope and samples were in the Geology building
  • A computer terminal was in the Command building
  • A filing cabinet was in the Admin building
  • A cloning tank was in the Science building.
  • A hyperwave jammer was at the eastern end of the base clearing.
  • The base's power supply was at the western end of the complex.
The major objective was Doctor Smith, who was in the open at the very centre of the research base.

The Leagues

Federation Away Team

  • Captain Bellamy is inspiring, quick-witted and a lucky devil.  He can shoot and brawl a bit, but his strengths are really in problem-solving.
  • Science Officer Tring is extremely smart, but probably lacks some social graces (well, he is an alien, after all).
  • Doctor Johnson is a hard-nosed medical officer.  He probably spends much of his life being quietly exasperated by everyone and everything else in the universe.
  • Lieutenant Rashi leads the security detail.  He's impetuous and a daredevil, so it's a bit of a wonder that he has survived even his first few years in Star Fleet.
  • 3 redshirts are also included in the party, to provide the inevitable "meat shield".  Their skills are, well, mediocre (as you might expect from a bunch of goons).

Professor Frinkle's Base Experiments

The mad professor is determined to preserve the autonomy of his research from outside interference of any sort.  To that end, he has the following resources:

  • Professor Frinkle is your standard crazy geneticist who won't be shackled by anything so paltry as morality.  He is a deductive and an inventor.  For this game he used his inventing skill to come up with some mind-enhancing drugs for himself.  Frinkle has also set up cameras and booby traps all over the base; this is represented by his cursed presence ability.
  • B-9 is the professor's sinister robot.  It is armoured and can project some form of electrical field (long burst).
  • Miaou Miaou is a harmless pet - probably one of the professor's early experiments.  It looks a bit like a cross between a seal and a penguin, but is surprisingly agile.
  • Eygar is a faithful lab assistant.  She is clever and crafty, though somewhat faint-of-heart.
  • The professor has been using other base personnel as experimental subjects.  3 of them are present as reanimated plague zombies.

Klingon Expeditionary Force

  • Captain Mor'tah is a classic, "bad guy" Klingon.  He's intimidating, savage and veteran, which together make him quite a fighter.  He's also very cunning, though not particularly subtle.
  • Maal is the captain's loyal second-in-command.  He is intelligent, cold and calculating, ruthless and indomitable.
  • Science officer Sira is extremely bright, but not as tough as the other members of the Klingon party.
  • Vagh is a close combat specialist who believes that fighting with the bat'leth is the only true way to gain honour.
  • "Targ" is a strange, pig-like beast picked up by the captain on his travels and regarded as a pet.  It's not a real, Klingon targ of course - that's just the captain's little joke.  Actually, it's quite a dangerous animal.
  • Leyra is the Klingon's answer to the Federation's redshirts: a security goon with little expectation of surviving an episode.

The Game

Unsurprisingly, given the setup, the first turn was spent with most characters heading for the inevitable "scrum in the middle".  Turn 2 started to become interesting:

  1. The Klingon pig-beast charged around the corner of the Science building, straight into Eygar.  Both were knocked down, but the pig-beast just shook itself and regained its feet. The faint-of-heart lab assistant didn't bother to get up again.
  2. Science officer Sira tried to switch off the base's power supply - but each time failed a peril and was knocked down.  Even though she stood back up and tried again several times more, eventually the repeated zaps knocked her out (i.e. she kept failing perils and taking damage; eventually she failed a recovery roll).  It seems that the mad professor's booby traps were working as intended!
  3. Captain Mor'tah strode into the middle of the clearing, grabbed Doctor Smith and shook him into submission.  Of course, this immediately made him a prime target for every other faction - but Mor'tah embraced this position and returned all fire with glee.
  4. Both Doctor Johnson and Miaou Miaou made for the filing cabinet in the Admin block.  Neither had any luck, as both of them went down to hidden hazards in the darkened building.


The pig-beast charged into the nearest thing is could see, but Professor Frinkle was a tougher customer than his lab assistant.  He swatted the creature down with ease.

Meanwhile, B-9 rumbled forwards and then unleashed a deadly electro-bolt.  The ray narrowly missed Mor'tah, but completely fried the hapless Leyra.


Over in the Admin block, Doctor Johnson and Miaou Miaou both regained their senses at about the same time.  There was a brief scuffle which resulted in the strange alien pet bolting through the door, leaving the doctor alone in front of the filing cabinet.  However, despite several attempts the increasingly-frustrated doctor just couldn't figure out how to break into the locked cabinet.

As another moment of comic relief (perhaps?), one of the plague zombies chased a redshirt across the board in slow motion.  Neither had much chance of hurting the other, though the redshirt kept dodging backwards so as to use his phaser and the zombie repeatedly stumbled forwards to close the distance.


Then the robot lurched forwards.  It suffered some form of malfunction and splattered corrosive fluids all over itself, Professor Frinkle and Mor'tah, as well as making that area perilous for the remainder of the game (this was a fortune card, though I forget exactly which one).  The robot and the professor were unharmed, but the Klingon captain caught a face full of the poisonous goo.

What with the noxious chemicals and phaser fire from Lt. Rashi & Captain Bellamy, Mor'tah sank to his knees and then collapsed, releasing his grip on Doctor Smith.


With a detour into the Science building to look at the cloning tank, the Klingon pig-beast squealed its challenge and charged at Professor Frinkle.  It may have been intent on revenge for its fallen master, but once again the hopped-up professor smacked it down into the dirt.  This time the creature didn't stand up again.


B-9 now turned its attention on Captain Bellamy and Lt. Rashi.  It shot down the lieutenant before unleashing its electro bolt on the Federation captain.  Luckily, the captain survived, as did a nearby plague zombie which happened to be in the line of fire.  Honestly, I think at this point that the player of the Mad Science league was so annoyed with the plague zombies' hopeless performance that he was even trying to kill them himself.  Ah, well - what else would you do with a failed experiment except turn them back into spare parts?


In the last turn of the game, the Federation started to retreat.  Science officer Tring had managed to solve a minor plot point (the microscope in the Geology building), though not without a considerable amount of difficulty.  I think it took him 2 or 3 turns.

He now retreated to the relative safety of the away team's shuttle, having discovered several interesting facts about the microbiology of the planet's soil and the curious organisms which coexisted below the surface.

At the same time, Doctor Johnson gave up trying to open the records cabinet ("Dammit, Captain!  I'm a doctor, not a filing clerk!"); he also moved towards safety.

Conclusion

Even though Professor Frinkel held the centre ground, he had been totally unable to solve the major plot point.  I suspect that by this time Doctor Johnson had lost all means of cooperating with any of the leagues.  Indeed, I imagine he was quite dead, having been phasered, covered in corrosive robot fluids and then zapped with an electro bolt.

Likewise, Maal had spent several turns trying to understand the computer terminal in the Command centre.  Despite his advanced abilities, he just couldn't gain anything useful from it and failed to solve the plot point.

So, the final scores were these:

  • Federation away team: 1 victory point (for Tring's minor objective - the microscope).
  • Klingon expeditionary force: 0 points.  Sira's early, repeated and ultimately fatal failures to switch off the power grid and Maal's incomprehension of the computer terminal were frustrating.  However, captain Mor'tah's showboating move into the middle did claim the major objective briefly before he was shot down.  I suppose that could be seen as reckless & irresponsible, or glorious & brave, depending on your point of view.
  • Mad Science base defenders: 0 points.  Miaou Miaou did attempt a couple of plot points early on, but was easily chased off when someone else came close.  Professor Frinkle left it too late to claim the major plot point (though he did achieve 2 of the 3 successes he needed) and B-9 was having too much fun zapping things to bother with such trivia.
In the end, the Federation won the game, even though they only held a single, minor plot point.  This wasn't for lack of trying by all three leagues, though.  I cannot remember another game of Pulp Alley where the plot points proved so perilous and the challenges were so hard!

Man/machine/animal of the match: runners up are the pig-beast (which just kept getting back up and charging the next opponent) and Professor Frinkle (who shrugged off every hit he took from every source.  Maybe his combat drugs do work after a fashion?).  The winner, however, has to be B-9.  The large, armoured robot trundled around the centre of the table and scared the cr*p out of everything nearby.

Most useless: I think Sira was a bit of a waste of space.  This Klingon science officer failed to understand the base's power supply and indeed kept getting zapped whenever she prodded it.  Eventually this was too much and she was knocked out of action, without having contributed anything at all.

Friday, 30 March 2018

Full Thrust: Convoy RX-18

Introduction

There's a new club in town: the Helensburgh Alternative Hobby Association (HAHA).  I'm very excited about this as it opens up the possibility of getting some regular gaming after a number of years without such a group nearby.  With that in mind, I attended the weekly meeting for my first time yesterday and took along Full Thrust; a couple of members had expressed interest in learning how to play.

So, here's a simple scenario for beginners: a Federation convoy is leaving a planetary system when it is pounced upon by Klingon raiders.  The Federation have some warships, but are outclassed by the attackers.  Will any of the merchantmen make it to the far end of the table, where they are deemed to have reached the hyper limit of the solar system and can escape by engaging their warp drives?


Federation Forces


The defenders have the following resources:

  • USS Los Angeles (light cruiser)
  • USS Endeavour (scout cruiser)
  • USS Oryx and USS Antelope (large destroyers)
  • 5 assorted merchant ships, from the tiny Peregrine (free trader) to the huge Pride of the Orient (bulk carrier).
For the warships, the decision is simple: do they stay with the freighters or advance to meet the Klingons?
  • If they take the former path then the attackers might leave the Federation warships untargeted in favour of the merchantmen, thus allowing them to fight back for longer.
  • On the other hand, if they attack the Klingons first then the smaller Federation vessels won't last long, but they might manage to disable or distract one or more of the attackers and thus buy time for the freighters to escape.


Klingon Forces


The Klingons have a very simple fleet:
  • IKS Asgard (heavy cruiser)
  • IKS Ragnarok (heavy cruiser)
  • IKS Valhalla (heavy cruiser)
They have exactly the opposite decision to the Federation.  Should they target the escorts first and remove them as a threat (but risk the convoy escaping in the meantime), or should they attack the freighters first (and perhaps the Federation warships will be able to fight back unopposed)?


The Game


The convoy accelerated as hard as it could (which wasn't much; merchantmen are typically very sluggish!).  Their only real chance was to build up as much speed as they could and race past the raiders in as short a time as possible.  Even so, at least some of them weren't likely to make it...

Initially, the escorts kept station with the freighters, though when a Klingon warship appeared around the gas giant, Endeavour and Oryx peeled off to face it.

The IKS Valhalla fired everything it had at the light scout cruiser; Endeavour was raked from stem to stern and suffered a triple threshold check (for those readers who don't know Full Thrust, that's a very bad thing.  Each internal system only survives on a d6 roll of '1'!).  By the time the sparks had stopped flying, the only things still working on the Federation vessel were Life Support and the Warp Core.  Could be worse...

In return, the Oryx fired a stupendously accurate torpedo which hit the Valhalla square in the engine room.  This, together with damage accumulated from a long range torpedo the previous turn (Oryx again), caused a warp core breach on the Klingon ship.  Her damage control parties raced to contain the damage, but the reactor went super-critical before they could take any action and the heavy cruiser blew up rather spectacularly!


The other two Klingons were not so easily dispatched.  The Ragnarok curved in to a position behind the convoy, destroying the Lunar Conveyor as it passed.  The Asgard, however, manoeuvred perfectly into the very heart of the merchant fleet and began to fire at all the targets around her!


Asgard's left-hand beams did significant damage to the Marie Celeste, though not enough to be fatal.  At least, not ordinarily - for in a strange quirk of fate the freighter lost her Bridge, Life Support and Warp Core all from this one salvo (each requiring a roll of '6' to be damaged).  With the ship in such a bad way, the remaining crew decided to abandon ship.

Asgard also put some serious hurt onto the large freighter Empress of Orion, though this wasn't enough to stop the civilian ship.


At the rear of the convoy, all three of the Federation warships (discounting the crippled Endeavour) converged on either flank of the Ragnarok...


...while at the same time, the Asgard just about kept pace with the fleeing merchantmen (the convoy was travelling rather faster than the cruiser at this point, but the difference wasn't enough to increase the range significantly.  Worryingly for the Klingon, the burning, drifting hulk of the Marie Celeste was still alongside the Asgard; the freighter could blow up at any moment!

In fact, if the Federation got lucky then both the remaining Klingon cruisers might be crippled or destroyed this turn!


Fate works in strange ways.  The Klingons had the initiative and could therefore choose the first ship to fire.  They decided it would be the Ragnarok, as otherwise - surrounded as she was - she might not have a chance later on.

The Ragnarok split her fire between the two Federation destroyers.  At point-blank range, phasers chopped the Oryx apart.  In Full Thrust, a beam weapon that rolls a '6' to hit does damage (typically 2 points) and is then re-rolled.  The player just kept rolling '6's, one after the other, whilst the rest of us watched on, dumbfounded!  By the time the cascade came to an end, the poor Oryx had taken 15 points of damage; she was completely atomised.

Ragnarok then fired her other wing weapons at the Antelope.  Although the second Federation destroyer survived, she was reduced to a smoking wreck which was abandoned a turn or two later.


Asgard was equally lucky, at least from a Klingon point of view.  The Marie Celeste didn't blow up whilst adjacent to the cruiser, but instead drifted far enough away that the shock wave wouldn't be an issue - and then exploded.  Meanwhile, the Asgard had dispatched the Empress of Orion and was knocking chunks out of the large bulk carrier Pride of the Orient.


Bulk carriers are big and the attacker didn't manage to destroy the freighter before it crossed the edge of the table.  However, the Pride of the Orient wasn't in a good way; she had a lot of damage and (especially significant) a warp core breach.  She had a single damage control party (DCP) so the odds of them saving the ship were not great, but we diced it out anyway:
  • First turn (after leaving the table): DCP failed to control the warp core (they needed to roll a '1'), but it didn't explode (which would have happened on a die roll of '5' or '6').
  • Second turn: DCP failed to control the damage, but it didn't explode.
  • Third turn: DCP managed to eject the core and thus save the ship.  Or at least, what was left of it.  At least they had functioning life support...


There were now just two Klingon heavy cruisers on the table (although the Ragnarok had accumulated quite a lot of damage over the course of the game and now had a lot of weapons knocked out) and only one Federation light cruiser.  That's discounting the crippled Endeavour, which was creeping away quietly on the other side of the planet.

We were playing with my Full Thrust Event Cards, though not much use had been made of them up till this point.  The Federation player belatedly tried a Confused Orders card on the Klingons; if the two big cruisers could be prevented from ganging up on the Los Angeles then she might just have a chance of taking out the more damaged Ragnarok.  It wasn't to be though; the enemy helmsman wasn't fooled for a moment.

In the dying moments of the game, the plucky Los Angeles came face to face with the almost untouched IKS Asgard at very close range.  This time, the Federation had the initiative; Los Angeles' strike was lucky enough to disable most of Asgard's weapons.  She survived the return fire from the enraged pair of Klingon vessels and fled into hyperspace (though not before taking a non-critical hit: her supplies locker was destroyed, flooding decks 2 and 3 with ankle-deep grey paint).


Conclusion

As expected, this was a bloodbath!  The convoy is basically there so that players can get the hang of the Full Thrust orders and movement system - which the Klingon commander seemed to do extremely efficiently.  It certainly helped that my Klingon cruiser designs are very maneuverable and have good, all-round firepower.  Once the Asgard was within the convoy and unopposed, she could just sit there and shoot in all directions.

Oddly, there seemed to be a lot of "extreme" dice rolls.  The Klingon player in particular was afflicted by this; sometimes a full cruiser salvo would produce virtually no hits and sometimes a penetrating hit would explode into a massive cascade.  Still, the Federation had their piece of luck as well: the destroyer Oryx taking out a heavy cruiser (Valhalla) with 2 turns of torpedo and beam damage was stupendous!

Klingon Status:

  • IKS Valhalla: DESTROYED
  • IKS Asgard: Damaged
  • IKS Ragnarok: Heavily damaged

Federation Status

  • USS Los Angeles: Damaged
  • USS Endeavour: Heavily damaged
  • USS Antelope: DESTROYED
  • USS Oryx: DESTROYED
  •  Pride of the Orient: Heavily damaged
  • Lunar Conveyor: DESTROYED
  • Marie Celeste: DESTROYED
  • Empress of Orion: DESTROYED
  • Peregrine: DESTROYED
We didn't really quantify any victory conditions.  It was stated that "some" of the freighters had to escape, but not how many, or indeed if different levels of victory would apply for different numbers of craft saved.  Both the warship commanders (and me, as umpire & convoy captain) enjoyed the game, so who won?  Does it even matter?  What do you think?

Monday, 20 March 2017

28mm Space Fighters: Finished

Introduction

Remember this?


A while ago, I mentioned that I had found a couple of starfighter kits very cheap and that these were perfectly-sized for 28mm miniature figures.  I wrote a work-in-progress article, though at the time I didn't have any firm plans as to how the models should be finished.  Well, the pair are now complete; here they are!


Klingon Attack Shuttles


As you can see from the picture above, I've painted these craft in Klingon livery.  They've come out slightly dusty-looking; that's my varnish not working as well as I'd like.  I'll just have to claim that they have frost forming on them due to the cold atmosphere of the planet on which they have landed.


The first model I built had the canopy glued in place, but I did something different for the second kit.  The canopy on this model has a tab attached to the back of it; it can be slotted into position either open (see above) or closed (see below).


It took me quite a long time to paint the first fighter.  This was not because they are in any way difficult, but rather because I dithered over the colour schemes; I took weeks to decide.  Eventually I settled for a very dark green, with dusty green and red oxide details.  Of course, the second model was much simpler as I didn't have to go through this again!


So, how will I use these shuttles?  I've no idea, really.  They could be static, ground decoration in pretty much any science fiction game, but they could also be suspended above a game table and used for ground support.  I'm sure there are many other ways they could be employed as well...

Sunday, 13 November 2016

Work-in-progress: the Space Fighter

Introduction

This starfighter is my son's model, completed as the kit intended but then somewhat broken and missing parts through careless play
Some 6 months ago, I wrote an article about my acquisition of a couple of Revell EasyKit "Jedi Starfighters" that were in perfect scale for 28mm wargaming figures: here. At the time, I couldn't decide how to finish these kits, but that doesn't mean I haven't made any progress since!

Work-in-Progress

I've built one of my own two models so far.  There were some modifications made to suit my needs, as described here:


1. The "R2-D2" droid protruding from the port wing has been removed and the gap filled with green stuff.  This detail was too recognisable as coming from Star Wars...

2. I cut the wingtip panels from their "folded out" positions and glued them back into the recesses in the wings.  This left an abrupt end of detail on the very ends of the wings, so I've added some fluted cylinders instead.  These could be extra fuel tanks, engines or cannons; I really haven't decided and I'm not sure that I care!  As you can see from the picture above, these extra bits have been built from the cap and end of some expired felt tip pens.


3 holes have been drilled to take the support pegs/undercarriage
3. I want my craft to be usable for land-based games, perhaps as decorations at a space port.  For a while, I wondered how I was going to scratch build a suitable undercarriage (probably skis rather than wheels).  Then it hit me: you won't even be able to see under the craft when it's placed on a table.

Instead of anything complex, I intend to use transparent pegs (cut down from spare posts for Games Workshop flying bases) just to lift the model off the dirt.  I can always claim that it's a grav effect of some kind rather than a physical undercarriage!


So far, this first tester model has been undercoated.  I used a white primer rather than my usual grey as I thought at first I might paint it up in Star Trek Federation colours (white with a red trim). Since then, I've changed my mind: I'll probably colour it dark green and use it as a Klingon machine instead.  Or maybe Federation white would be better after all?

Aargh - I just can't make up my mind!

Sunday, 24 January 2016

The Tesserae Incident: Part 2 (the Game)

Introduction

Last week, I described my reworking of a scenario for Full Thrust: The Tesserae Incident.  It's basically a Klingon commando raid on a secretive Romulan research base.  Initially, the attackers have overwhelming force, but the defender's reinforcements arrive steadily; how much time can the attackers afford to retrieve the secrets from the installation?

As I see it, the Klingons have a number of key decisions that they need to take early on:
  • The Romulan plasma torpedos are nasty, area-effect weapons but they can be degraded with concentrated firepower.  Will the fleet split up and try to pre-position itself to attack any Romulan ships that uncloak?  Is it better to split up and limit the number of ships that could be hurt by a single weapon, or should the Klingons stick close together, guard the assault carrier and try to shoot down any incoming torpedoes?
  • How much should the Romulan base be bombarded before the commandos assault it?  Too little and the base's point defences and security troops will still be at full effect; too much and there may be no loot left for the commandos to retrieve.
  • The assault shuttles can carry either marines or loot.  How many should be assigned to each function?  Too few marines and the klingons won't capture the base - but there's no point in taking the research centre if the attackers cannot then retrieve anything of value.
For the Romulans, these issues arise:
  • Should any of the early reinforcement ships drop their cloaks and appear on the table?  It might provoke a Klingon response and distract them from their task, or it might just sacrifice the Romulan ship.
  • Assuming that the Romulan fleet wish to uncloak en-masse, in which turn should this occur?  Too soon and they might be outnumbered; too late and the Klingons will have accomplished their task and be heading for outer space.
Here's how it went when we played the game:

Turn 1


In our game, the Klingons decided to come in at high speed (typically 16" or so).  Shuttles were launched and the warships surged forwards.


There wasn't a lot for the Romulans to do on turn 1, but I realised with delight that one of the enemy frigates was just in extreme range for the base's heavy beam battery.  A runaway series of '6's ended up causing 9 points of damage to the tiny ship which was completely vapourised [in Full Thrust, a beam weapon that rolls a '6' not only inflicts damage, but also gets to roll again].  So, a bad omen for the Klingons, or just an extremely lucky shot?

Turn 2

The Klingons continued to approach at high speed.  Anticipating a bombardment, the base switched on its Reflex Field (thus prohibiting it from shooting).  However, the attackers also held their fire...

Turn 3

An ever-increasing number of "blips" was beginning to worry the Klingons,  Romulan reinforcements were arriving, but there wasn't much the attackers could do about this except carry on with their plan.

The main event of turn 3 was the ground assault on the Romulan base as the troop-carrying shuttles arrived at their destination.  Here's how it went:
  • 12 Klingon shuttles (loaded with 10 squads of commandos) stormed the base.
  • 3 shuttles from Red Group were shot down by point defence fire.  Remaining = 9 shuttles, 7 commandos.
  • The survivors all attempted a combat landing on the base.  Red Group touched down successfully, but Blue Group suffered a disaster.  One shuttle clipped a hill when making a low approach; it somersaulted and exploded.  2 other shuttles attempted to avoid the flying wreckage and instead collided with each other [of 9 dice thrown for the 2 groups, 3 came up with a '1' - an appalling result for the Klingons].  Remaining = 6 shuttles, 5 commandos.
  • The 5 Klingon assault teams engaged the 5 base security squads.  Honours were even and 3 of each fell.  Remaining = 6 shuttles, 2 commandos, 2 base security.

Turn 4


Still there were no Romulan ships on the board, though there were blips all over the place.  The assault on the planet was taking too long (and the outcome was too evenly balanced).

In an act of desperation, the Klingon battlecruiser "Relentless" fired everything it could as it flashed past the planet at high speed.  The base lost one living quarters (and the associated scientists), but more importantly the volley knocked out all of the facility's fire control systems and killed one base security squad.  At least that was very much in the Klingon's favour!


Things looked better for the commandos now that they had a 2:1 advantage in surviving troops.  However, the Romulan commander (i.e. me) then played a Vengeance! event card.  Sadly, even though the last base security squad fought with redoubled strength, they didn't manage to do more than trade losses with the Klingons.  Result = 6 shuttles, 1 commando squad left.  No base security remaining, so the last Klingon assault team captures the base (just)!

Turn 5


As the Klingon ships executed high speed turns away from the planet, the Romulan fleet decloaked!  The defending ships were travelling relatively slowly, hoping to sandwich the invaders in the middle of the table.  Whilst that wasn't quite how it turned out, they were still fairly well positioned.


Realising that the Romulan cruiser "Dragon" was perfectly positioned to attack his assault carrier, the desperate Klingon played an event card on her.  Normally, this card ("The engines willnae stand it!" would be used on a friendly ship, but the Klingon was hoping that the Dragon would break down.  It was an interesting gambit, but it wasn't to be; the Dragon's chief engineer was too canny to over-stress his engines in this manner.


The Klingon ships took evasive action, but it wasn't enough.  The Dragon's plasma torpedo just clipped the Ragnarok (the assault transport) and rocked the vessel.  Damage was severe, including a warp core critical hit.  Before damage control teams could react properly, the Ragnarok blew up in a spectacular display of pyrotechnics!
Turns 6 and after

The Klingons were in real trouble now.  Their battlecruiser (Relentless) had flown off the table; it's high speed and relative lack of maneuverability meant that it couldn't turn tightly enough to stay in the battle.  Even though the 6 assault shuttles left the planetary base full of captured equipment, technicians and documents, the loss of the troopship meant that they would find it extraordinarily difficult to escape.


Events were played on the Romulans whenever possible, at least until the Klingon player ran out of cards, but they only slowed down the inevitable end.


Finally, the Romulan battlecruiser Consul torpedoed the last remaining Klingon cruiser.  Although the Valhalla survived that attack, she was very heavily damaged and didn't have any realistic chance of either escaping or of fighting back.  We played another turn after this, but it was obvious that the Klingons could do nothing to change their fortunes.


Final results

  • Romulans: only minor damage to any ships.  Research base heavily damaged and sabotaged.
  • Klingons: Valhalla (CA), Ragnarok (assault carrier) and Victory (FG) destroyed.  Relentless (BC) and Warrior (FG) escaped.  6 shuttles still at large and filled with important data about Romulan weapons research, though hiding in a system deep in Romulan space.

Conclusion

Could the Klingons have won this scenario?  The game went quite heavily against them, yet they did suffer some bad luck:
  • The flak from the base was probably average, but the shuttles' combat landings were spectacularly bad!  Had more commandos made it into the base then the Klingons might have captured it a turn earlier; this would have made their escape more likely.
  • The plasma torpedos performed well above average (again!  I'm beginning to wonder if the Romulan's secret weapons research is really about increasing the yield from a torpedo, rather than anything else).  In particular, the troop transport was horrendously unlucky to take a double threshold check from 1 torpedo and thence pick up a critical hit which resulted in her immediate destruction!  Had she survived, albeit damaged, the game might have ended very differently.
  • The Relentless couldn't manoeuvre enough to stay on the table; she was travelling too fast to turn in time.  That's not really bad luck, but rather a misjudgement on the part of the Klingon player.  Had their most powerful asset still been around when the ship-to-ship combat began then the Klingons might have put up a better fight!

So, could you do better as the Klingon?  Would you have changed the force composition (perhaps having 2 smaller assault transports might have worked better)?  What changes to tactics might have improved their odds?  I'd be most interested to hear your thoughts - and I'd be absolutely delighted if anyone else also played this scenario and reported their results!

Tuesday, 19 January 2016

The Tesserae Incident: part 1 (the Scenario)

Introduction

Some of you with long memories might remember a game of Full Thrust in which a Klingon fleet investigated a secret Romulan research base: here.  This game was played 2 years ago, almost to the day and I thought that it was high time we gave the Klingon fleet another chance (it was hammered in the previous game).

However, rather than replay the game exactly as we did in 2014, I thought that I'd change the scenario around a bit.  Rather than having a small Romulan force already on table, we'd have a much larger Romulan fleet arriving slowly over time.  This would give the Klingons an advantage early on, but they'd have to move quickly to achieve their objectives or risk being overwhelmed later on.  Additionally, I thought that this would be an excellent testbed for my half-baked revision of the Full Thrust boarding rules.  The original rules for marines are extremely basic; it has long been an intention of mine to experiment with something slightly more detailed.

The Scenario


So, the Klingons have to raid the planetary research base, steal whatever data, materials and personnel (scientists, technicians) they can and then make their escape before the ever-escalating Romulan response becomes too much for them.  Sounds simple, right?

Well, standard boarding (using transporters, short range pods or similar) in Full Thrust requires the attacker and the defender to match both speed and heading (to within 1 point of each) and to be within a fairly short distance (6mu, from memory).  This is so difficult to achieve as to be effectively impossible if the target is mobile; it's hard enough even when the defender is a stationary planet!

To overcome this difficulty and give them a reasonable chance of success, the Klingons have been given a fast attack transport equipped with assault shuttles capable of ferrying a generous complement of marines.  These assault shuttles are detailed in the Full Thrust: Continuum supplement, though I've modified some of the rules for their use here.

Forces

Klingons


  • Ragnarok: assault transport/commando carrier.
  • Relentless: battle cruiser
  • Valhalla: heavy cruiser
  • Warrior and Victory: frigates
This adds up to around 800NPV, excluding the assault transport (which the Klingons get for free).  The Relentless and Valhalla are capable, fast ships though the frigates are pretty useless.

Romulans


  • Farside Base: military research station.  The "secret weapon" developed by this base is a reflex field, as detailed in the Full Thrust rules.  As well as the weapon, the base has 2 "P" passenger/living quarters for the research scientists & technicians and 4 "H" holds for their materials, workshops, computer banks and data archives.
  • Consul: battle cruiser
  • Dragon: heavy cruiser
  • Decurion: light cruiser
  • Lorica and Pilum: destroyers
The Romulans have about 1200NPV of ships (plus the base, which is free).  They outgun the attackers by about 3:2, though this is tempered by the fact that their ships arrive piecemeal and over a number of turns.  Fortunately, all the Romulan ships have cloaking devices and so early arrivals can hide until the fleet is ready, rather than risk being annihilated one-at-a-time.

Victory Conditions

The Klingons must capture the base and carry off research material.  There are a maximum possible of 7 points worth of such loot: 1 for parts from the reflex field generator, 2 from the "P" crew quarters and 4 from the "H" laboratories and stores.  Loot can only be captured if the system hasn't already been destroyed in the fighting!

Each point of loot is a full assault shuttle load or it can be transported as per the standard Full Thrust rules.   It must be taken to a warp-capable ship which must then escape in order for it to be counted.

Obviously the scale of victory is from 0 (the Klingons fail completely) to 7 (total Klingon success; every loot point retrieved).  All else, including casualties, is really secondary to this!

Deployment

Klingons

  • The Klingon fleet is placed 48mu (4') away from the planet (i.e. outside of weapons range) at any speed and heading desired by their commander.  We used a 6'x4' table; the Klingons were allocated one of the short table edges as their deployment zone.

Romulans

  • The Romulan fleet is divided into 5 groups as evenly as possible and each is assigned a unique number from 1..6 .  Note that since their are 5 ships and 6 groups, one of the groups will be empty.
  • At the start of each of the first 6 turns, the Romulan player rolls a single dice and receives the group with that number as the turn's reinforcements.  If the group has already been used as a reinforcement then the player re-rolls until an available group is received.
  • Once the reinforcement group is known, the Romulan player rolls for its entry point.  This should be the centre of one of the 3 "non-Klingon" table edges.  On arrival, reinforcements may have any desired initial speed; their heading is directly towards the table centre.
  • If the reinforcement ship is to remain cloaked (including the group without any ship in it) then a suitable blip should be placed at the entry point and the Romulan must write orders for as many turns ahead as the ship will remain cloaked, as per the standard Full Thrust rules.
    The Klingon player may know that "group 4" has arrived, but will not know the composition of group 4 until it uncloaks.  Obviously, for the empty group any such orders will be a blind since in all likelihood it will never uncloak.
  • Otherwise, if the reinforcement is to be uncloaked then the model should be placed directly at the entry point.
On average, Romulan forces on the table will have achieved parity with the Klingons by turn 4, but they might be lucky and receive heavy units early or they might be unlucky and only get small ships by then.  The Klingon will have to guess when (and where!) the Romulans will appear, whilst the Romulans will have to plan for the uncertain location and timing of their reinforcements.  Should they try for an all-out uncloaking & assault for turn 5 (say), or is it worth having a smaller number of ships uncloak earlier?

Special Rules

Assault Shuttles

  • Unlike in the Full Thrust: Continuum rules, my assault shuttle can be reused - if they survive!  They can therefore be used to lift off marines as well as captured loot after an assault.
  • Each assault shuttle can carry 1 marine or 1 unit of loot (captured personnel, secret parts, data crystals or whatever).
  • When making an attack, the shuttle squadron(s) are moved into contact with the target.  The defenders may fire point defenses and class-1 beams as normal.
  • Shuttle which survive point defense fire make a combat landing on the target.  This is a dangerous manoeuvre, so a dice is thrown for each shuttle: any score of 1 or less and the shuttle plus anything it was carrying is destroyed.  Modifiers: take the thrust rating of the target away from the roll [note that this makes assaulting anything other than the slowest freighter or static base a very risky plan].
  • Once an assault shuttle has landed on the target, any marines it is carrying will disembark and fight the defenders.

Threshold Checks

  • If a ship or base takes a threshold check whilst hostile shuttles and/or marines are present then make rolls for each of these as well as for the defending ship or base's systems.  Firing on a ship that has an internal battle going on is just as likely to hurt the invaders as it is to hurt the defenders!

Marine Combat

  • Once per round, during the final phase (just before making threshold checks), all marines will fire at any enemies who are within the same ship or base.  To resolve this, roll 1 die for each marine and calculate the number of casualties as if a beam-1 was being fired at a level-1 screen.  In other words, a roll of '5' causes 1 casualty, whereas a roll of '6' causes 2 casualties and a re-roll.
  • As an extra rule, not needed for this scenario: if firing on lighter forces (such as civilian freighter crews) then treat them as an unscreened target.  If firing on better trained and equipped troops (for example, regular army in armoured battle suits) then treat them as a target with screen-2.
  • Re-rolls don't count as penetrating in the same way as beam fire against a ship, so the target's "screen" class remains the same.  However, if any further enemy squad is hit on a re-roll then the ship or base takes 1 hull point of damage as well.  Note that the re-rolls should be made even if all enemy squads have been eliminated, just in case such structural damage is caused!
  • Whilst an assault is in progress, the defenders still control all systems on the ship or base.  The fighting occurs around the perimeter, not on the bridge!
  • If at any time all the defenders are eliminated and at least some attackers remain then the base or ship has been captured.  Generally speaking, weapons, propulsion and other systems will be unusable by either side from that point on in the game (the defenders may have sabotaged them or installed lockouts, the controls could have been too badly damaged in the firefight, or perhaps enemy systems are just too alien to operate in the heat of battle).  Specific scenario rules may sometimes override this.

Coming soon in part 2: how our game played out => HERE!

Monday, 1 December 2014

Full Thrust: Treachery!

Introduction

It's been over 6 months since I last posted a Full Thrust battle report, if I've calculated correctly.  Games (of anything) have been hard to arrange since the club shut down early this year.  However, yesterday afternoon my sons and I played a short, sharp little action.  Here's how it went...

The Scenario

Background

A Klingon flotilla is refuelling at a small space station near to the Cepheus Rift.  They've been tasked with anti-piracy patrols; the Klingons have already disrupted an Orion operation at an abandoned starbase, but these criminals don't give up easily.


As the Klingon commander contemplates how he will conduct this campaign, alarms go off!  Unidentified vessels have warped in, perilously close to his warships.  Immediately after this, all systems on the Klingon vessels suddenly malfunction and go off line.  It seems that a computer virus has been smuggled onto the imperial warships and has been triggered by the new arrivals.  The hunters have just become the hunted!

Setup

  • The defending Klingons have a fleet of 800 NPV value.  They also have an unarmed refuelling station of 400 NPV; this is placed in the middle of the playing area.  All ships are stationary and are deployed within 6" of the station.
  • The Orion attackers have 500 NPV to build their fleet.  Their ships arrive at the start of turn 1, 24" from the space station in any direction they choose.  Initial speed is 6.

Special Rules

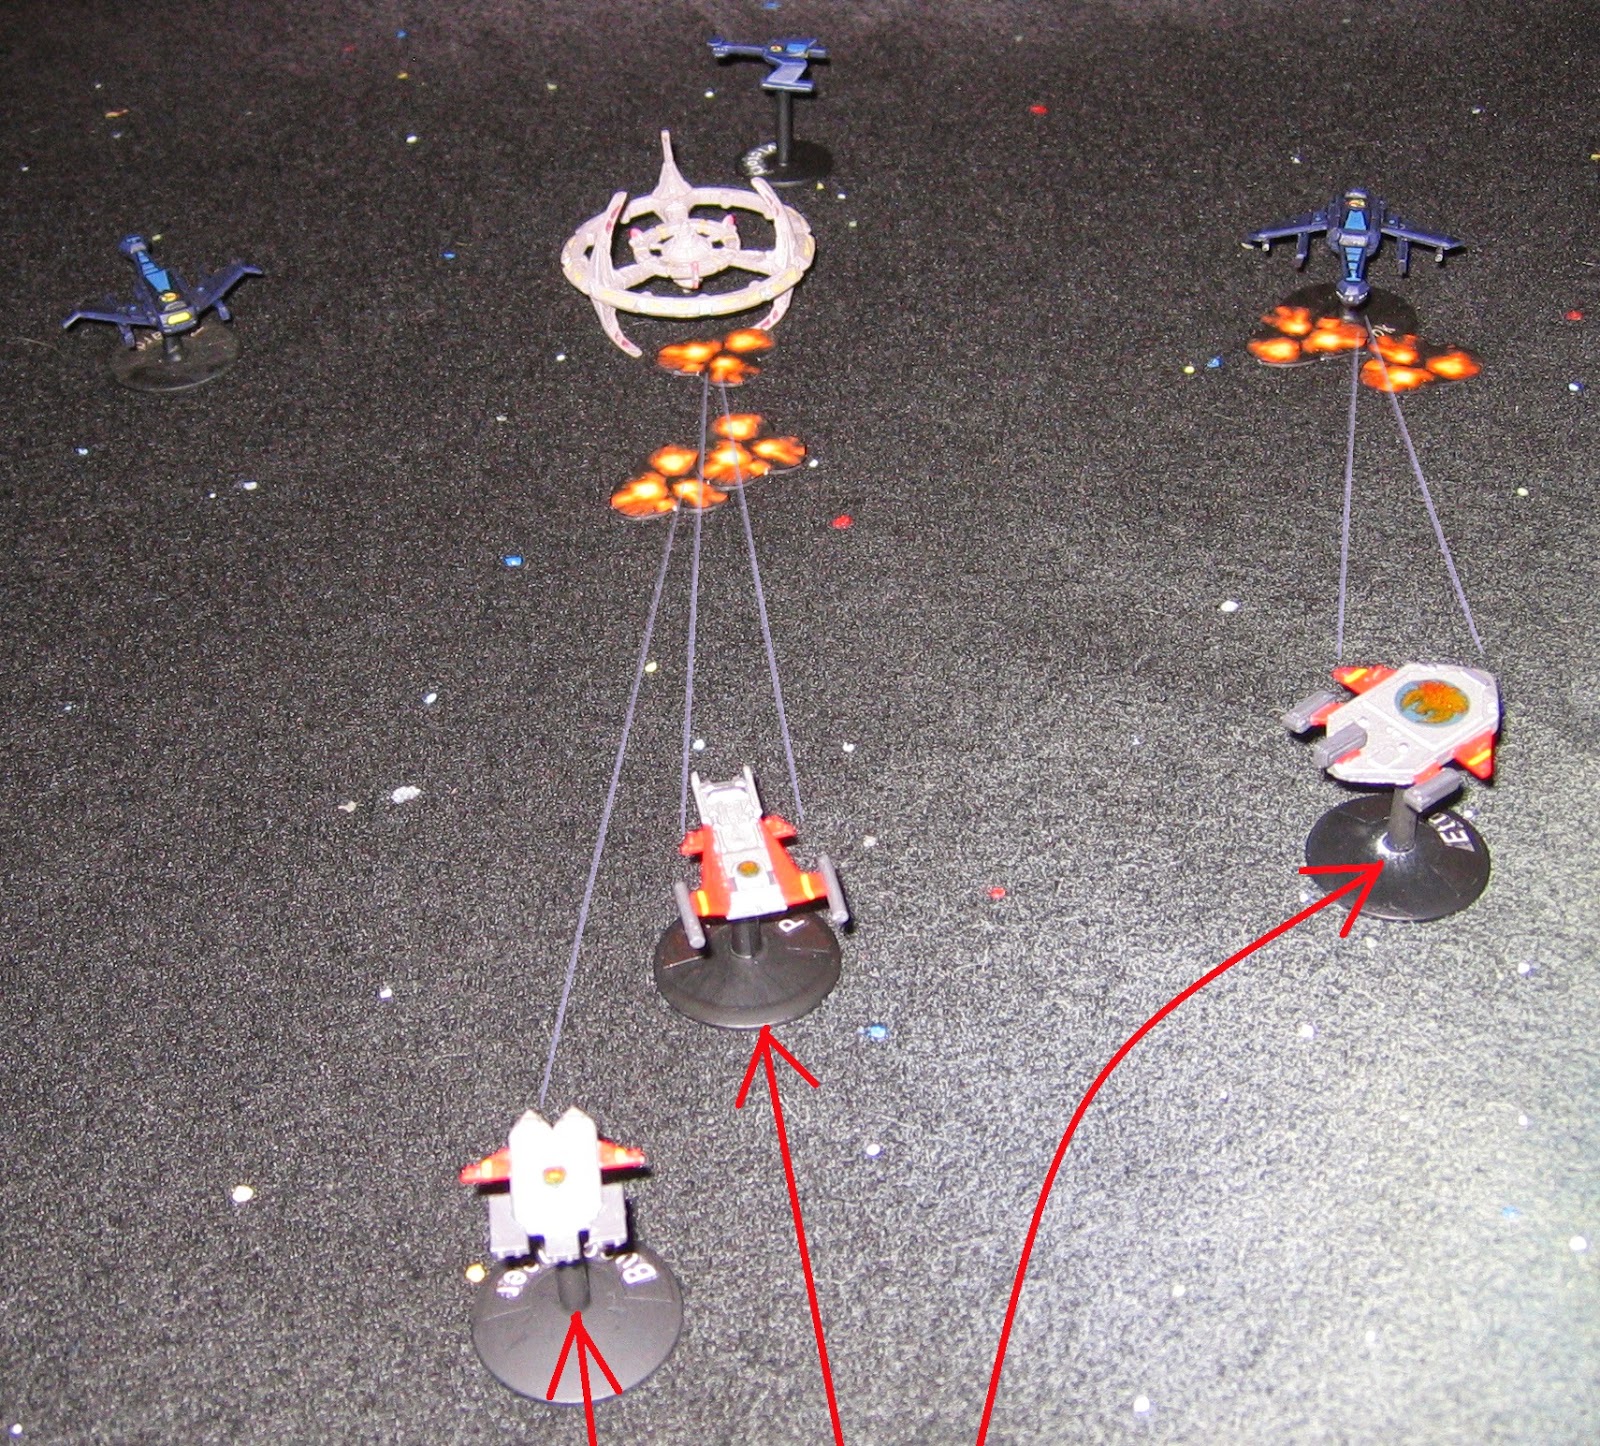
The Klingon flotilla at anchor around the refuelling satellite.  From the top left, clockwise: Asgard (heavy cruiser), Conquest (frigate), Ragnarok (heavy cruiser) and Warrior (frigate).
The Klingon fleet has been caught napping!  Their ships are completely disabled by a computer virus and it will take some time for their experts to restore them to full working order.

Every turn, after writing orders, each Klingon ship (and the space station) rolls 1 dice and adds the result to its running total for "preparedness".  The ship can only operate systems when the total value reaches certain numbers:
  • Preparedness 0 [all ships start the game at this]: the ship may not move or fire weapons.  Defensive systems such as screens and point defence do not work.  In fact, no systems at all will function!
  • Preparedness 6+: Defensive systems such as point defence and screens operate as normal.  Thrust is available, but only at 50% of normal levels.
  • Preparedness 12+: All systems work as normal, with no restrictions.
So, it is theoretically possible for a Klingon ship to be restored to fully operational status within 2 turns, but the average will be around 4 turns.  To counter this, the Orions have a much smaller fleet.  Can the attacking pirates kill half of the Klingon fleet within 3 turns?  If they fail to do this then they'll be out-gunned by some very angry warriors!

Our Game

The Orions attack!  From left to right: Pegasus (light cruiser), Etna (heavy cruiser), Buccaneer (corvette)
Right from the start, the 3 Orion ships accelerated towards the helpless Klingons.  They opened fire at medium range, inflicting moderate damage on one of the enemy cruisers and severe damage to the nearer Klingon frigate.

To add insult to injury, we threw for a "non-critical hit" for the damaged frigate.  She took two such hits and lost not only her video arcade but also the captain's prized collection of stuffed tribbles.  What a disaster!  The game had to be suspended for a few moments to allow the players to regain their composure...

In turn 2, the Orion ships advanced again at speed 10 or thereabouts.  Weapons were much more effective at this range and the Klingon cruiser Ragnarok was lashed with phasers.  The crippled frigate Warrior was finished off, though the sheer bulk of the space station absorbed all of the light cruiser's firepower without showing many signs of damage.

The Orion ships continued to approach; the lighter ships slowed as they approached the starbase, whilst the heavy cruiser went wide.  By now, some of the Klingon ships had started to move, though the cruiser Asgard was still completely silent [she had thrown a 1, 1, 2 for the first 3 turns and therefore had a total of only 4 preparedness points.  No doubt her captain was ranting at his technical and security officers as they completely failed to bypass the computer virus that was disabling his ship].

In a surprise move, the Klingon frigate Conquest brought weapons online and targeted the Buccaneer.  The Orion corvette suffered crippling damage, with her bridge smashed, captain dead and a warp core breach.  From now on, the tiny ship played no part in the battle; she coasted along, out of control, whilst engineers desperately tried to prevent an internal explosion.

Retribution was swift, though: the light cruiser Pegasus smashed the Klingon frigate with an overwhelming volley that tore the vessel apart.  On the flank, the Etna continued to pound the Ragnarok, knocking out several of her weapons.

In turn 4, the Orions surprised the Klingon commander by playing an event card: "The engines willnae stand it!" [we were using my Full Thrust Event cards].  The heavy cruiser Etna executed a high speed turn, coming round into just the right position to fire on the refuelling base [though I do have to admit that my heart was in my mouth as I rolled to see if a breakdown would occur - it didn't!].

Due in part to poor communication and the inexperience of the junior cruiser captain, both Orion captains fired on the station instead of either Klingon cruiser.  Whilst the heavily damaged Ragnarok was probably easy prey and could be left for later, the Asgard was finally showing signs of getting her act together.  The undamaged Klingon cruiser restored partial mobility this turn [finally!], though she still had no operational weapons.

Despite receiving the full firepower of 2 cruisers at point blank range, the stations shields served her well and the damage inflicted was not particularly serious.  [At this point, as the Orion commander, I began to wish that my ships were fitted with some torpedoes instead of phasers alone.  The beam weapons were just not effective enough against a large, fully-screened target!]

ThePegasus overshot the station in a way that left her weapons unable to bear on most of the enemy forces.  Between them, the 2 Orion cruisers finally demolished the reeling Ragnarok, just as the other, undamaged Klingon cruiser's weapons became operational.

At this point, I decided that it was time to leave.  As the Orions, we had destroyed a heavy cruiser and 2 frigates in return for the loss of a single corvette [technically, the Buccaneer wasn't yet lost, but given the severity of her damage it would have taken a miracle to save her].  We could have turned to make another pass at the remaining Klingon vessel, but she was quite a bit larger than either of the pirate cruisers and our current positioning would have meant coming at her one-at-a-time.  This didn't sound like a recipe for success...

The 2 Orion cruisers both accelerated at best speed, just heading for the exits.  Although the Etna was clearly going to get away easily, the Pegasus was still in the firing line for a turn or two.

The Asgard contemptuously ignored the crippled Orion corvette [which promptly blew up anyway] and leaped in pursuit of the small cruiser.  Although she was coming from a standing start, the big Klingon ship was very quick [thrust 6!].  Even so, I thought that the Pegasus was safe enough - until the pursuer fired 2 disruptor bolts and scored 2 direct hits!  Pegasus staggered and reeled under the impact, but kept on going.

The Asgard accelerated hard, though the Pegasus was still travelling faster and opening the range.  When the Orion ship was within a couple of inches of safety [i.e. the table edge], the Klingon fired again: 2 disruptors - 2 hits!  The bolts cut through the Pegasus's screens as if they weren't there and tore the Orion ship apart.

Conclusion

Those big Klingon cruisers and the station just kept soaking up the damage, even when their shields weren't operating!  I thought that the Etna [in particular] was very well armed, but it was all she could do to kill the Ragnarok over about 4 turns.

The Asgard had the most appalling luck early in the game when trying to fix the ravages of the surprise computer virus.  In the long run, this probably saved her though: the Orion captains didn't see her as a threat and instead concentrated on targets that were shooting back, or were just about to do so.  The last Klingon warship definitely redeemed herself at the end, though - her gunnery was nothing short of scarily accurate!

So, who won?  At the point where I decided to retreat, the Orions were definitely ahead.  However, the loss of their light cruiser makes this less clear cut.  The final tally is thus:

Klingons

  • Ragnarok (CA): Destroyed
  • Asgard (CA): Undamaged
  • Conquest (FG): Destroyed
  • Warrior (FG): Destroyed
  • Refuelling Station: Moderate damage

Orions

  • Etna (CA): Undamaged
  • Pegasus (CL): Destroyed
  • Buccaneer (CT): Destroyed
Whilst the Orions wiped out more material than they lost, a pirate force cannot afford to trade ships with an imperial navy, even at a 2:1 rate.  They also failed to destroy or cripple the starbase.  Overall, I think I'd give them a Pyrrhic victory - it's good propaganda and will safeguard their operations for a little while, but they won't win the war with escapades like this!