Tuesday, 12 February 2019

7th Voyage/8th Voyage: Jason and the Playwright

Introduction

It's been a long time since I played any games based around ancient Greek myth; I think the last such one was in 2016 (here: Jason and Medea).  All my previous outings have used the 7th Voyage rules from Crooked Dice, but despite there being much to admire in these rules, something wasn't quite right for me.  More specifically, the combat felt flat; both sides would simply stand next to each other and hack repeatedly until someone got lucky and hit their opponent enough times to knock them out.  Boring...

Since that last game over 2 years ago, I've been intending to write my own, revised combat rules for 7th Voyage.  This new adaptation would be based loosely on the equivalent combat rules from 7TV (2nd edition), but with inspiration also taken from Song of Blades and Heroes and the existing 7th Voyage.

Well, I finally got round to firming up and writing down my ideas (which I'll call "8th Voyage"; more on those in a future article) and this is a report of the first playtest.


Jason and the Playwright


The story for this game would be very simple: it's the Steal scenario from the 7th Voyage rulebook.  However, instead of an object the Argonauts have been charged with the rescue of a person.  The famed playwright Phineas has fallen in with bad company; he's been taken away by a bunch of hard-partying satyrs!  It's not completely clear whether Phineas has been kidnapped, or whether he has been beguiled and tricked into this wasteful life...

Either way, Jason and his fellow Argonauts have determined to rescue the man.  They have an ulterior motive: Phineas's work is much respected in Agathopolis, their next port of call.  If they can persuade the playwright to put on a show in that town then their passage would no doubt be expedited by the locals!

So, forces are as follows:
  • Jason, plus a whole bunch of heavily-armed Argonauts.
  • Meleager, plus some very lightly-armed skirmishers/psiloi.
  • Antigone.  She doesn't have any followers at all, but has a magic helm which makes her invisible.  The black "7th Voyage" counter denotes when she has activated this item and cannot be seen.  Note that this doesn't make it impossible for opponents to hit or impede her; it's just much more difficult for them!
Antigone with her Helm of Invisibility.  You really cannot see her at all, can you?

On the other side:
  • Hylaeus (the satyr leader) plus several spear-armed satyrs (in the background of the picture above).
  • A small group of satyr archers, beside the river.
  • A larger group of satyrs with a mixture of bows and spears (foreground).
  • One cyclops.  Note that this monster is a neighbour of the satyrs and therefore an ally against human intruders.  However, there's not much love lost between him and the satyrs, so the monstrous cyclops causes fear in everyone who comes within 6" - friend as well as foe!
Phineas, the playwright, starts in the middle of the ruined theatre.  He is too befuddled to move on his own, but can move when accompanied by any of the rescuing humans.


The Game


Made invisible by her magic helmet, Antigone stalked forwards towards the amphitheatre and the playwright.  The nearest satyrs sensed her presence (maybe saw dust swirls, or smelled something)  but although they prodded the area with their spears, they failed to make contact with the heroine.


She reached Phineas and was just about to make herself visible and lead the playwright away when the cyclops came lumbering up.  Like the satyrs, it could sense that something wasn't right, but unlike them it had a much longer reach.  One of its flailing limbs caught Antigone with a forceful backhander and threw her across the stage.  She wasn't injured but - at least temporarily - was decidedly out of action.


Help wasn't forthcoming from Meleager and his light infantry.  The young javelineers were ineffective against the tougher satyrs who rushed to intercept them, though one lad caused a lot of frustration to Hylaeos (the satry leader) by simply refusing to die!  Even the hero Meleager was knocked off his feet and wounded; for a few moments he seemed to be in real trouble...


Jason made better progress.  Two satyrs tried to block the river ford, but Jason and his hoplites swept them aside with ease.  Not everything went their way, though: a lucky, long range arrow from a satyr archer felled one of the Argonauts in return.


Now that the way was clear, the Argonauts surged forwards.  The cyclops was reaching about in the dust trying to find the still-invisible Antigone when one of the hoplites ran around and stabbed it from behind.


Remember that the cyclops is fearsome to all other models on the table?  Since it was now pretty much the centre of the action, an increasing number of Argonauts and satyrs had to take fear tests whenever they were activated.  Not all of them passed; indeed later in the game we ran out of my yellow & black "Scared" tokens and had to improvise with other types of counter as well...


Whilst the cyclops roared with pain, Antigone made her move.  She stabbed at the creature (thus becoming visible at least for a while) - but her blow was ineffective.  In return, the cyclops belted her so hard that she landed in the amphitheatre's cheap seats (at the back).  It then turned around and swatted the Argonaut away as well.  Truly it was a very annoyed monster!


The dazed - and now visible - Antigone was promptly showered with arrows from the nearby satyrs.  Although a fair number bounced off her shield, eventually one shaft struck home and took her out of action.

Bellowing loudly, the cyclops rushed at the approaching Argonauts.  Its initial rush left Jason on his back in the dirt, but the hero was soon on his feet again and attacking.  Whilst he and the approaching Meleager distracted the monster, a brave Argonaut sank his spear into its flank [the spearman was considerably aided by a +2 modifier gained from sacrificing an event card.  As it happened, this particular event card was only useful for a spell caster, so "sacrificing" it wasn't much of a loss for the Argonaut player!].


Between them, Meleager and the Argonaut attacked repeatedly and forced the cyclops back all the way across the amphitheatre.  Jason saw his chance, rushed up to Phineas and started to hustle the confused playwright away from the fighting.


Before he could escape cleanly, Jason was shot in the back with an arrow.  Of course, it would take more than a single injury to fell a hero of his standing, but even so it was worrying...


Two Argonauts had been tasked with killing Hylaeus, the satyr leader, or at least with keeping him occupied so that he couldn't do anything especially useful.  After fighting with them inconclusively for much of the game, Hylaeus switched tactics and started to use his hypnotise power instead of his spear.

Almost immediately, he managed to dominate both of the humans; they were at least temporarily under his control.  The wily satyr suggested that they go and take a bath in the river, reasoning that the Argonauts would have to take drowning tests when they were next activated.  In this way there was a good chance that they would be lost to their original side whether or not they regained control of their senses.

As it happens, neither man recovered from the hypnotism by the end of the game; they were never seen again by the other Argonauts...


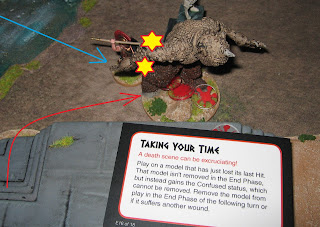
The cyclops tried to go around the amphitheatre to reach Jason and the escaping playwright, but it hadn't gone very far when it was charged from behind by an exceptionally enthusiastic Argonaut.  The man stabbed the monster fatally and as it writhed around on the ground [courtesy of a "Taking your time" event card], he stabbed it some more until it finally stopped moving.  Thus was Antigone avenged...


The exhausted Meleager was suddenly surrounded by satyrs who bounded into and across the amphitheatre.  He tried to defend himself, but was struck by arrows and fell.


With the loss of this hero and the two hypnotised hoplites, the Argonauts cast was thoroughly shaken.  Jason escorted Phineas off the table and at that point we had to call the game because we ran out of time.


Victory

So, who won?  Scores were as follows:

Hylaeus and the Satyrs

  • 2VP for knocking out Antigone
  • 2VP for knocking out Meleager
  • 1VP for shaking the opposing cast [i.e. reducing them to less than half their number of starting models].
So, a grand total of 5VP.

Jason and the Argonauts

  • 3VP for knocking out the cyclops
  • 3VP for rescuing Phineas and escorting him off the table.
...for a total of 6VP.  Therefore, it's a marginal Argonaut victory, albeit a somewhat Pyrrhic one.

However, consider this: if the game had gone on for just one more turn, the satyrs would almost certainly have axed the Argonauts [i.e. reduced them to 1/4 of their starting models] and would thus have earned themselves another 2VP, increasing their score by enough to claim themselves a marginal victory.


Conclusion

This was a fun game for me (as umpire) and hopefully for the players as well.  I'm delighted to have re-entered the world of gaming Greek Mythology!

The Argonauts achieved their goal of rescuing Phineas.  In addition, their heroes all acted, well, heroically.  Some hoplites got stuck in enthusiastically to help their leaders, though a few just cowered at the back and refused to engage.  The psiloi/javelinmen were not particularly effective, which is as it should be...

For their opponents, the cyclops did its thing, dominating the centre of the action and terrifying all and sundry.  The satyrs proved to be remarkably resilient; relatively few fell in combat - though this might reflect their tactics rather than any special powers.  I'm still not quite sure how they managed to wipe out so many armoured, veteran warriors!

My revised, "8th Voyage" combat rules seem to have worked very well and I don't see any immediate need to make changes to them.  Some more play-testing would be good before I can declare them to be "finished", of course.  I will publish this set of house rules soon, so if anyone is curious then you can see where my thinking has led.  In the meantime, I think that combat in 7th Voyage has become a whole lot more fluid and interesting...

Sunday, 3 February 2019

Terrain for Congo: Termites and Grass

Introduction

Here's a short post describing some terrain I'm making for games of Congo.  I've already got some large trees which can be used as stand ins for Baobabs or other large specimens (see here), but the new pieces below give me the option of some area features as well.

Termite Mounds


Let's see now; one of the iconic sights of the African veldt is a cluster of termite mounds.  These wouldn't be too hard to make from scratch, but I didn't have enough time or energy to do that.  Instead, I bought this set from Warlord Games.


This set is fairly expensive for just six smallish pieces of resin, but it does come with some MDF base plates as well.  I don't know if this is normal, but my pack had 9 base plates in it!  All of these are different shapes, some larger and some smaller than the one shown in the picture above.  So, given that I had 8 spare base plates, some more terrain was required.


Tall Grass

So, how am I going to fill another 8 area terrain base plates?  Well, I can and certainly will make some inserts from rocks, to represent rough ground.  However, I also wanted some elephant grass or something similar.  This vegetation is so called because even an elephant can hide in a clump of such grass; hardly surprising when you consider that some varieties can reach 18 feet high (i.e. about 5 1/2 metres)!  Good luck finding your golf or cricket ball if it vanishes into a patch of that!

There are a number of ways of modelling elephant grass in common use, but I thought I would try something different.  I'm not completely convinced by the end result, but see what you think...


I started with some artificial turf.  There is at least one company in the UK that offers free samples, so I carefully picked the longer styles (typically 40-45mm pile) and ordered some of these.  In only a day or two, I received a parcel containing 6 squares like the one above, each somewhat over 6" square.  That's the best part of 2 square feet of artificial grass which didn't cost me a penny!  The only downside is that every website I visit now puts astroturf in all the advertisement boxes - but I guess I'll just have to live with that...


So, artificial turf isn't the easiest material to work.  Cutting disks was moderately difficult, as was gluing it to the circular insert bases.

Additionally, the plastic turf was far from upright.  It had a definite and pronounced lean in one direction which was not at all what I expected or wanted.

I squirted copious amounts of white glue into the base of each piece and found a way to force them upright whilst the glue dried.  That seems to have done the trick and the tufts have pretty much stayed upright since.


I finished the pieces off by spraying them with a pale tan colour from the underside, so as to make the "stalks" look pale but allow the "leaves" to remain green.  This could possibly have been done better by dry-brushing instead; maybe I'll try that on the next batch...


Conclusion

Savannah/veldt isn't open, empty grassland with as few obstacles as a cricket or football pitch.  As well as significant hills and forests, there may be many local areas of blocking terrain.  I've just started to scratch the surface, really - and I'm doing it fairly cheaply so far!

Saturday, 19 January 2019

Congo: Mungo Mah Lobeh Cards

Introduction

Recently, we started playing the "Mungo Mah Lobeh"/"Throne of Thunder" campaign for the Congo game rules [published by Studio Tomahawk].  So far, we've only played one game [described here] and that went well enough.

Character Cards

It was obvious during this initial game that we didn't have all the player aids we desired.  More specifically, the campaign introduces some new character types [archaeologist, doctor &c] and these are described fully in the main rules.

For all the characters from the main rulebook, Studio Tomahawk have provided quick reference cards which can be printed out for use during a game.  Sadly, there are no cards available for the characters from the expansion - so I decided to create some myself.  Here they are; you should be able to copy them directly from this article if desired:


Sunday, 13 January 2019

Test of Honour: The Oda Clan

Introduction

It's been a while since I wrote an article about any of my models.  Indeed, I haven't been blogging very frequently for some months now.  At least in part, that's because much of my hobby effort has been diverted towards preparing forces with which to play Test of Honour.

For anyone who hasn't heard of this, it's a simple, fast-play game of heroic skirmishes, set in feudal Japan.  This is aimed at recreating scenes from classic films such as "Seven Samurai", rather than necessarily being historically accurate.  As such, it promises to be great fun and very much the kind of thing I enjoy!

The Oda

The Test of Honour box set put out by Warlord Games contains enough figures for 2 basic forces of 2 or 3 Samurai backed by Ashigaru (peasant) troopers.  I've painted up half of the box set with a black-and-white livery and given them "mon" (Japanese heraldic icons) that indicate they belong to the Oda family.  A few other, metal figures have been added to give a little more variety.

The Samurai


A Test of Honour force is led by 1 hero and can have up to 2 other samurai in it.  The 2 figures in the middle armed with katanas are plastic figures from the ToH starter set.  However, I wanted some variety and so there are 3 metal samurai with alternate weapons also in this band.


The metal clubman, spearman and archer all come from Footsore Miniatures.  They're a little bigger and bulkier than the Warlord plastics, but not enough to bother me.

Ashigaru


As well as the leaders, my warband includes some troopers for them to lead.  I built the 15 ashigaru in this force as follows:

  • 4 archers
  • 1 musician (conch player)
  • 1 ammunition carrier (he can be the "3rd man" in an archer group - ToH allows "units" of 3 commoners as well as single figures)
  • 1 standard bearer
  • 1 sergeant
  • 7 spearmen

The Geisha


I felt that I wanted a geisha as well, partly because they are such an iconic part of Japanese history and partly so that she could act as a spy or other scenario-specific objective.


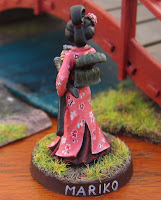
This geisha model is from Hasslefree Miniatures, although (oddly) she's listed amongst their Modern martial artists.  Still, her costume seems traditional enough to me.  This was a refreshingly different model to paint; I enjoyed doing so very much and I'm immensely pleased with the result!

A Word on the Figures

I can't really finish this description without saying at least something about the models involved:

Warlord Games

 These are the plastics that were originally produced by the now-defunct Wargames Factory.

Advantages:
  • They're cheap!
  • They can be built into some very nice models.
Disadvantages:
  • These are the most fiddly, fragile plastic models I've ever built.  Most have 10+ separate parts (for example 2 legs, 2 body, head, 2 arms, spear, sashimono, swords) and many of these are extremely thin and delicate.  No doubt they're scaled very accurately and are in "real world" proportions, but I have grave doubts about their durability on the wargames table.
  • Matching arms to spears is something of a nightmare; not all combinations work properly and you need to use trial and error to figure it out.

Footsore Miniatures

I've only bought a few metal samurai from Footsore and cannot therefore comment on the rest of their range.  However, here are some observations on the figures I've built.

Advantages:
  • The models available cover exactly the weapons options from Test of Honour.  That's hardly surprising, since they were (I believe) made for the game, or the game was made for this range or something like that.
  • They're nicely-detailed, solid models; I'm not particularly worried about them breaking with normal use.
Disadvantages:
  • I found that several of the Footsore models didn't fit together at all well and needed quite a bit of adjustment.
  • They're a bit more expensive than the Warlord models, or other ranges such as the excellent Perry Miniatures samurai.

Conclusion


Here's the entire clan so far.  In this picture you can also see my first piece of Japanese-themed scenery (who'd have thought it - a bridge!).

I do have plans to add some arquebuses to the Oda, but these may have to take their turn.  After all, I'm also working on the red/yellow Takeda clan as well as bandit and ninja warbands.  And more scenery.  And some ronin.  And it might be nice to get some warrior monks.  Perhaps some horsemen too...

Sunday, 6 January 2019

Congo: Mungo Mah Lobeh, Game 1

Introduction

What better way to start the new year than to fulfil a long-cherished goal: to play through the Throne of Thunder ("Mungo Mah Lobeh") campaign for one of my favourite miniatures games: Congo?!  Steve came round to visit yesterday, so we launched into the first game.

Pre-game


We decided that I would take the White Man Expedition, headed by the late Victorian adventuress Mary Kingsley.  In the brief pre-game sequence (2 dice rolls), I achieved the following:
  • A slightly disreputable medical man ("Herr Doctor Heineken") agreed to join the party.  Despite his name, I suspect that his problem was schnapps rather than beer and that it would suit him very well to disappear into the interior of Africa for a while.
  • A group of enthusiastic ascaris decided to come along for just the first mission.  Sadly, this second bunch (the expedition already had one band of ascaris hired for the entire campaign) proved to be absolutely useless in the game and Mary might as well not have bothered with them!


Steve would be in command of Ujuwa, the xenophobic witch doctor.  As well as his band of acolytes, the pre-game rolls gained him the following benefits:
  • A village elder offered Ujuwa a charm.  He was unable to give anything more direct ("You know how it is, Ujuwa - we're so busy at this time of year; no-one can be spared.  I won't get a day off work for at least a couple of months.  And it's my daughter's birthday next week - I can't miss that or I'd never be forgiven.  Here, take this lucky hyena's foot instead...").
  • Komboso, an elderly soothsayer, did decide to join the witch doctor's column.  Given how completely useless his predictions were during our first game, I'm inclined to believe that Komboso is either too deep a thinker to be practical for Ujuwa's crusade, or else he's simply senile.  Either way, perhaps his relatives encouraged him to join up and were secretly delighted to be relieved of the burden of care?

The Mission


Starting from opposite corners of the board, both forces would visit the village of Maskouii, where they would attempt to make money by trading with the natives for carved, wooden masks.  There were also a number of areas of dangerous terrain (the mealie plantation, the wooded hill, the cattle enclosure, the large trees, the rocky circle) where discoveries might possibly be made.  Of course, it might be easier to achieve some of these objectives by eliminating the opposition first...


The Game...


Right from the start of the game, the witch doctor's followers scouted all the dangerous terrain areas they could reach, looking for useful discoveries.  In the field of mealies, they came across a government official who needed assistance.  Rather than just assegai-ing him on the spot, they helped the man to his feet and escorted him to safety (thus earning 2 easy-to-come-by victory points!).


Seeing that the forest tribesmen were concentrating on the outlying areas, Mary and her escort ran for the village.  If they could reach the huts first, maybe she could buy up all the masks?  Perhaps this was a bit optimistic, but it seemed worth a try.

In parallel, her kirangozi (local guide) led the expedition's full-time ascaris through the cattle enclosure.  They didn't find anything useful there, but couldn't help feeling that there was something creepy about the place...


In the dash for the masks, Mary and her group reached the furthest hut before any of the tribesmen.  They seemed somewhat isolated, though - in his haste to join them, the kirangozi used his special ability to extend the move of the ascaris, but one of them sprained an ankle and brought the group to a halt (in other words, they drew a stress token for the extra distance - and the counter was movement stress.  This group suddenly went from being the fastest bunch in the game to the slowest, much to my chagrin).


Now that Mary had obtained her first mask from the seller at the hut, her soldiers fired a warning volley at the approaching warriors.  At least, Mary ordered her men to fire over the heads of the natives; it seems that the soldiers had other ideas!  Despite throwing themselves to the ground in a last minute attempt to avoid the bullets, three of the tribesmen were killed.


This seemed to annoy Ujuwa and his followers intensely.  Firstly, the witch doctor and his bodyguard charged into the back of the soldiers, screaming war cries and insults.  When the soldiers retreated in disarray from this assault, another group of warriors attacked them.  Despite Mary using every trick she had (pacifism and barter) 2 soldiers fell and the remainder were chased out of the village.  Worse (for the white lady), Ujuwa now had the mask as well as handfuls of trade goods...

No help for Mary was forthcoming from the kirangozi and his ascaris.  As well as the twisted ankle, these stalwarts decided that this would be a good time to quake with terror and wail at the vagaries of fate (a successful terror attack by the forest tribe saw them draw a red 'panic' stress token).


Mary was determined not to leave the village empty-handed.  One of the villagers decided that it was too hot to sell masks today (I'm sure that the aggro on his doorstep had nothing to do with this decision!), but the third vendor was still there.  Mary and her last 2 soldiers ran past his front door, threw some trinkets at the seller, grabbed the mask and hightailed it out of town.

Ujuwa was happy enough to leave as well.  After all, he had one of the available masks (taken from Mary at spearpoint) as well as a goodly lot of trade goods - and his followers had showed the white imperialist and her lackeys that they weren't to be taken for granted.  The warriors covered his withdrawal, but there was no more fighting anyway and this turned out not to be strictly necessary.  Shortly after this, Ujuwa met up with the European mask collector and sold the trophy to him.

Just then, a lion appeared in the cattle enclosure.  No wonder that Mary's ascaris had felt unsettled when crossing there earlier!


Since they were otherwise unoccupied, half of the white men column formed a firing line around the livestock pen.  However, despite the intense fusilade, not a single bullet hit the lion.

The animal, tired of the noise and irritated by the heat of the day, finally decided to charge.  The white hunder/adventurer types were struck with terror when the beast bounded at them, but it backed off without maiming anyone.  It then charged into the Ruga Ruga, but these fellows were stout of heart - they slew the lion easily with their knives.


We called the game at this point.  There was no realistic prospect of either side catching and defeating their opponent's (single) mask-bearing group in order to claim a second mask.  Additionally, all the discoveries had been claimed or found out to be dummy markers and no units were engaged with hostiles or even close to any enemies.  In short, there was no reason to fight any more.


Conclusion

Final victory point total were as follows:

Mary

Most of Mary's forces never even made it near the village.  In particular, her hired young warriors never moved at all and her 2nd group of ascaris barely did so.  Doctor Heineken didn't have anything much to do and the kirangozi proved to be a poor guide.
  • 2VP for the carved mask.
  • 3VP for the loot (it was a very fine lionskin)
Total: 5VP

Ujuwa

Like Mary, many of the tribesmen barely moved during the game.  Those that did were sufficient to take the first mask from Mary at spearpoint, though.  Ujuwa's attempts at witch doctor magic mostly failed miserably and his soothsayer provided much cryptic, useless advice from the sidelines.  His big man/chieftain (and he was a very big, fat man) seems to have decided that the day was too hot to walk, let alone fight.
  • 3VP for the blessed mask
  • 4VP for selling the mask to the collector
  • 4VP for a discovery
  • 2VP for loot (the trade goods scattered by Mary in an attempt to save her soldiers)
  • 2VP for rescuing the wounded government official
Total: 15VP


So, it looks as if Mary's column was thoroughly whipped.  It was a significant victory for Ujuwa and his native followers.  No doubt word of his deeds will spread like wildfire across the region and ferment more unrest!

Two things strike me as noteworthy about this game:
  1. There was very little in the way of fighting.  This scenario was much more a race to make discoveries and/or buy masks - and the two players had to decide how best to priorities these two different activities.  Reading the scenario setup made me wonder whether some of the further objectives were even theoretically achievable in the timescale allotted (especially the 3rd mask, which would almost certainly become unavailable before anyone was in a position to acquire it).
  2.  I wonder if there's a touch of hypocrisy about Ujuwa?  For all his claimed hatred of foreigners, he was happy enough to sell his mask to a European collector and for his followers to assist a waylaid government official.  Hmm, perhaps his principles aren't allowed to get in the way of pragmatism?

The second game in this campaign can be found ==> here

Monday, 24 December 2018

Santa: The Battle of 6 Armies

Introduction

It's that time of the year again!  Just before Christmas, I pull my Santa army from storage and arrange a big battle of Hordes of the Things.  This time, there were 6 armies involved (3 for Good/Jollity and 3 for Evil/Humbug) together with 3 objectives.  To find out what happened, read on...

Doesn't look much like the North Pole, does it?  I blame global warming...

The 6 Armies: forces of Good

1. Elves.  These are my son's figures and he hasn't painted up enough for a "proper" Hordes of the Things army.  To compensate for their inferior numbers, we lifted the "superior" status from DBMM and gave it to all of them.  In past games these elves have proved to be extremely tough...

Santa's army.  This is more fully described ==> here <==.

Kung Fu.  Again, this army is described in detail ==> here <==.


The 6 Armies: forces of Evil

Goblins.  Hordes and more hordes, some wolves, warband general.  Also, they have a troll...

Undead.  This is a difficult army to command as extra PiPs (initiative points) are needed for both the flyers and for the magician.

Barbarians: warband, shooters, panther riders (knights) and heroes.  Much of this army is impetuous...

 The Game


Wolves and a troll surged forwards towards Mrs. Claus' house.  It took the troll a while to work out how to enter, but eventually he (she? it?) did so and claimed the objective for the evil side.  I don't think Mrs Claus will ever get that smell out of the carpets...

The elves advanced to meet this assault; their archers rained arrows upon the wolf riders and destroyed one element.  Firsat blood to the forces of good!

Here's a little extra rule that we used on the day: one of my club mates had brought a large bag of chocolates to the meeting.  I ruled that each time an enemy element was destroyed, the victor could have one.  It certainly gave some real-world consequence to the fights.


On the other flank, the barbarians surged forwards enthusiastically.  In an unexpected turn of events, their hero general was repulsed; this defeat then affected all the other combats down the line and the barbarians didn't win a single fight.


The Kung Fu front line counterattacked and, with a spectacularly bad series of dice rolls, much of the barbarian army just disintegrated.


The barbarian commander fought on alone and even managed to slay one of the Kung Fu heroes, but the odds were heavily against him and he was surrounded.  Even though his attackers sportingly gave him a chance by rolling a '1' (!), the dispirited warrior couldn't fight on any more (he rolled a '1' himself.  Again!).


The centre was an almost totally defensive fight for the undead, as they never had enough PiPs to move more than a handful of troops.  Indeed, the giant bats were never activated during the entire game.

The necromancer general stayed at the back, casting ineffectual spells at Santa's army.  In return, the ice bears charged forwards and fought with zombies and skeletons.  There were losses on both sides, but when Santa joined in as well, the tide turned in favour of the forces of good.


Then, disaster struck the undead!  Firstly, the vampire knights were destroyed in combat with a horde of snowmen.  That's nearly (but not quite) impossible.

Then, Santa saw the necromancer standing alone behind the ranks of skeletal infantry.  A twitch on the reins was all he needed to guide his flying reindeer over the intervening enemies.  The sleigh landed directly on top of the undead general, squashing him into the dirt.

With the loss of their commander, the undead army crumbled to dust (it failed the "panic" roll on the turn after losing the general).  All that was left were a few ghosts (i.e. the sneaker element), drifting about the battlefield looking for something they could haunt.


Over near the cottage, the elf bowmen advanced slowly, slaughtering everything that stood in their way (by this time, the Good players were starting to refuse the chocolates they earned for every 'kill'; it was just too much for them).

The elf spearmen moved past the house in an attempt to engage the troll, but were ambushed from the side by the goblin general and his warband.  For many turns, these embattled elves threw the evil forces back (their 'superior' status helped here!), but the goblins just kept on coming until eventually they overran the first group of elven infantry.


The greater goblins pressed their advantage and pushed the remaining elf spearmen up the hill.  For a brief moment it looked as if the goblin army might be able to inflict some real hurt on the forces of good, but by this time Santa was free from crushing the necromancer.

The sleigh took to the skies once more and came barreling down the hill, into (and through) the troll without even slowing down.  That catastrophic loss was too much to bear and all of the goblin hordes fled the battlefield in terror, leaving just their demoralised general and his bodyguard.  There seemed little point in playing on after this, so we called the game.


Conclusion

That was a rout!  Of the 3 evil sides, only the goblins put up much of a fight. Their opponents (the elves) suffered the heaviest losses of any good army - and even that was only 2 elements.  The barbarians' collapse was unexpected but spectacular; I don't know if I've ever seen so many '1's rolled in a row.  The necromancer's command-heavy army never threw higher than a '3' on a d6 for PiPs (it might have been a '4' on one turn; my memory isn't perfect here) and was consequently paralysed & ineffectual.  It basically stood there and allowed Santa to attack wherever and whenever he desired.

I don't want to take anything away from the good side's victory, though: they played competently and came away with a massive win.  Sometimes what looks like an even fight just isn't.

So, make merry and enjoy yourselves this Christmas, in the knowledge that evil has been roundly defeated once again.  Have another chocolate, if you can face it 🙂...

Wednesday, 5 December 2018

Miniatures: Taking the Pledge

Introduction

I've been a bit quiet on the blogging front recently.  No excuses; I'm just hoping that at least someone noticed.  Anyway, onwards and upwards...

Here's a problem: I have too many models.  That's a bit broad and not something which I either can or wish to tackle all in one go.  Let's narrow it down a bit: I have too many part-completed models - items that I have started to assemble, but which I haven't completed and packed away.  The number of undercoated or part-painted models has risen to the point where they are clogging up my workbench and making it really difficult to make progress on anything much.

This is my answer: the pledgeI hereby state that I will only permit myself one new model to be taken out of its packaging, assembled &c for every two already-started items which I complete.

Obviously this cannot go on indefinitely as I would eventually run out of already-started models and therefore not allow myself to initiate any further new builds.  Equally, there may come a point where a painting competition, a blog challenge or a special scenario at the games club requires one or more fresh models to be built in a limited time.  My pledge is not to be applied rigidly and may be broken temporarily if such an event should require, but otherwise I do intend to honour it.

I made this commitment about 2 weeks ago.  Since then, I believe that I have completed 19 models and started 1.  By my own rules, I am therefore allowed to start another 8.5 figures whenever I wish.  It's nice to be in credit already!

Here are some of the recently-finished models, just to show that I'm not cheating 🙂:

1st Corps flock of sheep and shepherd

4Ground wagon, North Star oxen and scratch-built carrots!

Antediluvian Miniatures adventurers, cavewoman and priestess 

Warlord Games samurai and bandits

Gripping Beast Saracen ghulams