Showing posts with label Cards. Show all posts

Saturday, 19 January 2019

Congo: Mungo Mah Lobeh Cards

Introduction

Recently, we started playing the "Mungo Mah Lobeh"/"Throne of Thunder" campaign for the Congo game rules [published by Studio Tomahawk].  So far, we've only played one game [described here] and that went well enough.

Character Cards

It was obvious during this initial game that we didn't have all the player aids we desired.  More specifically, the campaign introduces some new character types [archaeologist, doctor &c] and these are described fully in the main rules.

For all the characters from the main rulebook, Studio Tomahawk have provided quick reference cards which can be printed out for use during a game.  Sadly, there are no cards available for the characters from the expansion - so I decided to create some myself.  Here they are; you should be able to copy them directly from this article if desired:


Wednesday, 14 January 2015

Mystery Incorporated

Introduction

I've mentioned Fear and Faith a few times recently, either in one of my own articles or in a comment on someone else's blog.This has reminded me how much I want to get out some figures and play this game.

So, what is Fear and Faith?  It's a set of rules for skirmish wargaming, based on Ganesha Games' very successful Song of Blades and Heroes fantasy offering, but with an emphasis on horror.  In particular, it's really aimed at Gothic through to modern horror, so any time in the last 3 centuries or so.

In addition to the main Fear and Faith rules, I have purchased a supplement called (sic!) Kooky Teenage Monster Hunters!  It expands on the main rules by providing profiles and scenarios aimed at the modern, American, urban monster genre.  Think Buffy, Twilight and the like and you won't be far wrong!

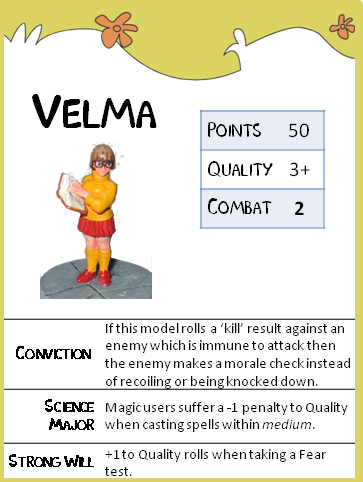
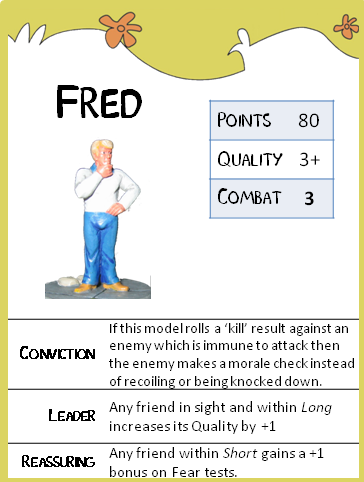
However, there's one set of profiles in KTMG that I've just got to play!  I've made up some quick reference cards for this band; let's see if anyone can recognise them.  Note that I've changed the names from those given in the booklet; I think that my names work much better.

Without further ado, I present my band "Mystery Incorporated":


Conclusion

I am a little puzzled by some of the traits that have been assigned to these characters; they're not always what I would have done myself.  Still, I can always change them if I want, can't I?

Of course, I'll need to get them some transport (maybe the Crooked Dice van with Company B decals?)  More importantly, I'll need some adversaries and some special scenario rules.  I have a feeling that dog treats might be important...

Wednesday, 17 September 2014

Black Powder personality cards

Introduction

The Black Powder wargames rules are very popular - and rightly so in my opinion.  They're an excellent toolkit which can be easily adjusted to provide the type of "Horse and Musket" game that you want.

One of the optional blocks of rules in which I've been particularly interested can be found on pages 94-95 of the original rulebook, under the heading The Personal Qualities of Commanders.  Some may feel that this is edging into role-playing, but I've always been fascinated by the human effect in warfare and so I believe that these characteristics are entirely appropriate and desirable, even (say) in a large-scale Napoleonic battle.

So, why use cards?


Why indeed?  The rules in the Black Powder book give 3 characteristics (Aggression, Decisiveness and Independence), each of which has a 1 in 6 chance of being rated "high" and a 1 in 6 chance of being rated "low".  So we could just roll 3 dice for each commander at the start of the game and write down the results.

This approach will give us the mechanics perfectly well, but there's something not satisfying about it:
  1. If you're anything like me then the rolled-for characteristics would be written on rough scraps of paper.  These would invariably be ugly and we'd need to refer back to the main rulebook every time we needed to apply the effect of a general's characteristic(s).
  2. Writing the characteristics out like this is functionally correct, but they're just labels.  I need to get a better sense of the man to whom these characteristics apply.


Right, so a deck of cards with the characteristics on them can address all these issues: a single draw can replace 3 dice rolls, the card can have a quick-reference copy of the rule effects for the characteristic(s) on it and it can have a quote or a picture that helps to describe the commander as a person.

How are the cards designed?


If we ignore the trimmings, there are 2 functional parts to each of my card: the portrait and the rules summary.  Let's take a closer look at each of these in turn:

The Portraits

I was determined to use pictures for my Napoleonic officers, but this was a somewhat daunting task!  Collecting images of 54 period paintings wouldn't be too hard with the modern internet, but they'd almost certainly be quite varied in style and quality.  It might have worked, but would have taken a lot of effort to get the effect I desired.


Fortunately, very early in my search for suitable images I stumbled across replaceface.tumblr.com .  This is a godsend!  It's a site where a modern artist has taken a large collection of portraits of Napoleonic-period Russian Officers and has replaced their faces with those of modern celebrities.  Well, OK - I could have used the original portraits for my purposes if I could have found them, but that didn't matter: celebrities would work too.  Oh, by the way - I've used these portraits pretty much at random, so the association of certain characteristics with specific celebrities is just coincidence.  Mostly, at any rate.

The Attributes

Once again, there are 2 aspects to this functional part of the card.  Firstly, the presentation: I was determined to include a rule summary for each characteristic.  Sadly, in some cases with multiple characteristics this has resulted in quite a lot of text to fit into a small area.  Although this has been achieved, the result is that the rules are in a very small font and can be quite hard to read if your eyesight isn't good.  There's not a great deal I could have done different here, but at least the title of each characteristic is somewhat larger and the rules could therefore be looked up in the main rulebook if needed.

Next there's the distribution of the characteristics.  To remain truly faithful to the probabilities of rolling 3 6-sided dice, we'd need 216 cards (6 x 6 x 6).  However, a standard print-your-own, poker-sized deck has 54 cards (52 regular suit cards and 2 jokers).  This is exactly 1/4 of what would be needed.

For a single characteristic, that's easy.  9 of the 54 cards should have High aggression and 9 should have Low aggression; the remainder should be neutral as far as this characteristic is concerned.  But what are we to do when we add in more characteristics?  A general can have more than one characteristic that is not average, surely?

OK, first decision: I won't put 3 non-average characteristics on a single card.  That would make the card very full of text and hard to read and in any case the probability is quite low.

So, for our 9 High aggression cards, we should have 1.5 (i.e. 1/6 of 9) that also have High decisiveness, along with 1.5 that have Low decisiveness.  Similarly if we honour the probabilities in the rulebook then we need the same numbers for High and Low independence.  Awkward: they're not whole numbers.

This leads us on to my next decision, which is quite arbitrary but gives a reasonable distribution.  Of the 9 cards that have High aggression, we'll have 4 that also have another characteristic: 1 each of High/Low decisiveness/independence.  That works quite well: a card can have no exceptional attribute, sometimes one, or occasionally two.  Of course, the same formula applies to all the other characteristics as well: 5 cards with each aspect (high or low) of the characteristic on its own and 4 with the aspect plus another characteristic as well.  Excellent!

Can I try?

We've used these cards just once so far; you can read about it here: The Three Villages.  I'm certainly encouraged to use them again, though!

The master file for these cards is a PowerPoint document.  If you wish, you can view and download it freely here,   All I ask is that you don't use it for commercial purposes and that you give me due credit if you share this with anyone else.

If you prefer to obtain a professionally-printed deck of cards, such as I have shown in the pictures above, then here's a link to the design on Artscow.  I believe that you should be able to buy a deck by clicking the appropriate buttons on that page.  Note: I have no association, financial or otherwise, with artscow.com other than that of a satisfied customer.

Tuesday, 26 August 2014

Black Powder: The Three Villages!

Introduction

The battlefield after 1 move.  Mouse-over the image to see who is who...
So, last weekend Steve came round for a day's gaming.  This is something we're fortunate enough to be able to do every few months and since it's quite a long journey for poor Steve, we try at least to make it an activity-packed visit.  This time we managed to fit in 2 games.

As is customary, we started with a big game of Black Powder using our 6mm Napoleonic forces.  We also managed a game of Song of Blades and Heroes, using my Robin Hood-themed warbands.  More on that another time.

On with the show: here's a description of the Black Powder game...

The Scenario

In 1809, a large Russian force is approaching a plain which contains the 3 fictional, central European villages of Großrinderheim, Württemfeld and Tauberbischofsberg.  Help (?) is on its way to repel the invaders, in the shape of a mixed force of French and Confederation of the Rhine troops.  The Confederation troops are outnumbered but have a more flexible command structure.  Would that be enough to make a difference?  Oh, the allies also have a lot more artillery than the Russians...

Victory would be determined very simply: each of the 3 villages is an objective.  Whoever holds more villages at the end of the game would be declared the winner.  The game would end either when 1 side were all dead or ran away, or when we ran out of time or energy to continue!

In the past, we have found troops in buildings to be nearly invulnerable under the Black Powder rules.  Since we didn't want this game to stagnate, it had to be at least plausible to assault an occupied village.  To achieve this, we reduced the morale save modifier for troops in houses from +2 to +1 and the combat result bonus from 3 to 2.  Maybe these buildings are wooden rather than stone?  Or maybe our troops haven't read the manuals on the best way to defend such a position?  Who knows?

The Forces

Most of the troops we used in this battle were fairly standard, with few special rules employed.  However, we wanted to test out the optional rules for Personal Characteristics of Commanders.  We could just have rolled dice for the results and written them down on paper, but I like things to be a bit easier than that.  I've made a deck of cards with a reasonable distribution of these characteristics on them, so all we needed to do was draw one card for each general and brigadier.

Russians

The Russian force was made up of 3 identical brigades, each consisting of 4 infantry units, 1 battery of artillery and a unit of (unreliable) Cossacks.
When we assigned characteristics to the Russian commanders, we discovered that the corps commander, Generallieutenant Raevskii, was average but that his subordinates were anything but!  Generalmajor Rylieff was timid and hesitant (!), Generalmajor Pantzerbeiter was decisive (probably an emigre with something to prove, I think...) and Generalmajor Palitsyn was also timid.  OK, this could be interesting...
Totals: 12 infantry, 3 cavalry, 3 artillery units.

Confederation

The Confederation had 5 small brigades (1 Bavarian, 2 French, 1 Hesse-Darmstadt and 1 mixed light cavalry).  Each of these typically had 2 units of infantry or cavalry and 1 battery of artillery.
The commander (French general Saint Cyr) was decisive, but all 5 of his brigadiers (Cossons and Dalesme for the French infantry, the Hessian Schiner, Bavarian von Minucci and cavalry commander des Essarts) were all completely bland.  A bit disappointing, perhaps, but I suppose it simplified things.
Totals: 9 infantry (7 normal, 2 small), 2 cavalry, 5 artillery units.

The Game

The Russians moved first and immediately force-marched regiments of infantry into all 3 of the villages.  Some of their support forces were a bit slower off the mark, but they were well entrenched in the objectives before the Confederation forces got close.  As the armies approached each other there was an outbreak of firing all along the line, though most was relatively ineffective due to the use of skirmish screens.

The exceptions to this were in the centre, where the French General Cossons steadfastly kept his infantry in attack columns (without a screen!) and the otherwise professional Dalesme advanced the "Lucky 56th" Ligne into a storm of cannon and musket fire without any support.

The Musketry Exchanges

For most of the game, fire was given and taken all along the front line, with the Russian line anchored in the 3 villages and the Confederation just beyond them.  Rather than bore you with a turn by turn account, here are the highlights:
  • French Hussars tried to outflank in the north, but were met by Cossacks.  In an inconclusive skirmish, both sides withdrew behind their infantry supports.
  • In the south, a probe by Bavarian cavalry and light infantry was met by a Russian square.  Without any nearby artillery, the Bavarians were unable to advance any further and a stand-off developed.
  • First blood went to the concentrated French and Hessian artillery on the northern ridge.  One unlucky Russian regiment was decimated and then fled in rout.  There were still plenty more like them, though...
  • At the near end of the line, the Russians found themselves unable to make use of their superior numbers.  A combination of hesitant command and the occasional blunder led to a bunching of units with no room to deploy.
  • Meanwhile, the Russian front line took a pounding, especially from the Confederation artillery that was mostly placed along the ridges in their rear.  In particular, the Russian centre fell into disarray and had trouble reacting.

The Assault

Seeing the Russian centre apparently in disorder, General Cossons ordered his columns to attack.  With banners waving and shouts of "Vive L'Empereur!", the 24th Légère and 44th Ligne regiments marched in double time towards their enemies.  At the last moment, the columns broke into a run and crashed into the confused Russians.  At the same time, General Dalesme's 4th Ligne made a diversionary attack on the village of Württemfeld, fully expecting to withdraw after distracting the defenders from the fight to their flanks.

Disoriented the Russians may have been, but they were going nowhere!  2 of the attacks stalled and halted in stalemates, whilst the 44th Ligne was repulsed in disorder.  Oh, crumbs!

Near Tauberbischofsberg in the north, a single Russian regiment attempted to close with some of the artillery that had been galling them all through the game.  This was a small but bad mistake; the nearby French cavalry made several fake charges to force the attacking infantry into a square.  As soon as this happened, the Hessian artillery and skirmishers set about the poor Russians with a vengeance.
All the square could do was hold on and pray for deliverance; if they moved then the hussars would have been on them in a flash and if they didn't then they would be pummelled with cannister from the cannons.  A unit of Cossacks attempted to charge the guns to relieve their infantry, but these light cavalry refused to charge home and withdrew after taking a few losses.

The Turning Point

In a completely unexpected turn of events, the next round of the 4th Ligne's diversionary attack on the central village succeeded in eliminating the defenders with no real loss to the attacking regiment.  The French soldiers quickly occupied the objective and then poured a thunderous enfilading volley on the unsuspecting Russian regiment at the far side.

Seeing this, the nearby "Lucky 56th" Ligne charged at the wavering Russian unit.  In a tremendous crash, both regiments just disintegrated, leaving whoever was left alive streaming from the field.

Suddenly, it was all over.  The Russians had lost 3 regiments completely, but enough of their other units were shaken for 2 of the 3 brigades to now count as broken.  Since most of the brigades in the army were broken, the entire army was broken.  This came as a complete shock to both players, I think!

Rather than play out the rest of the game, we decided to allow the defeated Russian army to retire in (relatively) good order.  No doubt the small numbers of Confederation cavalry and the ever present Cossacks would have prevented a close pursuit and a total rout.

Conclusion

Well, that was unexpected!  Most of the Confederation units had taken some hits, but were still in good shape.  The Russian infantry never really got going; their superior numbers (especially in the south!) couldn't be brought to bear because of a mixture of hesitant leadership from General Rylieff and frequent disorder in the front lines.

Heroes of the hour were the Confederation artillery: the guns lined the ridges and pounded away on the masses of infantry below.  Some counter-battery fire from the few Russian cannons to get into action had done a lot of damage, but not enough to silence their enemies.

The cards for leaders' characteristics seemed to work well.  We found that most of the time the characteristics didn't have much influence on play, though just occasionally they made a critical moment more ... interesting!  That's as it should be.  Having the cards laid out made it easier to remember which commanders had these special rules.  It also brought a more personal touch to the game: the officers had both names and portraits (even if the pictures are technically all in Russian uniforms!)

Finally, next time I think the Confederation should take fewer brigades, but with more regiments in each one.  5 sub-commanders is really a bit too many!

Sunday, 12 January 2014

A few Character Cards for ATZ

We've been out today at the cinema, seeing The Hobbit: Desolation of Smaug.  Since the film is quite long and travelling to even our nearest cinema takes a while, I haven't much time for today's post.

I thought it would be nice to remind people about one of my earliest blog posts: ATZ Character Cards.  This was a surprisingly popular article (well, it surprised me) and that early success helped a lot in making me decide to continue blogging.

Anyway, there has to be something new in this post, else you'll all get bored and go away.  I've designed a fair number of new characters for All Things Zombie since the initial publication.  My oldest son has also prepared some cards for his own miniatures.  Here are some of them; see what you think...

Doctor Pertwee is an eccentric old academic, but very much a man of action rather than an ivory tower dreamer.  He has an extraordinary ability with machinery, though his strongly-held principles won't allow him to attack anything.  His female companion is fond of adventure, but tends to lose her head when danger looms.

"And they called it puppy love..."  These 2 teenagers are besotted with each other; if anything happened to one of them then the other would surely die!

There's a very strong trope (I can't think of the name) that has most of the soldiers in a unit, players in a team or buddies in a group as fairly useless.  It's up to the square-jawed leader to save the day.  So it is with these guys too...

That's all for now, folks!  Until next time, goodbye...


Sunday, 8 December 2013

Wound Cards for "The Rules With No Name"

Introduction

Every time we play The Rules With No Name, we have difficulty tracking the effects of injury to those gunslingers who are unfortunate enough to be shot.  The data for the effect of each wound is all there, but it's embedded within the various tables and charts, or sometimes in the body text of the rules.  This makes it difficult to remember which modifiers apply to each test.

In the past, I had a bunch of small, paper slips printed, each with the effect of a single wound.  However, these were not ideal because:
  1. We'd have to spend quite a while looking for just the right card to match the injury just received.  It always seemed that you couldn't easily find a "serious chest wound" chit when needed!
  2. Each slip had all the relevant penalties printed on it, but this data was presented as a list.  This meant that every wound chit needed to be read for every test, just in case it had a relevant modifier.  Distinctly tedious!

After gaining some experience with this earlier method of tracking wounds, I decided to design a deck of "wound" cards instead.  This article describes my new approach.

TRWNN Wound Cards

The idea behind these is very straightforward: when your character is shot, draw a card and keep the card to remind you of the effects.  Simple, yes?

The 4 classes of wound: Graze, Flesh wound, Serious wound, Dead
OK, this needs a little more description, I think:
  • Firstly, the card has a location listed on it (one of head, chest, gun arm, other arm, belly or legs).  If that location is behind cover then the injury may not occur; see the main rulebook for penetration of wooden structures and the like.
  • Secondly, the Graze and Dead cards don't require any extra data; their effects are immediate and not progressive.
  • The 54 cards in the deck are obviously more than the 36 possible results on the wound location/severity table.  Indeed, there are exactly 1.5 times as many possibilities with this deck.  To achieve that, I doubled the effects of every second column in the table.  In other words, there are 6 cards for a severity roll of '1' (one for each location), but 12 cards for a severity roll of '2' (i.e. 2 duplicate cards for each location) and so on.
  • Obviously if we keep cards out of the deck to record injuries that have already occurred then it will alter the probabilities for further draws.  Without having done the maths, I don't think that this will be too much of a problem as long as games result in 10 or fewer wounds in total: the deck is large enough that the odds won't be changed by much.  It's a trade-off that I'm prepared to make in order to simplify things.
  • Some characters have skills that allow them to adjust the severity or location of a hit, either in the shooter's favour or to benefit the injured model.  Again, I haven't worked out the statistics for these effects, but I think we'll just draw 2 cards together and allow the beneficiary to choose the one they prefer.  This will still give a bonus to such a character, though without making things too complicated.
  • If wounds are acquired in other ways (melee, falling...) then of course this deck won't give the correct results either in the distribution of severities or locations.  In our games, these are very rare events; maybe we'll just roll the injury as normal and then search through the deck for a card with the correct description.
  • The cards are designed so that they can be stacked to represent the cumulative effect on the injured cowboy.  In the example above, the poor fellow has a total of -3 firing, -5 brawling and so on; this can be seen at a glance.  He won't be doing anything much even if he recovers from the "knocked out" effect of the last card, I think!

Acquiring the Deck

For my own reference, as well as for anyone else who is interested in getting hold of a set of these cards, they can be found here.

[Edit: I've uploaded the original PowerPoint source file here, if anyone prefers that instead].

Wednesday, 26 June 2013

Full Thrust: Never Trust a Ferengi!

Introduction

Lat weekend I played a small game of Full Thrust with my eldest son, primarily so that we could try out my Romulan fleet and see how the cloaking devices worked.  I took an amended version of the same scenario to the last night at the games club; that will be reported in due course.  In the meantime, here's how the tester went.

The Scenario

3 Ferengi warships are escorting a small merchant convoy through a dangerous region of space.  Their goal is for as many of the freighters as possible to escape (by reaching an edge in the furthest 1/3 of the board).

3 Romulan warships have just appeared (they can setup on any table edge in "their half" of the board) and are determined to stop the convoy.  Let battle commence.

How did it play?

In the very first turn, the Romulan ships fired a couple of plasma torpedoes at the convoy and then cloaked [scenario adjustment needed: start the 2 sides a little further apart!].  Many ships fired on the smaller torpedo and it was successfully dispersed.  However, the larger weapon detonated with full force, inflicting minor damage to the destroyer Bractor and crushing the medium freighter Marie Celeste.

Nothing much happened for another turn, as the Romulans were hidden.  The remaining ships in the convoy continued to accelerate in their attempt to reach safety, but that was about all.

Then, the Romulan ships uncloaked and, sadly for them, each was virtually on top of their opposite number in the Ferengi fleet.  The surprised captain of the heavy cruiser Krayton immediately opened fire, with devastating results.  The Romulan cruiser Dragon was hit in the engines and, just as bad, lost her torpedo launcher, while the light cruiser Decurion took hits to engine and cloaking device.  Ouch!

In return, the best the attackers could do was to inflict minor damage on the large merchantman Empress of Orion and to cripple the light freighter Ivanhoe [she lost 3 of her 4 holds.  Oddly, all of these were determined to be carrying personal grooming equipment - I guess those Ferengi really love their ear-lobe polish!  Ivanhoe also suffered a non-critical hit, which came out as "make it up yourself".  I decided that her robotic loading system had malfunctioned and was busy unloading the contents of the 4th cargo hold - desk lamps - into space].

To add insult to injury, the Bractor then gutted her opposite number - the Lorica - leaving the Romulan destroyer just a drifting, lifeless hulk.

Things just continued to get worse for the Romulans.  The next turn, the damaged Dragon attempted to fire on a merchantman, only to discover that it couldn't lock its phasers on target due to scanner damage.  At least the cruiser's damage control parties had managed to repair the plasma torpedo launcher...

...or so they thought.  However, when the Dragon attempted to fire another torpedo, the weapon malfunctioned and flew off in completely the wrong direction.

In desperation, the cruiser's captain ordered his chief engineer to push the damaged engines to the limit.  This gave him just enough thrust to turn round...

...and come straight into the sights of 2 Ferengi warships at close range.  The Romulan flagship didn't even manage to shoot before she was torn to shreds by fire from the Krayton and the Bractor.

Conclusion

The cloaking device and the torpedo use up a lot of the mass in these Romulan ship designs.  That means they really cannot go head-to-head with an enemy warship of about the same size; they just don't have the same number of phasers and the like.  Instead, they must rely on hidden movement to position themselves where they can shoot without much return fire.  That's not what happened here!

[scenario adjustment - in hindsight, the convoy escorts should have had less firepower.  Perhaps 3/4 or 2/3 of the points value of the attackers rather than parity with them.]

Romulan status:

  • Dragon (CA): destroyed
  • Decurion (CL): limping away, engines damaged, warp drive and cloaking device inoperable.
  • Lorica (DD): lost.  Drifting, bridge smashed beyond repair and all decks open to atmosphere.

Ferengi status:

  • Krayton (CA): undamaged
  • Letek (CL): undamaged
  • Bractor (DD): minor damage
  • Empress of Orion (large freighter): minor damage
  • Marie Celeste (medium freighter): destroyed
  • Ivanhoe (light freighter): destroyed - warp core breach.

The really sad thing is that the attackers even had a Romulan Ale event card.  My son chose not to use this, in case it gave me new cards that were more useful than those I held, but this wasn't likely.  When fighting against Romulans, is any card more useful than a Torpedo Malfunction?!

[Update: we ran this scenario again, with minor differences.  Will it turn out any differently?  See here: http://colgar6.blogspot.com/2013/07/full-thrust-klingon-honour.html]


Wednesday, 22 May 2013

Full Thrust: Arachnophobia!

Introduction

At the weekend, I finally received the finished version of my Full Thrust event cards from the printers.  That being so, there was only one choice of game for this week's club meeting!  [For my ATZ fans, I know it's been a long wait, but good things are coming.  Soon...]

Sa'Vasku bioships entering human space
So, I thought it was high time to bring out my Sa'Vasku alien fleet.  Normally, I don't use these at the games club because they're tricky to control.  In Full Thrust, these space-dwelling creatures have their own energy allocation rules and this makes them much more complicated to manage than any of the other fleets.  Still, I thought I'd give my older son the chance to learn how to use them.

The Scenario

Right, I'm not a great fan of "line 'em up and shoot until everyone bar me is dead" games, so I needed to come up with a scenario for the game.  Here's how this one goes:

The setting is near the Federation planet 'Caledon'.  This is a fertile, M-class planet, sparsely populated with a total of about 10 million humans, mostly farmers.

In distant orbit around Caledon there is a large space station, home to a zero-G manufacturing facility and owned by the M.D.B. corporation.

Further off, the bulk freighter Pride of the Orient is in trouble.  She's supposed to be delivering raw materials to the M.D.B. factory, but one of her holds has ruptured and she's shed 8,000 of ore into space.

So far, this is just a regular day in the Caledon system, but sensors have picked up the rapid approach of some alien vessels.  The good news is that the Federation have a significant squadron of assorted light cruisers and heavy destroyers present; these were due to take part in the "Solar Freedom XXVI" exercises next week.

The bad news is that the Federation have no idea what the alien creatures want.  Are they just passing through (migrating)?  Are they trying to make contact?  Or are they planning to attack?

Special Rules

  • Federation forces may not fire on the Sa'Vasku until either they approach within 12" or until the aliens make a hostile action.  To compensate for this, the Federation have a larger force than the biofleet [by a ratio of about 5:4 in points].
  • Sa'Vasku have 3 possible objectives; they must secretly choose just 1 before the game and that will set their victory conditions.  The Federation win if the Sa'Vasku fail to meet their chosen objective.  Note that the Federation player(s) don't even know what the possible objectives are, let alone which one has been picked by the Sa'Vasku.
  • Objective A: It's spawning time!  To win, at least 3 out of the 4 alien ships must release spores into the planet's atmosphere.  They may accomplish this by entering planetary orbit; the ship may then spawn [release spores] in place of firing on any subsequent turn.  Note that this will probably render the planet unsuitable for human habitation thereafter, though it might make a good scenario for a ground-based battle.
  • Objective B: Curious!  The space factory has been emitting some strange radiations; the Sa'Vasku wish to find out more.  To win, they must board and capture the facility, then take away at least some of the crew as prisoners.  Captive human factory workers may be moved to a nearby Sa'Vasku ship at the same rate as boarders, so if the ship has 4 boarding parties then it may transport 4 "items" per turn, either boarding parties, groups of captives or a mixture.  Bonus points for capturing all the workers from the factory!
  • Objective C: Hungry!  The Pride of the Orient has spilled some of its cargo; the Sa'Vasku can consume this to win.  Initially, the spillage is clumped into 2 x size-4 "asteroids" or chunks.  These may be fired upon; 4 points of damage will split a size-4 into 2 x size-2 asteroids, each placed 3" in a random direction from the "parent".  Similarly, 2 points of damage will split a size-2 into 2 x size-1.  A size-1 chunk may be consumed by a Sa'Vasku ship that flies over it; the ship may repair 1 lost biomass box when it does this.  If either a Sa'Vasku hits a size-2 or larger chunk, or a Federation ship hits any chunk then the ship must dodge or take damage as normal for an asteroid field.  To win, the aliens must consume at least 4 x size-1 chunk.

The Game

For the first couple of turns, the Sa'Vasku approached slowly, not making any use of their advanced drives and potentially incredible maneuverability.  Indeed, they did possibly the worst possible thing at this time: the outnumbered bioships opened fire on the central group of cruisers!  This clearly signaled their hostile intent and the Federation commodore immediately ordered all his ships to return fire.

Damage was taken by both sides over a couple of turns of shooting.  In particular, one of the 2 Sa'Vasku "cruisers" was badly hurt and the smaller Sa'Vasku "destroyer" lost all maneuvering and shooting ability.  On the other size, the Federation cruiser Callisto was damaged significantly.  Indeed, Callisto and her sister ship Phoebe, along with the destroyer Sable all took hits from leech pods - a particularly pernicious bio-weapon that clings to the hull of its target and continues to gnaw its way through in further turns unless it is killed.
 

On turn 3, the 2 damaged small Sa'Vasku vessels drifted forward, but the other pair of bioships suddenly accelerated.  Their battlecruiser turned towards the planet at high speed and ended up face-to-face with the small (and trembling!) scout cruiser EndeavourEndeavour gave her best shot and certainly hurt the beast that was bearing down on her, before she took 11 points of damage in return out of a possible 12.  With life support failing and the command bridge in disarray, the gallant ship was abandoned and left to drift.

Despite being troubled by a leech pod, the destroyer Sable and her undamaged sister Oryx threw down some massive salvos on the monster and caused it a lot of injury in return.


As the other undamaged Sa'Vasku ship accelerated, the ship's counselor on the Phoebe had a premonition.  "Captain, it's going to fly right past us!" she exclaimed.


The captain immediately ordered "Hard a port!  Full stop!" - but even then the Federation cruiser couldn't turn tightly enough to bring most of its weapons to bear on the enemy.

The leech pod attached to the Callisto chewed its way into the engineering section and accidentally caused a warp core breech.  Panic ensued, though in the end the ship's structural integrity was compromised by the leech: she fell apart before she blew up!

At the same time, the leech attached to the Sable also ate its way through the hull and destroyed the smaller ship.

Meanwhile, the leech that was attached to the Phoebe was running rampant!  For 3 turns in a row, mixed teams of security and engineering tried to contain the thing and flush it out into space, but it just kept on dissolving its way through deck after deck.  It even managed to destroy the navigator's manga collection!

Now, here's the good part: the Federation commander was holding a "Makeshift Repairs" event card and could have used it to stop the leech pod at the cost of one of his ship's systems (a point defence, say - not needed in this scenario).  For 3 turns he agonised over whether to play the card for a guaranteed success (minus a ship's system) or whether to roll the dice for a 50% chance of success, but keeping all systems.  Each time, he chose to roll and lost!

With only 1 cruiser fully operational, the Sa'Vasku gave up their plan of capturing humans from the space station.  Instead, that ship made a screaming high-speed turn past the M.D.B. facility and fled into outer space.  The other Sa'Vasku cruiser was hurt, but was still able to out-accelerate the defending ships quite easily and escape.  Of the 7 initial Federation vessels, 3 were now lost; the remaining 4 took out their anger on the heavily damaged Sa'Vasku battlecruiser and destroyer.  Neither of these bioships survived.

Result

Federation:
  • Los Angeles: survived
  • Toronto: survived
  • Phoebe: moderate damage
  • Callisto: destroyed
  • Endeavour: drifting hulk
  • Sable: destroyed
  • Oryx: survived
Sa'Vasku:
  • Battlecruiser Cisplantin: destroyed
  • Cruiser Zoloft: badly damaged
  • Cruiser Carboplatin: survived
  • Destroyer Zofran: destroyed
Mission: capture subjects for experimentation - failed

Overall: Federation Victory!  The Sa'Vasku player was not familiar with their special rules; had he understood their capabilities better then this could have been a very different game!

[Update: a second game using (almost) the same scenario is available here: http://colgar6.blogspot.com/2013/07/full-thrust-return-of-spider.html]

Saturday, 18 May 2013

Full Thrust Event Cards: The Final Version!

Introduction

Regular readers of my blog will already know that I'm a fan of adding a bit of colour and narrative to the games I run.  Often this involves having some form of random events which probably won't change the overall course of the game, but may well throw a spanner in the works for someone.

To this end, I've previously published a random event deck for All Things Zombie (http://colgar6.blogspot.co.uk/2012/08/atz-event-cards-finally.html) and have republished work by Super Galactic Dreadnaught for "special" hits in Full Thrust (http://colgar6.blogspot.co.uk/2012/04/damage-control-to-disco-lounge.html).

A little while ago, I announced that I was working on a complete deck of random events for Full Thrust (http://colgar6.blogspot.com/2013/01/full-thrust-event-cards-initial-version.html).  This preliminary version has been used in a number of my games and some changes have been made as a result.  In fact, I completed the final design many weeks ago and have been waiting ever since for delivery of the printed deck.  Well, the postman finally dropped the finished item through my letterbox this morning.  It's here!

The Event Deck

The event deck is based on a regular poker pack and therefore has 54 cards in it.  However, that's the end of the resemblance; there are no spades, hearts, diamonds or clubs to be seen!

The back is a fairly simple design of my own:
Since holding these in my hands, I've realised that the lettering is really too close to the top of each card.  It's a minor annoyance and I've already corrected that in my uploaded designs.  Obviously I cannot alter the deck that's already been printed, though.

Like my Full Thrust games, the events on the cards mostly (but not entirely!) have a Star Trek theme.  The colour depth and resolution of the printing is generally very good, though 1 card had a few disappointing marks on the back.  Some of the more verbose cards have text that is a bit smaller than I would like, but it's still legible.  In any case, that's my fault as the designer rather than being an error by the printers!

Oddly, 1 of the cards (and only 1) has its front printed upside down with respect to the back.  It's still quite usable, but I'm puzzled as to how this happened since my source materials do not have this fault. 

Using Event Cards in Full Thrust

Full Thrust doesn't have any built-in random events.  Instead, I use the same mechanism as the Doctor Who Miniatures Game.  In that set of rules, each side is dealt 3 cards at the start of the game.  These may be played at any appropriate moment, but once played they are gone; the owner does not draw more cards to replenish his/her hand.  Personally, I limit each side to playing at most one card per turn, though I would make an exception for a "response" card such as "That's not fair!".


Obtaining the Deck

If you wish to obtain this deck for yourself then you have 2 options:
  1. Order a copy from Artscow.com here: http://www.artscow.com/gallery/playing-cards/full-thrust-event-cards-hp58ug5jugwr .  It's worth noting that Artscow have frequent discounts, so there's usually no need to pay "full" price.  Also note that I have no association with Artscow, financial or otherwise, other than being a satisfied customer.
  2. Download my original design and print it yourself (but not for commercial purposes, please!).  The PowerPoint master file can be found here: http://www.mediafire.com/view/?z9p24e7lnlxxg6h .  If you do this then obviously you can add or remove cards, or edit the existing ones to suit your taste.

Finally

 I'd be delighted to hear what you think about this idea, or about general mechanisms for adding a little uncertainty to games.  It's surprisingly easy to make a deck like this, though it does take time and a certain amount of imagination.  Anyone could do it!

Wednesday, 20 March 2013

Full Thrust: Running the Imperial blockade

Introduction

Tonight at the Games Club, my son and I needed to leave a few minutes ahead of the official end time.  This was because the Dog Training club he attends was to hold its AGM and they would start rather earlier than normal.  Tuesday evenings are our busy time!  That being so, I had to be able to pack up my game quickly when we had finished.  There's only 1 candidate for this from my regular stable of rules: Full Thrust!

So, a spaceship game, eh?  Now I needed a scenario.  For a change, I thought it would be nice to use some lighter ships such as frigates and destroyers, rather than the more usual cruisers and above.  Right, so what are these light forces to do?  Hmm... I know - how about escaping from a blockaded planet!  One side (let's call them "Rebels") have been discovered operating from a remote world.  The local enemy light forces (I'll call them "Imperials") have penned them in there, but are awaiting heavy units before they can assault the base itself.  The Rebels must escape before the rest of the Imperial fleet arrives, or they'll be caught and annihilated.  How's that?

The Scenario

Initial forces were as follows:

Imperial

  • Monarch (large destroyer)
  • Despot (large destroyer)
  • Hammer (frigate)
  • Iron Fist (frigate)
Imperial ships have decent medium range firepower, mostly concentrated in the frontal arc.
The blockading squadron was permitted to set up anywhere on the map (but beware the planet's defences; see below).  Their goal: stop all the Rebel scum from escaping!

Rebels

  • Tiger (destroyer)
  • Panther (destroyer)
  • Lynx (destroyer)
  • Leopard (destroyer)
  • Martian Princess (light freighter)
  • Olympic (light freighter)
  • Lady Godiva (medium freighter)
  • Peregrine (small free trader)
Rebel destroyers have a powerful short range punch, but are weak at longer distances.  Freighters are mostly unarmed and are not very robust!
In addition to the ships, the planet contained:
  • 2 missile bases.  Each could fire 1 salvo of missiles per turn up to a range of 24" (the missiles would then home in on the nearest enemy within 6", thus giving them an absolute maximum range of 30", if you were lucky).  Given that the biggest enemy ship was only a destroyer, these bases were a very useful way of holding the Imperials at a distance!
As the evacuation progressed, 2 Rebel ships would launch from the planet each turn.  An initial speed of 6 was permitted for the turn on which a ship launched.  This represented the Imperials' uncertainty about Rebel activities on and near the planet rather than any unusual powers of acceleration (besides, a thrust-2 freighter wasn't going anywhere very much without such an initial boost!).  After this special deployment move, all Rebel ships had to rely on their engines as normal.

Victory Conditions

To escape, a rebel ship had to exit the far end of the table with its warp drive functioning, or at least with the capacity to mend it if damaged.

The Rebel players were given 3 "items" that they must preserve:
  1. A popular hero of the rebellion
  2. An important Rebel diplomat/statesman (/princess?)
  3. Plans for the next part of their campaign.
Each item could be carried on any ship, decided in advance.  The Imperials wouldn't know which ship or ships held the Rebel items.  If all 3 of the items were saved then the Rebels won a major victory, if 2 then it would be a minor Rebel victory.  The Imperials would win a minor victory if the Rebels saved only 1 and would crush the rebellion completely if none escaped.

The Game

The Imperials set up in a line, holding their position just outside the range of the planetary missile bases.  Rebel ships began to leave; first the Martian Princess and the Tiger went one way, then the Lady Godiva and the Lynx headed in a different direction.

More Rebel ships left the planet, but the first pair were now approaching the Imperial gun line.  Initially, the Star Destroyers concentrated their fire on the Tiger.  Although most of their shots missed, one lucky hit from an ion cannon vapourised the Rebel warship.

The North

In the excitement, both Imperial frigates edged forward to try to get a better shot as the Martian Princess sped past them.  They failed to halt the fleeing freighter (though it was badly damaged).  In return, the planetary missile base fired a speculative salvo towards the Hammer; 3 of the 6 missiles had just enough fuel to home in on the Imperial frigate and blow it to bits!

The first pair of Rebel ships had now gone (one destroyed and one heavily damaged), so the Imperial ships to the north concentrated on the third pair.  Despot exchanged fire with the Rebel destroyer Panther and came off better.  Indeed, Panther lost most of her weaponry and sensors, along with her engines.  Her one remaining damage control team spent the rest of the game desperately trying to bring the warp drive back on line!

Iron Fist managed to damage the Olympic, though not seriously.  However, more missiles were launched from the Rebel planet and some of them locked on to the Imperial ship.  Like her sister ship, the small frigate could not withstand such firepower and was lost with all hands!

Meanwhile, the last 2 Rebel ships (the destroyer Leopard and the small, fast trader Peregrine) thought they could now sneak through the unguarded hole in between the 2 Star Destroyers.

The South

On the near side of the table, the Lynx was badly damaged by medium range fire from the other Imperial destroyer before she could reach effective range for her own weapons.  Out of control after a bridge hit, Lynx sailed off the side of the board (where she would have been an easy target for Imperial ships in the next sector).  The blockaders' strategy seemed to be clear: target the warships in preference to the freighters!

Monarch was then perfectly lined up for a shot at the defenceless Lady Godiva when an extraordinary thing happened.

We were playing this game using my prototype deck of event cards.  At this point, the Rebel team decided to play an Energy Vortex card.  Luckily for them, the Monarch was selected randomly and was spun round by 2 points to starboard.  This left her ion cannon unable to bear on the intended target, though beam weapons did a small amount of damage.

Not to be outdone, the Imperial admiral played a Rogue Comet card.  Again, the player got lucky; the comet appeared very close indeed to the Lady Godiva as she fled along the edge of the board.

The poor Lady Godiva barely made it past the comet when she came face-to-face with yet another Imperial ship.  This was the Iron Fist II, coming in as reinforcements (because one player had lost his entire command).  However, the transport had built up a very considerable speed by this time and wasn't about to be stopped by some puny little frigate.  The Iron Fist II managed to get off one quick shot (which missed) before the Rebel freighter went hurtling past and away into hyperspace!

Back in the Middle

The gap between the 2 Imperial destroyers wasn't as large as it seemed, especially since the Monarch had been spun round towards the remaining Rebel ships.  She fired on the destroyer Leopard and did considerable damage.  Meanwhile, the Rebel freighter Olympic did a desperate jink to avoid the Despot, at least for now!

Seeing that the Rebel ships were now pulling out of range at high speed, the Imperial admiral played a Plasma Fire event.  This affected the Peregrine, much to the dismay of the Rebel players.  However, a small, dustbin-shaped repair droid managed to put out the fire before it could cause any real damage.  The crew of the damaged Leopard transported over to the Peregrine and the Free Trader made her escape too!

The last Rebel transport (the Olympic) was almost safely out of range by the time that Monarch could draw a bead on her.  Once again, the Imperial ship got lucky; the small freighter was blown to pieces by a direct hit.

Summary

The Imperials lost 2 frigates (the 3rd one, Iron Fist II, made an accidental high-speed pass of the planet after a manoeuvring error, narrowly missing both the rogue comet and the furious missile salvos from the automated defence systems).  I doubt the Emperor will be bothered by this; frigates are completely expendable.

Rebel losses were as follows:
  • Tiger: destroyed
  • Lynx: lost (out of control and heading for another Imperial blockade sector)
  • Leopard: lost (abandoned, crew saved by being transported to Peregrine)
  • Panther: damaged, but escaped.
  • Martian Princess: damaged.  Escaped, but with a warp core breach!  Very hairy for 4 or 5 turns, but eventually managed to bring it under control.
  • Olympic: destroyed
  • Lady Godiva: escaped, slightly damaged
  • Peregrine: escaped, undamaged
And what of the Rebel special objectives?  The Rebel Hero and the Rebel Diplomat were both on the Peregrine (somewhat traditional!), while the Rebel Plans were on the Lady Godiva.   Since both these ships escaped intact, the game was a resounding victory for the Rebels, in the sense that any evacuation can ever be a victory!