Sunday, 8 December 2013

Wound Cards for "The Rules With No Name"

Introduction

Every time we play The Rules With No Name, we have difficulty tracking the effects of injury to those gunslingers who are unfortunate enough to be shot.  The data for the effect of each wound is all there, but it's embedded within the various tables and charts, or sometimes in the body text of the rules.  This makes it difficult to remember which modifiers apply to each test.

In the past, I had a bunch of small, paper slips printed, each with the effect of a single wound.  However, these were not ideal because:
  1. We'd have to spend quite a while looking for just the right card to match the injury just received.  It always seemed that you couldn't easily find a "serious chest wound" chit when needed!
  2. Each slip had all the relevant penalties printed on it, but this data was presented as a list.  This meant that every wound chit needed to be read for every test, just in case it had a relevant modifier.  Distinctly tedious!

After gaining some experience with this earlier method of tracking wounds, I decided to design a deck of "wound" cards instead.  This article describes my new approach.

TRWNN Wound Cards

The idea behind these is very straightforward: when your character is shot, draw a card and keep the card to remind you of the effects.  Simple, yes?

The 4 classes of wound: Graze, Flesh wound, Serious wound, Dead
OK, this needs a little more description, I think:
  • Firstly, the card has a location listed on it (one of head, chest, gun arm, other arm, belly or legs).  If that location is behind cover then the injury may not occur; see the main rulebook for penetration of wooden structures and the like.
  • Secondly, the Graze and Dead cards don't require any extra data; their effects are immediate and not progressive.
  • The 54 cards in the deck are obviously more than the 36 possible results on the wound location/severity table.  Indeed, there are exactly 1.5 times as many possibilities with this deck.  To achieve that, I doubled the effects of every second column in the table.  In other words, there are 6 cards for a severity roll of '1' (one for each location), but 12 cards for a severity roll of '2' (i.e. 2 duplicate cards for each location) and so on.
  • Obviously if we keep cards out of the deck to record injuries that have already occurred then it will alter the probabilities for further draws.  Without having done the maths, I don't think that this will be too much of a problem as long as games result in 10 or fewer wounds in total: the deck is large enough that the odds won't be changed by much.  It's a trade-off that I'm prepared to make in order to simplify things.
  • Some characters have skills that allow them to adjust the severity or location of a hit, either in the shooter's favour or to benefit the injured model.  Again, I haven't worked out the statistics for these effects, but I think we'll just draw 2 cards together and allow the beneficiary to choose the one they prefer.  This will still give a bonus to such a character, though without making things too complicated.
  • If wounds are acquired in other ways (melee, falling...) then of course this deck won't give the correct results either in the distribution of severities or locations.  In our games, these are very rare events; maybe we'll just roll the injury as normal and then search through the deck for a card with the correct description.
  • The cards are designed so that they can be stacked to represent the cumulative effect on the injured cowboy.  In the example above, the poor fellow has a total of -3 firing, -5 brawling and so on; this can be seen at a glance.  He won't be doing anything much even if he recovers from the "knocked out" effect of the last card, I think!

Acquiring the Deck

For my own reference, as well as for anyone else who is interested in getting hold of a set of these cards, they can be found here.

[Edit: I've uploaded the original PowerPoint source file here, if anyone prefers that instead].

Thursday, 5 December 2013

Full Thrust: A Nest of Vipers!

Introduction

Pirate ships docked at Starbase-13

In a remote part of the frontier, Orion pirates have taken over an old battle-station (Starbase 13) and are using it to refuel and repair their privateers.  They have been a considerable thorn in the flesh of the Federation; twice the sector admiral has attempted to retake the station, with disastrous results on both occasions (here and here).  However, the Federation are not the only government who have been stung by the Orion raids...

[I seem to be getting very forgetful these days.  Last week at the Helensburgh club night, I forgot to take my camera.  This week I had the camera, but had forgotten my Full Thrust event cards and all my explosion & missile markers.  Oh, well - those are optional anyway, so the game can go on without them.  Annoying, though.]

The Scenario

"Commander, there's an unidentified ship approaching the station at high speed.  Looks like an ore carrier or something like that."
"A single freighter?  Must be one of our prize crews; they may have forgotten to re-tune their ID signal.  Now stop worrying and don't disturb me again."
"Sir!  Multiple warp signatures, inbound!  Emergency - we're under attack!"

Setup


Place an Orion starbase 18" from one end of the table.  It is surrounded by a thick ring of mines, 24" away from the station.

All the ships in the Orion fleet are docked at the base.  Until they undock, they cannot use any of their own weapons or launch any fighters.

The Klingon fleet arrives from the far end of the table at any desired speed up to 10.  The attackers don't have any minesweepers, but the resourceful admiral has commandeered a large freighter.  He/she may use this to force passage through the minefield or it may be filled with marines and used in an attempt to capture the base (good luck with that!).

We played with roughly the following size of forces:
  • Klingons: 2000NPV
  • Starbase: 1750NPV
  • Orion ships: 500NPV
  • Mines: lots!

Special Rules

The Orions are partying hard, as many of their raiders have returned from successful forays at the same time.  Consequently, they aren't as alert as they might be and are relying on their passive defences (minefield) more than they should be.
Every Orion ship and each sector of the starbase must track readiness for each of the following items that are fitted to that ship/sector.  At the start of every turn, throw a dice for each item on each ship; on a '6' the preparedness advances to the next level:
  • Weapons - level-0: cannot use, level-1: class-1 beams and point defence may be used as normal, level-2: fully operational
  • Engines - level-0: cannot use, level-1: may use 1 thrust, level-2: fully operational
  • Screens - level-0: cannot use, level-1: count as class-1 screens, level-2: fully operational.
  • Hangars - level-0: cannot use, level-1: fully operational.

The starbase rotates 90 degrees clockwise at the end of every turn.

Victory Conditions

This game is heavily weighted in the attacker's favour, due to the large element of surprise.  So, the Klingons must capture or destroy every Orion ship and the starbase.  None shall escape!  Any other result is an Orion Victory.

For a variant, the Orions could improve their readiness on a 5 or 6 (rather than just a 6) and then victory would be determined by a straight comparison of points value destroyed or captured by the end of the game.

How it played for us

The Klingon fleet approached rapidly, in tight formation.  They had sent the Minotaur (bulk freighter) on ahead with controls locked; the intent was that she would enter the minefield obliquely and thereby cut a wide hole in it through which the fleet would pass.

Consternation and confusion reigned on the Orion side as crews raced for their ships and tried to find their missing officers.  The corvette Pirate was more alert than most; she undocked from Starbase-13 and started to power up her weapons.  Slightly later, the cruiser Etna pulled away from the station on impulse power, but all her other systems were down.

Quadrant-3 of the starbase reacted much more swiftly than the remaining Orion forces; its big weapons were activated just as the station's rotation turned the quadrant away from the attacking fleet.  They did manage to launch a squadron of fighters, though.

The commandeered freighter Minotaur hit the minefield and the Klingons were delighted when she only took 3 points of damage from the first and second clusters of bombs.  This would be easy!  Their joy turned quickly to horror as the third part of the barrage scored a whopping 17 hits.  When the sensors had settled down again and the debris had cleared, it became obvious that the Minotaur had been destroyed before hitting the fourth and final set of mines.

Captains cursed and helmsmen sweated as the port half of the Klingon fleet turned even closer to the other ships.  The battlecruiser Relentless and the frigate Victory couldn't quite make it past the mines, though; these detonated with a spectacular "fut!", scoring minor damage to the frigate and none at all to the larger vessel.  Even as the first squadron of Orion fighters approached, the fleet was through the gap and racing towards the shocked defenders!

White squadron attempted to slow down the Klingons by making an attack run on the Admiral Kang.  However, the flagship's gunners were ready for action and jubilantly shot down 5 of the 6 fighters.

One of the Orion players commented, wistfully "It would be nice if the last pilot was Luke Skywalker".  He wasn't; the lone fighter achieved nothing against the enemy battleship...

Another set of Orion fighters (Red squadron) was launched.  It also made a firing pass on one of the Klingon capital ships, but again without much success.

By now, the Klingon fleet was charging forward.  The battleship Admiral Kang and the battlecruiser Relentless kept close together and concentrated their fire on the starbase.  Phasers did a moderate amount of damage, but almost all of the ships' disruptors missed.  Meanwhile, the cruisers and frigates split off to hunt down the few Orion ships which had managed to undock.

As the Orion battlestation rotated, the fully active quadrant-3 was able to open fire.  It could only bring weapons to bear on 2 over-eager Klingon frigates this turn, so these bore the brunt of the Orion's frustrations and were vapourised.  One of these ships took twice as many hits as were needed to kill it; the crew never even realised they were dead until they arrived in Sto'Vo'Kor to begin their afterlife.

In retaliation, the Klingon warships fired on and destroyed the plucky Orion corvette Pirate and the struggling cruiser Etna; neither ship had much chance against the weight of fire-power directed against them.

Due to some navigational errors, the Klingon frigate Warrior ended up well out of the fight, heading back towards the minefield.  On the Admiral Kang, the flag captain's staff noted this apparent dereliction of duty but were too busy to take action immediately.  Once the battle was over, the captain of the Warrior would probably be reassigned to some awful cargo run, I suspect...

In the final turn of the game, before we ran out of time, the Klingon fleet reached point blank range to the starbase.  Even as Quadrant-2 started powering up its heavy weapons, the Admiral Kang and the Relentless pounded it mercilessly with phasers (all disruptors missed, again!), inflicting heavy damage and knocking out both torpedo launchers.  In return, the fully active Quadrant-3 was rotated towards the attackers and it lashed out at the Klingon battleship.  The Admiral Kang was forced to take a threshold check, but luckily (for her!) only lost her warp drive and a single disruptor.

Conclusion

At this point, we had to pack the game away.  What might have happened next, if we had more time to play on?

The Klingon warships would have overshot the starbase quite dramatically, given the speed at which they were travelling.  This is especially true for the 2 capital ships, which weren't quite as nimble as the cruisers.

Had they been able to trade blows with Quadrant-3 for one turn from their current position, they would then have been faced by the useless and totally inactive Quadrant-4 (I guess that's where the party was being held!)  If this had happened then the massed Klingon fire-power should have reduced the base to rubble quite rapidly, though probably not without taking a few hits themselves.

As it was, it would be a race between the fleet slowing down and turning round, versus the remainder of the starbase (especially Quadrant-1 and Quadrant-4) remembering where they had left their weapon-arming codes and/or finding someone sober enough to man their tactical consoles!  When/if the battlestation woke up properly, the attackers would have taken some real damage.

The few, remaining Orion ships were toast, really.  Their chances of disengaging from the station and then escaping before being picked off were slim, I think.

Finally, I suspect that the Klingon admiral will dispatch a task force to hunt down that Ferengi trader who sold him all those "advanced" disruptor targeting controls, in order to negotiate a refund!

Tuesday, 3 December 2013

The "Long Serpent"

Introduction

Last year, one of my brothers gave me the Revell "Viking Ship" kit for my birthday.  He knew that I'd been enthusing about SAGA and that this would be a useful accessory for my growing band of Viking warriors.  Well, it's taken me over a year to find time to finish it, but here is ... the "Long Serpent"!


The Build

I wanted this to be a gaming model, rather than a static, display piece.  Consequently, I made some changes as I built the kit.

Firstly, I cut the hull down to the waterline so that the ship could be positioned on a regular games table.  This wasn't particularly easy and I may have cut her a bit low.  I suppose that she could be heavily laden with loot?

Secondly, the vessel needed to be "at rest" (either anchored or beached, depending on the game scenario).  In other words, I don't intend to fight ship-to-ship sea battles with this model.

The sail was furled and the yard was stowed.  Rather than using the billowing, vac-formed sail that came with the kit, I made a new one out of a scrap of folded cloth.  Additionally, the oars were glued into piles on the deck instead of being deployed through the sides of the ship.

Note also that the piles of oars are positioned well into the centre of the vessel, thus leaving room for a 25mm figure base on the decks.  There aren't any rowing benches (boxes?) or any other clutter to obstruct the placement of figures.  This omission may not be completely accurate, but it's one of the compromises that is made constantly with gaming models.

Finally, I chose to use the 32-shield option rather than the 64-shield one.  Partly this was because I couldn't face all those shield transfers, but also I reasoned that the Viking warband would probably have taken most of their shields with them when they went ashore.  In this case, they've left a few spares hanging on the sides of the ship.

I did consider leaving all the shields off, but I felt that this would have spoiled some of the effect.  After all, everyone knows that Viking ships had shields hung over the edges at all times, right?

Conclusion

There is some confusion about the scale of this kit.  The Revell website describes it as 1:72, though the kit's box is clearly labelled as 1:50.  I'd say that the latter is the correct figure; the shields and other details are a good match in size for my 28mm wargaming figures (and 28mm figures are about 1:56 scale, aren't they?)  Either way, the finished model is about 38cm (15") long.

Once the hull had been cut down to the waterline (a difficult job!), the remaining pieces were easy to assemble.  I had to use some blank plastic card to fill in the anchor well at the front of the ship, which otherwise would have gone down to the ship's keel.  This wasn't a big job at all, especially as I left the anchor off the model.

Even the rigging is straightforward and the kit provided an abundant supply of thin, brown cord for the job.  My main concern was that some of the lines might have ended up sagging if I didn't get the tension just right, but this doesn't seem to have been a problem.

The shield decals are a bit weak.  They're fragile and didn't react well to one of my common varnishes (I had to touch up some parts of melted designs by hand).  Also, the printing of the decals suffered very slightly from registration issues for the different colours.  I'm a little suspicious of the patterns on the shields, as they're not really like anything I've seen anywhere else.  Still, I'm no expert on Viking designs and the end result is nicely colourful!

So now I have 2 further problems!  Firstly I'll need to build some coastline terrain for my games so that I can use this model.  Secondly (and more immediately!) I'll have to work out how to store the completed ship!

Sunday, 1 December 2013

Spendlove's ATZ Event Cards

They say that imitation is the most sincere form of flattery.  Well, I'm feeling very flattered right now!

In August 2012, I published details of my deck of random event cards for All Thing Zombie (here).  At the time, these attracted quite a lot of attention and to this day it is still the 3rd most popular article I've written for my blog.

My originals on the left, Spendlove's designs on the right.  Obviously, the backs are identical!

Jumping ahead to October 2013, I was contacted by 'Spendlove' (http://spendloves.wordpress.com/).  He was asking permission to make his own deck of ATZ event cards based on my original templates.  Well, I had already made the template document available for anyone who wishes (though not for commercial purposes), so sure - go right ahead!

Again, my cards on the left, Spendlove's on the right

Shortly after that, I was sent the first draft of Spendlove's version and was mightily impressed by what I saw!  We discussed a few minor adjustments (occasional proof-reading errors, mostly) and then he uploaded the set to artscow.com - you can view the full set here .

Sample cards from Spendlove's set

Next, I went and ordered a set of these 'extra' ATZ event cards for myself.  They arrived last week and I'm delighted with them.  Both the game effects and the pictures and text on the cards are very much in the same style as my original cards.  I know how much effort this must have taken and appreciate the deck all the more for this!

3 more samples from Spendlove's "extra" ATZ event cards

So, will I be using these in my next game of ATZ?  You bet I will!  I haven't yet decided whether to keep the 2 sets separate (perhaps choosing which set to use by the roll of a dice?) or just to shuffle them all into one big deck.  However, that's just a detail...

Wednesday, 27 November 2013

Doctor Who and the Prehistoric Swamp!

Introduction

Normally towards the end of the week I would post a battle report that describes the game I ran on Tuesday at the Helensburgh Games Club.  In honour of the recent 50th anniversary of Doctor Who, we would be playing the Doctor Who Miniatures Game (DWMG).  However, this week I did something I've never done before - I forgot to take a camera along with me to the club.  Consequently, I won't be able to bring you the usual description of the game (no!).  Instead, I can describe the scenario I created and give a brief synopsis of the way it played out (hurrah?).

The Scenario

Sea Devils, along with their pet myrka

The Doctor and his companions are in the Tardis, chasing a stolen spaceship piloted by the Master through time and space.  They've travelled some 65 million years into the past and are approaching a primitive Earth covered with swamps and jungles, when both craft are fired upon.  It appears that they have stumbled into the middle of an unsuspected high-tech war!

The Master's spacecraft crash-lands and breaks up into several large (but scattered) chunks.  The Tardis is also forced down nearby, damaged and in need of repair.  Squads from the 2 warring factions are nearby, shooting at anything which moves!

Can the Doctor repair the Tardis and escape?  Can the Master steal the Tardis and escape?  Is either set of warriors interested in the Doctor or the Master, or would they rather just attack their hated enemies?

Terrain

The table should be liberally covered with a mixture of jungle and/or swamp, possibly with a river or two as well.  Somewhere between 6 and 8 pieces of crashed spaceship need to be added, preferably at least 1 move apart from each other.

Forces

  • The Doctor: Any generation of Doctor, plus 2 companions.  We used a screamer (Sarah Jane Smith) and K-9, the robot dog.  The Tardis and all other models on this side start at a random position on the table, but at least 12" away from either end.
  • The Master: as well as the Master, we gave this side a strong-arm companion.  Possibly he should have had 2 companions - a scientist would seem appropriate as an extra follower.  The Master's group starts at a random position on the table, but at least 12" away from either end and from the Tardis.
  • Sea Devils: the "defending" force on the planet comprised 2 Sea Devil leaders (in heavy armour), 7 Sea Devil warriors and 1 Myrka.  This force enters the table from one end.
  • Cybermen: the notional attackers had 2 cybermen lieutenants and 10 regular cybermen.  These used the "Welcome to Torchwood" stats, though in hindsight this was too powerful.  Either we should have used half the number of cybermen or a less potent model!  This force enters the table from the opposite end to the Sea Devils.

Victory Conditions

  • Either the Doctor or the Master can win by repairing the Tardis and flying away with it.  To fix the Tardis requires 2 new parts to be fashioned; each of these can be made from the fragments of the Master's spacecraft with a successful repair roll.  Note that each piece of wreckage can only be tested once, so if the roll is failed then that piece of wreckage is unusable junk!
    Note that anyone with the invent skill is free to use the wreckage as a source of inventions instead of repairs, if desired!
  • The Cybermen and the Sea Devils gain 1 victory point for each member of the enemy force who is killed (no matter who kills it!).  They don't score anything for killing the Doctor's or the Master's forces, but gain 1VP per member that is captured and taken off the table via their "home" edge.

Our Game

Initially, the Master attacked the Doctor and tried to persuade the Cybermen to do the same.  However, the metal men just stomped forward, capturing the Master's bodyguard (who was later shot whilst trying to escape) and wounding all the characters in the area.  The Sea Devils lined up in the open to try to return fire, but were cut down mercilessly without even scratching the polish of their attackers.
By the time the Sea Devils had been reduced to 3 models, K-9 and the Doctor had found the new parts they needed.  The Master persuaded Sarah Jane to let him enter the Tardis and he was sitting there drinking tea when the Doctor returned.  There were some discussions: the Master suggested that they attack the cybermen from inside the blue box, whereas the Doctor was planning how to save the last few Sea Devils.
Withering and deadly accurate cybermen fire killed off the last of the Sea Devils, at which point the Doctor activated the Tardis and flew away with the Master, leaving the field to the victorious cybermen.

Result: Cybermen complete victory (only a single model was stunned; apart from that they took no losses)!  Both the Doctor and the Master were wounded, as was Sarah Jane.  The Master's bodyguard was missing, presumed dead.  I'd give these guys a partial victory, as they did all escape.  The poor sea devils were exterminated completely and therefore have to be classed as a total loss!

Sunday, 24 November 2013

The Crossing Patrol Man (28mm)

Introduction

As many of my regular readers will know, I tend to prefer regular civilians over heavily-armed rednecks for my games of All Thing Zombie.  I also draw a certain amount of inspiration from the scenes I see when just walking about my local town (though I will stress that any resemblance between my models and anyone I know is entirely accidental and unintentional).

Part-painted model in greatcoat (?), built entirely "out of the box"
When I examined the sprues from Wargames Factory's "Apocalypse Survivors: The Men" set, I discovered that there were 3 identical bodies in long trench-coats or greatcoats.  These are great for making models of tough guys from popular TV shows or movies, but aren't the sort of thing that ordinary people wear much.

Same model from rear, showing high collar and short cape
I'd already built one of these figures straight from the parts in the kit, so what could I do with the next one to make it a bit different?  Let's think...

The Crossing Patrol

At around 9am and again at 3pm near any primary school in the UK, crossing patrols are a common sight.  These are volunteers, often middle-aged, who halt the traffic and thus assist the children to cross roads.  They are often referred to as "lollipop men", though near us they are mostly women.

Right, then: this model uses the basic "greatcoat" body and legs from the "Men" kit.  Some modifications were necessary to the upper torso: I've removed the high collar and carved away the cape.  To replace this, I've added a hood made from green stuff.

For this figure, I've used the head with the peaked hat, straight from the box.  The left arm is from the "Men" kit as well, though I've rotated the hand by 90 degrees.

The right arm is from Gripping Beast's "Dark Age Warriors" kit (!); it originally held a spear.  I cut the spear away, drilled the hand out and added a sign made from brass rod tipped with a circle of plasticard.

Painted Up

Lollipop men and women wear a reflective coat and a hat or cap over regular (civilian) clothes.  I've given my guy dark trousers, a sweater with a patterned band around the chest and green wellies (very common in Helensburgh at this time of year).

The dayglo coat was painted in my normal mixture of yellow and silver (1:1); the darker reflective strips are steel.  A thin, dark-coloured wash brings out some of the detail.

To finish, I printed off a couple of images for the "stop" sign and fixed these onto the model.  Once the glue was dry, I touched up the edge with some red paint, gave him a name ("Sid") and sealed the model.  Done!

Wednesday, 20 November 2013

ATZ (B Team-2): Running the Gauntlet

Introduction

The last time we saw the B-team in action (here) they were trying to find lunch, unaware that the zombie apocalypse had started without them.  Since then, the authorities have reacted swiftly to seal off the troubled area of the city, leaving our heroes stranded and unable to get home in the evening.

 Sam (REP 4 dumbass), Bob (REP 3, dumbass) and Bert (REP 2) have been wandering the streets near work since lunch time.  Ernie, the 4th member of their group, left earlier to take the bus home.  The remaining trio are confused and down heartened; everywhere they go there are people panicking and multiple rumours are being repeated and embellished.  It's now growing dark and the group have finally decided to move to a safer area.  However, just up the road, the police are turning everyone back!

The Scenario

This will be a fairly standard "Quarantine" game from the ATZ: Haven scenario book.  As written, a group of police need to hold a barricade line until the end of their shift against whatever approaches.

My variations on this scenario are as follows:
  • The B-team may enter from the south on any of their activations.  They must try to escape off the north edge without being arrested.
  • The game will continue as long as the B-team have a chance of escaping, or until we run out of playing time (i.e. the normal scenario's 16-activation limit is suspended).
Police forces consist of:
  • Sergeant Clouseau (REP 4)
  • Officer Callahan (REP 4)
  • Officer Dalgliesh (REP 4)
  • Rookie Columbo (REP 3)
  • Rookie Cagney (REP 3)
  • Bloodhound Jupiter (REP 3 - he's a big softy, really)

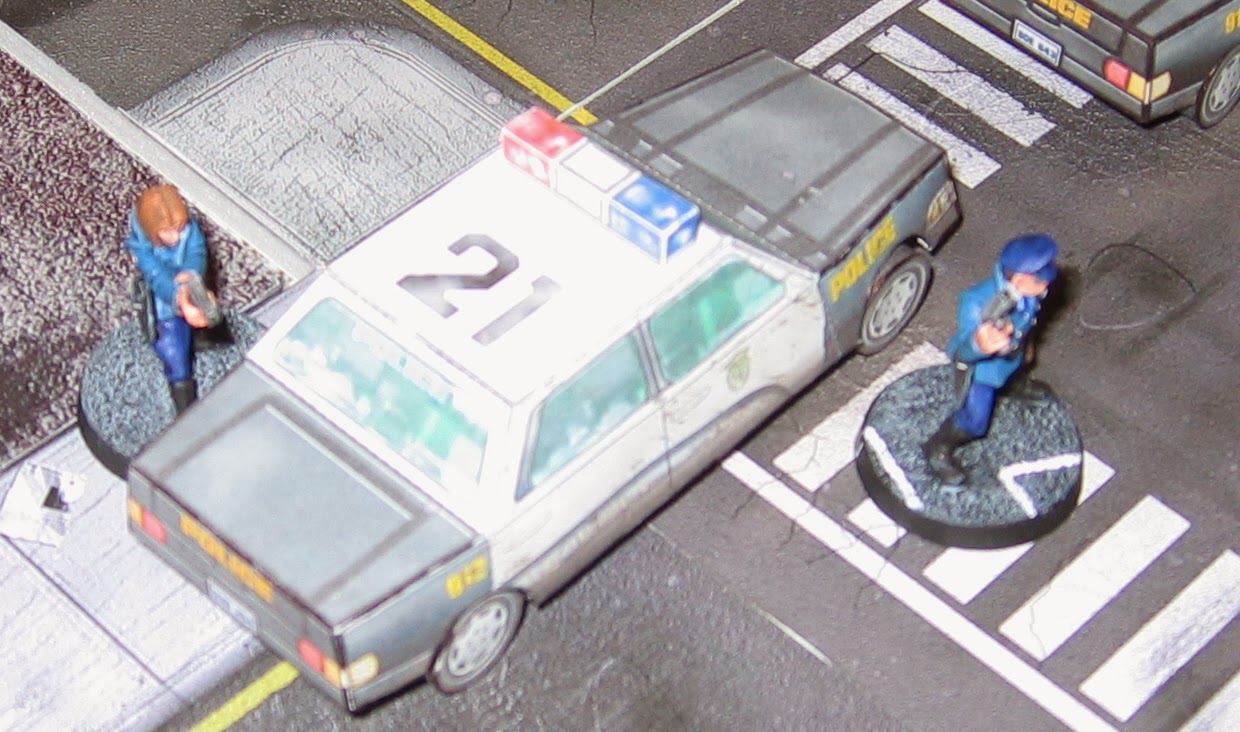
Cagney, Clouseau, Jupiter and Callahan

Dalgliesh and Columbo

How the game played...

The first part of the shift was peaceful, but after half an hour or so, Cagney noticed smoke coming from the top of the tall, red brick building just opposite the police line.  Sergeant Clouseau radioed for help and was told that the fire department would be notified immediately.  However no assistance came because after the conversation with the dispatcher, a lot of things happened in a rush...

Firstly, rookie Cagney claimed that she had been targeted by a sniper; she ducked back behind the nearest patrol car.  Sergeant Clouseau told her not to be an idiot as the noise was just a car backfiring, or maybe something popping in the burning building.

Immediately after that, a couple of civilians left the book store to the right (Suzanne and Gordon, both REP 4).

The newcomers tried to pass the police line, ignoring all instructions to halt.  Dalgliesh and Columbo ended up wrestling with the couple in an attempt to arrest them.

Callahan and Jupiter ran over to assist their colleagues, who were failing to subdue the boisterous citizens.  As they did so, a blue car came screeching along the road, aiming straight for the barricade.

The dice gods were laughing now, as one thing after another distracted the poor cops.  A man (George, REP 3) called out from the red brick building to Sergeant Clouseau: "Help!  My girlfriend - she's sick and acting strangely.  The ambulance won't come, but I need help now!"  The sergeant dutifully turned and followed the man into the building, leaving rookie Cagney to look after the quarantine barriers.

Then, all the street lights went out, plunging the area into darkness...

Inside the grubby apartment, Clouseau immediately recognised that the girlfriend was not alive any more, but instead was one of the infected.  He wasted no time in putting a bullet through her head.  This didn't go down well with George, who pulled a pistol of his own and started to shout and rant at the policeman.

For a few moments, it looked as if there would be further bloodshed, but Clouseau asserted his authority calmly and George dropped the gun and collapsed on a sobbing heap.  The unfortunate citizen was swiftly handcuffed and led out of the building (the roof of which was now starting to burn a bit more fiercely now).

The Sprint!

Back at the crossroads, Cagney had run over to try to stop the speeding blue car.  However, she was too late to affect what happened next.  Jupiter was ordered to sit on the stunned Gordon, though the civilian didn't really have much fight left in him.  Suzanne, however, was fighting like a cornered wildcat, shouting "Let me through!  You pigs - you'll pay for this if you don't let me go right now!"  She had knocked Columbo to the ground and was wrestling with Dalgliesh when the vehicle charged through.

The unfortunate Columbo didn't have a chance as the car drove right over him.  It then crashed into the parked patrol car, shunting this aside and inflicting severe damage to it, before disappearing into the night.  Only a trail of sparks from its damaged suspension showed where the car had been.

This was the time that the B-team decided to act.  Sam, despite his dumbass reputation, called out to his mates "Come on, lads - run!"  Sam and Bob sprinted across the car park, though Bert was a little slower off the mark and trailed several metres behind.

As they sprinted, the different levels of fitness became apparent.  Sam had nearly made it past the deserted police roadblock, with Bob and Bert following him, when...

...officers Callahan and Cagney realised that they left their post unguarded.  They ran back just in time to challenge the B-team.  In awe of the uniforms, or possibly noting that the cops seemed very much on edge and had drawn weapons, the civilians turned around and walked back all the way they had come.

If you don't succeed at first...


Callahan and Cagney returned to the scene of the accident, where Jupiter continued to guard his opponent and Dalgliesh was still struggling with the feisty Suzanne, who just refused to give up.  However, the police reinforcements made the outcome of this fight inevitable and both she and her accomplice were taken to the ground and handcuffed.

The B-team chose this exact moment to walk up the road in another attempt to pass the quarantine barriers.  Callahan, Cagney and Jupiter were standing in the middle of the street.  "You!" spluttered the increasingly annoyed Callahan.  "I already told you to go back.  Now turn around and get out of here!  If I see you again then you'll be arrested!  Go!"

As the B-team slunk away, the cops were distracted by another vehicle.  This time, the car held a family; they were easily persuaded to turn around, away from the quarantine line.  They had switched off their engine whilst talking to the officers, though - it took several turns under the watchful eyes of the police for them to start the car up again.

Try, Try Again!

Seeing that the police were occupied, the B-team ducked behind the book store and crept through the car park on the other side of it.  It was hard to tell in the dark, but it looked as if there was nobody ahead of them, so once again they started to run.

Sadly, they were mistaken: Sergeant Clouseau had just finished putting his prisoner into car 21.  He'd also taken the opportunity to re-arm himself with the shotgun from the vehicle, just in case there were more zombies (or crazy car drivers) around.  He called out a challenge to the B-team.
"Come on!" shouted Sam, in a moment of desperation.  There's three of us and only one of him - we can take him!"

Perhaps the friends hadn't realised that the cop was armed, or maybe they thought that he wouldn't shoot them.  However, Sergeant Clouseau was not having a good evening.  He'd fired at and killed something that looked human (but wasn't), been threatened by one distraught citizen and had heard over the radio of the death of a colleague and the breaching of the roadblock.  These new troublemakers wouldn't succeed - the law would be upheld.

Clouseau's shotgun blast was unnaturally effective.  Sam collapsed after a few steps into his charge and lay bleeding and wounded on the tarmac.  As he fell, his spade whacked Bob across the jaw, knocking him down also.  Poor Bert caught the brunt of the shot, though; he was dead before he hit the ground.

The officer strolled over to the fallen group and put handcuffs on the two who were still alive.  He then radioed for an ambulance, as well as requesting more backup.  This had been a very eventful shift and the exhausted Clouseau would be extremely glad when it was over!

[Update: Episode 3 of the B-Team's adventures is ==> here]